User Guide
Page 5
... and Code Charts 61 RDX VHF Frequencies Chart 61 RDV2020 - VHF Default Frequencies Chart 65 RDX UHF Frequencies Chart 66 RDU2020 - UHF Default Frequencies Chart 71 CTCSS and PL/DPL Codes 72 Programming Customized Frequencies on 4W/5W RDX models 75 Motorola Limited Warranty for the...AC Pin Adaptors 81 Software Applications 81 Cables 81 Chargers 81 Power Supplies 82 RDX Series™ Features Summary 83 Programmable Buttons Chart 92 Icons Chart 93 3 English CONTENTS Cloning with RDX Radios - UHF Default Frequencies Chart 70 RDU4100 - Quick Instructions 64 RDV5100 -
... and Code Charts 61 RDX VHF Frequencies Chart 61 RDV2020 - VHF Default Frequencies Chart 65 RDX UHF Frequencies Chart 66 RDU2020 - UHF Default Frequencies Chart 71 CTCSS and PL/DPL Codes 72 Programming Customized Frequencies on 4W/5W RDX models 75 Motorola Limited Warranty for the...AC Pin Adaptors 81 Software Applications 81 Cables 81 Chargers 81 Power Supplies 82 RDX Series™ Features Summary 83 Programmable Buttons Chart 92 Icons Chart 93 3 English CONTENTS Cloning with RDX Radios - UHF Default Frequencies Chart 70 RDU4100 - Quick Instructions 64 RDV5100 -
User Guide
Page 6
For a list of Motorola-approved antennas, batteries, and other accessories, visit the following website which lists approved accessories: http://www.motorola.com/RDX SAFETY English 4 SAFETY PRODUCT SAFETY AND RF EXPOSURE COMPLIANCE ! ATTENTION! This radio is restricted to occupational use only to satisfy FCC RF energy exposure requirements. C a u t i o n Before using this product, read the operating instructions and RF energy awareness information contained in the Product Safety and RF Exposure booklet enclosed with your radio.
For a list of Motorola-approved antennas, batteries, and other accessories, visit the following website which lists approved accessories: http://www.motorola.com/RDX SAFETY English 4 SAFETY PRODUCT SAFETY AND RF EXPOSURE COMPLIANCE ! ATTENTION! This radio is restricted to occupational use only to satisfy FCC RF energy exposure requirements. C a u t i o n Before using this product, read the operating instructions and RF energy awareness information contained in the Product Safety and RF Exposure booklet enclosed with your radio.
User Guide
Page 9
...result in any maintenance or cleaning 7 English Before using the battery charger, read all the instructions and cautionary markings on • the charger, • the battery, and • the radio using the battery 1. If an extension cord must be used , make sure that the cord...plug rather than the cord when disconnecting the charger. 4. it to the electric plug and cord, pull by Motorola may explode, causing personal injury and damage. 2. Read these instructions carefully and save them for lengths up to 9.8 feet (3.0 m). 5. Do not disassemble the charger; Use of...
...result in any maintenance or cleaning 7 English Before using the battery charger, read all the instructions and cautionary markings on • the charger, • the battery, and • the radio using the battery 1. If an extension cord must be used , make sure that the cord...plug rather than the cord when disconnecting the charger. 4. it to the electric plug and cord, pull by Motorola may explode, causing personal injury and damage. 2. Read these instructions carefully and save them for lengths up to 9.8 feet (3.0 m). 5. Do not disassemble the charger; Use of...

User Guide
Page 11
... Fax-On- To transmit on these FCC forms, request document 000601 which includes all forms and instructions. To obtain these frequencies, you wish to have questions, use the following contact information. RDX Series™ Business two-way radios operate on FCC Form 601 and Schedules D, H, and Remittance Form 159. If you are regulated...
... Fax-On- To transmit on these FCC forms, request document 000601 which includes all forms and instructions. To obtain these frequencies, you wish to have questions, use the following contact information. RDX Series™ Business two-way radios operate on FCC Form 601 and Schedules D, H, and Remittance Form 159. If you are regulated...
User Guide
Page 20
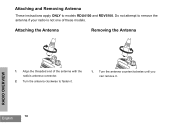
Attaching the Antenna Removing the Antenna RADIO OVERVIEW 1. Turn the antenna counterclockwise until you can remove it . 1. English 18 Turn the antenna clockwise to fasten it . Align the threaded end of these models. Attaching and Removing Antenna These instructions apply ONLY to remove the antenna if your radio is not one of the antenna with the radio's antenna connector. 2. Do not attempt to models RDU4100 and RDV5100.
Attaching the Antenna Removing the Antenna RADIO OVERVIEW 1. Turn the antenna counterclockwise until you can remove it . 1. English 18 Turn the antenna clockwise to fasten it . Align the threaded end of these models. Attaching and Removing Antenna These instructions apply ONLY to remove the antenna if your radio is not one of the antenna with the radio's antenna connector. 2. Do not attempt to models RDU4100 and RDV5100.
User Guide
Page 30
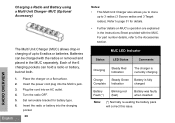
...for details. • Further details on a flat surface. English Place the charger on MUC's operation are explained in the Instructions Sheet provided with the radios or removed and placed in charging of the 6 charging pockets can be charged with the MUC. MUC LED Indicator Status LED... was faulty when inserted Note: (*) Normally re-seating the battery pack will correct this issue. Batteries can hold a radio or battery, but not both. Turn the radio OFF. MUC (Optional Accessory) The Multi Unit Charger (MUC) allows drop-in the MUC separately. For part number details...
...for details. • Further details on a flat surface. English Place the charger on MUC's operation are explained in the Instructions Sheet provided with the radios or removed and placed in charging of the 6 charging pockets can be charged with the MUC. MUC LED Indicator Status LED... was faulty when inserted Note: (*) Normally re-seating the battery pack will correct this issue. Batteries can hold a radio or battery, but not both. Turn the radio OFF. MUC (Optional Accessory) The Multi Unit Charger (MUC) allows drop-in the MUC separately. For part number details...
User Guide
Page 44
... 'Idle' Programming Mode and start blinking green again. I do it . Programming Mode FAQ 1. Therefore you try to program code 128, the radio would not do it . Check the Frequencies and Codes Charts section to make sure you are not available in the beginning of this section) 2.... The radio will return to the 'Idle' Programming Mode or, • Turn OFF the radio and enter Programming Mode again (see instructions in the frequencies and codes pool. PROGRAMMING FEATURES • If you 'roll-over'...
... 'Idle' Programming Mode and start blinking green again. I do it . Programming Mode FAQ 1. Therefore you try to program code 128, the radio would not do it . Check the Frequencies and Codes Charts section to make sure you are not available in the beginning of this section) 2.... The radio will return to the 'Idle' Programming Mode or, • Turn OFF the radio and enter Programming Mode again (see instructions in the frequencies and codes pool. PROGRAMMING FEATURES • If you 'roll-over'...
User Guide
Page 54
... 1. English 52 PROGRAMMING FEATURES • Wait for the cloning to clone radios are explained in the source pocket that pairs with the Motorola logo facing front. Notes: • Paired Target radios and Source radios must be of the same band type in order for 3 seconds before... the display (a tone will either a 'pass' tone (cloning was successful) or a 'fail' tone (cloning process has failed). Place the Source radio in the Instructions Sheet provided with the MUC. Further details on page 54. Press and release SB1. 4. The 'pass' tone sounds like a good key 'chirp'...
... 1. English 52 PROGRAMMING FEATURES • Wait for the cloning to clone radios are explained in the source pocket that pairs with the Motorola logo facing front. Notes: • Paired Target radios and Source radios must be of the same band type in order for 3 seconds before... the display (a tone will either a 'pass' tone (cloning was successful) or a 'fail' tone (cloning process has failed). Place the Source radio in the Instructions Sheet provided with the MUC. Further details on page 54. Press and release SB1. 4. The 'pass' tone sounds like a good key 'chirp'...

User Guide
Page 55
... FEATURES Unplug any cables (power supply or USB cables) from the SUCs. 3. Turn ON the Target radio and place it into one of the cloning cable mini connector to Radio (R2R) Cloning Cable (Optional Accessory) Operating Instructions 1. Before beginning the cloning process, make sure you have: • A fully charged battery on each one...
... FEATURES Unplug any cables (power supply or USB cables) from the SUCs. 3. Turn ON the Target radio and place it into one of the cloning cable mini connector to Radio (R2R) Cloning Cable (Optional Accessory) Operating Instructions 1. Before beginning the cloning process, make sure you have: • A fully charged battery on each one...

User Guide
Page 66
QUICK INSTRUCTIONS The following instructions are a quick and easy way to interoperate with RDX Series™ default frequencies: 1. Make sure to choose a compatible frequency whenever you need to make your radio ON while holding the MENU and PTT buttons simultaneously for XV2600 model only) with Frequency # 21 (154.5150 Mhz). Make... (154.5700 MHz) and # 4 (154.6000 MHz) are considered MURS frequencies and are different from the XTN default values. MAKING XTN COMPATIBLE WITH RDX RADIOS - Program Channel 1 with Frequency # 20 (154.4900 Mhz) and Channel 2 (for three seconds). 2.
QUICK INSTRUCTIONS The following instructions are a quick and easy way to interoperate with RDX Series™ default frequencies: 1. Make sure to choose a compatible frequency whenever you need to make your radio ON while holding the MENU and PTT buttons simultaneously for XV2600 model only) with Frequency # 21 (154.5150 Mhz). Make... (154.5700 MHz) and # 4 (154.6000 MHz) are considered MURS frequencies and are different from the XTN default values. MAKING XTN COMPATIBLE WITH RDX RADIOS - Program Channel 1 with Frequency # 20 (154.4900 Mhz) and Channel 2 (for three seconds). 2.

