User Guide
Page 3
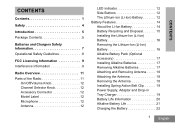
CONTENTS Contents 1 Safety 4 Introduction 5 Package Contents 5 Batteries and Chargers Safety Information 7 Operational Safety Guidelines 8 FCC Licensing Information 9 Interference Information 9 Radio Overview 11 Parts of the Radio 11 On/Off/Volume Knob 12 Channel Selector Knob 12 Accessory Connector 12 Model Label 12 Microphone 12 Antenna 12 LED Indicator 12 Side Buttons 12 The Lithium...
CONTENTS Contents 1 Safety 4 Introduction 5 Package Contents 5 Batteries and Chargers Safety Information 7 Operational Safety Guidelines 8 FCC Licensing Information 9 Interference Information 9 Radio Overview 11 Parts of the Radio 11 On/Off/Volume Knob 12 Channel Selector Knob 12 Accessory Connector 12 Model Label 12 Microphone 12 Antenna 12 LED Indicator 12 Side Buttons 12 The Lithium...
User Guide
Page 4
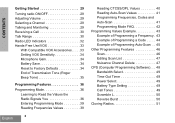
CONTENTS Getting Started 29 Turning radio ON/OFF 29 Adjusting Volume 29 Selecting a Channel 29 Talking and Monitoring 29 Receiving a Call 30 Talk Range 30 Radio LED Indicators 32 Hands-Free Use/VOX 33 With Compatible VOX Accessories. . . . .33 Setting VOX Sensitivity 34 Microphone ...of Programming a Code . . . . . 44 Example of Programming Auto-Scan . . 45 Other Programming Features 46 Scan 46 Editing Scan List 47 Nuisance Channel Delete 47 CPS (Computer Programming Software) . . . 48 Bandwidth Select 49 Time-Out Timer 49 Power Select 49 Battery Type Setting 49 Call Tones 49 ...
CONTENTS Getting Started 29 Turning radio ON/OFF 29 Adjusting Volume 29 Selecting a Channel 29 Talking and Monitoring 29 Receiving a Call 30 Talk Range 30 Radio LED Indicators 32 Hands-Free Use/VOX 33 With Compatible VOX Accessories. . . . .33 Setting VOX Sensitivity 34 Microphone ...of Programming a Code . . . . . 44 Example of Programming Auto-Scan . . 45 Other Programming Features 46 Scan 46 Editing Scan List 47 Nuisance Channel Delete 47 CPS (Computer Programming Software) . . . 48 Bandwidth Select 49 Time-Out Timer 49 Power Select 49 Battery Type Setting 49 Call Tones 49 ...
User Guide
Page 14
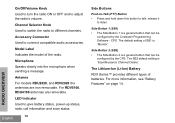
... connect compatible audio accessories. Accessory Connector Used to different channels. For RDV5100, RDU4100 antennas are non-removable. The Lithium-Ion (Li-Ion) Battery RDX Series™ provides different types of the radio. Antenna For models RDU2020, and RDV2020 the antennas are removable. LED Indicator Used to listen. CPS. Side Button 2 (SB2) • The Side...
... connect compatible audio accessories. Accessory Connector Used to different channels. For RDV5100, RDU4100 antennas are non-removable. The Lithium-Ion (Li-Ion) Battery RDX Series™ provides different types of the radio. Antenna For models RDU2020, and RDV2020 the antennas are removable. LED Indicator Used to listen. CPS. Side Button 2 (SB2) • The Side...
User Guide
Page 15
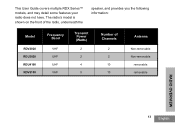
The radio's model is shown on the front of the radio, underneath the speaker, and provides you the following information: Model RDV2020 RDU2020 RDU4100 RDV5100 Frequency Band VHF UHF UHF VHF Transmit Power (Watts) 2 2 4 5 Number of Channels 2 2 10 10 Antenna Non-removable Non-removable removable removable RADIO OVERVIEW 13 English This User Guide covers multiple RDX Series™ models, and may detail some features your radio does not have.
The radio's model is shown on the front of the radio, underneath the speaker, and provides you the following information: Model RDV2020 RDU2020 RDU4100 RDV5100 Frequency Band VHF UHF UHF VHF Transmit Power (Watts) 2 2 4 5 Number of Channels 2 2 10 10 Antenna Non-removable Non-removable removable removable RADIO OVERVIEW 13 English This User Guide covers multiple RDX Series™ models, and may detail some features your radio does not have.
User Guide
Page 31
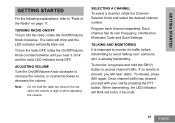
...following explanations, refer to the ear when the volume is high or when adjusting the volume SELECTING A CHANNEL To select a channel, rotate the Channel Selector Knob and select the desired channel number. The radio will chirp and the LED Indicator will blink red every 3 seconds. 29 English Program each...PTT button. ADJUSTING VOLUME Turn the On/Off/Volume Knob clockwise to increase the volume, or counterclockwise to access channel traffic. TURNING RADIO ON/OFF To turn the radio OFF, rotate the On/Off/Volume Knob counterclockwise until you will hear 'static'. When transmitting, the LED ...
...following explanations, refer to the ear when the volume is high or when adjusting the volume SELECTING A CHANNEL To select a channel, rotate the Channel Selector Knob and select the desired channel number. The radio will chirp and the LED Indicator will blink red every 3 seconds. 29 English Program each...PTT button. ADJUSTING VOLUME Turn the On/Off/Volume Knob clockwise to increase the volume, or counterclockwise to access channel traffic. TURNING RADIO ON/OFF To turn the radio OFF, rotate the On/Off/Volume Knob counterclockwise until you will hear 'static'. When transmitting, the LED ...
User Guide
Page 32
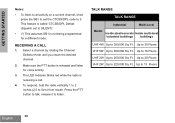
... not being programmed for voice activity. 3. To respond, hold the radio vertically 1 to 2 inches (2.5 to 250,000 Sq. Ft. Ft. Select a channel by rotating the Channel Selector Knob until you reach the desired channel. 2. Up to 18 Floors UHF 2W Up to 5cm) from mouth. Up to 20 Floors VHF ...2W Up to 0. GETTING STARTED Notes: • To listen to all activity on a current channel, short press the SB1...
... not being programmed for voice activity. 3. To respond, hold the radio vertically 1 to 2 inches (2.5 to 250,000 Sq. Ft. Ft. Select a channel by rotating the Channel Selector Knob until you reach the desired channel. 2. Up to 18 Floors UHF 2W Up to 5cm) from mouth. Up to 20 Floors VHF ...2W Up to 0. GETTING STARTED Notes: • To listen to all activity on a current channel, short press the SB1...
User Guide
Page 33
Bandwidth: Some frequencies have selectable channel spacing, which must be the same on the radio: 1. GETTING STARTED To establish a proper two-way communication, the channel, frequency, and interference eliminator codes must match other radios for optimum audio quality. Channel: Current channel that specific code. 5. Frequency: The frequency the radio uses to that the radio is not set up frequencies...
Bandwidth: Some frequencies have selectable channel spacing, which must be the same on the radio: 1. GETTING STARTED To establish a proper two-way communication, the channel, frequency, and interference eliminator codes must match other radios for optimum audio quality. Channel: Current channel that specific code. 5. Frequency: The frequency the radio uses to that the radio is not set up frequencies...
User Guide
Page 34
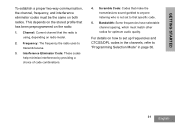
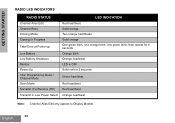
GETTING STARTED RADIO LED INDICATORS RADIO STATUS LED INDICATION Channel Alias Edit Channel Busy Cloning Mode Red heartbeat Solid orange Two orange heartbeats Cloning In Progress Fatal Error at Power up Low Battery Solid orange One green blink, ...one orange blink, one green blink, then repeat for 4 seconds Orange blink Low Battery Shutdown Monitor Power-Up 'Idle' Programming Mode / Channel Mode Scan Mode Orange heartbeat LED is OFF Solid red for 2 seconds Green heartbeat Red heartbeat Transmit (Tx)/Receive (RX) Red heartbeat Transmit in Low...
GETTING STARTED RADIO LED INDICATORS RADIO STATUS LED INDICATION Channel Alias Edit Channel Busy Cloning Mode Red heartbeat Solid orange Two orange heartbeats Cloning In Progress Fatal Error at Power up Low Battery Solid orange One green blink, ...one orange blink, one green blink, then repeat for 4 seconds Orange blink Low Battery Shutdown Monitor Power-Up 'Idle' Programming Mode / Channel Mode Scan Mode Orange heartbeat LED is OFF Solid red for 2 seconds Green heartbeat Red heartbeat Transmit (Tx)/Receive (RX) Red heartbeat Transmit in Low...
User Guide
Page 38
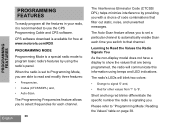
...PROGRAMMING FEATURES To easily program all the features in your radio, it is set a particular channel to automatically enable Scan each channel. The Auto-Scan feature allows you to set to Programming Mode, you switch to that channel. English 36 The Interference Eliminator Code (CTCSS/ DPL... to select frequencies for each time you are being programmed, the radio will blink two colors: • Orange to signal '0' and, • Red for free at www.motorola.com/RDX PROGRAMMING MODE Programming Mode is a special radio mode to read and modify three features: • Frequencies, &#...
...PROGRAMMING FEATURES To easily program all the features in your radio, it is set a particular channel to automatically enable Scan each channel. The Auto-Scan feature allows you to set to Programming Mode, you switch to that channel. English 36 The Interference Eliminator Code (CTCSS/ DPL... to select frequencies for each time you are being programmed, the radio will blink two colors: • Orange to signal '0' and, • Red for free at www.motorola.com/RDX PROGRAMMING MODE Programming Mode is a special radio mode to read and modify three features: • Frequencies, &#...
User Guide
Page 41
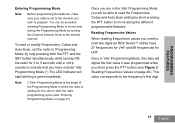
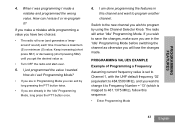
...two digits as RDX Series™ radios have 27 frequencies for VHF and 89 frequencies for the user to start blinking a green heartbeat. You can do so before entering Programming Mode or at any time during the Programming Mode by turning the Channel Selector Knob to the desired channel To read ...program. Once in 'Idle' Programming Mode, the radio will signal the first value it was programmed when you short press the PTT button (see Figure 2: Reading Frequencies Values on page 37) Once you are in which the radio is waiting for UHF. This value corresponds to the frequency's first digit ...
...two digits as RDX Series™ radios have 27 frequencies for VHF and 89 frequencies for the user to start blinking a green heartbeat. You can do so before entering Programming Mode or at any time during the Programming Mode by turning the Channel Selector Knob to the desired channel To read ...program. Once in 'Idle' Programming Mode, the radio will signal the first value it was programmed when you short press the PTT button (see Figure 2: Reading Frequencies Values on page 37) Once you are in which the radio is waiting for UHF. This value corresponds to the frequency's first digit ...
User Guide
Page 43
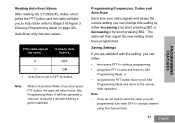
...(refer to Stage 3 of Figure 3: Entering Programming Mode on page 40). Saving Settings If you are satisfied with the setting, you just programmed, turn radio OFF or change this setting by either : • short press PTT to continue programming, • long press PTT to save and return to 'Idle... After reading the CTCSS/DPL codes, short press the PTT button and the radio will return to the 'Idle' Programming Mode. Note: • If you do not wish to save the value you can change channel using the channel knob. 41 English PROGRAMMING FEATURES It will then generate a 'roll-over'...
...(refer to Stage 3 of Figure 3: Entering Programming Mode on page 40). Saving Settings If you are satisfied with the setting, you just programmed, turn radio OFF or change this setting by either : • short press PTT to continue programming, • long press PTT to save and return to 'Idle... After reading the CTCSS/DPL codes, short press the PTT button and the radio will return to the 'Idle' Programming Mode. Note: • If you do not wish to save the value you can change channel using the channel knob. 41 English PROGRAMMING FEATURES It will then generate a 'roll-over'...
User Guide
Page 45
... Mode 43 English Keep increasing (short press SB1) or decreasing (short pressing SB2) until you wish to the new channel you get the desired value or, • Turn OFF the radio and start-over (and generates a 'wraparound' sound) each time it reaches a maximum (9) or minimum (0) value....program it to Frequency Number = '13' (which is set to Channel 1, with the UHF default frequency '02' (equivalent to 461.1375 MHz), follow this channel and want to program another channel. If you make sure you have two choices: • The radio roll-over . 5. How do I exit Programming Mode? •...
... Mode 43 English Keep increasing (short press SB1) or decreasing (short pressing SB2) until you wish to the new channel you get the desired value or, • Turn OFF the radio and start-over (and generates a 'wraparound' sound) each time it reaches a maximum (9) or minimum (0) value....program it to Frequency Number = '13' (which is set to Channel 1, with the UHF default frequency '02' (equivalent to 461.1375 MHz), follow this channel and want to program another channel. If you make sure you have two choices: • The radio roll-over . 5. How do I exit Programming Mode? •...
User Guide
Page 47
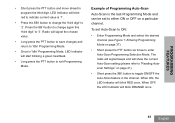
...Mode, LED Indicator will start blinking a green heartbeat. • Long press the PTT button to toggle ON/OFF the Auto-Scan feature in the channel. The radio will signal beeps and will blink red to indicate current value is the last Programming Mode and can be set Auto-Scan to ON: •...; Enter Programming Mode and select the desired channel (see Figure 1: Entering Programming Mode on page 41). • Short press the SB1 button to exit Programming...
...Mode, LED Indicator will start blinking a green heartbeat. • Long press the PTT button to toggle ON/OFF the Auto-Scan feature in the channel. The radio will signal beeps and will blink red to indicate current value is the last Programming Mode and can be set Auto-Scan to ON: •...; Enter Programming Mode and select the desired channel (see Figure 1: Entering Programming Mode on page 41). • Short press the SB1 button to exit Programming...
User Guide
Page 48
... the SB2 button (*). You can talk to the person(s) transmitting without having to change the channel knob. Note: (*)Assumes the SB2 button is scanning, the radio will not hear Channel 2. This will allow you will transmit on that channel until the activity ends. If there is set the code settings for 5 seconds before Scan...
... the SB2 button (*). You can talk to the person(s) transmitting without having to change the channel knob. Note: (*)Assumes the SB2 button is scanning, the radio will not hear Channel 2. This will allow you will transmit on that channel until the activity ends. If there is set the code settings for 5 seconds before Scan...
User Guide
Page 49
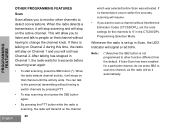
...short pressing the SB2 button again or by using the CPS (refer to CPS section on a 'nuisance' channel tie up the radio's scanning feature. PROGRAMMING FEATURES 47 English To delete a channel from the Scan List: • Start Scan by short pressing the SB2 button (*) • Wait ...SB2 button to temporarily remove channels from the default. Note: (*) Assumes the SB2 button is useful when irrelevant conversations on page 48) Nuisance Channel Delete Nuisance Channel Delete allows you to delete it. • The channel will not be edited by turning the radio OFF. This feature is ...
...short pressing the SB2 button again or by using the CPS (refer to CPS section on a 'nuisance' channel tie up the radio's scanning feature. PROGRAMMING FEATURES 47 English To delete a channel from the Scan List: • Start Scan by short pressing the SB2 button (*) • Wait ...SB2 button to temporarily remove channels from the default. Note: (*) Assumes the SB2 button is useful when irrelevant conversations on page 48) Nuisance Channel Delete Nuisance Channel Delete allows you to delete it. • The channel will not be edited by turning the radio OFF. This feature is ...
User Guide
Page 51
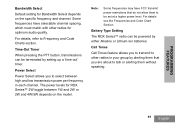
...a 'time-out' timer. Battery Type Setting The RDX Series™ radio can be powered by alerting them that do not allow them without speaking. 49 English Call Tones Call Tones feature allows you to transmit to other radios for Bandwidth Select depends on the model. Some frequencies...that you to be set at a higher power level. Note: Some frequencies may have selectable channel spacing, which must match with other radios in each channel. The power levels for RDX Series™ 2W toggle between high and low transmission power per frequency in your group by either...
...a 'time-out' timer. Battery Type Setting The RDX Series™ radio can be powered by alerting them that do not allow them without speaking. 49 English Call Tones Call Tones feature allows you to transmit to other radios for Bandwidth Select depends on the model. Some frequencies...that you to be set at a higher power level. Note: Some frequencies may have selectable channel spacing, which must match with other radios in each channel. The power levels for RDX Series™ 2W toggle between high and low transmission power per frequency in your group by either...
User Guide
Page 58
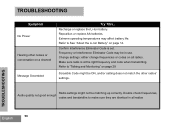
...No Power Hearing other noises or conversation on page 29 Scramble Code might not be in all radios. Reposition or replace AA batteries. Refer to "Talking and Monitoring" on a channel Message Scrambled Try This... Recharge or replace the Li-Ion battery. Extreme operating temperatures may be...to See "About the Li-Ion Battery" on all radios TROUBLESHOOTING English 56 Change settings: either change frequencies or codes on page 14. Radio settings might be ON, and/or setting does not match the other radios' settings. Frequency or Interference Eliminator Code may affect battery ...
...No Power Hearing other noises or conversation on page 29 Scramble Code might not be in all radios. Reposition or replace AA batteries. Refer to "Talking and Monitoring" on a channel Message Scrambled Try This... Recharge or replace the Li-Ion battery. Extreme operating temperatures may be...to See "About the Li-Ion Battery" on all radios TROUBLESHOOTING English 56 Change settings: either change frequencies or codes on page 14. Radio settings might be ON, and/or setting does not match the other radios' settings. Frequency or Interference Eliminator Code may affect battery ...
User Guide
Page 59
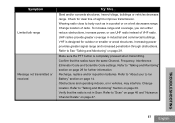
... decreases range. Check for outdoor or smaller or wood structures. UHF radios provide greater coverage in vehicles, may interfere. Change location. TROUBLESHOOTING 57 English Wearing radio close to "Scan" on page 46 and "Nuisance Channel Delete" on page 29. Verify that the radios have the same Channel, Frequency, Interference Eliminator Code and Scramble Code settings. Refer...
... decreases range. Check for outdoor or smaller or wood structures. UHF radios provide greater coverage in vehicles, may interfere. Change location. TROUBLESHOOTING 57 English Wearing radio close to "Scan" on page 46 and "Nuisance Channel Delete" on page 29. Verify that the radios have the same Channel, Frequency, Interference Eliminator Code and Scramble Code settings. Refer...
User Guide
Page 65
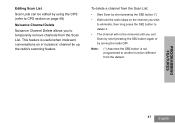
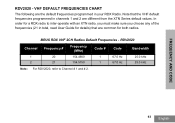
... The following are the default frequencies programmed in total, read User Guide for details) that the VHF default frequencies programmed in channels 1 and 2 are common for a RDX radio to Channel # 1 and # 2. 63 English RDV2020 Channel Frequency # Frequency (MHz) Code # Code Bandwidth 1 20 154.4900 1 67.0 Hz 25.0 kHz 2 21 154.5150 1 67.0 Hz 25.0 kHz...
... The following are the default frequencies programmed in total, read User Guide for details) that the VHF default frequencies programmed in channels 1 and 2 are common for a RDX radio to Channel # 1 and # 2. 63 English RDV2020 Channel Frequency # Frequency (MHz) Code # Code Bandwidth 1 20 154.4900 1 67.0 Hz 25.0 kHz 2 21 154.5150 1 67.0 Hz 25.0 kHz...

User Guide
Page 66
... to interoperate with Frequency # 21 (154.5150 Mhz). Program Channel 1 with Frequency # 20 (154.4900 Mhz) and Channel 2 (for three seconds). 2. Make sure your radio ON while holding the MENU and PTT buttons simultaneously for XV2600 model... only) with XTN series. • (**) Former XTN frequencies # 3 (154.5700 MHz) and # 4 (154.6000 MHz) are considered MURS frequencies and are different from the XTN default values. MAKING XTN COMPATIBLE WITH RDX RADIOS...
... to interoperate with Frequency # 21 (154.5150 Mhz). Program Channel 1 with Frequency # 20 (154.4900 Mhz) and Channel 2 (for three seconds). 2. Make sure your radio ON while holding the MENU and PTT buttons simultaneously for XV2600 model... only) with XTN series. • (**) Former XTN frequencies # 3 (154.5700 MHz) and # 4 (154.6000 MHz) are considered MURS frequencies and are different from the XTN default values. MAKING XTN COMPATIBLE WITH RDX RADIOS...


