User Guide
Page 3
... Package Contents 5 Batteries and Chargers Safety Information 7 Operational Safety Guidelines 8 FCC Licensing Information 9 Interference Information 9 Radio Overview 11 Parts of the Radio 11 On/Off/Volume Knob 12 Channel Selector Knob 12 Accessory Connector 12 Model Label 12 Microphone 12 Antenna 12 LED... and Disposal 15 Installing the Lithium-Ion (Li-Ion) Battery 16 Removing the Lithium-Ion (Li-Ion) Battery 16 Alkaline Battery Pack (Optional Accessory 17 Installing Alkaline Batteries 17 Removing Alkaline Batteries 17 Attaching and Removing Antenna . . . . . 18 Attaching the...
... Package Contents 5 Batteries and Chargers Safety Information 7 Operational Safety Guidelines 8 FCC Licensing Information 9 Interference Information 9 Radio Overview 11 Parts of the Radio 11 On/Off/Volume Knob 12 Channel Selector Knob 12 Accessory Connector 12 Model Label 12 Microphone 12 Antenna 12 LED... and Disposal 15 Installing the Lithium-Ion (Li-Ion) Battery 16 Removing the Lithium-Ion (Li-Ion) Battery 16 Alkaline Battery Pack (Optional Accessory 17 Installing Alkaline Batteries 17 Removing Alkaline Batteries 17 Attaching and Removing Antenna . . . . . 18 Attaching the...
User Guide
Page 18
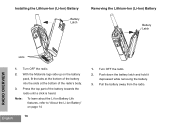
With the Motorola logo side up on page 14 English 16 1. Push down the battery latch and hold it depressed while removing the battery. 3. Turn OFF the radio. 2. Turn OFF the radio. 2. Pull the battery away from the radio. Note: To learn about the Li-Ion Battery Life features, refer to "About the Li-...Ion Battery" on the battery pack, fit the tabs at the bottom of the battery into the slots at the bottom of the battery towards the radio until a click is heard. Installing the Lithium-Ion (Li-Ion) Battery Battery Latch Removing ...
With the Motorola logo side up on page 14 English 16 1. Push down the battery latch and hold it depressed while removing the battery. 3. Turn OFF the radio. 2. Turn OFF the radio. 2. Pull the battery away from the radio. Note: To learn about the Li-Ion Battery Life features, refer to "About the Li-...Ion Battery" on the battery pack, fit the tabs at the bottom of the battery into the slots at the bottom of the battery towards the radio until a click is heard. Installing the Lithium-Ion (Li-Ion) Battery Battery Latch Removing ...
User Guide
Page 19
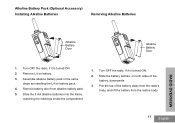
... batteries into the frame, matching the markings inside the compartment 1. Assemble alkaline battery pack in the same steps as installing the Li-Ion battery pack. 4. Remove Li-Ion battery. 3. Remove battery door from the radio's body. 17 English Turn OFF the radio, if it is turned ON. 2. Pull the top of the battery, downwards...
... batteries into the frame, matching the markings inside the compartment 1. Assemble alkaline battery pack in the same steps as installing the Li-Ion battery pack. 4. Remove Li-Ion battery. 3. Remove battery door from the radio's body. 17 English Turn OFF the radio, if it is turned ON. 2. Pull the top of the battery, downwards...
User Guide
Page 21
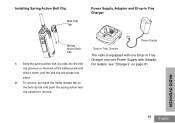
To remove, pull back the metal release tab on page 81. RADIO OVERVIEW 19 English Power Supply Drop-in Tray Charger The radio is equipped with Adaptor. Installing Spring Action Belt Clip Belt Clip Tab Power Supply, Adaptor and Drop-in Tray Charger and one Power Supply with ... spring action belt clip upward to remove. Slide the spring action belt clip rails into the belt clip grooves on the back of the battery pack and slide it down until the belt clip tab snaps into place. 2.
To remove, pull back the metal release tab on page 81. RADIO OVERVIEW 19 English Power Supply Drop-in Tray Charger The radio is equipped with Adaptor. Installing Spring Action Belt Clip Belt Clip Tab Power Supply, Adaptor and Drop-in Tray Charger and one Power Supply with ... spring action belt clip upward to remove. Slide the spring action belt clip rails into the belt clip grooves on the back of the battery pack and slide it down until the belt clip tab snaps into place. 2.
User Guide
Page 27
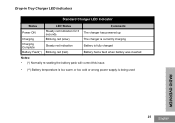
Drop-in Tray Charger LED Indicators Standard Charger LED Indicator Status Power ON Charging Charging Complete Battery Fault(*) LED Status Steady red indication for 3 seconds Blinking red (slow) Steady red indication Blinking red (fast) Comments The charger has powered up The charger is currently charging Battery is fully charged Battery had a fault when battery was inserted Notes: • (*) Normally re-seating the battery pack will correct this issue. • (**) Battery temperature is too warm or too cold or wrong power supply is being used RADIO OVERVIEW 25 English
Drop-in Tray Charger LED Indicators Standard Charger LED Indicator Status Power ON Charging Charging Complete Battery Fault(*) LED Status Steady red indication for 3 seconds Blinking red (slow) Steady red indication Blinking red (fast) Comments The charger has powered up The charger is currently charging Battery is fully charged Battery had a fault when battery was inserted Notes: • (*) Normally re-seating the battery pack will correct this issue. • (**) Battery temperature is too warm or too cold or wrong power supply is being used RADIO OVERVIEW 25 English
User Guide
Page 28
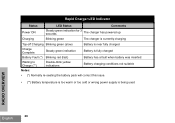
... has a fault when battery was inserted Waiting to Charge (**) Double-blink yellow indications Battery charging conditions not suitable Notes: • (*) Normally re-seating the battery pack will correct this issue. • (**) Battery temperature is too warm or too cold or wrong power supply is being used...
... has a fault when battery was inserted Waiting to Charge (**) Double-blink yellow indications Battery charging conditions not suitable Notes: • (*) Normally re-seating the battery pack will correct this issue. • (**) Battery temperature is too warm or too cold or wrong power supply is being used...
User Guide
Page 30
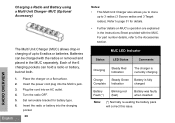
...fully charged Battery Fault (*) Blinking red (fast) Battery was faulty when inserted Note: (*) Normally re-seating the battery pack will correct this issue. Turn the radio OFF. Plug the cord into the MUC's jack. Batteries can be charged with the MUC. Refer to the Accessories ...Accessory) The Multi Unit Charger (MUC) allows drop-in the MUC separately. Each of up to 6 radios or batteries. Charging a Radio and Battery using a Multi Unit Charger- Insert the radio or battery into the charging pocket. 28 Notes: • This Multi Unit Charger also allows you ...
...fully charged Battery Fault (*) Blinking red (fast) Battery was faulty when inserted Note: (*) Normally re-seating the battery pack will correct this issue. Turn the radio OFF. Plug the cord into the MUC's jack. Batteries can be charged with the MUC. Refer to the Accessories ...Accessory) The Multi Unit Charger (MUC) allows drop-in the MUC separately. Each of up to 6 radios or batteries. Charging a Radio and Battery using a Multi Unit Charger- Insert the radio or battery into the charging pocket. 28 Notes: • This Multi Unit Charger also allows you ...