User Guide
Page 3
... 4 Introduction 5 Package Contents 5 Batteries and Chargers Safety Information 7 Operational Safety Guidelines 8 FCC Licensing Information 9 Interference Information 9 Radio Overview 11 Parts of the Radio 11 On/Off/Volume Knob 12 Channel Selector Knob 12 Accessory Connector 12 Model Label 12 Microphone 12 Antenna 12 LED Indicator 12 Side Buttons 12 The Lithium-Ion (Li...
... 4 Introduction 5 Package Contents 5 Batteries and Chargers Safety Information 7 Operational Safety Guidelines 8 FCC Licensing Information 9 Interference Information 9 Radio Overview 11 Parts of the Radio 11 On/Off/Volume Knob 12 Channel Selector Knob 12 Accessory Connector 12 Model Label 12 Microphone 12 Antenna 12 LED Indicator 12 Side Buttons 12 The Lithium-Ion (Li...
User Guide
Page 5
... RDX models 75 Motorola Limited Warranty for the United States and Canada 76 Accessories 80 Antennas 80 Audio Accessories 80 Battery 80 Carry Accessories 81 Power Supplies AC Pin Adaptors 81 Software Applications 81 Cables 81 Chargers 81 Power Supplies 82 RDX Series... - Quick Instructions 64 RDV5100 - Cloning with RDX Radios - VHF Default Frequencies Chart 65 RDX UHF Frequencies Chart 66 RDU2020 - VHF Default Frequencies Chart 63 Making XTN Compatible with a Multi Unit Charger (MUC 51 Cloning Radio using the Radio to Radio (R2R) Cloning Cable (Optional Accessory 53 Cloning...
... RDX models 75 Motorola Limited Warranty for the United States and Canada 76 Accessories 80 Antennas 80 Audio Accessories 80 Battery 80 Carry Accessories 81 Power Supplies AC Pin Adaptors 81 Software Applications 81 Cables 81 Chargers 81 Power Supplies 82 RDX Series... - Quick Instructions 64 RDV5100 - Cloning with RDX Radios - VHF Default Frequencies Chart 65 RDX UHF Frequencies Chart 66 RDU2020 - VHF Default Frequencies Chart 63 Making XTN Compatible with a Multi Unit Charger (MUC 51 Cloning Radio using the Radio to Radio (R2R) Cloning Cable (Optional Accessory 53 Cloning...
User Guide
Page 14
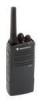
...Software - The Lithium-Ion (Li-Ion) Battery RDX Series™ provides different types of SB1 is 'Scan/Nuisance Channel Delete'. For more information, see "Battery Features" on page 14. Accessory Connector Used to listen. Antenna For models RDU2020, and RDV2020 the antennas are removable. For RDV5100,... RDU4100 antennas are non-removable. LED Indicator Used to adjust the radio's volume. On/Off/Volume Knob Used to turn the radio ON or OFF and to give battery status,...
...Software - The Lithium-Ion (Li-Ion) Battery RDX Series™ provides different types of SB1 is 'Scan/Nuisance Channel Delete'. For more information, see "Battery Features" on page 14. Accessory Connector Used to listen. Antenna For models RDU2020, and RDV2020 the antennas are removable. For RDV5100,... RDU4100 antennas are non-removable. LED Indicator Used to adjust the radio's volume. On/Off/Volume Knob Used to turn the radio ON or OFF and to give battery status,...
User Guide
Page 15
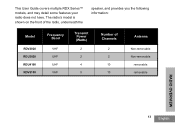
The radio's model is shown on the front of the radio, underneath the speaker, and provides you the following information: Model RDV2020 RDU2020 RDU4100 RDV5100 Frequency Band VHF UHF UHF VHF Transmit Power (Watts) 2 2 4 5 Number of Channels 2 2 10 10 Antenna Non-removable Non-removable removable removable RADIO OVERVIEW 13 English This User Guide covers multiple RDX Series™ models, and may detail some features your radio does not have.
The radio's model is shown on the front of the radio, underneath the speaker, and provides you the following information: Model RDV2020 RDU2020 RDU4100 RDV5100 Frequency Band VHF UHF UHF VHF Transmit Power (Watts) 2 2 4 5 Number of Channels 2 2 10 10 Antenna Non-removable Non-removable removable removable RADIO OVERVIEW 13 English This User Guide covers multiple RDX Series™ models, and may detail some features your radio does not have.
User Guide
Page 20
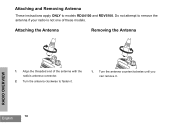
Do not attempt to remove the antenna if your radio is not one of the antenna with the radio's antenna connector. 2. Turn the antenna clockwise to models RDU4100 and RDV5100. Align the threaded end of these models. English 18 Attaching the Antenna Removing the Antenna RADIO OVERVIEW 1. Turn the antenna counterclockwise until you can remove it . 1. Attaching and Removing Antenna These instructions apply ONLY to fasten it .
Do not attempt to remove the antenna if your radio is not one of the antenna with the radio's antenna connector. 2. Turn the antenna clockwise to models RDU4100 and RDV5100. Align the threaded end of these models. English 18 Attaching the Antenna Removing the Antenna RADIO OVERVIEW 1. Turn the antenna counterclockwise until you can remove it . 1. Attaching and Removing Antenna These instructions apply ONLY to fasten it .
User Guide
Page 32
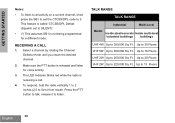
.... The LED Indicator blinks red while the radio is called 'CTCSS/DPL Defeat (Squelch set the CTCSS/DPL code to 0. TALK RANGE TALK RANGE Industrial Multi-Level Model Inside steel/concrete Inside multi-level Industrial buildings buildings UHF 4W Up to 300,000 Sq. release it... to 5cm) from mouth. This feature is receiving a call. 4. To respond, hold the radio vertically 1 to 2 inches (2.5 to listen. Select...
.... The LED Indicator blinks red while the radio is called 'CTCSS/DPL Defeat (Squelch set the CTCSS/DPL code to 0. TALK RANGE TALK RANGE Industrial Multi-Level Model Inside steel/concrete Inside multi-level Industrial buildings buildings UHF 4W Up to 300,000 Sq. release it... to 5cm) from mouth. This feature is receiving a call. 4. To respond, hold the radio vertically 1 to 2 inches (2.5 to listen. Select...
User Guide
Page 33
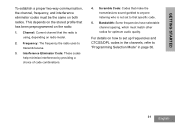
... code. 5. GETTING STARTED To establish a proper two-way communication, the channel, frequency, and interference eliminator codes must match other radios for optimum audio quality. This depends on radio model. 2. Frequency: The frequency the radio uses to "Programming Selection Mode" in the channels, refer to transmit/receive. 3. For details on how to set to anyone...
... code. 5. GETTING STARTED To establish a proper two-way communication, the channel, frequency, and interference eliminator codes must match other radios for optimum audio quality. This depends on radio model. 2. Frequency: The frequency the radio uses to "Programming Selection Mode" in the channels, refer to transmit/receive. 3. For details on how to set to anyone...
User Guide
Page 34
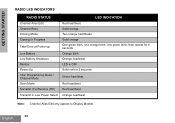
GETTING STARTED RADIO LED INDICATORS RADIO STATUS LED INDICATION Channel Alias Edit Channel Busy Cloning Mode Red heartbeat Solid orange Two orange heartbeats Cloning In Progress Fatal Error at Power up ... Green heartbeat Red heartbeat Transmit (Tx)/Receive (RX) Red heartbeat Transmit in Low Power Select Orange heartbeat Note: Channel Alias Edit only applies to Display Models English 32
GETTING STARTED RADIO LED INDICATORS RADIO STATUS LED INDICATION Channel Alias Edit Channel Busy Cloning Mode Red heartbeat Solid orange Two orange heartbeats Cloning In Progress Fatal Error at Power up ... Green heartbeat Red heartbeat Transmit (Tx)/Receive (RX) Red heartbeat Transmit in Low Power Select Orange heartbeat Note: Channel Alias Edit only applies to Display Models English 32
User Guide
Page 38
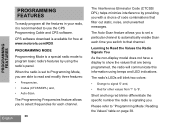
...The Auto-Scan feature allows you to set to Programming Mode, you to select frequencies for free at www.motorola.com/RDX PROGRAMMING MODE Programming Mode is a special radio mode to '9'. Please refer to use the CPS Programming Cable and CPS software. PROGRAMMING FEATURES PROGRAMMING FEATURES To... • Orange to signal '0' and, • Red for other values from '1' to program basic radio's features by providing you . Learning to Read the Values the Radio Signals You As the non-display model does not have a display to read and modify three features: • Frequencies, • Codes ...
...The Auto-Scan feature allows you to set to Programming Mode, you to select frequencies for free at www.motorola.com/RDX PROGRAMMING MODE Programming Mode is a special radio mode to '9'. Please refer to use the CPS Programming Cable and CPS software. PROGRAMMING FEATURES PROGRAMMING FEATURES To... • Orange to signal '0' and, • Red for other values from '1' to program basic radio's features by providing you . Learning to Read the Values the Radio Signals You As the non-display model does not have a display to read and modify three features: • Frequencies, • Codes ...
User Guide
Page 51
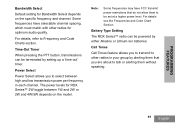
...button, transmissions can be set at a higher power level. Note: Some frequencies may have selectable channel spacing, which must match with other radios in each channel. Power Select Power Select allows you are about to Frequency and Code Charts section. Some frequencies have FCC transmit power ...and 4W/5W depends on the specific frequency and channel. Call Tones Call Tones feature allows you to transmit to other radios for Bandwidth Select depends on the model. Battery Type Setting The RDX Series™ radio can be terminated by either Alkaline or Lithium-Ion batteries.
...button, transmissions can be set at a higher power level. Note: Some frequencies may have selectable channel spacing, which must match with other radios in each channel. Power Select Power Select allows you are about to Frequency and Code Charts section. Some frequencies have FCC transmit power ...and 4W/5W depends on the specific frequency and channel. Call Tones Call Tones feature allows you to transmit to other radios for Bandwidth Select depends on the model. Battery Type Setting The RDX Series™ radio can be terminated by either Alkaline or Lithium-Ion batteries.
User Guide
Page 52
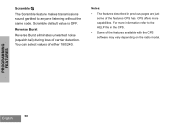
... sound garbled to the HELP file in previous pages are just some of the features available with the CPS software may vary depending on the radio model. Reverse Burst Reverse Burst eliminates unwanted noise (squelch tail) during loss of either 180/240. PROGRAMMING FEATURES English 50
... sound garbled to the HELP file in previous pages are just some of the features available with the CPS software may vary depending on the radio model. Reverse Burst Reverse Burst eliminates unwanted noise (squelch tail) during loss of either 180/240. PROGRAMMING FEATURES English 50
User Guide
Page 54
... within 5 seconds). 5. Once you chose in the source pocket that pairs with the Motorola logo facing front. The 'pass' tone sounds like a good key 'chirp' whereas the 'fail' tone sounds similar to clone radios are explained in order for 3 seconds before releasing the buttons until a distinctive audible tone...a 'bonk' tone. English 52 Press and release SB1. 4. After cloning is a display model, it will be read from left to right with the target pocket you have completed the cloning process, turn the radios OFF and ON to exit the 'cloning' mode. • If cloning fails please refer ...
... within 5 seconds). 5. Once you chose in the source pocket that pairs with the Motorola logo facing front. The 'pass' tone sounds like a good key 'chirp' whereas the 'fail' tone sounds similar to clone radios are explained in order for 3 seconds before releasing the buttons until a distinctive audible tone...a 'bonk' tone. English 52 Press and release SB1. 4. After cloning is a display model, it will be read from left to right with the target pocket you have completed the cloning process, turn the radios OFF and ON to exit the 'cloning' mode. • If cloning fails please refer ...

User Guide
Page 55
... Chargers (SUC). • Turned OFF the radios and, • Both radios are of the SUCs. 5. Before beginning the cloning process, make sure you have: • A fully charged battery on each one of the same radio model. 2. Place the Source radio in its SUC, press and release SB1. ...53 English PROGRAMMING FEATURES Cloning Radio using the Radio to the SUC. Note: During the cloning process no power is being established between...
... Chargers (SUC). • Turned OFF the radios and, • Both radios are of the SUCs. 5. Before beginning the cloning process, make sure you have: • A fully charged battery on each one of the same radio model. 2. Place the Source radio in its SUC, press and release SB1. ...53 English PROGRAMMING FEATURES Cloning Radio using the Radio to the SUC. Note: During the cloning process no power is being established between...
User Guide
Page 56
.... The 'pass' tone sounds like a good key 'chirp' whereas the 'fail' tone sounds similar to Accessories section. If the Source radio is a display model, it will either a 'pass' tone (cloning was successful) or a 'fail' tone (cloning process has failed). Ensure that the Target...This cloning cable is completed, the Source radio will sound either show 'Pass' or 'Fail' on the display (a tone will emit an audible 'bonk' indicating that cloning fails, try performing each of the following before trying to operate only with compatible Motorola RLN6175 (Standard) and RLN6304 (Rapid)...
.... The 'pass' tone sounds like a good key 'chirp' whereas the 'fail' tone sounds similar to Accessories section. If the Source radio is a display model, it will either a 'pass' tone (cloning was successful) or a 'fail' tone (cloning process has failed). Ensure that the Target...This cloning cable is completed, the Source radio will sound either show 'Pass' or 'Fail' on the display (a tone will emit an audible 'bonk' indicating that cloning fails, try performing each of the following before trying to operate only with compatible Motorola RLN6175 (Standard) and RLN6304 (Rapid)...

User Guide
Page 66
...to FCC regulations, the highlighted frequencies are not available in the RDX Series™. 64 Make sure your XTN is programmed to make your radio ON while holding the MENU and PTT buttons simultaneously for XV2600 model only) with XTN series. • (**) Former XTN frequencies ... values. Program Channel 1 with RDX Series™ default frequencies: 1. MAKING XTN COMPATIBLE WITH RDX RADIOS - QUICK INSTRUCTIONS The following instructions are a quick and easy way to the factory default frequencies (Turn your XTN (XV1100, XV2100 and XV2600 models) compatible with Frequency # 20 ...
...to FCC regulations, the highlighted frequencies are not available in the RDX Series™. 64 Make sure your XTN is programmed to make your radio ON while holding the MENU and PTT buttons simultaneously for XV2600 model only) with XTN series. • (**) Former XTN frequencies ... values. Program Channel 1 with RDX Series™ default frequencies: 1. MAKING XTN COMPATIBLE WITH RDX RADIOS - QUICK INSTRUCTIONS The following instructions are a quick and easy way to the factory default frequencies (Turn your XTN (XV1100, XV2100 and XV2600 models) compatible with Frequency # 20 ...
User Guide
Page 77
FREQUENCY AND CODE PROGRAMMING CUSTOMIZED FREQUENCIES ON 4W/5W RDX MODELS Certain 4W/5W Models can also be programmed to work with repeaters. Certain 4W/5W models can be programmed to have customized frequencies (different from the ones shown in the VHF and UHF charts in previous pages). VHF range is 146 -174 MHz and UHF 438 - 470 MHz. Please contact your Motorola point of purchase for details. 75 English
FREQUENCY AND CODE PROGRAMMING CUSTOMIZED FREQUENCIES ON 4W/5W RDX MODELS Certain 4W/5W Models can also be programmed to work with repeaters. Certain 4W/5W models can be programmed to have customized frequencies (different from the ones shown in the VHF and UHF charts in previous pages). VHF range is 146 -174 MHz and UHF 438 - 470 MHz. Please contact your Motorola point of purchase for details. 75 English
User Guide
Page 85
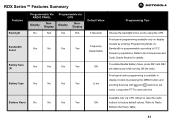
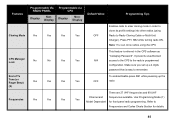
... entering Programming Mode (1). Refer to save and exit. To enable/disable Battery Save, press SB1 and SB2 simultaneously while turning ON the radio. Front panel programming available only on display models by using the CPS. RDX Series™ Features Summary M Features Backlight Bandwidth Select Battery Save (2) Battery Type Programmable Via Programmable via CPS.
... entering Programming Mode (1). Refer to save and exit. To enable/disable Battery Save, press SB1 and SB2 simultaneously while turning ON the radio. Front panel programming available only on display models by using the CPS. RDX Series™ Features Summary M Features Backlight Bandwidth Select Battery Save (2) Battery Type Programmable Via Programmable via CPS.

User Guide
Page 86
... Yes Yes Mode(1). To enter or exit Channel Aliasing mode press PTT and buttons simultaneously while turning radio ON for Display Models by using the Channel Selector Knob (non-display models) or the MENU button (display models). Note: To edit, refer to exit and save, long press PTT. Features Call Tones (4) Channel Aliasing Channels...
... Yes Yes Mode(1). To enter or exit Channel Aliasing mode press PTT and buttons simultaneously while turning radio ON for Display Models by using the Channel Selector Knob (non-display models) or the MENU button (display models). Note: To edit, refer to exit and save, long press PTT. Features Call Tones (4) Channel Aliasing Channels...
User Guide
Page 87
...-Unit Charger). Use Programming Mode (1) Frequencies Yes Yes Yes Yes Model Dependant for details. 85 CPS Manager Lock No No Yes Yes This feature is easy to remember. Make sure you set up the radio There are 27 VHF frequencies and 89 UHF Channel and frequencies available. End of Tx Tone (or Roger...
...-Unit Charger). Use Programming Mode (1) Frequencies Yes Yes Yes Yes Model Dependant for details. 85 CPS Manager Lock No No Yes Yes This feature is easy to remember. Make sure you set up the radio There are 27 VHF frequencies and 89 UHF Channel and frequencies available. End of Tx Tone (or Roger...
User Guide
Page 88
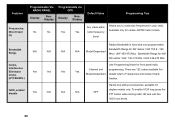
... until the IVOX icon blinks. 86 Available only for front panel radio Interference Channel and programming. Bandwidth Range for 2W radios: VHF 150.8 - 160 N/A N/A N/A N/A Model Dependant Mhz / UHF 450-470 Mhz Bandwidth Range for display models only. Features Frequencies, Direct Input (3) Programmable Via RADIO PANEL Display NonDisplay No No Programmable via CPS Display NonDisplay Yes Yes...
... until the IVOX icon blinks. 86 Available only for front panel radio Interference Channel and programming. Bandwidth Range for 2W radios: VHF 150.8 - 160 N/A N/A N/A N/A Model Dependant Mhz / UHF 450-470 Mhz Bandwidth Range for display models only. Features Frequencies, Direct Input (3) Programmable Via RADIO PANEL Display NonDisplay No No Programmable via CPS Display NonDisplay Yes Yes...


