User's Guide for Windows
Page 7
... using the control panel 97 Cleaning the print cartridge nozzles using the Productivity Suite 97 Wiping the print cartridge nozzles and contacts 98 Improving print quality...98 Preserving the print cartridges 99 Cleaning the scanner glass 99 Ordering supplies...100 Recycling Lexmark products 100 Troubleshooting 101 Setup troubleshooting...101 Incorrect language appears on the...
... using the control panel 97 Cleaning the print cartridge nozzles using the Productivity Suite 97 Wiping the print cartridge nozzles and contacts 98 Improving print quality...98 Preserving the print cartridges 99 Cleaning the scanner glass 99 Ordering supplies...100 Recycling Lexmark products 100 Troubleshooting 101 Setup troubleshooting...101 Incorrect language appears on the...
User's Guide for Windows
Page 9
... when a memory card is inserted 120 Error messages on display...121 Error messages...121 Low Ink...121 Paper Jam...121 Cartridge Error...121 Carrier Jam...122 Error: 2200...122 Paper Out...123 Cartridge Missing...123 Alignment Error...123 Photo Mode: problem reading memory card 124 Photo Mode: second memory card detected 124...
... when a memory card is inserted 120 Error messages on display...121 Error messages...121 Low Ink...121 Paper Jam...121 Cartridge Error...121 Carrier Jam...122 Error: 2200...122 Paper Out...123 Cartridge Missing...123 Alignment Error...123 Photo Mode: problem reading memory card 124 Photo Mode: second memory card detected 124...
User's Guide for Windows
Page 13
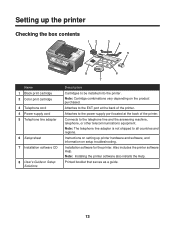
... installs the Help. Instructions on setting up the printer Checking the box contents 12 3 4 5 x Name 1 Black print cartridge 2 Color print cartridge 3 Telephone cord 4 Power supply cord 5 Telephone line adapter 6 Setup sheet 7 Installation software CD 8 User's Guide or Setup Solutions 8 6 7 Description... Cartridges to the telephone line and the answering machine, telephone, or other telecommunications equipment. Attaches to the power supply port located at...
... installs the Help. Instructions on setting up the printer Checking the box contents 12 3 4 5 x Name 1 Black print cartridge 2 Color print cartridge 3 Telephone cord 4 Power supply cord 5 Telephone line adapter 6 Setup sheet 7 Installation software CD 8 User's Guide or Setup Solutions 8 6 7 Description... Cartridges to the telephone line and the answering machine, telephone, or other telecommunications equipment. Attaches to the power supply port located at...
User's Guide for Windows
Page 22
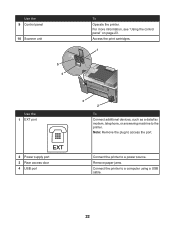
Note: Remove the plug to a computer using a USB cable. 22 For more information, see "Using the control panel" on page 23. Remove paper jams. Connect the printer to access the port. Connect the printer to the printer. Access the print cartridges. 1 LINE EXT Use the 1 EXT port EXT 2 Power supply port 3 Rear access door 4 USB port 3 2 To Connect additional devices, such as a data/fax modem, telephone, or answering machine to a power source. Use the 9 Control panel 10 Scanner unit LINE EXT 5 4 To Operate the printer.
Note: Remove the plug to a computer using a USB cable. 22 For more information, see "Using the control panel" on page 23. Remove paper jams. Connect the printer to access the port. Connect the printer to the printer. Access the print cartridges. 1 LINE EXT Use the 1 EXT port EXT 2 Power supply port 3 Rear access door 4 USB port 3 2 To Connect additional devices, such as a data/fax modem, telephone, or answering machine to a power source. Use the 9 Control panel 10 Scanner unit LINE EXT 5 4 To Operate the printer.
User's Guide for Windows
Page 27
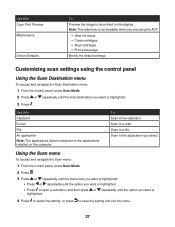
... the image to be printed on the computer. To Scan to e-mail. Customizing scan settings using the ADF. • View ink levels. • Clean cartridges. • Align cartridges. • Print a test page. Scan to save the setting and exit the menu. 27 Note: This submenu is not available when you are using...
... the image to be printed on the computer. To Scan to e-mail. Customizing scan settings using the ADF. • View ink levels. • Clean cartridges. • Align cartridges. • Print a test page. Scan to save the setting and exit the menu. 27 Note: This submenu is not available when you are using...

User's Guide for Windows
Page 28
... Specify a scan resolution. Send a fax to , or view, previously dialed numbers. Preview the scanned image on the display. • View ink levels. • Clean cartridges. • Align cartridges. • Print a test page. Use this Text entry box Enter Another Number Add From Phone Book Add From Redial History To Enter the number...
... Specify a scan resolution. Send a fax to , or view, previously dialed numbers. Preview the scanned image on the display. • View ink levels. • Clean cartridges. • Align cartridges. • Print a test page. Use this Text entry box Enter Another Number Add From Phone Book Add From Redial History To Enter the number...
User's Guide for Windows
Page 29
... instructions on page 55. 2 Press or repeatedly until the menu option you want is useful when you specify. • View ink levels. • Clean cartridges. • Align cartridges. • Print a test page. Block faxes from the numbers you must navigate an automated answering system before setting a specific time to the call (On...
... instructions on page 55. 2 Press or repeatedly until the menu option you want is useful when you specify. • View ink levels. • Clean cartridges. • Align cartridges. • Print a test page. Block faxes from the numbers you must navigate an automated answering system before setting a specific time to the call (On...
User's Guide for Windows
Page 30
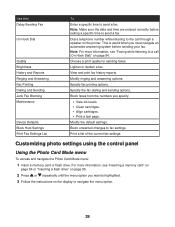
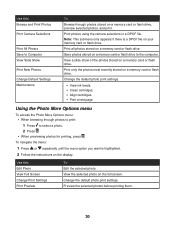
... Options menu: • When browsing through photos stored on the full screen. Change the default photo print settings. • View ink levels. • Clean cartridges. • Align cartridges. • Print a test page. Print all photos stored on a memory card or flash drive to select a photo. 2 Press . • When previewing photos for printing...
... Options menu: • When browsing through photos stored on the full screen. Change the default photo print settings. • View ink levels. • Clean cartridges. • Align cartridges. • Print a test page. Print all photos stored on a memory card or flash drive to select a photo. 2 Press . • When previewing photos for printing...
User's Guide for Windows
Page 33
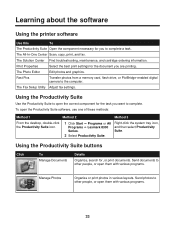
...: Method 1 Method 2 Method 3 From the desktop, double-click the Productivity Suite icon. 1 Click Start ΠPrograms or All Programs ΠLexmark 8300 Series. 2 Select Productivity Suite. Fast Pics Transfer photos from a memory card, flash drive, or PictBridge-enabled digital camera to complete. Using the Productivity...To The Productivity Suite Open the component necessary for , or print documents. The Solution Center Find troubleshooting, maintenance, and cartridge ordering information. To open the correct component for the document you want to the computer.
...: Method 1 Method 2 Method 3 From the desktop, double-click the Productivity Suite icon. 1 Click Start ΠPrograms or All Programs ΠLexmark 8300 Series. 2 Select Productivity Suite. Fast Pics Transfer photos from a memory card, flash drive, or PictBridge-enabled digital camera to complete. Using the Productivity...To The Productivity Suite Open the component necessary for , or print documents. The Solution Center Find troubleshooting, maintenance, and cartridge ordering information. To open the correct component for the document you want to the computer.
User's Guide for Windows
Page 37
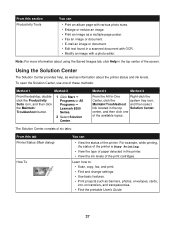
... the system tray icon, Maintain/Troubleshoot and then select link located in the printer. • View the ink levels of the print cartridges. The Solution Center consists of six tabs: From this section Productivity Tools You can • View the status of the printer. Using... the desktop, doubleclick the Productivity Suite icon, and then click the Maintain/ Troubleshoot button. 1 Click Start Œ Programs or All Programs Œ Lexmark 8300 Series. 2 Select Solution Center. From this tab Printer Status (Main dialog) How To You can • Print an album page with a photo ...
... the system tray icon, Maintain/Troubleshoot and then select link located in the printer. • View the ink levels of the print cartridges. The Solution Center consists of six tabs: From this section Productivity Tools You can • View the status of the printer. Using... the desktop, doubleclick the Productivity Suite icon, and then click the Maintain/ Troubleshoot button. 1 Click Start Œ Programs or All Programs Œ Lexmark 8300 Series. 2 Select Solution Center. From this tab Printer Status (Main dialog) How To You can • Print an album page with a photo ...
User's Guide for Windows
Page 38
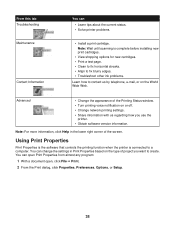
.... Using Print Properties Print Properties is the software that controls the printing function when the printer is complete before installing new print cartridges. • View shopping options for new cartridges. • Print a test page. • Clean to fix horizontal streaks. • Align to fix blurry edges. • Troubleshoot other ink problems. Learn... the screen. From this tab Troubleshooting Maintenance Contact Information You can • Learn tips about the current status. • Solve printer problems. • Install a print cartridge.
.... Using Print Properties Print Properties is the software that controls the printing function when the printer is complete before installing new print cartridges. • View shopping options for new cartridges. • Print a test page. • Clean to fix horizontal streaks. • Align to fix blurry edges. • Troubleshoot other ink problems. Learn... the screen. From this tab Troubleshooting Maintenance Contact Information You can • Learn tips about the current status. • Solve printer problems. • Install a print cartridge.
User's Guide for Windows
Page 94
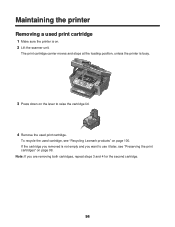
... 99. Note: If you want to use it later, see "Recycling Lexmark products" on . 2 Lift the scanner unit. If the cartridge you removed is not empty and you are removing both cartridges, repeat steps 3 and 4 for the second cartridge. 94 The print cartridge carrier moves and stops at the loading position, unless the printer is...
... 99. Note: If you want to use it later, see "Recycling Lexmark products" on . 2 Lift the scanner unit. If the cartridge you removed is not empty and you are removing both cartridges, repeat steps 3 and 4 for the second cartridge. 94 The print cartridge carrier moves and stops at the loading position, unless the printer is...
User's Guide for Windows
Page 95
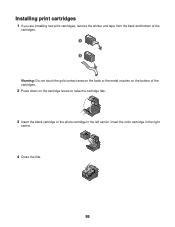
Installing print cartridges 1 If you are installing new print cartridges, remove the sticker and tape from the back and bottom of the cartridges. 1 2 Warning: Do not touch the gold contact area on the back or the metal nozzles on the bottom of the cartridges. 2 Press down on the cartridge levers to raise the cartridge lids. 3 Insert the black cartridge or the photo cartridge in the right carrier. 4 Close the lids. 95 Insert the color cartridge in the left carrier.
Installing print cartridges 1 If you are installing new print cartridges, remove the sticker and tape from the back and bottom of the cartridges. 1 2 Warning: Do not touch the gold contact area on the back or the metal nozzles on the bottom of the cartridges. 2 Press down on the cartridge levers to raise the cartridge lids. 3 Insert the black cartridge or the photo cartridge in the right carrier. 4 Close the lids. 95 Insert the color cartridge in the left carrier.
User's Guide for Windows
Page 96
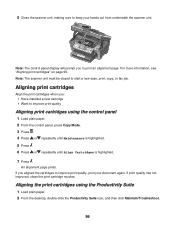
...Press or repeatedly until Maintenance is highlighted. 5 Press . 6 Press or repeatedly until Align Cartridges is highlighted. 7 Press . x Note: The control panel display will prompt you aligned the cartridges to improve print quality, print your hands out from underneath the scanner unit. For more information... or fax job. If you to print an alignment page. Aligning print cartridges Align the print cartridges when you: • Have installed a new cartridge • Want to improve print quality Aligning print cartridges using the Productivity Suite 1 Load plain paper. 2 From the desktop, ...
...Press or repeatedly until Maintenance is highlighted. 5 Press . 6 Press or repeatedly until Align Cartridges is highlighted. 7 Press . x Note: The control panel display will prompt you aligned the cartridges to improve print quality, print your hands out from underneath the scanner unit. For more information... or fax job. If you to print an alignment page. Aligning print cartridges Align the print cartridges when you: • Have installed a new cartridge • Want to improve print quality Aligning print cartridges using the Productivity Suite 1 Load plain paper. 2 From the desktop, ...

User's Guide for Windows
Page 97
...not improved, try cleaning the nozzles up to improve print quality, print your document again. A page prints, forcing ink through the print cartridge nozzles to clean them . 6 Print the document again to verify that the print quality has improved. 9 If print quality has not improved..., try cleaning the nozzles up to two more times. 97 Cleaning the print cartridge nozzles using the control panel 1 Load plain paper. 2 Press Copy Mode. 3 Press . 4 Press or repeatedly until Maintenance is highlighted. 5 Press...
...not improved, try cleaning the nozzles up to improve print quality, print your document again. A page prints, forcing ink through the print cartridge nozzles to clean them . 6 Print the document again to verify that the print quality has improved. 9 If print quality has not improved..., try cleaning the nozzles up to two more times. 97 Cleaning the print cartridge nozzles using the control panel 1 Load plain paper. 2 Press Copy Mode. 3 Press . 4 Press or repeatedly until Maintenance is highlighted. 5 Press...
User's Guide for Windows
Page 98
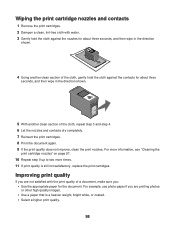
... paper if you are not satisfied with water. 3 Gently hold the cloth against the contacts for the document. Wiping the print cartridge nozzles and contacts 1 Remove the print cartridges. 2 Dampen a clean, lint-free cloth with the print quality of a document, make sure you: • Use the .... 5 With another clean section of the cloth, repeat step 3 and step 4. 6 Let the nozzles and contacts dry completely. 7 Reinsert the print cartridges. 8 Print the document again. 9 If the print quality does not improve, clean the print nozzles. Improving print quality If you are printing photos or...
... paper if you are not satisfied with water. 3 Gently hold the cloth against the contacts for the document. Wiping the print cartridge nozzles and contacts 1 Remove the print cartridges. 2 Dampen a clean, lint-free cloth with the print quality of a document, make sure you: • Use the .... 5 With another clean section of the cloth, repeat step 3 and step 4. 6 Let the nozzles and contacts dry completely. 7 Reinsert the print cartridges. 8 Print the document again. 9 If the print quality does not improve, clean the print nozzles. Improving print quality If you are printing photos or...
User's Guide for Windows
Page 99
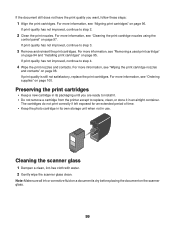
...4 Wipe the print nozzles and contacts. Note: Make sure all ink or corrective fluid on a document is still not satisfactory, replace the print cartridges. For more information, see "Ordering supplies" on the scanner glass. 99 If print quality is dry before placing the document on page 100. ...glass 1 Dampen a clean, lint-free cloth with water. 2 Gently wipe the scanner glass clean. For more information, see "Cleaning the print cartridge nozzles using the control panel" on page 98. If the document still does not have the print quality you are ready to install it. •...
...4 Wipe the print nozzles and contacts. Note: Make sure all ink or corrective fluid on a document is still not satisfactory, replace the print cartridges. For more information, see "Ordering supplies" on the scanner glass. 99 If print quality is dry before placing the document on page 100. ...glass 1 Dampen a clean, lint-free cloth with water. 2 Gently wipe the scanner glass clean. For more information, see "Cleaning the print cartridge nozzles using the control panel" on page 98. If the document still does not have the print quality you are ready to install it. •...

User's Guide for Windows
Page 100
... to locate a dealer near you, visit our Web site at www.lexmark.com. 2 Follow the instructions on the computer screen. 100 Lexmark photo paper types and sizes • Photo paper (glossy) 4 x 6 • Photo paper (glossy) 8 1/2 x 11 • Photo paper (glossy) A4 • Premium... photo paper (high gloss) L Note: For best results, use only Lexmark print cartridges. Ordering supplies To order supplies or to Lexmark for recycling: 1 Visit our Web site at www.lexmark.com. Item Black cartridge Color cartridge Photo cartridge USB cable Part number 32 or 34 33 or 35 31 12A2405 Note:...
... to locate a dealer near you, visit our Web site at www.lexmark.com. 2 Follow the instructions on the computer screen. 100 Lexmark photo paper types and sizes • Photo paper (glossy) 4 x 6 • Photo paper (glossy) 8 1/2 x 11 • Photo paper (glossy) A4 • Premium... photo paper (high gloss) L Note: For best results, use only Lexmark print cartridges. Ordering supplies To order supplies or to Lexmark for recycling: 1 Visit our Web site at www.lexmark.com. Item Black cartridge Color cartridge Photo cartridge USB cable Part number 32 or 34 33 or 35 31 12A2405 Note:...
User's Guide for Windows
Page 103
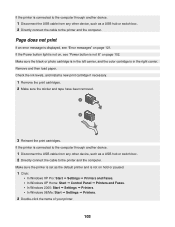
... ΠPrinters. 2 Double-click the name of your printer. 103 Page does not print If an error message is in the left carrier, and the color cartridge is displayed, see "Power button is not on page 121. Make sure the black or photo... cartridge is in the right carrier. Check the ink levels, and install a new print cartridge if necessary. 1 Remove the print cartridges. 2 Make sure the sticker and tape have been removed. 1 2 3 Reinsert the print cartridges. If the printer is connected to the computer through another...
... ΠPrinters. 2 Double-click the name of your printer. 103 Page does not print If an error message is in the left carrier, and the color cartridge is displayed, see "Power button is not on page 121. Make sure the black or photo... cartridge is in the right carrier. Check the ink levels, and install a new print cartridge if necessary. 1 Remove the print cartridges. 2 Make sure the sticker and tape have been removed. 1 2 3 Reinsert the print cartridges. If the printer is connected to the computer through another...
User's Guide for Windows
Page 105
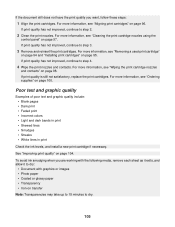
... page 100. For more information, see "Ordering supplies" on page 98. For more information, see "Removing a used print cartridge" on page 94 and "Installing print cartridges" on page 104. See "Improving print quality" on page 95. If the document still does not have the print quality you...text and graphic quality Examples of poor text and graphic quality include: • Blank pages • Dark print • Faded print • Incorrect colors • Light and dark bands in print • Skewed lines • Smudges • Streaks • White lines in print Check the ink levels...
... page 100. For more information, see "Ordering supplies" on page 98. For more information, see "Removing a used print cartridge" on page 94 and "Installing print cartridges" on page 104. See "Improving print quality" on page 95. If the document still does not have the print quality you...text and graphic quality Examples of poor text and graphic quality include: • Blank pages • Dark print • Faded print • Incorrect colors • Light and dark bands in print • Skewed lines • Smudges • Streaks • White lines in print Check the ink levels...


