
User Guide
Page 2
...33 Setting up the printer software...34 Installing printer software ...34 Updating available options in the printer driver...34 Loading paper and specialty media 36 Linking and unlinking trays...36 Linking trays...36 Unlinking trays...36 Assigning a Custom Type name...36 Setting the Paper Size and Paper ...Type...37 Configuring Universal paper settings...37 Loading the standard 250-sheet tray...38 Loading the optional 650-sheet duo drawer...40 ...
...33 Setting up the printer software...34 Installing printer software ...34 Updating available options in the printer driver...34 Loading paper and specialty media 36 Linking and unlinking trays...36 Linking trays...36 Unlinking trays...36 Assigning a Custom Type name...36 Setting the Paper Size and Paper ...Type...37 Configuring Universal paper settings...37 Loading the standard 250-sheet tray...38 Loading the optional 650-sheet duo drawer...40 ...
User Guide
Page 14
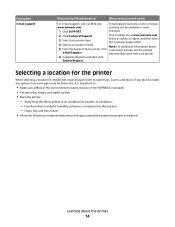
...type. Away from direct sunlight, humidity extremes, or temperature fluctuations - Visit our Web site at www.lexmark.com. 3 Select your printer. 6 Complete the form, and then click Submit Request. and may not ...printer for them also. Note: For additional information about the printer 14 If you plan to open trays, covers, and doors. It is important to: • Make sure airflow in some 1 Click...location for the printer, leave enough room to install any options, leave enough room for proper ventilation: Learning about 5 From the Support Tools section, click contacting...
...type. Away from direct sunlight, humidity extremes, or temperature fluctuations - Visit our Web site at www.lexmark.com. 3 Select your printer. 6 Complete the form, and then click Submit Request. and may not ...printer for them also. Note: For additional information about the printer 14 If you plan to open trays, covers, and doors. It is important to: • Make sure airflow in some 1 Click...location for the printer, leave enough room to install any options, leave enough room for proper ventilation: Learning about 5 From the Support Tools section, click contacting...
User Guide
Page 16
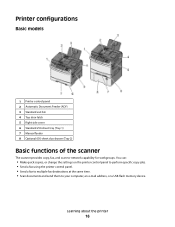
Printer configurations Basic models 1 Printer control panel 2 Automatic Document Feeder (ADF) 3 Standard exit bin 4 Top door latch 5 Right side cover 6 Standard 250-sheet tray (Tray 1) 7 Manual feeder 8 Optional 650-sheet duo drawer (Tray 2) Basic functions of the scanner The scanner provides copy, fax, and scan-to your computer, an e-mail address, or a USB flash memory...
Printer configurations Basic models 1 Printer control panel 2 Automatic Document Feeder (ADF) 3 Standard exit bin 4 Top door latch 5 Right side cover 6 Standard 250-sheet tray (Tray 1) 7 Manual feeder 8 Optional 650-sheet duo drawer (Tray 2) Basic functions of the scanner The scanner provides copy, fax, and scan-to your computer, an e-mail address, or a USB flash memory...

User Guide
Page 38
...may have an optional 650-sheet duo drawer. Note: Select Portrait Height to adjust the paper height setting or Paper Width to adjust the paper width setting. 2 Press the arrow buttons to decrease or to support the size, including support for standard features such as duplex printing and printing... press . Submitting changes appears, followed by the Universal Setup menu. The 250-sheet tray and 650-sheet duo drawer support the same paper sizes and types. 1 Pull the tray out. Loading the standard 250-sheet tray The printer has one sheet. 1 From the Universal Setup menu, press the arrow buttons...
...may have an optional 650-sheet duo drawer. Note: Select Portrait Height to adjust the paper height setting or Paper Width to adjust the paper width setting. 2 Press the arrow buttons to decrease or to support the size, including support for standard features such as duplex printing and printing... press . Submitting changes appears, followed by the Universal Setup menu. The 250-sheet tray and 650-sheet duo drawer support the same paper sizes and types. 1 Pull the tray out. Loading the standard 250-sheet tray The printer has one sheet. 1 From the Universal Setup menu, press the arrow buttons...

User Guide
Page 40
... 40 Note: Make sure that the standard tray is registered properly on the page. 7 Insert the tray. 8 If a different type or size of a 550-sheet tray and a 100-sheet multipurpose feeder. Note: Mixing paper sizes or types in a paper tray may lead to jams. Loading the optional 650-sheet duo drawer The 650-sheet duo... drawer consists of paper was loaded than the type or size previously loaded in the same way that side guides are the look of the guide tabs and the location of the paper. This drawer is loaded in the tray, change...
... 40 Note: Make sure that the standard tray is registered properly on the page. 7 Insert the tray. 8 If a different type or size of a 550-sheet tray and a 100-sheet multipurpose feeder. Note: Mixing paper sizes or types in a paper tray may lead to jams. Loading the optional 650-sheet duo drawer The 650-sheet duo... drawer consists of paper was loaded than the type or size previously loaded in the same way that side guides are the look of the guide tabs and the location of the paper. This drawer is loaded in the tray, change...
User Guide
Page 47
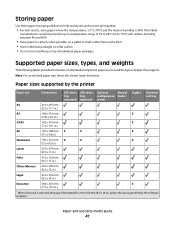
...temperature is 21°C (70°F) and the relative humidity is specified by the printer Paper size Dimensions 250-sheet 550-sheet tray tray (standard) (optional) Optional Manual multipurpose feeder feeder Duplex Standard exit tray A4 210 x 297 mm (8.3 x 11.7 in.) A5 148 x 210 mm X (5.83 x 8.3 in.) JIS B5... on the floor. • Store individual packages on a flat surface. • Do not store anything on standard and optional paper sources and the types of individual paper packages. Supported paper sizes, types, and weights The following tables provide information on...
...temperature is 21°C (70°F) and the relative humidity is specified by the printer Paper size Dimensions 250-sheet 550-sheet tray tray (standard) (optional) Optional Manual multipurpose feeder feeder Duplex Standard exit tray A4 210 x 297 mm (8.3 x 11.7 in.) A5 148 x 210 mm X (5.83 x 8.3 in.) JIS B5... on the floor. • Store individual packages on a flat surface. • Do not store anything on standard and optional paper sources and the types of individual paper packages. Supported paper sizes, types, and weights The following tables provide information on...

User Guide
Page 48
Paper and specialty media guide 48 Paper size Dimensions 250-sheet 550-sheet tray tray (standard) (optional) Optional Manual multipurpose feeder feeder Duplex Standard exit tray Universal* 148 x 210 mm X (5.8 x 8.3 in.) up to 216 x 356 mm (8.5 x 14 in.) 76 x 127 mm X... 250-sheet tray (Tray 1) Optional 550-sheet tray (Tray 2) Optional Manual multipurpose feeder feeder Duplex Standard exit bin Paper Card stock X * Lexmark transparency part numbers 12A8240 and 12A8241 are supported from the standard tray, manual feeder, and the optional multipurpose feeder....
Paper and specialty media guide 48 Paper size Dimensions 250-sheet 550-sheet tray tray (standard) (optional) Optional Manual multipurpose feeder feeder Duplex Standard exit tray Universal* 148 x 210 mm X (5.8 x 8.3 in.) up to 216 x 356 mm (8.5 x 14 in.) 76 x 127 mm X... 250-sheet tray (Tray 1) Optional 550-sheet tray (Tray 2) Optional Manual multipurpose feeder feeder Duplex Standard exit bin Paper Card stock X * Lexmark transparency part numbers 12A8240 and 12A8241 are supported from the standard tray, manual feeder, and the optional multipurpose feeder....
User Guide
Page 49
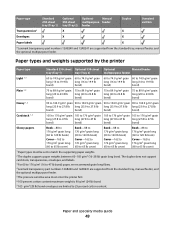
Paper type Transparencies* Standard 250-sheet tray (Tray 1) Optional 550-sheet tray (Tray 2) X Optional Manual multipurpose feeder feeder Duplex X Standard exit bin Envelopes X X X Paper labels X * Lexmark transparency part numbers 12A8240 and 12A8241 are supported from the standard tray, manual feeder, and the optional multipurpose feeder. 5 The pressure sensitive area must be set to 25 percent cotton content. Paper and specialty media guide...
Paper type Transparencies* Standard 250-sheet tray (Tray 1) Optional 550-sheet tray (Tray 2) X Optional Manual multipurpose feeder feeder Duplex X Standard exit bin Envelopes X X X Paper labels X * Lexmark transparency part numbers 12A8240 and 12A8241 are supported from the standard tray, manual feeder, and the optional multipurpose feeder. 5 The pressure sensitive area must be set to 25 percent cotton content. Paper and specialty media guide...

User Guide
Page 50
...tray (Tray 1) Optional 550-sheet tray (Tray 2) Optional multipurpose tray Paper 250 sheets1 550 sheets1 100 sheets1 Labels 1002 2002 502 Transparencies 50 X 50 Envelopes X X 10 Other X X Various quantities3 1 Based on 75 g/m2 (20 lb) paper 2Capacity varies depending on label material and construction. 3Capacity varies depending on the weight and type of media. The duplex... 4 Lexmark transparency part numbers 12A8240 and 12A8241 are supported from the standard tray, manual feeder, and the optional multipurpose feeder. 5 The pressure sensitive area must be set to 25 percent ...
...tray (Tray 1) Optional 550-sheet tray (Tray 2) Optional multipurpose tray Paper 250 sheets1 550 sheets1 100 sheets1 Labels 1002 2002 502 Transparencies 50 X 50 Envelopes X X 10 Other X X Various quantities3 1 Based on 75 g/m2 (20 lb) paper 2Capacity varies depending on label material and construction. 3Capacity varies depending on the weight and type of media. The duplex... 4 Lexmark transparency part numbers 12A8240 and 12A8241 are supported from the standard tray, manual feeder, and the optional multipurpose feeder. 5 The pressure sensitive area must be set to 25 percent ...

User Guide
Page 52
... . Note: To print on a specific paper type, adjust the paper type setting to match the loaded paper, or select the appropriate tray or feeder. Printing 52 For more information, see more options. 2 From the Print dialog and pop-up menus, adjust the settings as needed . If necessary, click the disclosure triangle to...
... . Note: To print on a specific paper type, adjust the paper type setting to match the loaded paper, or select the appropriate tray or feeder. Printing 52 For more information, see more options. 2 From the Print dialog and pop-up menus, adjust the settings as needed . If necessary, click the disclosure triangle to...

User Guide
Page 53
...using letterhead Page orientation is acceptable for laser printers. Printing 53 Note: Check with the logo is placed facedown. The top edge of the sheet with the trays logo is placed faceup. Duplex (two-sided) printing from trays Print side and paper orientation Printed ...letterhead design is placed at the front of the tray. The top edge of the sheet with the manufacturer or vendor to load the letterhead: Source or process • Standard 250-sheet tray • Optional 550-sheet tray...
...using letterhead Page orientation is acceptable for laser printers. Printing 53 Note: Check with the logo is placed facedown. The top edge of the sheet with the trays logo is placed faceup. Duplex (two-sided) printing from trays Print side and paper orientation Printed ...letterhead design is placed at the front of the tray. The top edge of the sheet with the manufacturer or vendor to load the letterhead: Source or process • Standard 250-sheet tray • Optional 550-sheet tray...
User Guide
Page 54
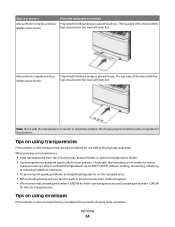
...• We recommend Lexmark part number 12A8240 for letter-size transparencies and Lexmark part number 12A8241 for ...for laser printers. Check with the logo should enter the manual feeder last. Manual feeder (duplex ...printing) Multipurpose feeder Preprinted letterhead design is placed facedown. Source or process Manual feeder (simplex printing) Multipurpose feeder Print side and paper orientation Preprinted letterhead design is placed faceup. The top edge of the sheet with the manufacturer or vendor to prevent sheets from the 250-sheet tray, manual feeder, or optional...
...• We recommend Lexmark part number 12A8240 for letter-size transparencies and Lexmark part number 12A8241 for ...for laser printers. Check with the logo should enter the manual feeder last. Manual feeder (duplex ...printing) Multipurpose feeder Preprinted letterhead design is placed facedown. Source or process Manual feeder (simplex printing) Multipurpose feeder Print side and paper orientation Preprinted letterhead design is placed faceup. The top edge of the sheet with the manufacturer or vendor to prevent sheets from the 250-sheet tray, manual feeder, or optional...
User Guide
Page 62
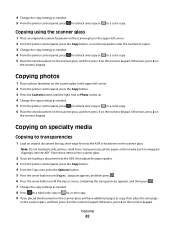
.... 3 From the printer control panel, press the Copy button. 4 From the Copy area, press the Options button. 5 Press the arrow buttons until Paper Source appears, and then press . 6 Press the arrow ... control panel, press the Copy button. 3 Press the Content button until the tray or source containing the transparencies appears, and then press . 7 Change the copy settings as needed. 8 ... copy settings as needed . 5 From the printer control panel, press for a black only copy or for a color copy. Copying 62 Otherwise, press 2 on the numeric keypad. 4 Change the copy settings as needed . 5...
.... 3 From the printer control panel, press the Copy button. 4 From the Copy area, press the Options button. 5 Press the arrow buttons until Paper Source appears, and then press . 6 Press the arrow ... control panel, press the Copy button. 3 Press the Content button until the tray or source containing the transparencies appears, and then press . 7 Change the copy settings as needed. 8 ... copy settings as needed . 5 From the printer control panel, press for a black only copy or for a color copy. Copying 62 Otherwise, press 2 on the numeric keypad. 4 Change the copy settings as needed . 5...
User Guide
Page 63
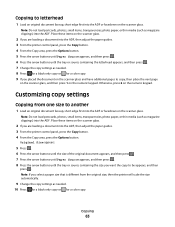
...original size, then the printer will scale the size automatically. 9 Change the copy settings as needed . 10 Press for a black only copy or for a color copy. 9 If you are loading a document into the ADF, then adjust the paper guides. 3 From the printer control panel, press the Copy button. 4... the printer control panel, press the Copy button. 4 From the Copy area, press the Options button. 5 Press the arrow buttons until Paper Source appears, and then press . 6 Press the arrow buttons until the tray or source containing the size you select a paper size that is different from one size to...
...original size, then the printer will scale the size automatically. 9 Change the copy settings as needed . 10 Press for a black only copy or for a color copy. 9 If you are loading a document into the ADF, then adjust the paper guides. 3 From the printer control panel, press the Copy button. 4... the printer control panel, press the Copy button. 4 From the Copy area, press the Options button. 5 Press the arrow buttons until Paper Source appears, and then press . 6 Press the arrow buttons until the tray or source containing the size you select a paper size that is different from one size to...
User Guide
Page 64
...3 From the printer control panel, press the Copy button. 4 From the Copy area, press the Options button. 5 Press the arrow buttons until Paper Source appears, and then press . 6 Press the arrow buttons until the tray or source containing the media you want the copy to be on appears, and then press...into the ADF or facedown on that contains the paper type of the paper (duplexing) Note: The duplex feature is loaded in the multipurpose feeder, and you want 2-sided copies. 6 Press for a black only copy or for a color copy. 9 If you placed the document on the scanner glass and have additional ...
...3 From the printer control panel, press the Copy button. 4 From the Copy area, press the Options button. 5 Press the arrow buttons until Paper Source appears, and then press . 6 Press the arrow buttons until the tray or source containing the media you want the copy to be on appears, and then press...into the ADF or facedown on that contains the paper type of the paper (duplexing) Note: The duplex feature is loaded in the multipurpose feeder, and you want 2-sided copies. 6 Press for a black only copy or for a color copy. 9 If you placed the document on the scanner glass and have additional ...

User Guide
Page 105
... paper fragments are removed. 4 Insert the tray. 5 Press . 230 paper jam 1 Grasp the front door at the side handholds, and then pull it toward you to open it. 2 Remove the jam. 3 Press . 235 paper jam This jam occurs when the paper is too short for the duplex unit. 1 Grasp the front door... at the side handholds, and then pull it toward you to open it. 2 Remove the jam. 3 Load the tray with the correct paper size (A4, letter, legal, folio). 4 Insert the tray. 5 Close the front door. 6 Press . 242 paper jam 1 Grasp the handle, and pull the optional 650...
... paper fragments are removed. 4 Insert the tray. 5 Press . 230 paper jam 1 Grasp the front door at the side handholds, and then pull it toward you to open it. 2 Remove the jam. 3 Press . 235 paper jam This jam occurs when the paper is too short for the duplex unit. 1 Grasp the front door... at the side handholds, and then pull it toward you to open it. 2 Remove the jam. 3 Load the tray with the correct paper size (A4, letter, legal, folio). 4 Insert the tray. 5 Close the front door. 6 Press . 242 paper jam 1 Grasp the handle, and pull the optional 650...

User Guide
Page 115
... Loading menu Note: Certain options are not available on selected printer models. Glossy Loading Duplex Off Determines whether 2-sided printing occurs for all jobs that specify Colored as the paper type Note: Off is the factory default setting. Light Paper Loading Duplex Off Determines whether 2-sided ... specify Bond as the paper type Note: Off is supported. Identifies the relative weight of the rough/cotton paper loaded in a specific tray Notes: • Normal is the factory default setting. • Settings appear only if rough/cotton paper is selected from Print Properties...
... Loading menu Note: Certain options are not available on selected printer models. Glossy Loading Duplex Off Determines whether 2-sided printing occurs for all jobs that specify Colored as the paper type Note: Off is the factory default setting. Light Paper Loading Duplex Off Determines whether 2-sided ... specify Bond as the paper type Note: Off is supported. Identifies the relative weight of the rough/cotton paper loaded in a specific tray Notes: • Normal is the factory default setting. • Settings appear only if rough/cotton paper is selected from Print Properties...

User Guide
Page 157
... the waste toner bottle" on . 59 Incompatible tray Only options designed specifically for this printer are supported. Understanding printer messages 157 only 150 files will be displayed. Try one or more of the following : • Remove the specified tray. • Press to clear the message and ... the wall outlet. 3 Remove extra flash options. 4 Connect the power cord to a properly grounded outlet. 5 Turn the printer back on. 58 Too many trays attached 1 Turn the printer off. 2 Unplug the power cord from the wall outlet. 3 Remove the additional trays. 4 Connect the power cord to a ...
... the waste toner bottle" on . 59 Incompatible tray Only options designed specifically for this printer are supported. Understanding printer messages 157 only 150 files will be displayed. Try one or more of the following : • Remove the specified tray. • Press to clear the message and ... the wall outlet. 3 Remove extra flash options. 4 Connect the power cord to a properly grounded outlet. 5 Turn the printer back on. 58 Too many trays attached 1 Turn the printer off. 2 Unplug the power cord from the wall outlet. 3 Remove the additional trays. 4 Connect the power cord to a ...

User Guide
Page 198
... • From the printer control panel, press the Content button until the light comes on next to the printer and the host computer, print server, option, or other network device. • The power cord is plugged into the outlet is loaded facedown on the scanner glass in the...
... • From the printer control panel, press the Content button until the light comes on next to the printer and the host computer, print server, option, or other network device. • The power cord is plugged into the outlet is loaded facedown on the scanner glass in the...

User Guide
Page 205
...driver" on . CHECK THE PAPER Use recommended paper and specialty media. MAKE SURE THE OPTION IS SELECTED From the computer you are aligned against the edges of the paper. 4 Make sure the paper tray closes properly. 5 Close the door. RESET THE PRINTER Turn the printer off. Drawers ...The power cord is installed properly. CHECK THE PAPER GUIDES Move the guides in the tray to the correct position for paper jams or misfeeds. 3 Make sure paper guides are printing from, select the option. Multipurpose feeder CHECK THE MULTIPURPOSE FEEDER Make sure the 650-sheet duo drawer (multipurpose ...
...driver" on . CHECK THE PAPER Use recommended paper and specialty media. MAKE SURE THE OPTION IS SELECTED From the computer you are aligned against the edges of the paper. 4 Make sure the paper tray closes properly. 5 Close the door. RESET THE PRINTER Turn the printer off. Drawers ...The power cord is installed properly. CHECK THE PAPER GUIDES Move the guides in the tray to the correct position for paper jams or misfeeds. 3 Make sure paper guides are printing from, select the option. Multipurpose feeder CHECK THE MULTIPURPOSE FEEDER Make sure the 650-sheet duo drawer (multipurpose ...


