
User's Guide
Page 43
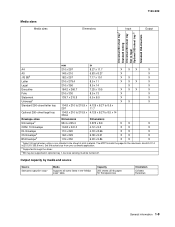
...° C (356°F) and pressure up to 75°F) with relative humidity between 40 and 60%. • Store paper in .) strip on the leading and driver edge, and use a non-oozing adhesive. • Portrait orientation works best, especially when printing bar codes. • Do not use preprinted card stock manufactured with...
...° C (356°F) and pressure up to 75°F) with relative humidity between 40 and 60%. • Store paper in .) strip on the leading and driver edge, and use a non-oozing adhesive. • Portrait orientation works best, especially when printing bar codes. • Do not use preprinted card stock manufactured with...

User's Guide
Page 48
...the Copies & Pages or General pop-up menu, adjust the settings. 3 Click OK or Print. Note: Print settings selected from the driver override the default settings selected from a Macintosh computer 1 With a document open Print Properties and see Avoiding jams and Storing print media. Printing... a document from a software application, a dialog representing the printer driver opens. Selection and handling of the available printer settings that lets the computer communicate with the printer or click Install printer and ...
...the Copies & Pages or General pop-up menu, adjust the settings. 3 Click OK or Print. Note: Print settings selected from the driver override the default settings selected from a Macintosh computer 1 With a document open Print Properties and see Avoiding jams and Storing print media. Printing... a document from a software application, a dialog representing the printer driver opens. Selection and handling of the available printer settings that lets the computer communicate with the printer or click Install printer and ...
Service Manual
Page 22
... applications that operate with most Apple LaserWriter printers will generally operate with standard Ethernet supports an Embedded Web Server. Download the latest Lexmark printer PPD files or printer drivers from www.lexmark.com. 1-2 Service Manual The USB interface supports: • Windows 98 SE • Windows Me • Windows NT &#...compatible with applications running at 366mhz. 7100-XXX MFP Specifications General device technical specifications Interfaces USB 2.0 Ethernet 10/100 Base T X500n X X X502n X X Note: The USB 2.0 and network interfaces can be ordered separately.
... applications that operate with most Apple LaserWriter printers will generally operate with standard Ethernet supports an Embedded Web Server. Download the latest Lexmark printer PPD files or printer drivers from www.lexmark.com. 1-2 Service Manual The USB interface supports: • Windows 98 SE • Windows Me • Windows NT &#...compatible with applications running at 366mhz. 7100-XXX MFP Specifications General device technical specifications Interfaces USB 2.0 Ethernet 10/100 Base T X500n X X X502n X X Note: The USB 2.0 and network interfaces can be ordered separately.
Service Manual
Page 23
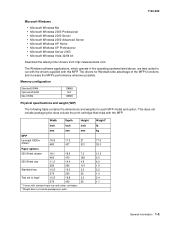
... ships with standard input tray and starter cartridges. 2 Weight does not include packaging or pubs. Width Depth Height inch inch inch mm mm mm MFP Lexmark X500n/ 18.9 17.2 21 X502n1 480 437 531 Paper options 530-Sheet drawer 18.1 18.5 7.3 460 470 185 530-Sheet tray 11.2 14.4 4.5 285 365...; Microsoft Windows XP Home • Microsoft Windows XP Professional • Microsoft Windows Server 2003 • Microsoft Windows Vista 32/64 bit Download the latest printer drivers from http://www.lexmark.com.
... ships with standard input tray and starter cartridges. 2 Weight does not include packaging or pubs. Width Depth Height inch inch inch mm mm mm MFP Lexmark X500n/ 18.9 17.2 21 X502n1 480 437 531 Paper options 530-Sheet drawer 18.1 18.5 7.3 460 470 185 530-Sheet tray 11.2 14.4 4.5 285 365...; Microsoft Windows XP Home • Microsoft Windows XP Professional • Microsoft Windows Server 2003 • Microsoft Windows Vista 32/64 bit Download the latest printer drivers from http://www.lexmark.com.
Service Manual
Page 29
... Supports all sizes listed in optional tray 1, but size sensing must be turned off. Set the actual size from your software application. 2 Supported through the driver. 3 B5 may be supported in the "Media sizes" table Capacity 250 sheets (20 lb paper) 50 Transparencies Orientation Collated Facedown General information 1-9 The MFP formats...
... Supports all sizes listed in optional tray 1, but size sensing must be turned off. Set the actual size from your software application. 2 Supported through the driver. 3 B5 may be supported in the "Media sizes" table Capacity 250 sheets (20 lb paper) 50 Transparencies Orientation Collated Facedown General information 1-9 The MFP formats...
Service Manual
Page 30
...-XXX Scan specifications Resolution Scan size Scan depth Lamp warm up time MTF Depth of focus Magnification Scanning Connectivity Push scan Web status monitor Scanner driver (TWAIN) features Scan mode Contrast adjustment Brightness adjustment Color / Mono switch Scan to E-mail feature Network requirements Authorization function Register E-mail address Scan destination E-mail...
...-XXX Scan specifications Resolution Scan size Scan depth Lamp warm up time MTF Depth of focus Magnification Scanning Connectivity Push scan Web status monitor Scanner driver (TWAIN) features Scan mode Contrast adjustment Brightness adjustment Color / Mono switch Scan to E-mail feature Network requirements Authorization function Register E-mail address Scan destination E-mail...
Service Manual
Page 78
... to step 3 op panel. Network service check Step 1 2 3 4 Questions / actions Yes Ping the MFP using the address on the Go to step 4. Check to the driver. Is DHCP used on the MFP Go to the USB cable. Does the MFP IP address match the ports IP address on the RIP card.... Go to the op panel. Check Voltages on J-PNL1, located on the driver? See "Flatbed assembly removal" on page 4-36. 2-40 Service Manual Issue fixed. See "System board removal" on page 4-49. Properly connect the cable to step...
... to step 3 op panel. Network service check Step 1 2 3 4 Questions / actions Yes Ping the MFP using the address on the Go to step 4. Check to the driver. Is DHCP used on the MFP Go to the USB cable. Does the MFP IP address match the ports IP address on the RIP card.... Go to the op panel. Check Voltages on J-PNL1, located on the driver? See "Flatbed assembly removal" on page 4-36. 2-40 Service Manual Issue fixed. See "System board removal" on page 4-49. Properly connect the cable to step...

Service Manual
Page 88
.... See "Fuser assembly removal" on page 4-6. Check fuser, and remove shipping pieces if still installed. Non recommended paper is selected for specific media in use. Driver media setting is a customer order supply. 2-50 Service Manual Close release lever. Note: The fuser is wrong. 7100-XXX insufficient fusing service check Printed image...
.... See "Fuser assembly removal" on page 4-6. Check fuser, and remove shipping pieces if still installed. Non recommended paper is selected for specific media in use. Driver media setting is a customer order supply. 2-50 Service Manual Close release lever. Note: The fuser is wrong. 7100-XXX insufficient fusing service check Printed image...
Service Manual
Page 89
Ensure proper media setting is wrong. See "Fuser assembly removal" on paper is a customer order supply. insufficient gloss service check 7100-XXX Gloss on page 4-6. Diagnostic information 2-51 Replace fuser. Problem area 1 Driver media settings 2 Fuser Action Driver media setting is selected for specific media in use. Fuser roller is not properly controlled. Fuser temperature is deteriorated. Note: The fuser is not sufficient.
Ensure proper media setting is wrong. See "Fuser assembly removal" on paper is a customer order supply. insufficient gloss service check 7100-XXX Gloss on page 4-6. Diagnostic information 2-51 Replace fuser. Problem area 1 Driver media settings 2 Fuser Action Driver media setting is selected for specific media in use. Fuser roller is not properly controlled. Fuser temperature is deteriorated. Note: The fuser is not sufficient.
Service Manual
Page 124
7100-XXX Lexmark confidential until announce edited 1/4/2007 Step 5: Fuse Once the image has been fully transferred to the media, the transfer roller helps move the paper into ... callout 5 in the opposite direction it ; Note: If the fuser rollers are damaged, they can cause toner to relieve the pressure on the printer and driver before replacing the fuser. in addition, never pull unfused toner through the fuser if you can be pulled off the page or cause paper jams...
7100-XXX Lexmark confidential until announce edited 1/4/2007 Step 5: Fuse Once the image has been fully transferred to the media, the transfer roller helps move the paper into ... callout 5 in the opposite direction it ; Note: If the fuser rollers are damaged, they can cause toner to relieve the pressure on the printer and driver before replacing the fuser. in addition, never pull unfused toner through the fuser if you can be pulled off the page or cause paper jams...
Service Manual
Page 128
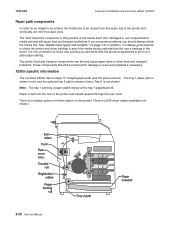
... is fed from the paper tray to see the picture below). In addition, it is always good practice to check the printer and driver settings to the printer and eventually exit into the output area. There is not uncommon to find a user printing on card stock with the... tray 1 and tray 2 paper paths merge at the tray 1 paperfeed roll. It is a 530-sheet drawer available (not shown). 3-20 Service Manual 7100-XXX Lexmark confidential until announce edited 1/4/2007 Paper path components in blue (Tray 2 is not shown). See "Media input types and weights" on this media itself. There...
... is fed from the paper tray to see the picture below). In addition, it is always good practice to check the printer and driver settings to the printer and eventually exit into the output area. There is not uncommon to find a user printing on card stock with the... tray 1 and tray 2 paper paths merge at the tray 1 paperfeed roll. It is a 530-sheet drawer available (not shown). 3-20 Service Manual 7100-XXX Lexmark confidential until announce edited 1/4/2007 Paper path components in blue (Tray 2 is not shown). See "Media input types and weights" on this media itself. There...
Service Manual
Page 163
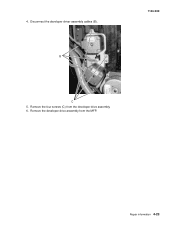
Remove the four screws (C) from the MFP. Remove the developer drive assembly from the developer drive assembly. 6. Disconnect the developer driver assembly cables (B). 4. Repair information 4-23 B 7100-XXX C 5.
Remove the four screws (C) from the MFP. Remove the developer drive assembly from the developer drive assembly. 6. Disconnect the developer driver assembly cables (B). 4. Repair information 4-23 B 7100-XXX C 5.


