Troubleshooting Guide
Page 1
...and using compatible printer software. For information regarding tested and approved USB flash memory devices, visit the Lexmark Web site at www.lexmark.com. Contact your system administrator. Error message about reading USB drive appears Make sure the USB drive is turned on and connected to the ...back on the display before the printer IP address to print in the tray. For more information, visit the Lexmark Web site at www.lexmark.com. Lexmark™ T65x Troubleshooting Guide Troubleshooting Solving basic problems Solving basic printer problems If there are basic printer problems, ...
...and using compatible printer software. For information regarding tested and approved USB flash memory devices, visit the Lexmark Web site at www.lexmark.com. Contact your system administrator. Error message about reading USB drive appears Make sure the USB drive is turned on and connected to the ...back on the display before the printer IP address to print in the tray. For more information, visit the Lexmark Web site at www.lexmark.com. Lexmark™ T65x Troubleshooting Guide Troubleshooting Solving basic problems Solving basic printer problems If there are basic printer problems, ...

User's Guide
Page 5
... PostScript menu...136 PCL Emul menu ...137 HTML menu...140 Image menu...141 Flash Drive menu ...141 Help menu...143 Understanding printer messages 145 List of status and error messages...145 Maintaining the printer 166 Cleaning the exterior of the printer...166 Storing supplies...166 Conserving supplies...166 Checking the status of supplies...
... PostScript menu...136 PCL Emul menu ...137 HTML menu...140 Image menu...141 Flash Drive menu ...141 Help menu...143 Understanding printer messages 145 List of status and error messages...145 Maintaining the printer 166 Cleaning the exterior of the printer...166 Storing supplies...166 Conserving supplies...166 Checking the status of supplies...
User's Guide
Page 6
...a fuser...169 Ordering a fuser wiper ...169 Ordering pick rollers ...170 Ordering staple cartridges...170 Ordering a transfer roller...170 Recycling Lexmark products...170 Moving the printer...170 Before moving the printer...170 Moving the printer to another location...171 Shipping the printer ...171 ...blank or displays only diamonds 175 Embedded Web Server does not open...175 Solving printing problems...176 Multiple-language PDFs do not print...176 Error message about reading USB drive appears...176 Jobs do not print...176 Confidential and other held jobs do not print ...177 Job takes longer...
...a fuser...169 Ordering a fuser wiper ...169 Ordering pick rollers ...170 Ordering staple cartridges...170 Ordering a transfer roller...170 Recycling Lexmark products...170 Moving the printer...170 Before moving the printer...170 Moving the printer to another location...171 Shipping the printer ...171 ...blank or displays only diamonds 175 Embedded Web Server does not open...175 Solving printing problems...176 Multiple-language PDFs do not print...176 Error message about reading USB drive appears...176 Jobs do not print...176 Confidential and other held jobs do not print ...177 Job takes longer...
User's Guide
Page 81
... postage stamps attached - Are stuck together or damaged in any exposed adhesive when the flap is in the sealed or closed position - Clearing jams Jam error messages appear on page 70. • Do not load wrinkled, creased, damp, bent, or curled paper. • Flex, fan, and straighten paper before loading it. •...
... postage stamps attached - Are stuck together or damaged in any exposed adhesive when the flap is in the sealed or closed position - Clearing jams Jam error messages appear on page 70. • Do not load wrinkled, creased, damp, bent, or curled paper. • Flex, fan, and straighten paper before loading it. •...
User's Guide
Page 145
Try one or more of status and error messages Activating Menu Changes Wait for the message to clear. List of the following : • Turn the printer off . 2 Unplug the power cord from the wall outlet. 3 Remove the duplex unit. 4 Reattach the ...duplex unit. 5 Connect the power cord to is a tray or feeder, and is a paper type or size. Cancel not available Wait for the message to clear. If the error occurs a second time: 1 Turn the printer off and then back on the display, it refers to the multipurpose feeder. Change to a properly grounded...
Try one or more of status and error messages Activating Menu Changes Wait for the message to clear. List of the following : • Turn the printer off . 2 Unplug the power cord from the wall outlet. 3 Remove the duplex unit. 4 Reattach the ...duplex unit. 5 Connect the power cord to is a tray or feeder, and is a paper type or size. Cancel not available Wait for the message to clear. If the error occurs a second time: 1 Turn the printer off and then back on the display, it refers to the multipurpose feeder. Change to a properly grounded...
User's Guide
Page 146
Close finisher side door Close the finisher side door to clear. Defragmenting Flash DO NOT POWER OFF Wait for the message to a properly grounded outlet. 7 Restart the printer. If the error occurs again: 1 Turn the printer off. 2 Unplug the power cord from the wall outlet. 3 Remove the duplex... unit. 4 Contact Customer Support. • Press to clear the message and print without using the duplex unit. If the error occurs again: 1 Turn the printer off while this message appears on . Insert the cartridge and close all doors and covers. Warning-Potential Damage:...
Close finisher side door Close the finisher side door to clear. Defragmenting Flash DO NOT POWER OFF Wait for the message to a properly grounded outlet. 7 Restart the printer. If the error occurs again: 1 Turn the printer off. 2 Unplug the power cord from the wall outlet. 3 Remove the duplex... unit. 4 Contact Customer Support. • Press to clear the message and print without using the duplex unit. If the error occurs again: 1 Turn the printer off while this message appears on . Insert the cartridge and close all doors and covers. Warning-Potential Damage:...
User's Guide
Page 148
...off while the printer is active. Formatting Flash DO NOT POWER OFF Wait for the message to clear the message and print without using the staple feature. Error reading USB drive Remove the device and wait for the message to a properly grounded outlet. 5 Restart the printer. • Cancel the current... in the Ready state, and Hex Trace is formatting the printer hard disk. Formatting Disk x/y XX% DO NOT POWER OFF Wait for the message to clear. The percentage completed appears on the display. Install bin Try one or more of the following : • Install the specified bin...
...off while the printer is active. Formatting Flash DO NOT POWER OFF Wait for the message to clear the message and print without using the staple feature. Error reading USB drive Remove the device and wait for the message to a properly grounded outlet. 5 Restart the printer. • Cancel the current... in the Ready state, and Hex Trace is formatting the printer hard disk. Formatting Disk x/y XX% DO NOT POWER OFF Wait for the message to clear. The percentage completed appears on the display. Install bin Try one or more of the following : • Install the specified bin...
User's Guide
Page 153
...the bins. 5 Connect the power cord to a properly grounded outlet. 6 Restart the printer. Ready The printer is ready to clear. Reattach bin - If the error occurs a second time: 1 Turn the printer off . 2 Unplug the power cord from the wall outlet. 3 Remove the specified bin. 4 Reattach the bin. ...5 Connect the power cord to clear the message and print without using the specified bin. If the error occurs again: 1 Turn the printer off . 2 Unplug the power cord from the wall outlet. 3 Remove the specified bins...
...the bins. 5 Connect the power cord to a properly grounded outlet. 6 Restart the printer. Ready The printer is ready to clear. Reattach bin - If the error occurs a second time: 1 Turn the printer off . 2 Unplug the power cord from the wall outlet. 3 Remove the specified bin. 4 Reattach the bin. ...5 Connect the power cord to clear the message and print without using the specified bin. If the error occurs again: 1 Turn the printer off . 2 Unplug the power cord from the wall outlet. 3 Remove the specified bins...
User's Guide
Page 154
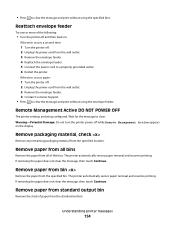
If the error occurs again: 1 Turn the printer off . 2 Unplug the power cord from the wall outlet. 3 Remove the envelope feeder. 4 Contact Customer Support. • Press to clear the message and print without using the envelope feeder. The printer automatically senses paper removal and resumes... bin. Remove paper from all of the following: • Turn the printer off while Remote Management Active appears on . Understanding printer messages 154 If the error occurs a second time: 1 Turn the printer off . 2 Unplug the power cord from the wall outlet. 3 Remove the envelope feeder...
If the error occurs again: 1 Turn the printer off . 2 Unplug the power cord from the wall outlet. 3 Remove the envelope feeder. 4 Contact Customer Support. • Press to clear the message and print without using the envelope feeder. The printer automatically senses paper removal and resumes... bin. Remove paper from all of the following: • Turn the printer off while Remote Management Active appears on . Understanding printer messages 154 If the error occurs a second time: 1 Turn the printer off . 2 Unplug the power cord from the wall outlet. 3 Remove the envelope feeder...

User's Guide
Page 160
...the arrow buttons until Continue appears, and then press • Cancel the current print job. If the error message remains, the flash memory may be defective and require replacing. 54 Serial option error is the proper one for resources Try one or more of the following: • Press the arrow...53 Unformatted flash detected Try one or more of the following: • Press the arrow buttons until Continue appears, and then press to clear the message and continue printing. • The printer cannot find a similar font and reformat the affected text. • Cancel the current print job. 51...
...the arrow buttons until Continue appears, and then press • Cancel the current print job. If the error message remains, the flash memory may be defective and require replacing. 54 Serial option error is the proper one for resources Try one or more of the following: • Press the arrow...53 Unformatted flash detected Try one or more of the following: • Press the arrow buttons until Continue appears, and then press to clear the message and continue printing. • The printer cannot find a similar font and reformat the affected text. • Cancel the current print job. 51...
User's Guide
Page 161
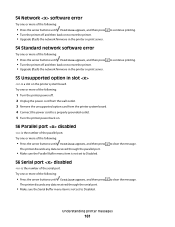
... to continue printing. 55 Unsupported option in the printer or print server. to clear the message. to clear the message. 56 Serial port disabled is the number of the serial port. Understanding printer messages 161 Try one or more of the following: • Press the arrow buttons until Continue... to reset the printer. • Upgrade (flash) the network firmware in the printer or print server. to continue printing. 54 Standard network software error Try one or more of the following: 1 Turn the printer power off. 2 Unplug the power cord from the wall outlet. 3 Remove the ...
... to continue printing. 55 Unsupported option in the printer or print server. to clear the message. to clear the message. 56 Serial port disabled is the number of the serial port. Understanding printer messages 161 Try one or more of the following: • Press the arrow buttons until Continue... to reset the printer. • Upgrade (flash) the network firmware in the printer or print server. to continue printing. 54 Standard network software error Try one or more of the following: 1 Turn the printer power off. 2 Unplug the power cord from the wall outlet. 3 Remove the ...

User's Guide
Page 165
Understanding printer messages 165 To fix this, download the correct download emulator version from the Lexmark Web site at www.lexmark.com. 1565 Emulation error, load emulation option The printer automatically clears the message in 30 seconds and then disables the download emulator on the firmware card.
Understanding printer messages 165 To fix this, download the correct download emulator version from the Lexmark Web site at www.lexmark.com. 1565 Emulation error, load emulation option The printer automatically clears the message in 30 seconds and then disables the download emulator on the firmware card.
User's Guide
Page 176
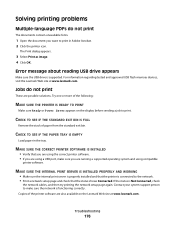
... PRINT Make sure Ready or Power Saver appears on the Lexmark Web site at www.lexmark.com. Troubleshooting 176 The Print dialog appears. 3 Select Print as image. 4 Click OK. Solving printing problems Multiple-language PDFs do not print These are possible solutions. Error message about reading USB drive appears Make sure the USB drive...
... PRINT Make sure Ready or Power Saver appears on the Lexmark Web site at www.lexmark.com. Troubleshooting 176 The Print dialog appears. 3 Select Print as image. 4 Click OK. Solving printing problems Multiple-language PDFs do not print These are possible solutions. Error message about reading USB drive appears Make sure the USB drive...

User's Guide
Page 213
... streaked horizontal lines 191 streaked vertical lines 191 toner fog or background shading 192 toner rubs off 192 toner specks 193 print troubleshooting error reading USB drive 176 held jobs do not print 177 incorrect characters print 178 incorrect margins 185 job prints from wrong tray 178 ...location 14 shipping 171 Printer busy, Continue, Quit 152 printer control panel 15 factory defaults, restoring 174 printer hard disk installing 30 printer messages 1565 Emulation error, load emulation option 165 200-282 Paper jam 164 281 paper jam 91 282 paper jam 91 30 Invalid refill, change cartridge 158 ...
... streaked horizontal lines 191 streaked vertical lines 191 toner fog or background shading 192 toner rubs off 192 toner specks 193 print troubleshooting error reading USB drive 176 held jobs do not print 177 incorrect characters print 178 incorrect margins 185 job prints from wrong tray 178 ...location 14 shipping 171 Printer busy, Continue, Quit 152 printer control panel 15 factory defaults, restoring 174 printer hard disk installing 30 printer messages 1565 Emulation error, load emulation option 165 200-282 Paper jam 164 281 paper jam 91 282 paper jam 91 30 Invalid refill, change cartridge 158 ...
User's Guide
Page 215
...134 R Reading USB drive 153 Ready 153 Reattach bin 153 Reattach bin - 153 Reattach envelope feeder 154 recycled paper using 67 recycling Lexmark products 170 WEEE statement 198 Remote Management Active 154 Remove packaging material, check 154 Remove paper from 155 Remove paper from all bins... troubleshooting, display display is blank 175 display shows only diamonds 175 troubleshooting, paper feed message remains after jam is cleared 183 page that jammed does not reprint 183 troubleshooting, print error reading USB drive 176 held jobs do not print 177 incorrect characters print 178 incorrect...
...134 R Reading USB drive 153 Ready 153 Reattach bin 153 Reattach bin - 153 Reattach envelope feeder 154 recycled paper using 67 recycling Lexmark products 170 WEEE statement 198 Remote Management Active 154 Remove packaging material, check 154 Remove paper from 155 Remove paper from all bins... troubleshooting, display display is blank 175 display shows only diamonds 175 troubleshooting, paper feed message remains after jam is cleared 183 page that jammed does not reprint 183 troubleshooting, print error reading USB drive 176 held jobs do not print 177 incorrect characters print 178 incorrect...
Service Manual
Page 25
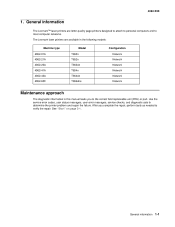
General information The Lexmark™ laser printers are available in the following models: Machine type 4062-01A 4062-21A 4062-23A 4062-41A 4062-43A 4062-630 Model T650n ... page 2-1. General information 1-1 After you to verify the repair. The Lexmark laser printers are letter-quality page printers designed to attach to personal computers and to determine the printer problem and repair the failure. Use the service error codes, user status messages, user error messages, service checks, and diagnostic aids to most computer networks. 4062...
General information The Lexmark™ laser printers are available in the following models: Machine type 4062-01A 4062-21A 4062-23A 4062-41A 4062-43A 4062-630 Model T650n ... page 2-1. General information 1-1 After you to verify the repair. The Lexmark laser printers are letter-quality page printers designed to attach to personal computers and to determine the printer problem and repair the failure. Use the service error codes, user status messages, user error messages, service checks, and diagnostic aids to most computer networks. 4062...
Service Manual
Page 35
... the printer down. WARNING: When operating the driving units using the diagnostics or other tools, never touch the driving units. Note: There may be printer error messages that are not under the printer when you connect or disconnect any cable electronic board or assembly. Never touch the live even while the power...
... the printer down. WARNING: When operating the driving units using the diagnostics or other tools, never touch the driving units. Note: There may be printer error messages that are not under the printer when you connect or disconnect any cable electronic board or assembly. Never touch the live even while the power...
Service Manual
Page 235
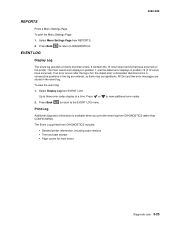
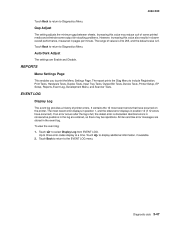
... CONFIG MENU. 4062-XXX REPORTS Prints a Menu Settings Page. All 2xx and 9xx error messages are stored in the log are entered, so there may be repetitions. EVENT LOG Display Log The event log provides a history of printer errors. Identical errors in consecutive positions in the event log. Up to DIAGNOSTICS. Press Back to...
... CONFIG MENU. 4062-XXX REPORTS Prints a Menu Settings Page. All 2xx and 9xx error messages are stored in the log are entered, so there may be repetitions. EVENT LOG Display Log The event log provides a history of printer errors. Identical errors in consecutive positions in the event log. Up to DIAGNOSTICS. Press Back to...
Service Manual
Page 241
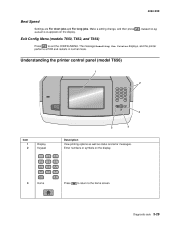
... printer control panel (model T656) Item 1 2 Display Keypad 1 2 3 ABC DEF 4 5 6 GHI JKL MNO 7 8 9 PQRS TUV WXYZ * 0 # Description View printing options as well as status and error messages. Make a setting change, and then press selection appears on the display. 3 Home Press to return to exit the CONFIG MENU. Submitting Exit Config Menu (models...
... printer control panel (model T656) Item 1 2 Display Keypad 1 2 3 ABC DEF 4 5 6 GHI JKL MNO 7 8 9 PQRS TUV WXYZ * 0 # Description View printing options as well as status and error messages. Make a setting change, and then press selection appears on the display. 3 Home Press to return to exit the CONFIG MENU. Submitting Exit Config Menu (models...
Service Manual
Page 259
...Event Log, Development Menu, and Scanner Tests. The report prints the Diag Menu to Diagnostics Menu. Increasing this value may be repetitions. Identical errors in consecutive positions in the log are stored in the event log. Touch to display additional information, if available. 2. It contains the ...Display Log The event log provides a history of values is 0 to 255, and the default value is discarded. All 2xx and 9xx error messages are entered, so there may reduce curl of some printed media and eliminate some output bin stacking problems. However, increasing this value also...
...Event Log, Development Menu, and Scanner Tests. The report prints the Diag Menu to Diagnostics Menu. Increasing this value may be repetitions. Identical errors in consecutive positions in the log are stored in the event log. Touch to display additional information, if available. 2. It contains the ...Display Log The event log provides a history of values is 0 to 255, and the default value is discarded. All 2xx and 9xx error messages are entered, so there may reduce curl of some printed media and eliminate some output bin stacking problems. However, increasing this value also...


