Quick Reference
Page 8
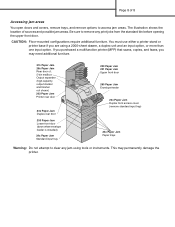
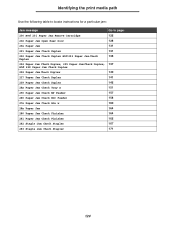
... output stacker and finisher not shown) 202 Paper Jam Printer rear door 23x Paper Jam Duplex rear door 250 Paper Jam Lower front door (down when envelope feeder is installed) 24x Paper Jam Standard input tray 200 Paper Jam 201 Paper Jam Upper front door 260 Paper Jam Envelope feeder 23x Paper Jam Duplex front access cover (remove standard input tray) 24x Paper Jam Paper trays Warning: Do not attempt...
... output stacker and finisher not shown) 202 Paper Jam Printer rear door 23x Paper Jam Duplex rear door 250 Paper Jam Lower front door (down when envelope feeder is installed) 24x Paper Jam Standard input tray 200 Paper Jam 201 Paper Jam Upper front door 260 Paper Jam Envelope feeder 23x Paper Jam Duplex front access cover (remove standard input tray) 24x Paper Jam Paper trays Warning: Do not attempt...
User's Reference
Page 5
... 201 Paper Jam Remove Cartridge 125 202 Paper Jam Open Rear Door 128 Before reaching the standard output bin 129 While exiting to the standard output bin 130 23x Paper Jam ...131 231 Paper Jam Check Duplex 131 232 Paper Jam Check Duplex and 233 Paper Jam Check Duplex 135 234 Paper Jam Check Duplex, 235 Paper Jam Check Duplex, and 238 Paper Jam Check Duplex 137 236 Paper Jam Check...
... 201 Paper Jam Remove Cartridge 125 202 Paper Jam Open Rear Door 128 Before reaching the standard output bin 129 While exiting to the standard output bin 130 23x Paper Jam ...131 231 Paper Jam Check Duplex 131 232 Paper Jam Check Duplex and 233 Paper Jam Check Duplex 135 234 Paper Jam Check Duplex, 235 Paper Jam Check Duplex, and 238 Paper Jam Check Duplex 137 236 Paper Jam Check...
User's Reference
Page 122
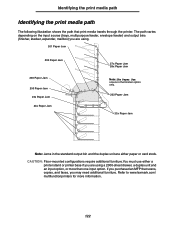
... are using . 201 Paper Jam 200 Paper Jam 260 Paper Jam 250 Paper Jam 23x Paper Jam 24x Paper Jam 27x Paper Jam 28x Paper Jam Note: 28x Paper Jam occurs in the finisher option only. 202 Paper Jam 23x Paper Jam Note: Jams in the standard output bin and the duplex unit are using a 2000-sheet drawer, a duplex unit and an input option, or more information. 122 Refer to www.lexmark.com/ multifunctionprinters for...
... are using . 201 Paper Jam 200 Paper Jam 260 Paper Jam 250 Paper Jam 23x Paper Jam 24x Paper Jam 27x Paper Jam 28x Paper Jam Note: 28x Paper Jam occurs in the finisher option only. 202 Paper Jam 23x Paper Jam Note: Jams in the standard output bin and the duplex unit are using a 2000-sheet drawer, a duplex unit and an input option, or more information. 122 Refer to www.lexmark.com/ multifunctionprinters for...
User's Reference
Page 124
... 201 Paper Jam Remove Cartridge 125 202 Paper Jam Open Rear Door 128 23x Paper Jam 131 231 Paper Jam Check Duplex 131 232 Paper Jam Check Duplex and 233 Paper Jam Check 135 Duplex 234 Paper Jam Check Duplex, 235 Paper Jam Check Duplex, 137 and 238 Paper Jam Check Duplex 236 Paper Jam Check Duplex 140 237 Paper Jam Check Duplex 141 239 Paper Jam Check Duplex 145 24x Paper Jam Check Tray x 151 250 Paper Jam...
... 201 Paper Jam Remove Cartridge 125 202 Paper Jam Open Rear Door 128 23x Paper Jam 131 231 Paper Jam Check Duplex 131 232 Paper Jam Check Duplex and 233 Paper Jam Check 135 Duplex 234 Paper Jam Check Duplex, 235 Paper Jam Check Duplex, 137 and 238 Paper Jam Check Duplex 236 Paper Jam Check Duplex 140 237 Paper Jam Check Duplex 141 239 Paper Jam Check Duplex 145 24x Paper Jam Check Tray x 151 250 Paper Jam...
User's Reference
Page 128
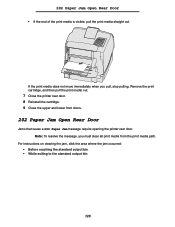
...printer rear door. 8 Reinstall the cartridge. 9 Close the upper and lower front doors. 202 Paper Jam Open Rear Door Jams that cause a 202 Paper Jam message require opening the printer rear door. For instructions on clearing the jam, click the area where the jam occurred: • Before reaching the standard output bin • While exiting to the ...standard output bin 128 202 Paper Jam Open Rear Door • If the end of the print media is visible, pull the print media straight out. Note: To resolve the message...
...printer rear door. 8 Reinstall the cartridge. 9 Close the upper and lower front doors. 202 Paper Jam Open Rear Door Jams that cause a 202 Paper Jam message require opening the printer rear door. For instructions on clearing the jam, click the area where the jam occurred: • Before reaching the standard output bin • While exiting to the ...standard output bin 128 202 Paper Jam Open Rear Door • If the end of the print media is visible, pull the print media straight out. Note: To resolve the message...
User's Reference
Page 129
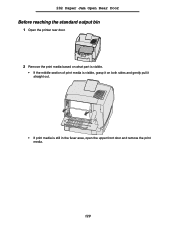
202 Paper Jam Open Rear Door Before reaching the standard output bin 1 Open the printer rear door. 2 Remove the print media based on what part is visible. • If the middle section of print media is visible, grasp it on both sides and gently pull it straight out. • If print media is still in the fuser area, open the upper front door and remove the print media. 129
202 Paper Jam Open Rear Door Before reaching the standard output bin 1 Open the printer rear door. 2 Remove the print media based on what part is visible. • If the middle section of print media is visible, grasp it on both sides and gently pull it straight out. • If print media is still in the fuser area, open the upper front door and remove the print media. 129

User's Reference
Page 130
202 Paper Jam Open Rear Door • If the end of the print media is visible, pull the print media straight out. Remove the print cartridge, and then pull the print media out. 3 Close the printer rear door. While exiting to the standard output bin Pull the print media straight out. 130 If the print media does not move immediately when you pull, stop pulling.
202 Paper Jam Open Rear Door • If the end of the print media is visible, pull the print media straight out. Remove the print cartridge, and then pull the print media out. 3 Close the printer rear door. While exiting to the standard output bin Pull the print media straight out. 130 If the print media does not move immediately when you pull, stop pulling.
User's Reference
Page 282
... Paper Jam Remove Cartridge 125 201 Paper Jam Remove Cartridge 125 202 Paper Jam Open Rear Door 128 231 Paper Jam Check Duplex 131 232 Paper Jam Check Duplex 135 233 Paper Jam Check Duplex 135 234 Paper Jam Check Duplex 137 235 Paper Jam Check Duplex 137 jam messages (continued) 236 Paper Jam Check Duplex 140 237 Paper Jam Check Duplex 141 238 Paper Jam Check Duplex 137 239 Paper Jam Check Duplex 145 24x Paper Jams...
... Paper Jam Remove Cartridge 125 201 Paper Jam Remove Cartridge 125 202 Paper Jam Open Rear Door 128 231 Paper Jam Check Duplex 131 232 Paper Jam Check Duplex 135 233 Paper Jam Check Duplex 135 234 Paper Jam Check Duplex 137 235 Paper Jam Check Duplex 137 jam messages (continued) 236 Paper Jam Check Duplex 140 237 Paper Jam Check Duplex 141 238 Paper Jam Check Duplex 137 239 Paper Jam Check Duplex 145 24x Paper Jams...
Technical Reference
Page 184
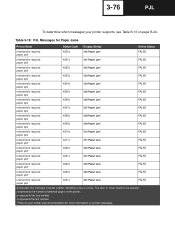
...: paper jam 4200x 200 Paper Jam FALSE Intervention required: paper jam 4201x 201 Paper Jam FALSE Intervention required: paper jam 4202x 202 Paper Jam FALSE Intervention required: paper jam 4203x 203 Paper Jam FALSE Intervention required: paper jam 4204x 204 Paper Jam FALSE Intervention required: paper jam 4205x 205 Paper Jam FALSE Intervention required: paper jam 4206x 206 Paper Jam FALSE Intervention required: paper jam 4207x 207 Paper Jam FALSE Intervention required: paper jam 4208x 208 Paper Jam FALSE Intervention required: paper jam 4209x 209 Paper Jam...
...: paper jam 4200x 200 Paper Jam FALSE Intervention required: paper jam 4201x 201 Paper Jam FALSE Intervention required: paper jam 4202x 202 Paper Jam FALSE Intervention required: paper jam 4203x 203 Paper Jam FALSE Intervention required: paper jam 4204x 204 Paper Jam FALSE Intervention required: paper jam 4205x 205 Paper Jam FALSE Intervention required: paper jam 4206x 206 Paper Jam FALSE Intervention required: paper jam 4207x 207 Paper Jam FALSE Intervention required: paper jam 4208x 208 Paper Jam FALSE Intervention required: paper jam 4209x 209 Paper Jam...
Technical Reference
Page 451
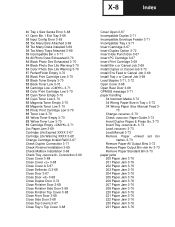
... Insert Tray 3-73 Load 3-73 Load Manual 3-73 Remove Paper 3-73 Remove Paper All Output Bins 3-73 Remove Paper Output Bin 3-73 Remove Paper Standard Bin 3-73 paper jams 200 Paper Jam 3-76 201 Paper Jam 3-76 202 Paper Jam 3-76 203 Paper Jam 3-76 204 Paper Jam 3-76 205 Paper Jam 3-76 206 Paper Jam 3-76 207 Paper Jam 3-76 208 Paper Jam 3-76 220 Paper Jam 3-76 221 Paper Jam 3-76 222 Paper Jam 3-76 230 Paper Jam 3-76 231 Paper Jam 3-76
... Insert Tray 3-73 Load 3-73 Load Manual 3-73 Remove Paper 3-73 Remove Paper All Output Bins 3-73 Remove Paper Output Bin 3-73 Remove Paper Standard Bin 3-73 paper jams 200 Paper Jam 3-76 201 Paper Jam 3-76 202 Paper Jam 3-76 203 Paper Jam 3-76 204 Paper Jam 3-76 205 Paper Jam 3-76 206 Paper Jam 3-76 207 Paper Jam 3-76 208 Paper Jam 3-76 220 Paper Jam 3-76 221 Paper Jam 3-76 222 Paper Jam 3-76 230 Paper Jam 3-76 231 Paper Jam 3-76
Service Manual
Page 43
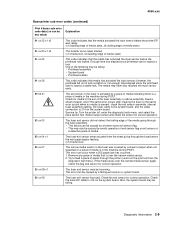
...sensor for correct operation. however, the printhead fell out of lock condition or not enough time elapsed since printhead start to feed a piece of paper through the fuser before the next page begins feeding. (x1=media size) The narrow media sensor in the fuser was ready. (x1=leading ... the machine during POST. The fuser exit sensor never actuated from the sheet going through the fuser assembly. • This failure can occur when a 202 paper jam has occurred. 1. 4060-xxx Base printer sub error codes (continued) First 6 bytes sub error code data (xx can be any piece of media ...
...sensor for correct operation. however, the printhead fell out of lock condition or not enough time elapsed since printhead start to feed a piece of paper through the fuser before the next page begins feeding. (x1=media size) The narrow media sensor in the fuser was ready. (x1=leading ... the machine during POST. The fuser exit sensor never actuated from the sheet going through the fuser assembly. • This failure can occur when a 202 paper jam has occurred. 1. 4060-xxx Base printer sub error codes (continued) First 6 bytes sub error code data (xx can be any piece of media ...
Service Manual
Page 64
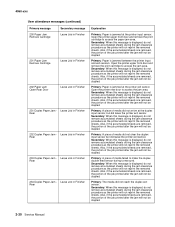
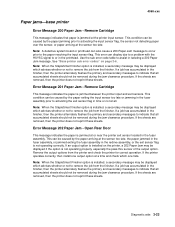
... (continued) Primary message 200 Paper Jam Remove Cartridge Secondary message Leave Job in Finisher 201 Paper Jam Remove Cartridge Leave Job in Finisher 202 Paper Jam Open Rear Door Leave Job in Finisher Rear 232 Duplex Paper Jam - Open the printer upper front door and remove the print cartridge to access the jam area. Primary: Paper is displayed, do not remove...
... (continued) Primary message 200 Paper Jam Remove Cartridge Secondary message Leave Job in Finisher 201 Paper Jam Remove Cartridge Leave Job in Finisher 202 Paper Jam Open Rear Door Leave Job in Finisher Rear 232 Duplex Paper Jam - Open the printer upper front door and remove the print cartridge to access the jam area. Primary: Paper is displayed, do not remove...
Service Manual
Page 97
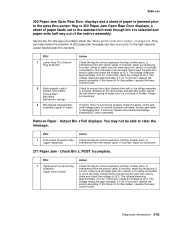
... correct operation and wear, broken gear teeth, or damaged parts. A 202 paper jam message can help isolate the problem. 4060-xxx 202 Paper Jam Open Rear Door displays and a sheet of paper is jammed prior to the pass thru sensor flag or 202 Paper Jam Open Rear Door displays, a sheet of paper feeds out to the high-capacity output stacker pass thru...
... correct operation and wear, broken gear teeth, or damaged parts. A 202 paper jam message can help isolate the problem. 4060-xxx 202 Paper Jam Open Rear Door displays and a sheet of paper is jammed prior to the pass thru sensor flag or 202 Paper Jam Open Rear Door displays, a sheet of paper feeds out to the high-capacity output stacker pass thru...
Service Manual
Page 107
...check the voltages on the output bin autoconnect located on the top left and right side covers. They can help isolate the problem. 202 Paper Jam messages can also occur prior to make sure it is correctly installed on the control board to the output expander pass thru sensor. ...belt drive Pulley drive belt Idler pulley belt tension spring 2 Mechanical linkage DC motor assembly Action Check to the pass thru sensor flag. 202 Paper Jam Open Rear Door message displays. If the output expander is installed, check each one or more than a single output expander option is ...
...check the voltages on the output bin autoconnect located on the top left and right side covers. They can help isolate the problem. 202 Paper Jam messages can also occur prior to make sure it is correctly installed on the control board to the output expander pass thru sensor. ...belt drive Pulley drive belt Idler pulley belt tension spring 2 Mechanical linkage DC motor assembly Action Check to the pass thru sensor flag. 202 Paper Jam Open Rear Door message displays. If the output expander is installed, check each one or more than a single output expander option is ...
Service Manual
Page 150
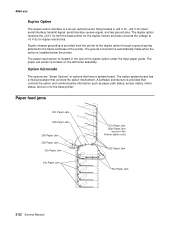
...microcode The options are "Smart Options" or options that controls the option mechanism. Duplex chassis grounding is located in the finisher option only) 202 Paper Jam 23x Paper Jam 3-22 Service Manual A software architecture is a six pin autoconnector that provides a +24 V dc, +24 V dc return, serial ...option through a ground spring attached to the frame and base of the duplex option under the input paper guide. Paper feed jams 201 Paper Jam 200 Paper Jam 260 Paper Jam 250 Paper Jam 23x Paper Jam 24x Paper Jam 27x Paper Jam (28x Paper Jam occurs in the rear of the printer.
...microcode The options are "Smart Options" or options that controls the option mechanism. Duplex chassis grounding is located in the finisher option only) 202 Paper Jam 23x Paper Jam 3-22 Service Manual A software architecture is a six pin autoconnector that provides a +24 V dc, +24 V dc return, serial ...option through a ground spring attached to the frame and base of the duplex option under the input paper guide. Paper feed jams 201 Paper Jam 200 Paper Jam 260 Paper Jam 250 Paper Jam 23x Paper Jam 24x Paper Jam 27x Paper Jam (28x Paper Jam occurs in the rear of the printer.
Service Manual
Page 151
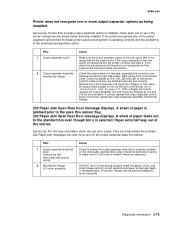
... secondary message may be caused by the paper jamming prior to activating the input sensor flag, the sensor not detecting paper over the sensor, or paper arriving at the sensor too late. See "Base printer sub error codes" on the printer, a 202 Paper Jam may be displayed which advises whether or ...or near the printer exit sensor located in the printhead. This error can also cause a 200 Paper Jam message to occur prior to remove the job from the finisher. Error Message 202 Paper Jam - If a job has accumulated in the finisher, then the printer alternately flashes the primary and...
... secondary message may be caused by the paper jamming prior to activating the input sensor flag, the sensor not detecting paper over the sensor, or paper arriving at the sensor too late. See "Base printer sub error codes" on the printer, a 202 Paper Jam may be displayed which advises whether or ...or near the printer exit sensor located in the printhead. This error can also cause a 200 Paper Jam message to occur prior to remove the job from the finisher. Error Message 202 Paper Jam - If a job has accumulated in the finisher, then the printer alternately flashes the primary and...
Service Manual
Page 325
... 2-64 260 Paper Jam - Check Finisher 2-32 282 Staple Jam - Check Stapler 2-32 283 Staple Jam - Remove Cartridge 2-30 202 Paper Jam - Front 2-31 238 Duplex Paper Jam 2-31 239 Duplex Paper Jam 2-31 24x Paper Jam - Index Numerics 1565 Emul Error Load Emul Option 2-32 200 Paper Jam - Front 2-31 237 Duplex Paper Jam - Check Envelope Feeder 2-31 27x Paper Jam - Open Rear Door 2-30 231 Duplex Paper Jam - Remove...
... 2-64 260 Paper Jam - Check Finisher 2-32 282 Staple Jam - Check Stapler 2-32 283 Staple Jam - Remove Cartridge 2-30 202 Paper Jam - Front 2-31 238 Duplex Paper Jam 2-31 239 Duplex Paper Jam 2-31 24x Paper Jam - Index Numerics 1565 Emul Error Load Emul Option 2-32 200 Paper Jam - Front 2-31 237 Duplex Paper Jam - Check Envelope Feeder 2-31 27x Paper Jam - Open Rear Door 2-30 231 Duplex Paper Jam - Remove...


