Setup Guide
Page 6
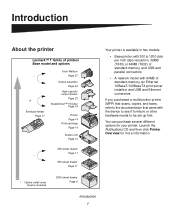
.... Launch the Publications CD and then click Printer Overview for your printer. Introduction About the printer Lexmark™ T family of printers Base model and options * or Envelope feeder Page 17 5-bin ...24 High-capacity output stacker Page 22 StapleSmart™ Finisher Page 19 Printer Page 14 Print cartridge Page 14 Duplex unit Page 13 250-sheet drawer Page 11 * 500-sheet drawer Page 11...; Base printer, with 300 to 1200 dots per inch (dpi) resolution, 32MB (T630) or 64MB (T632) of standard memory, and USB and parallel connectors • A network model with 64MB of standard memory...
.... Launch the Publications CD and then click Printer Overview for your printer. Introduction About the printer Lexmark™ T family of printers Base model and options * or Envelope feeder Page 17 5-bin ...24 High-capacity output stacker Page 22 StapleSmart™ Finisher Page 19 Printer Page 14 Print cartridge Page 14 Duplex unit Page 13 250-sheet drawer Page 11 * 500-sheet drawer Page 11...; Base printer, with 300 to 1200 dots per inch (dpi) resolution, 32MB (T630) or 64MB (T632) of standard memory, and USB and parallel connectors • A network model with 64MB of standard memory...
Setup Guide
Page 19
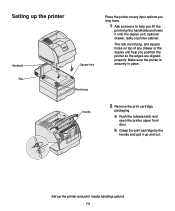
... pull it onto the duplex unit, optional drawer, table or printer cabinet. Tab Round peg Handle 2 Remove the print cartridge packaging. Make sure the printer is securely in place. b Grasp the print cartridge by the handholds and lower it up and out. a Push the release latch and open the printer upper front...
... pull it onto the duplex unit, optional drawer, table or printer cabinet. Tab Round peg Handle 2 Remove the print cartridge packaging. Make sure the printer is securely in place. b Grasp the print cartridge by the handholds and lower it up and out. a Push the release latch and open the printer upper front...
Setup Guide
Page 20
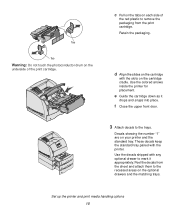
... decals keep the standard tray paired with any optional drawer to mark it drops and snaps into place. d Align the slides on the cartridge with the slots on your printer and the standard tray. Set up the printer and print media handling options 15 Use the colored arrows inside... the printer for placement. Peel the decals from the print cartridge. Decals showing the number "1" are on the cartridge cradle. Retain the packaging. c Pull on the tabs on the underside of the red plastic to remove the packaging from...
... decals keep the standard tray paired with any optional drawer to mark it drops and snaps into place. d Align the slides on the cartridge with the slots on your printer and the standard tray. Set up the printer and print media handling options 15 Use the colored arrows inside... the printer for placement. Peel the decals from the print cartridge. Decals showing the number "1" are on the cartridge cradle. Retain the packaging. c Pull on the tabs on the underside of the red plastic to remove the packaging from...
Setup Guide
Page 24
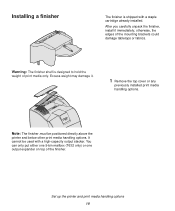
... one 5-bin mailbox (T632 only) or one output expander on top of the mounting brackets could damage tabletops or fabrics. After you carefully unpack the finisher, install it . 1 Remove the top cover or any previously installed print media handling options. Note: The finisher must be used with a staple cartridge already installed. otherwise...
... one 5-bin mailbox (T632 only) or one output expander on top of the mounting brackets could damage tabletops or fabrics. After you carefully unpack the finisher, install it . 1 Remove the top cover or any previously installed print media handling options. Note: The finisher must be used with a staple cartridge already installed. otherwise...
User's Reference
Page 3
... the standard bin 80 Chapter 4: Maintenance 81 Maintaining your printer 81 Determining the status of supplies 81 Conserving supplies ...82 Ordering supplies ...82 Ordering a print cartridge 82 Maintenance kit ...83 3
... the standard bin 80 Chapter 4: Maintenance 81 Maintaining your printer 81 Determining the status of supplies 81 Conserving supplies ...82 Ordering supplies ...82 Ordering a print cartridge 82 Maintenance kit ...83 3
User's Reference
Page 4
...Ordering a label fuser cleaner 85 Ordering staple cartridges 85 Storing supplies ...85 Storing the print cartridge 86 Replacing the print cartridge 86 Removing the used print cartridge 86 Cleaning the printer 87 Installing the new print cartridge 88 Replacing the charge roll 90 Replacing ...roller 94 Replacing the pick rollers 98 Replacing the label fuser cleaner 101 Replacing the staple cartridge 104 Removing a used staple cartridge 105 Installing a new staple cartridge 106 Resetting the maintenance counter 108 Printer maintenance when printing on card stock 108 Printer ...
...Ordering a label fuser cleaner 85 Ordering staple cartridges 85 Storing supplies ...85 Storing the print cartridge 86 Replacing the print cartridge 86 Removing the used print cartridge 86 Cleaning the printer 87 Installing the new print cartridge 88 Replacing the charge roll 90 Replacing ...roller 94 Replacing the pick rollers 98 Replacing the label fuser cleaner 101 Replacing the staple cartridge 104 Removing a used staple cartridge 105 Installing a new staple cartridge 106 Resetting the maintenance counter 108 Printer maintenance when printing on card stock 108 Printer ...
User's Reference
Page 5
Contents Identifying the print media path 122 Accessing jam areas 123 200 and 201 Paper Jam Remove Cartridge 125 202 Paper Jam Open Rear Door 128 Before reaching the standard output bin 129 While exiting to the standard output bin 130 23x Paper ...
Contents Identifying the print media path 122 Accessing jam areas 123 200 and 201 Paper Jam Remove Cartridge 125 202 Paper Jam Open Rear Door 128 Before reaching the standard output bin 129 While exiting to the standard output bin 130 23x Paper ...

User's Reference
Page 18
...warrant uninterrupted or error-free operation of remedies are not cumulative. This limitation of such damages. In no longer covered by a Lexmark warranty, technical support may recover actual damages up to the limit set forth in this Statement of 1) $5,000 or 2) ...Such developer is legally liable. Statement of limited warranty For further explanation of materials supplied to Lexmark. Lexmark offers a variety of other than Lexmark supplies (such as toner cartridges, inkjet cartridges, and ribbons) • Use of extended warranty programs that caused the damages.
...warrant uninterrupted or error-free operation of remedies are not cumulative. This limitation of such damages. In no longer covered by a Lexmark warranty, technical support may recover actual damages up to the limit set forth in this Statement of 1) $5,000 or 2) ...Such developer is legally liable. Statement of limited warranty For further explanation of materials supplied to Lexmark. Lexmark offers a variety of other than Lexmark supplies (such as toner cartridges, inkjet cartridges, and ribbons) • Use of extended warranty programs that caused the damages.

User's Reference
Page 36
... or 500-sheet trays, or the optional 250- or 500-sheet drawers. Partial sheets also contaminate your printer and your cartridge with the printer before purchasing a large quantity. For vinyl labels, you are considering using with adhesive, and could void your printer and...125 in the same source; Adhesive material contaminates your printer and could void your warranty. • If zone coating of the adhesive at www.lexmark.com/publications. We recommend zone coating of the adhesive is preferred, especially when printing bar codes. • Do not use with paper or transparencies...
... or 500-sheet trays, or the optional 250- or 500-sheet drawers. Partial sheets also contaminate your printer and your cartridge with the printer before purchasing a large quantity. For vinyl labels, you are considering using with adhesive, and could void your printer and...125 in the same source; Adhesive material contaminates your printer and could void your warranty. • If zone coating of the adhesive at www.lexmark.com/publications. We recommend zone coating of the adhesive is preferred, especially when printing bar codes. • Do not use with paper or transparencies...
User's Reference
Page 42
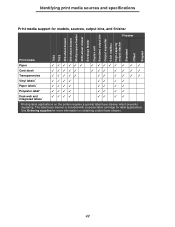
... for more information on the printer requires a special label fuser cleaner which prevents duplexing. The label fuser cleaner is included with a special label cartridge for label applications. T630 T632 250-sheet drawer 500-sheet drawer Multipurpose feeder 2000-sheet drawer Envelope feeder Duplex unit Standard output bin Output expander 5-bin mailbox High...
... for more information on the printer requires a special label fuser cleaner which prevents duplexing. The label fuser cleaner is included with a special label cartridge for label applications. T630 T632 250-sheet drawer 500-sheet drawer Multipurpose feeder 2000-sheet drawer Envelope feeder Duplex unit Standard output bin Output expander 5-bin mailbox High...
User's Reference
Page 81
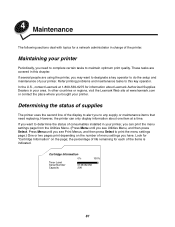
... printer. However, the printer can only display information about Lexmark Authorized Supplies Dealers in your printer, you can print the menu settings page from the Utilities Menu. (Press Menu until you bought your printer. Cartridge Information 0% 100% Toner Level Serial Number Capacity 013535245D 20K... 81 the percentage of the printer. If several people are covered in charge of life remaining for "Cartridge Information" on the number of menu settings you to any supply or maintenance items that need to complete certain tasks to do...
... printer. However, the printer can only display information about Lexmark Authorized Supplies Dealers in your printer, you can print the menu settings page from the Utilities Menu. (Press Menu until you bought your printer. Cartridge Information 0% 100% Toner Level Serial Number Capacity 013535245D 20K... 81 the percentage of the printer. If several people are covered in charge of life remaining for "Cartridge Information" on the number of menu settings you to any supply or maintenance items that need to complete certain tasks to do...
User's Reference
Page 82
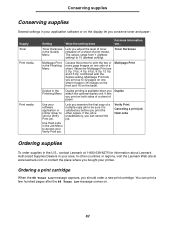
...available when you bought your printer. Verify Print Canceling a print job Held Jobs Ordering supplies To order supplies in the U.S., contact Lexmark at www.lexmark.com or contact the place where you Duplex attach the optional duplex unit. Conserving supplies Conserving supplies Several settings in your area.... Up, 3 Up, 4 Up, 6 Up, 9 Up, 12 Up, and 16 Up. If the job is unsatisfactory, you should order a new print cartridge. Ordering a print cartridge When the 88 Toner Low message appears, you can print a few hundred pages after the 88 Toner Low message comes on one side of...
...available when you bought your printer. Verify Print Canceling a print job Held Jobs Ordering supplies To order supplies in the U.S., contact Lexmark at www.lexmark.com or contact the place where you Duplex attach the optional duplex unit. Conserving supplies Conserving supplies Several settings in your area.... Up, 3 Up, 4 Up, 6 Up, 9 Up, 12 Up, and 16 Up. If the job is unsatisfactory, you should order a new print cartridge. Ordering a print cartridge When the 88 Toner Low message appears, you can print a few hundred pages after the 88 Toner Low message comes on one side of...
User's Reference
Page 83
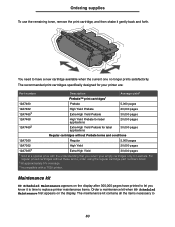
... Yield Prebate for label applications Extra High Yield Prebate for label applications 20,000 pages 30,000 pages Regular cartridges without these terms, order using the regular cartridge part numbers listed. 2 At approximately 5% coverage. 3 Incompatible with the understanding that you know it gently ...back and forth. The maintenance kit contains all the items necessary to Lexmark. Ordering supplies To use the remaining toner, remove the print cartridge, and then shake it is time to have printed to let you return your empty...
... Yield Prebate for label applications Extra High Yield Prebate for label applications 20,000 pages 30,000 pages Regular cartridges without these terms, order using the regular cartridge part numbers listed. 2 At approximately 5% coverage. 3 Incompatible with the understanding that you know it gently ...back and forth. The maintenance kit contains all the items necessary to Lexmark. Ordering supplies To use the remaining toner, remove the print cartridge, and then shake it is time to have printed to let you return your empty...
User's Reference
Page 85
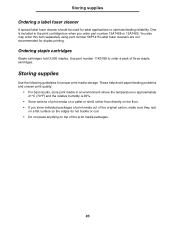
...also may order this item separately using part number 56P1415.Label fuser cleaners are not recommended for proper print media storage. Ordering staple cartridges Staple cartridges hold 3,000 staples. Use part number 11K3188 to optimize feeding reliability. Storing supplies Ordering a label fuser cleaner A special label fuser... printing. These help avoid paper feeding problems and uneven print quality: • For best results, store print media in the print cartridge box when you store individual packages of print media out of the original carton, make sure they rest on a flat surface so...
...also may order this item separately using part number 56P1415.Label fuser cleaners are not recommended for proper print media storage. Ordering staple cartridges Staple cartridges hold 3,000 staples. Use part number 11K3188 to optimize feeding reliability. Storing supplies Ordering a label fuser cleaner A special label fuser... printing. These help avoid paper feeding problems and uneven print quality: • For best results, store print media in the print cartridge box when you store individual packages of print media out of the original carton, make sure they rest on a flat surface so...
User's Reference
Page 86
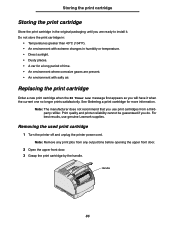
... and printer reliability cannot be guaranteed if you use genuine Lexmark supplies. For best results, use print cartridges from any print jobs from a thirdparty refiller. Storing the print cartridge Storing the print cartridge Store the print cartridge in the original packaging until you are present. •... to install it when the current one no longer prints satisfactorily. Removing the used print cartridge 1 Turn the printer off and unplug the printer power cord. Do not store the print cartridge in humidity or temperature. • Direct sunlight. • Dusty places. • ...
... and printer reliability cannot be guaranteed if you use genuine Lexmark supplies. For best results, use print cartridges from any print jobs from a thirdparty refiller. Storing the print cartridge Storing the print cartridge Store the print cartridge in the original packaging until you are present. •... to install it when the current one no longer prints satisfactorily. Removing the used print cartridge 1 Turn the printer off and unplug the printer power cord. Do not store the print cartridge in humidity or temperature. • Direct sunlight. • Dusty places. • ...
User's Reference
Page 87
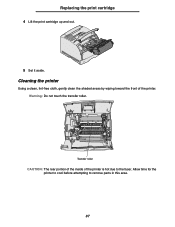
Allow time for the printer to cool before attempting to the fuser. Replacing the print cartridge 4 Lift the print cartridge up and out. 5 Set it aside. Cleaning the printer Using a clean, lint-free cloth, gently clean the shaded areas by wiping toward the front of the printer is hot due to remove parts in this area. 87 Transfer roller CAUTION: The rear portion of the inside of the printer. Warning: Do not touch the transfer roller.
Allow time for the printer to cool before attempting to the fuser. Replacing the print cartridge 4 Lift the print cartridge up and out. 5 Set it aside. Cleaning the printer Using a clean, lint-free cloth, gently clean the shaded areas by wiping toward the front of the printer is hot due to remove parts in this area. 87 Transfer roller CAUTION: The rear portion of the inside of the printer. Warning: Do not touch the transfer roller.
User's Reference
Page 88
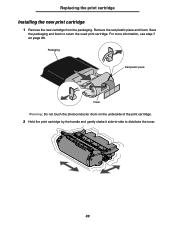
Packaging Red plastic piece Foam Warning: Do not touch the photoconductor drum on page 89. Remove the red plastic piece and foam. For more information, see step 7 on the underside of the print cartridge. 2 Hold the print cartridge by the handle and gently shake it side-to-side to return the used print cartridge. Replacing the print cartridge Installing the new print cartridge 1 Remove the new cartridge from the packaging. Save the packaging and foam to distribute the toner. 88
Packaging Red plastic piece Foam Warning: Do not touch the photoconductor drum on page 89. Remove the red plastic piece and foam. For more information, see step 7 on the underside of the print cartridge. 2 Hold the print cartridge by the handle and gently shake it side-to-side to return the used print cartridge. Replacing the print cartridge Installing the new print cartridge 1 Remove the new cartridge from the packaging. Save the packaging and foam to distribute the toner. 88

User's Reference
Page 89
... front door. 6 Turn the printer on. 7 Follow the instructions on each side of the print cartridge with the printer. For best results, use Lexmark supplies with the slots on the new print cartridge box to recycle the used print cartridge, you contribute to a worldwide recycling effort at no cost to you. Note: The print...
... front door. 6 Turn the printer on. 7 Follow the instructions on each side of the print cartridge with the printer. For best results, use Lexmark supplies with the slots on the new print cartridge box to recycle the used print cartridge, you contribute to a worldwide recycling effort at no cost to you. Note: The print...
User's Reference
Page 90
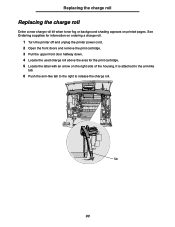
... supplies for information on ordering a charge roll. 1 Turn the printer off and unplug the printer power cord. 2 Open the front doors and remove the print cartridge. 3 Pull the upper front door halfway down. 4 Locate the used charge roll above the area for the print...
... supplies for information on ordering a charge roll. 1 Turn the printer off and unplug the printer power cord. 2 Open the front doors and remove the print cartridge. 3 Pull the upper front door halfway down. 4 Locate the used charge roll above the area for the print...
User's Reference
Page 93
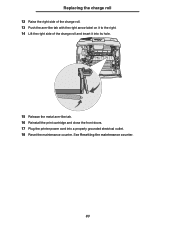
See Resetting the maintenance counter. 93 Replacing the charge roll 12 Raise the right side of the charge roll. 13 Push the arm-like tab with the right arrow label on it to the right. 14 Lift the right side of the charge roll and insert it into its hole. 15 Release the metal arm-like tab. 16 Reinstall the print cartridge and close the front doors. 17 Plug the printer power cord into a properly grounded electrical outlet. 18 Reset the maintenance counter.
See Resetting the maintenance counter. 93 Replacing the charge roll 12 Raise the right side of the charge roll. 13 Push the arm-like tab with the right arrow label on it to the right. 14 Lift the right side of the charge roll and insert it into its hole. 15 Release the metal arm-like tab. 16 Reinstall the print cartridge and close the front doors. 17 Plug the printer power cord into a properly grounded electrical outlet. 18 Reset the maintenance counter.


