Setup Solutions
Page 4
... Solutions booklet, see the Mac Help: 1 From the Finder desktop, double-click the Lexmark 350 Series folder. 2 Double-click the printer Help icon. If you install the printer software, the User's Guide printer and other information such as: will be installed. • Using the software (on Windows...how to solve printer setup problems. Note: These documents do not ship with photos If the link to the User's Guide is the letter of the User's Guide appears on your printer) • Maintaining the printer The installation screen appears. Note: If your printer supports Macintosh operating...
... Solutions booklet, see the Mac Help: 1 From the Finder desktop, double-click the Lexmark 350 Series folder. 2 Double-click the printer Help icon. If you install the printer software, the User's Guide printer and other information such as: will be installed. • Using the software (on Windows...how to solve printer setup problems. Note: These documents do not ship with photos If the link to the User's Guide is the letter of the User's Guide appears on your printer) • Maintaining the printer The installation screen appears. Note: If your printer supports Macintosh operating...
Setup Solutions
Page 6
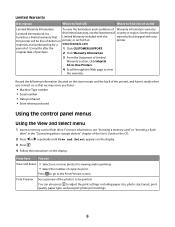
... • Store where purchased Using the control panel menus Using the View and Select menu 1 Insert a memory card or flash drive. For more photos for a www.lexmark.com. this printer will be printed. Limited Warranty Description Where to find (US) Where to the Print Preview screen. materials and workmanship for viewing and/or...
... • Store where purchased Using the control panel menus Using the View and Select menu 1 Insert a memory card or flash drive. For more photos for a www.lexmark.com. this printer will be printed. Limited Warranty Description Where to find (US) Where to the Print Preview screen. materials and workmanship for viewing and/or...
Setup Solutions
Page 7
... the total number of the User's Guide on the CD. 2 Press or repeatedly until Print Photos appears on the printer display. Using the Slideshow menu The Slideshow menu lets you view the images stored on your memory card. This option appears only when there is ... Date Print photos taken within certain dates. Using the Print Photos menu This menu lets you want to transfer photos to a USB flash drive, insert the drive. 5 Press or to select either USB Flash Drive or Computer (if the printer is a valid DPOF file on a memory card or flash drive. 1 Insert a memory card or...
... the total number of the User's Guide on the CD. 2 Press or repeatedly until Print Photos appears on the printer display. Using the Slideshow menu The Slideshow menu lets you view the images stored on your memory card. This option appears only when there is ... Date Print photos taken within certain dates. Using the Print Photos menu This menu lets you want to transfer photos to a USB flash drive, insert the drive. 5 Press or to select either USB Flash Drive or Computer (if the printer is a valid DPOF file on a memory card or flash drive. 1 Insert a memory card or...
Setup Solutions
Page 8
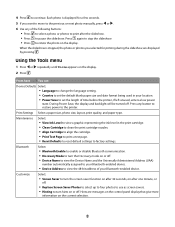
...Select: • View Ink Level to rotate the photo on the current selection. 8 Customize Select: • Screen Saver to the printer. Print Settings Select a paper size, photo size, layout, print quality, and paper type. Each photo is stopped, the photo or photos you selected for a few seconds. 5 If ...you want to move to the previous or next photo manually, press or . 6 Use any...
...Select: • View Ink Level to rotate the photo on the current selection. 8 Customize Select: • Screen Saver to the printer. Print Settings Select a paper size, photo size, layout, print quality, and paper type. Each photo is stopped, the photo or photos you selected for a few seconds. 5 If ...you want to move to the previous or next photo manually, press or . 6 Use any...
Setup Solutions
Page 9
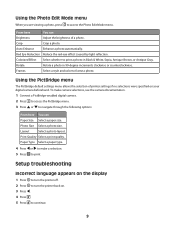
... beforehand. Setup troubleshooting Incorrect language appears on the display 1 Press to turn the printer off. 2 Press to continue. 9 To make a selection. 5 Press to print a photo in 90-degree increments clockwise or counterclockwise. Print Quality Select a print quality. Layout Select a photo layout. Colorized Effect Select whether to print. Using the PictBridge menu The PictBridge...
... beforehand. Setup troubleshooting Incorrect language appears on the display 1 Press to turn the printer off. 2 Press to continue. 9 To make a selection. 5 Press to print a photo in 90-degree increments clockwise or counterclockwise. Print Quality Select a print quality. Layout Select a photo layout. Colorized Effect Select whether to print. Using the PictBridge menu The PictBridge...
Setup Solutions
Page 11
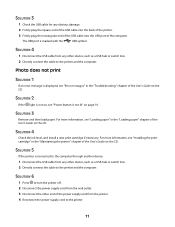
Photo does not print SOLUTION 1 If an error message is connected to the computer through another device: 1 Disconnect the USB cable from any other end of the power supply cord from the printer. 4 Reconnect the power supply cord to the printer. 11 For more information, see "Error messages" in the ... the USB cable from the wall outlet. 3 Disconnect the other device, such as a USB hub or switch box. 2 Directly connect the cable to the printer and the computer. SOLUTION 4 Check the ink level, and install a new print cartridge if necessary. SOLUTION 3 1 Check the USB cable for any other ...
Photo does not print SOLUTION 1 If an error message is connected to the computer through another device: 1 Disconnect the USB cable from any other end of the power supply cord from the printer. 4 Reconnect the power supply cord to the printer. 11 For more information, see "Error messages" in the ... the USB cable from the wall outlet. 3 Disconnect the other device, such as a USB hub or switch box. 2 Directly connect the cable to the printer and the computer. SOLUTION 4 Check the ink level, and install a new print cartridge if necessary. SOLUTION 3 1 Check the USB cable for any other ...
Getting Started
Page 3
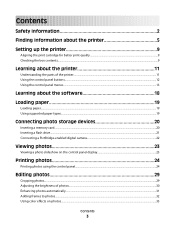
... 9 Checking the box contents...9 Learning about the printer 11 Understanding the parts of the printer...11 Using the control panel buttons...12 Using the control panel menus...13 Learning about the software 18 Loading paper 19 Loading paper...19 Using supported paper types...19 Connecting photo storage devices 20 Inserting a memory card...20...
... 9 Checking the box contents...9 Learning about the printer 11 Understanding the parts of the printer...11 Using the control panel buttons...12 Using the control panel menus...13 Learning about the software 18 Loading paper 19 Loading paper...19 Using supported paper types...19 Connecting photo storage devices 20 Inserting a memory card...20...

Getting Started
Page 6
...From the Finder desktop, double-click the Lexmark You can also find this document on To access the Lexmark Solution Center: your printer 1 Click Start Œ Programs or All Programs Œ Lexmark connects to a computer. 350 Series. 2 Select Lexmark Solution Center. It installs with the ... Click Start Œ Programs or All Programs Œ Lexmark • Loading paper 350 Series. • Printing 2 Click User's Guide. • Working with photos If the link to find The Help gives you install the printer software, the User's Guide printer and other software, if your CD.
...From the Finder desktop, double-click the Lexmark You can also find this document on To access the Lexmark Solution Center: your printer 1 Click Start Œ Programs or All Programs Œ Lexmark connects to a computer. 350 Series. 2 Select Lexmark Solution Center. It installs with the ... Click Start Œ Programs or All Programs Œ Lexmark • Loading paper 350 Series. • Printing 2 Click User's Guide. • Working with photos If the link to find The Help gives you install the printer software, the User's Guide printer and other software, if your CD.
Getting Started
Page 9
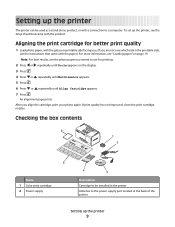
...improved, clean the print cartridge nozzles. To set up the printer, see the Setup sheet that came with the paper.) For more information, see the instructions that came with the product. Note: For best results, use the photo paper you intend to use for better print quality 1 ...printable side facing you. (If you align the cartridge, print your photo again. Aligning the print cartridge for printing. 2 Press or repeatedly until Align Cartridge appears. 7 Press . Setting up the printer The printer can be installed in the printer Attaches to a computer. After you are not sure which side ...
...improved, clean the print cartridge nozzles. To set up the printer, see the Setup sheet that came with the paper.) For more information, see the instructions that came with the product. Note: For best results, use the photo paper you intend to use for better print quality 1 ...printable side facing you. (If you align the cartridge, print your photo again. Aligning the print cartridge for printing. 2 Press or repeatedly until Align Cartridge appears. 7 Press . Setting up the printer The printer can be installed in the printer Attaches to a computer. After you are not sure which side ...
Getting Started
Page 10
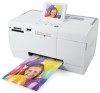
Name Description 3 Installation software CD • Installation software for the printer • Help • User's Guide in electronic format 4 Getting Started or Setup Solutions booklet Printed booklet that serves as a guide Note: The complete User's Guide can be found on the installation software CD that shipped with the printer. 5 Setup Instructions sheet Instructions on setting up printer hardware and software, and information on setup troubleshooting 6 4 x 6 in. (10 x 15 cm) photo paper Paper for the printer Note: USB cable sold separately Setting up the printer 10
Name Description 3 Installation software CD • Installation software for the printer • Help • User's Guide in electronic format 4 Getting Started or Setup Solutions booklet Printed booklet that serves as a guide Note: The complete User's Guide can be found on the installation software CD that shipped with the printer. 5 Setup Instructions sheet Instructions on setting up printer hardware and software, and information on setup troubleshooting 6 4 x 6 in. (10 x 15 cm) photo paper Paper for the printer Note: USB cable sold separately Setting up the printer 10
Getting Started
Page 11
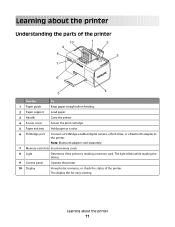
...memory cards. 8 Light Determine if the printer is reading a memory card. Learning about the printer 11 The light blinks while reading the device. 9 Control panel Operate the printer. 10 Display View photos or menus, or check the status of the printer Use the To 1 Paper guide Keep paper... straight when feeding. 2 Paper support Load paper. 3 Handle Carry the printer. 4 Access cover Access the print cartridge. 5...
...memory cards. 8 Light Determine if the printer is reading a memory card. Learning about the printer 11 The light blinks while reading the device. 9 Control panel Operate the printer. 10 Display View photos or menus, or check the status of the printer Use the To 1 Paper guide Keep paper... straight when feeding. 2 Paper support Load paper. 3 Handle Carry the printer. 4 Access cover Access the print cartridge. 5...
Getting Started
Page 12
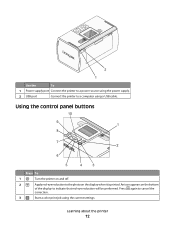
An icon appears on the display when it is printed. Learning about the printer 12 Use the To 1 Power supply port Connect the printer to a power source using the power supply. 2 USB port Connect the printer to a computer using the current settings. Press again to indicate that red-eye reduction will be performed. Using the control panel buttons Press To 1 Turn the printer on and off. 2 Apply red-eye reduction to the photo on the bottom of the display to cancel the correction. 3 Start a color print job using a USB cable.
An icon appears on the display when it is printed. Learning about the printer 12 Use the To 1 Power supply port Connect the printer to a power source using the power supply. 2 USB port Connect the printer to a computer using the current settings. Press again to indicate that red-eye reduction will be performed. Using the control panel buttons Press To 1 Turn the printer on and off. 2 Apply red-eye reduction to the photo on the bottom of the display to cancel the correction. 3 Start a color print job using a USB cable.
Getting Started
Page 13
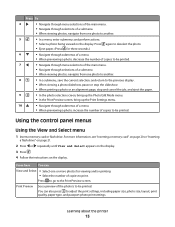
From here You can also press to the Print Preview screen. Learning about the printer 13 For more photos for viewing and/or printing • Select the number of copies to be printed. Using the control panel menus Using the View and Select menu 1 ... Mode menu. • In the Print Preview screen, bring up the Print Settings menu. 10 • Navigate through selections of a submenu. • When viewing photos, navigate from one or more information, see "Inserting a memory card" on page 20 or "Inserting a flash drive" on page 21. 2 Press or repeatedly until View ...
From here You can also press to the Print Preview screen. Learning about the printer 13 For more photos for viewing and/or printing • Select the number of copies to be printed. Using the control panel menus Using the View and Select menu 1 ... Mode menu. • In the Print Preview screen, bring up the Print Settings menu. 10 • Navigate through selections of a submenu. • When viewing photos, navigate from one or more information, see "Inserting a memory card" on page 20 or "Inserting a flash drive" on page 21. 2 Press or repeatedly until View ...

Getting Started
Page 14
...print an index page of copies to print per photo. • Other Print Settings to be printed. For more information, see "Printing photos from a memory card to a flash drive or a computer (if the printer is attached to select a group of photos" on the display. 3 Press . Using the... Transfer menu You can transfer photos from a digital camera using DPOF" on a memory device. Print All N Photos Print all the photos on page 27. For more information, see "...
...print an index page of copies to print per photo. • Other Print Settings to be printed. For more information, see "Printing photos from a memory card to a flash drive or a computer (if the printer is attached to select a group of photos" on the display. 3 Press . Using the... Transfer menu You can transfer photos from a digital camera using DPOF" on a memory device. Print All N Photos Print all the photos on page 27. For more information, see "...
Getting Started
Page 15
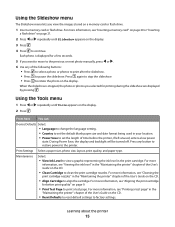
... Cartridge to pause the slideshow. Learning about the printer 15 Using the Slideshow menu The Slideshow menu lets you want to move to the previous or next photo manually, press or . 6 Use any button to restore power to rotate the photo on the CD. • Reset Defaults to ... View Ink Level to factory settings. For more information, see "Printing a test page" in the "Maintaining the printer" chapter of the following buttons: • Press to select a photo or photos to print after the slideshow. • Press to clean the print cartridge nozzles. From here You can Device Defaults ...
... Cartridge to pause the slideshow. Learning about the printer 15 Using the Slideshow menu The Slideshow menu lets you want to move to the previous or next photo manually, press or . 6 Use any button to restore power to rotate the photo on the CD. • Reset Defaults to ... View Ink Level to factory settings. For more information, see "Printing a test page" in the "Maintaining the printer" chapter of the following buttons: • Press to select a photo or photos to print after the slideshow. • Press to clean the print cartridge nozzles. From here You can Device Defaults ...

Getting Started
Page 16
... Address (UAA) number automatically assigned to your Bluetooth-enabled device. • Device Address to photos" on page 32. Colorized Effect Select whether to frame a photo. Using the PictBridge menu The PictBridge default settings menu allows the selection of printer settings if no selections were specified on page 30. For more information, see "Adjusting...
... Address (UAA) number automatically assigned to your Bluetooth-enabled device. • Device Address to photos" on page 32. Colorized Effect Select whether to frame a photo. Using the PictBridge menu The PictBridge default settings menu allows the selection of printer settings if no selections were specified on page 30. For more information, see "Adjusting...

Getting Started
Page 17
Paper Type Select a paper type. For more information, see "Using supported paper types" on page 19. 4 Press or to make a selection. 5 Press to navigate through the following options: From here You can Paper Size Select a paper size. Print Quality Select a print quality. 3 Press or to print. Photo Size Select a photo size. Layout Select a photo layout. Learning about the printer 17
Paper Type Select a paper type. For more information, see "Using supported paper types" on page 19. 4 Press or to make a selection. 5 Press to navigate through the following options: From here You can Paper Size Select a paper size. Print Quality Select a print quality. 3 Press or to print. Photo Size Select a photo size. Layout Select a photo layout. Learning about the printer 17

Getting Started
Page 18
...software Find troubleshooting, maintenance, and cartridge ordering information. page 21. • Edit and print photos stored on page 34. Learning about the software The printer software can be accessed only from a memory Insert a memory card or flash drive. For ...photos using a computer. 1 With a photo open in the "Printing photos" chapter of the User's Guide on setting up the printer with a computer, see "Transferring a memory card" on page 20 or photos from a memory device to a computer. From the desktop: 1 Click Start Œ Programs or All Programs Œ Lexmark...
...software Find troubleshooting, maintenance, and cartridge ordering information. page 21. • Edit and print photos stored on page 34. Learning about the software The printer software can be accessed only from a memory Insert a memory card or flash drive. For ...photos using a computer. 1 With a photo open in the "Printing photos" chapter of the User's Guide on setting up the printer with a computer, see "Transferring a memory card" on page 20 or photos from a memory device to a computer. From the desktop: 1 Click Start Œ Programs or All Programs Œ Lexmark...
Getting Started
Page 19
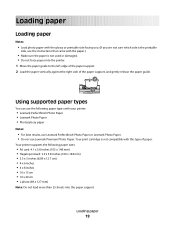
...the paper.) • Make sure the paper is not compatible with your printer: • Lexmark Perfectfinish Photo Paper • Lexmark Photo Paper • Photo/glossy paper Notes: • For best results, use Lexmark Perfectfinish Photo Paper or Lexmark Photo Paper. • Do not use the following paper sizes: • A6... • 4 x 8 inches • 10 x 15 cm • 10 x 20 cm • L photo (89 x 127 mm) Note: Do not load more than 25 sheets into the paper support. Your printer supports the following paper types with this type of the paper support, and gently release the paper...
...the paper.) • Make sure the paper is not compatible with your printer: • Lexmark Perfectfinish Photo Paper • Lexmark Photo Paper • Photo/glossy paper Notes: • For best results, use Lexmark Perfectfinish Photo Paper or Lexmark Photo Paper. • Do not use the following paper sizes: • A6... • 4 x 8 inches • 10 x 15 cm • 10 x 20 cm • L photo (89 x 127 mm) Note: Do not load more than 25 sheets into the paper support. Your printer supports the following paper types with this type of the paper support, and gently release the paper...

Getting Started
Page 20
... page 34. • From a memory card to the adapter that came with it before inserting it points toward the printer. For more information, see "Transferring photos from a memory device to a flash drive" on page 34. 1 Insert a memory card. • Insert the card with adapter) * Bottom slot CompactFlash Type I and Type II * ...
... page 34. • From a memory card to the adapter that came with it before inserting it points toward the printer. For more information, see "Transferring photos from a memory device to a flash drive" on page 34. 1 Insert a memory card. • Insert the card with adapter) * Bottom slot CompactFlash Type I and Type II * ...


