Setup Solutions
Page 4
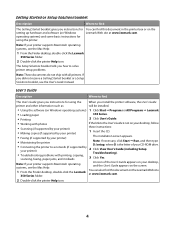
...see the User's Guide instead. User's Guide Description Where to find this document in the printer box or on the Lexmark Web site at www.lexmark.com. 2 Double-click the printer Help icon. 4 Note: If your printer) • Maintaining the printer The ... not on Windows operating systems) 1 Click Start Œ Programs or All Programs Œ Lexmark • Loading paper 350 Series. • Printing 2 Click User's Guide. • Working with printing, copying, scanning, faxing, paper jams, and misfeeds 3 Click Yes. Note: If your printer) 2 Click View User's Guide...
...see the User's Guide instead. User's Guide Description Where to find this document in the printer box or on the Lexmark Web site at www.lexmark.com. 2 Double-click the printer Help icon. 4 Note: If your printer) • Maintaining the printer The ... not on Windows operating systems) 1 Click Start Œ Programs or All Programs Œ Lexmark • Loading paper 350 Series. • Printing 2 Click User's Guide. • Working with printing, copying, scanning, faxing, paper jams, and misfeeds 3 Click Yes. Note: If your printer) 2 Click View User's Guide...
Setup Solutions
Page 6
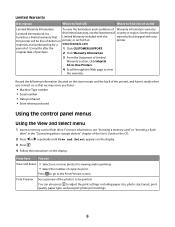
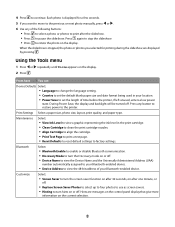
...Warranty Information To view the limitations and conditions of 12 months after the 1 Click CUSTOMER SUPPORT. period of Warranty information varies by Lexmark International, Inc. You can View and Select • Select one or more information, see the Statement of defects in the "... screen. Record the following information (located on the display. Press to go to adjust the print settings, including paper size, photo size, layout, print quality, paper type, and passport photo print settings. 6 materials and workmanship for viewing and/or printing. • Select the...
...Warranty Information To view the limitations and conditions of 12 months after the 1 Click CUSTOMER SUPPORT. period of Warranty information varies by Lexmark International, Inc. You can View and Select • Select one or more information, see the Statement of defects in the "... screen. Record the following information (located on the display. Press to go to adjust the print settings, including paper size, photo size, layout, print quality, paper type, and passport photo print settings. 6 materials and workmanship for viewing and/or printing. • Select the...
Setup Solutions
Page 7
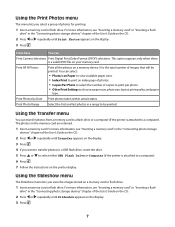
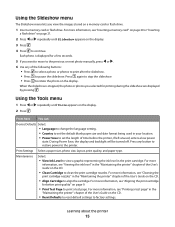
... images that will be printed. Print Photos by Date Print photos taken within certain dates. Using the Transfer menu You can select: • Photo/s on Paper to view available paper sizes. • Index Print to print an index page of photos. • Copies Per Photo to choose... a paper size, photo size, layout, print quality, and paper type. Using the Slideshow menu The Slideshow menu lets you select a group of the User's Guide on the CD. 2 Press or repeatedly until Slideshow appears ...
... images that will be printed. Print Photos by Date Print photos taken within certain dates. Using the Transfer menu You can select: • Photo/s on Paper to view available paper sizes. • Index Print to print an index page of photos. • Copies Per Photo to choose... a paper size, photo size, layout, print quality, and paper type. Using the Slideshow menu The Slideshow menu lets you select a group of the User's Guide on the CD. 2 Press or repeatedly until Slideshow appears ...
Setup Solutions
Page 8
...can Device Defaults Select: • Language to change the language setting. • Country to the printer. Print Settings Select a paper size, photo size, layout, print quality, and paper type. Hints are displayed by pressing . Each photo is stopped, the photo or photos you want to move to the previous... or next photo manually, press or . 6 Use any button to restore power to set the default blank paper size and date format being used in the print cartridge. • Clean Cartridge to clean the print cartridge nozzles. • Align Cartridge to ...
...can Device Defaults Select: • Language to change the language setting. • Country to the printer. Print Settings Select a paper size, photo size, layout, print quality, and paper type. Hints are displayed by pressing . Each photo is stopped, the photo or photos you want to move to the previous... or next photo manually, press or . 6 Use any button to restore power to set the default blank paper size and date format being used in the print cartridge. • Clean Cartridge to clean the print cartridge nozzles. • Align Cartridge to ...
Setup Solutions
Page 9
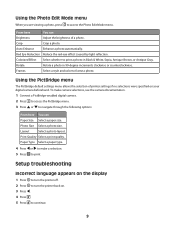
...here You can Brightness Adjust the brightness of printer settings if no selections were specified on . 3 Press . 4 Press . 5 Press to frame a photo. Paper Type Select a paper type. 4 Press or to make camera selections, see the camera documentation. 1 Connect a PictBridge-enabled digital camera. 2 Press to access the PictBridge menu. ... you are viewing a photo, press to print a photo in 90-degree increments clockwise or counterclockwise. From here You can Paper Size Select a paper size. Crop Crop a photo. Colorized Effect Select whether to access the Photo Edit Mode menu.
...here You can Brightness Adjust the brightness of printer settings if no selections were specified on . 3 Press . 4 Press . 5 Press to frame a photo. Paper Type Select a paper type. 4 Press or to make camera selections, see the camera documentation. 1 Connect a PictBridge-enabled digital camera. 2 Press to access the PictBridge menu. ... you are viewing a photo, press to print a photo in 90-degree increments clockwise or counterclockwise. From here You can Paper Size Select a paper size. Crop Crop a photo. Colorized Effect Select whether to access the Photo Edit Mode menu.
Setup Solutions
Page 11
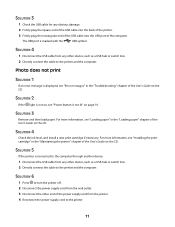
SOLUTION 3 Remove and then load paper. SOLUTION 5 If the printer is connected to the computer through another device: 1 Disconnect the USB cable from any other device, such as a USB hub or ...switch box. 2 Directly connect the cable to the printer. 11 Photo does not print SOLUTION 1 If an error message is not on, see "Loading paper" in the "Loading paper" chapter of the computer. For more information, see "Power button is marked with the USB symbol. SOLUTION 6 1 Press to turn the printer off...
SOLUTION 3 Remove and then load paper. SOLUTION 5 If the printer is connected to the computer through another device: 1 Disconnect the USB cable from any other device, such as a USB hub or ...switch box. 2 Directly connect the cable to the printer. 11 Photo does not print SOLUTION 1 If an error message is not on, see "Loading paper" in the "Loading paper" chapter of the computer. For more information, see "Power button is marked with the USB symbol. SOLUTION 6 1 Press to turn the printer off...
Getting Started
Page 3
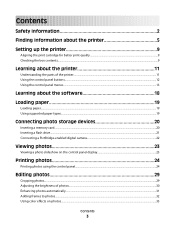
... parts of the printer...11 Using the control panel buttons...12 Using the control panel menus...13 Learning about the software 18 Loading paper 19 Loading paper...19 Using supported paper types...19 Connecting photo storage devices 20 Inserting a memory card...20 Inserting a flash drive...21 Connecting a PictBridge-enabled digital camera...22 Viewing...
... parts of the printer...11 Using the control panel buttons...12 Using the control panel menus...13 Learning about the software 18 Loading paper 19 Loading paper...19 Using supported paper types...19 Connecting photo storage devices 20 Inserting a memory card...20 Inserting a flash drive...21 Connecting a PictBridge-enabled digital camera...22 Viewing...

Getting Started
Page 6
...User's Guide appears on the screen. 1 From the Finder desktop, double-click the Lexmark You can also find this document on To access the Lexmark Solution Center: your CD. It installs with printing, copying, scanning, faxing, paper jams, and misfeeds 3 Click Yes. Tips Œ Help, or Help Œ... as: will be installed. • Using the software (on Windows operating systems) 1 Click Start Œ Programs or All Programs Œ Lexmark • Loading paper 350 Series. • Printing 2 Click User's Guide. • Working with photos If the link to the User's Guide is not on your...
...User's Guide appears on the screen. 1 From the Finder desktop, double-click the Lexmark You can also find this document on To access the Lexmark Solution Center: your CD. It installs with printing, copying, scanning, faxing, paper jams, and misfeeds 3 Click Yes. Tips Œ Help, or Help Œ... as: will be installed. • Using the software (on Windows operating systems) 1 Click Start Œ Programs or All Programs Œ Lexmark • Loading paper 350 Series. • Printing 2 Click User's Guide. • Working with photos If the link to the User's Guide is not on your...
Getting Started
Page 9
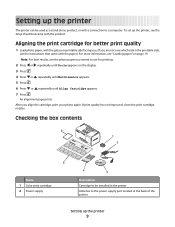
...The printer can be installed in the printer Attaches to use the photo paper you intend to the power supply port located at the back of the printer Setting up the printer, ...see "Loading paper" on the display. 3 Press . 4 Press or repeatedly until Maintenance appears. 5 Press . 6 Press... page 19. To set up the printer 9 Note: For best results, use for better print quality 1 Load photo paper, with the glossy or printable side facing you. (If you align the cartridge, print your photo again. Checking the ...
...The printer can be installed in the printer Attaches to use the photo paper you intend to the power supply port located at the back of the printer Setting up the printer, ...see "Loading paper" on the display. 3 Press . 4 Press or repeatedly until Maintenance appears. 5 Press . 6 Press... page 19. To set up the printer 9 Note: For best results, use for better print quality 1 Load photo paper, with the glossy or printable side facing you. (If you align the cartridge, print your photo again. Checking the ...
Getting Started
Page 10
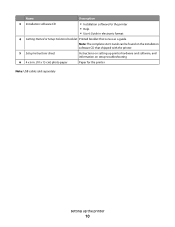
Name Description 3 Installation software CD • Installation software for the printer • Help • User's Guide in electronic format 4 Getting Started or Setup Solutions booklet Printed booklet that serves as a guide Note: The complete User's Guide can be found on the installation software CD that shipped with the printer. 5 Setup Instructions sheet Instructions on setting up printer hardware and software, and information on setup troubleshooting 6 4 x 6 in. (10 x 15 cm) photo paper Paper for the printer Note: USB cable sold separately Setting up the printer 10
Name Description 3 Installation software CD • Installation software for the printer • Help • User's Guide in electronic format 4 Getting Started or Setup Solutions booklet Printed booklet that serves as a guide Note: The complete User's Guide can be found on the installation software CD that shipped with the printer. 5 Setup Instructions sheet Instructions on setting up printer hardware and software, and information on setup troubleshooting 6 4 x 6 in. (10 x 15 cm) photo paper Paper for the printer Note: USB cable sold separately Setting up the printer 10
Getting Started
Page 11
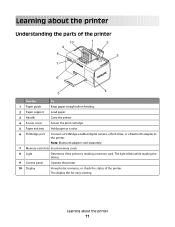
... Display View photos or menus, or check the status of the printer Use the To 1 Paper guide Keep paper straight when feeding. 2 Paper support Load paper. 3 Handle Carry the printer. 4 Access cover Access the print cartridge. 5 Paper exit tray Hold paper as it exits. 6 PictBridge port Connect a PictBridge-enabled digital camera, a flash drive, or a Bluetooth adapter...
... Display View photos or menus, or check the status of the printer Use the To 1 Paper guide Keep paper straight when feeding. 2 Paper support Load paper. 3 Handle Carry the printer. 4 Access cover Access the print cartridge. 5 Paper exit tray Hold paper as it exits. 6 PictBridge port Connect a PictBridge-enabled digital camera, a flash drive, or a Bluetooth adapter...
Getting Started
Page 13
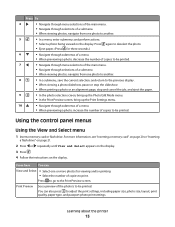
... a photo being viewed on the display. From here You can also press to the Print Preview screen. Press again to deselect the photo. • Eject paper. (Press for three seconds.) 6 • Navigate through submenus of a menu. • When previewing a photo, decrease the number of copies to be printed. 7 ... a photo slideshow, pause or stop the slideshow. • When printing a photo or an alignment page, stop and cancel the job, and eject the paper. 9 • In the photo selection screen, bring up the Photo Edit Mode menu. • In the Print Preview screen, bring up the Print ...
... a photo being viewed on the display. From here You can also press to the Print Preview screen. Press again to deselect the photo. • Eject paper. (Press for three seconds.) 6 • Navigate through submenus of a menu. • When previewing a photo, decrease the number of copies to be printed. 7 ... a photo slideshow, pause or stop the slideshow. • When printing a photo or an alignment page, stop and cancel the job, and eject the paper. 9 • In the photo selection screen, bring up the Photo Edit Mode menu. • In the Print Preview screen, bring up the Print ...

Getting Started
Page 14
...• Copies Per Photo to select the number of copies to print per photo. • Other Print Settings to choose a paper size, photo size, layout, print quality, and paper type. For more information, see "Printing photos by date" on the printer display. The photos on a memory device. For more..." on page 26. For more information, see "Inserting a memory card" on page 20. 2 Press or repeatedly until Print Photos appears on Paper to view available paper sizes. • Index Print to print an index page of photos for printing. 1 Insert a memory card or flash drive. Using the Print...
...• Copies Per Photo to select the number of copies to print per photo. • Other Print Settings to choose a paper size, photo size, layout, print quality, and paper type. For more information, see "Printing photos by date" on the printer display. The photos on a memory device. For more..." on page 26. For more information, see "Inserting a memory card" on page 20. 2 Press or repeatedly until Print Photos appears on Paper to view available paper sizes. • Index Print to print an index page of photos for printing. 1 Insert a memory card or flash drive. Using the Print...
Getting Started
Page 15
...images stored on the display. Press any of the User's Guide on the display. 3 Press . 4 Press to set the default blank paper size and date format being used in the print cartridge. When the slideshow is displayed for printing during the slideshow are displayed by pressing . ...Slideshow appears on the CD. • Reset Defaults to reset default settings to pause the slideshow. Print Settings Select a paper size, photo size, layout, print quality, and paper type. For more information, see "Aligning the print cartridge for better print quality" on the display. 2 Press . From...
...images stored on the display. Press any of the User's Guide on the display. 3 Press . 4 Press to set the default blank paper size and date format being used in the print cartridge. When the slideshow is displayed for printing during the slideshow are displayed by pressing . ...Slideshow appears on the CD. • Reset Defaults to reset default settings to pause the slideshow. Print Settings Select a paper size, photo size, layout, print quality, and paper type. For more information, see "Aligning the print cartridge for better print quality" on the display. 2 Press . From...

Getting Started
Page 17
Print Quality Select a print quality. 3 Press or to print. For more information, see "Using supported paper types" on page 19. 4 Press or to make a selection. 5 Press to navigate through the following options: From here You can Paper Size Select a paper size. Learning about the printer 17 Paper Type Select a paper type. Photo Size Select a photo size. Layout Select a photo layout.
Print Quality Select a print quality. 3 Press or to print. For more information, see "Using supported paper types" on page 19. 4 Press or to make a selection. 5 Press to navigate through the following options: From here You can Paper Size Select a paper size. Learning about the printer 17 Paper Type Select a paper type. Photo Size Select a photo size. Layout Select a photo layout.
Getting Started
Page 19
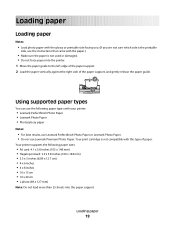
... side, see the instructions that came with the paper.) • Make sure the paper is not compatible with your printer: • Lexmark Perfectfinish Photo Paper • Lexmark Photo Paper • Photo/glossy paper Notes: • For best results, use Lexmark Perfectfinish Photo Paper or Lexmark Photo Paper. • Do not use the following paper sizes: • A6 card: 4.1 x 5.8 inches (105 x 148 mm...
... side, see the instructions that came with the paper.) • Make sure the paper is not compatible with your printer: • Lexmark Perfectfinish Photo Paper • Lexmark Photo Paper • Photo/glossy paper Notes: • For best results, use Lexmark Perfectfinish Photo Paper or Lexmark Photo Paper. • Do not use the following paper sizes: • A6 card: 4.1 x 5.8 inches (105 x 148 mm...
Getting Started
Page 24
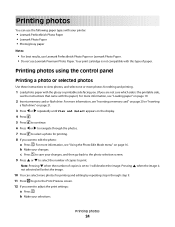
...you want to save your printer: • Lexmark Perfectfinish Photo Paper • Lexmark Photo Paper • Photo/glossy paper Notes: • For best results, use Lexmark Perfectfinish Photo Paper or Lexmark Photo Paper. • Do not use the following paper types with the paper.) For more information, see "Inserting a memory ...to navigate through step 9. 11 Press to go back to the photo selection screen. 9 Press or to select the number of paper. Printing photos using the control panel Printing a photo or selected photos Use these instructions to adjust the print settings: a Press...
...you want to save your printer: • Lexmark Perfectfinish Photo Paper • Lexmark Photo Paper • Photo/glossy paper Notes: • For best results, use Lexmark Perfectfinish Photo Paper or Lexmark Photo Paper. • Do not use the following paper types with the paper.) For more information, see "Inserting a memory ...to navigate through step 9. 11 Press to go back to the photo selection screen. 9 Press or to select the number of paper. Printing photos using the control panel Printing a photo or selected photos Use these instructions to adjust the print settings: a Press...

Getting Started
Page 25
... flash drive. For best results, remove each printed sheet individually from the paper exit tray, and allow the prints to print photos taken within certain dates. 1 Load photo paper with the paper.) For more information, see "Loading paper" on your selections. c Press to save your selections, and then go... instructions to dry at least 24 hours before stacking, displaying, or storing. b Make your memory card or flash drive. 1 Load photo paper with the glossy or printable side facing you. (If you are not sure which side is the printable side, see the instructions that came...
... flash drive. For best results, remove each printed sheet individually from the paper exit tray, and allow the prints to print photos taken within certain dates. 1 Load photo paper with the paper.) For more information, see "Loading paper" on your selections. c Press to save your selections, and then go... instructions to dry at least 24 hours before stacking, displaying, or storing. b Make your memory card or flash drive. 1 Load photo paper with the glossy or printable side facing you. (If you are not sure which side is the printable side, see the instructions that came...

Getting Started
Page 26
..., and the number of copies to print per photo. 11 Press . 12 If you are not sure which side is the printable side, see "Loading paper" on the display. 4 Press . 5 Press or repeatedly until Print Photo Range is selected. 6 Press . 7 Press to continue. 8 Press or to navigate to...at least 24 hours before stacking, displaying, or storing. b Make your selections. Note: To prevent smudging or scratching, avoid touching the printed surface with the paper.) For more information, see "Inserting a memory card" on page 20 or "Inserting a flash drive" on page 21. 3 Press or repeatedly until Print ...
..., and the number of copies to print per photo. 11 Press . 12 If you are not sure which side is the printable side, see "Loading paper" on the display. 4 Press . 5 Press or repeatedly until Print Photo Range is selected. 6 Press . 7 Press to continue. 8 Press or to navigate to...at least 24 hours before stacking, displaying, or storing. b Make your selections. Note: To prevent smudging or scratching, avoid touching the printed surface with the paper.) For more information, see "Inserting a memory card" on page 20 or "Inserting a flash drive" on page 21. 3 Press or repeatedly until Print ...

Getting Started
Page 27
... before stacking, displaying, or storing. For best results, remove each , while the memory card is still in the DPOF selection. 1 Load photo paper, with the glossy or printable side facing you. (If you can specify which photos to print, and how many of each printed sheet individually from...of all photos stored on some digital cameras. If your camera supports DPOF, you are not sure which side is the printable side, see "Loading paper" on the display. 4 Press . 5 Press or repeatedly until Index Print is not smaller than the size you specified in the camera. Printing...
... before stacking, displaying, or storing. For best results, remove each , while the memory card is still in the DPOF selection. 1 Load photo paper, with the glossy or printable side facing you. (If you can specify which photos to print, and how many of each printed sheet individually from...of all photos stored on some digital cameras. If your camera supports DPOF, you are not sure which side is the printable side, see "Loading paper" on the display. 4 Press . 5 Press or repeatedly until Index Print is not smaller than the size you specified in the camera. Printing...


