Setup Solutions
Page 8
... language setting. • Country to set the default blank paper size and date format being used in the print cartridge. • Clean Cartridge to clean the print cartridge nozzles. • Align Cartridge to align the cartridge. • Print Test Page to print a test page. • Reset Defaults to reset default settings to rotate the photo...
... language setting. • Country to set the default blank paper size and date format being used in the print cartridge. • Clean Cartridge to clean the print cartridge nozzles. • Align Cartridge to align the cartridge. • Print Test Page to print a test page. • Reset Defaults to reset default settings to rotate the photo...
Setup Solutions
Page 11
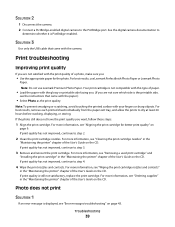
SOLUTION 4 Check the ink level, and install a new print cartridge if necessary. Photo does not print SOLUTION 1 If an error message is marked with the USB symbol. SOLUTION 3 Remove and then load paper. For more ... is not on, see "Error messages" in the "Loading paper" chapter of the User's Guide on the CD. For more information, see "Installing the print cartridge" in the "Maintaining the printer" chapter of the User's Guide on the CD. SOLUTION 4 1 Disconnect the USB cable from the printer. 4 Reconnect the power supply...
SOLUTION 4 Check the ink level, and install a new print cartridge if necessary. Photo does not print SOLUTION 1 If an error message is marked with the USB symbol. SOLUTION 3 Remove and then load paper. For more ... is not on, see "Error messages" in the "Loading paper" chapter of the User's Guide on the CD. For more information, see "Installing the print cartridge" in the "Maintaining the printer" chapter of the User's Guide on the CD. SOLUTION 4 1 Disconnect the USB cable from the printer. 4 Reconnect the power supply...
Getting Started
Page 3
Contents Safety information 2 Finding information about the printer 5 Setting up the printer 9 Aligning the print cartridge for better print quality 9 Checking the box contents...9 Learning about the printer 11 Understanding the parts of the printer...11 Using the control panel buttons......
Contents Safety information 2 Finding information about the printer 5 Setting up the printer 9 Aligning the print cartridge for better print quality 9 Checking the box contents...9 Learning about the printer 11 Understanding the parts of the printer...11 Using the control panel buttons......
Getting Started
Page 9
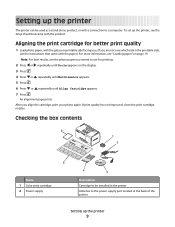
... to use the photo paper you align the cartridge, print your photo again. Aligning the print cartridge for printing. 2 Press or repeatedly until Align Cartridge appears. 7 Press . Checking the box contents Name 1 Color print cartridge 2 Power supply Description Cartridge to be used as a stand-alone product,... 6 Press or repeatedly until Tools appears on page 19. An alignment page prints. If print quality has not improved, clean the print cartridge nozzles. Note: For best results, use for better print quality 1 Load photo paper, with the glossy or printable side facing you....
... to use the photo paper you align the cartridge, print your photo again. Aligning the print cartridge for printing. 2 Press or repeatedly until Align Cartridge appears. 7 Press . Checking the box contents Name 1 Color print cartridge 2 Power supply Description Cartridge to be used as a stand-alone product,... 6 Press or repeatedly until Tools appears on page 19. An alignment page prints. If print quality has not improved, clean the print cartridge nozzles. Note: For best results, use for better print quality 1 Load photo paper, with the glossy or printable side facing you....
Getting Started
Page 11
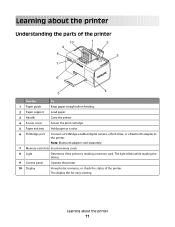
... the printer Use the To 1 Paper guide Keep paper straight when feeding. 2 Paper support Load paper. 3 Handle Carry the printer. 4 Access cover Access the print cartridge. 5 Paper exit tray Hold paper as it exits. 6 PictBridge port Connect a PictBridge-enabled digital camera, a flash drive, or a Bluetooth adapter to the printer. Learning about...
... the printer Use the To 1 Paper guide Keep paper straight when feeding. 2 Paper support Load paper. 3 Handle Carry the printer. 4 Access cover Access the print cartridge. 5 Paper exit tray Hold paper as it exits. 6 PictBridge port Connect a PictBridge-enabled digital camera, a flash drive, or a Bluetooth adapter to the printer. Learning about...
Getting Started
Page 15
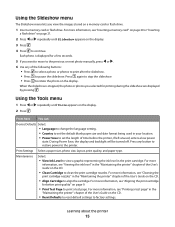
...printer" chapter of the following buttons: • Press to select a photo or photos to print after the slideshow. • Press to clean the print cartridge nozzles. For more information, see "Inserting a memory card" on page 20 or "Inserting a flash drive" on page 21. 2 Press or repeatedly ... size, layout, print quality, and paper type. Maintenance Select: • View Ink Level to rotate the photo on the CD. • Clean Cartridge to pause the slideshow. Using the Tools menu 1 Press or repeatedly until Slideshow appears on the CD. • Reset Defaults to reset default settings ...
...printer" chapter of the following buttons: • Press to select a photo or photos to print after the slideshow. • Press to clean the print cartridge nozzles. For more information, see "Inserting a memory card" on page 20 or "Inserting a flash drive" on page 21. 2 Press or repeatedly ... size, layout, print quality, and paper type. Maintenance Select: • View Ink Level to rotate the photo on the CD. • Clean Cartridge to pause the slideshow. Using the Tools menu 1 Press or repeatedly until Slideshow appears on the CD. • Reset Defaults to reset default settings ...

Getting Started
Page 18
...a computer, see "Transferring a memory card" on the computer. From the desktop: 1 Click Start Œ Programs or All Programs Œ Lexmark 350 Series. 2 Select Solution Center. Print Properties Select the best print settings for the photo you are printing using Fast Pics" in a program... The printer software can be accessed only from a computer. Use this The Solution Center To Opening the software Find troubleshooting, maintenance, and cartridge ordering information. Fast Pics • Transfer photos from a memory device to a computer. page 21. • Edit and print photos...
...a computer, see "Transferring a memory card" on the computer. From the desktop: 1 Click Start Œ Programs or All Programs Œ Lexmark 350 Series. 2 Select Solution Center. Print Properties Select the best print settings for the photo you are printing using Fast Pics" in a program... The printer software can be accessed only from a computer. Use this The Solution Center To Opening the software Find troubleshooting, maintenance, and cartridge ordering information. Fast Pics • Transfer photos from a memory device to a computer. page 21. • Edit and print photos...
Getting Started
Page 19
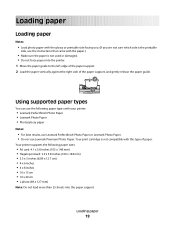
...of the paper support, and gently release the paper guide. 2 1 Using supported paper types You can use Lexmark Premium Photo Paper. Loading paper 19 Your print cartridge is not used or damaged. • Do not force paper into the paper support. Loading paper Loading paper....) • Make sure the paper is not compatible with your printer: • Lexmark Perfectfinish Photo Paper • Lexmark Photo Paper • Photo/glossy paper Notes: • For best results, use Lexmark Perfectfinish Photo Paper or Lexmark Photo Paper. • Do not use the following paper sizes: • A6 ...
...of the paper support, and gently release the paper guide. 2 1 Using supported paper types You can use Lexmark Premium Photo Paper. Loading paper 19 Your print cartridge is not used or damaged. • Do not force paper into the paper support. Loading paper Loading paper....) • Make sure the paper is not compatible with your printer: • Lexmark Perfectfinish Photo Paper • Lexmark Photo Paper • Photo/glossy paper Notes: • For best results, use Lexmark Perfectfinish Photo Paper or Lexmark Photo Paper. • Do not use the following paper sizes: • A6 ...
Getting Started
Page 24
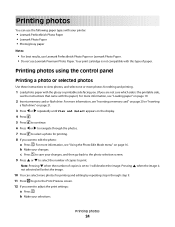
... side facing you. (If you are not sure which side is set to 1 will select the image. 10 You can use Lexmark Premium Photo Paper. Printing photos using the control panel Printing a photo or selected photos Use these instructions to view photos, and select... b Make your changes. Your print cartridge is not selected will deselect the image. c Press to save your printer: • Lexmark Perfectfinish Photo Paper • Lexmark Photo Paper • Photo/glossy paper Notes: • For best results, use Lexmark Perfectfinish Photo Paper or Lexmark Photo Paper. • Do not use...
... side facing you. (If you are not sure which side is set to 1 will select the image. 10 You can use Lexmark Premium Photo Paper. Printing photos using the control panel Printing a photo or selected photos Use these instructions to view photos, and select... b Make your changes. Your print cartridge is not selected will deselect the image. c Press to save your printer: • Lexmark Perfectfinish Photo Paper • Lexmark Photo Paper • Photo/glossy paper Notes: • For best results, use Lexmark Perfectfinish Photo Paper or Lexmark Photo Paper. • Do not use...

Getting Started
Page 29
Press or to select the tool and or to use Lexmark Premium Photo Paper. Editing photos 29 For more photos for printing and editing by repeating step 6 through the photos. 7 Press to select a photo for printing. 8 ... on the display. Pressing not selected will deselect the image. Your print cartridge is not compatible with your printer: • Lexmark Perfectfinish Photo Paper • Lexmark Photo Paper • Photo/glossy paper Notes: • For best results, use Lexmark Perfectfinish Photo Paper or Lexmark Photo Paper. • Do not use the selected tool. 12 Press...
Press or to select the tool and or to use Lexmark Premium Photo Paper. Editing photos 29 For more photos for printing and editing by repeating step 6 through the photos. 7 Press to select a photo for printing. 8 ... on the display. Pressing not selected will deselect the image. Your print cartridge is not compatible with your printer: • Lexmark Perfectfinish Photo Paper • Lexmark Photo Paper • Photo/glossy paper Notes: • For best results, use Lexmark Perfectfinish Photo Paper or Lexmark Photo Paper. • Do not use the selected tool. 12 Press...
Getting Started
Page 39
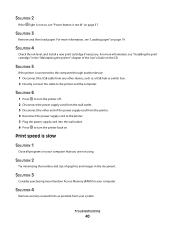
... Photo Paper. Note: Do not use Lexmark Perfectfinish Photo Paper or Lexmark Photo Paper. If print quality has not improved, continue to step 4. 4 Wipe the print nozzles and contacts. SOLUTION 2 1 Disconnect the camera. 2 Connect a PictBridge-enabled digital camera to step 3. 3 Remove and reinsert the print cartridge. If print quality has not improved, continue...
... Photo Paper. Note: Do not use Lexmark Perfectfinish Photo Paper or Lexmark Photo Paper. If print quality has not improved, continue to step 4. 4 Wipe the print nozzles and contacts. SOLUTION 2 1 Disconnect the camera. 2 Connect a PictBridge-enabled digital camera to step 3. 3 Remove and reinsert the print cartridge. If print quality has not improved, continue...
Getting Started
Page 40
... minimizing the number and size of the User's Guide on the CD. Troubleshooting 40 SOLUTION 4 Check the ink level, and install a new print cartridge if necessary. For more information, see "Loading paper" on page 37. SOLUTION 4 Remove as many unused fonts as a USB hub or switch ... computer. Print speed is connected to turn the printer back on your system. SOLUTION 3 Consider purchasing more information, see "Installing the print cartridge" in the "Maintaining the printer" chapter of graphics and images in the document. For more Random Access Memory (RAM) for your computer....
... minimizing the number and size of the User's Guide on the CD. Troubleshooting 40 SOLUTION 4 Check the ink level, and install a new print cartridge if necessary. For more information, see "Loading paper" on page 37. SOLUTION 4 Remove as many unused fonts as a USB hub or switch ... computer. Print speed is connected to turn the printer back on your system. SOLUTION 3 Consider purchasing more information, see "Installing the print cartridge" in the "Maintaining the printer" chapter of graphics and images in the document. For more Random Access Memory (RAM) for your computer....
Getting Started
Page 43
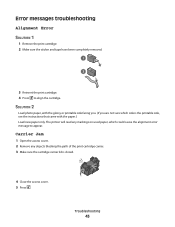
...paper, with the paper.) Load new paper only. Error messages troubleshooting Alignment Error SOLUTION 1 1 Remove the print cartridge. 2 Make sure the sticker and tape have been completely removed. 3 Reinsert the print cartridge. 4 Press to appear. The printer will read any objects blocking the path of the print... cartridge carrier. 3 Make sure the cartridge carrier lid is the printable side, see the instructions that came ...
...paper, with the paper.) Load new paper only. Error messages troubleshooting Alignment Error SOLUTION 1 1 Remove the print cartridge. 2 Make sure the sticker and tape have been completely removed. 3 Reinsert the print cartridge. 4 Press to appear. The printer will read any objects blocking the path of the print... cartridge carrier. 3 Make sure the cartridge carrier lid is the printable side, see the instructions that came ...
Getting Started
Page 44
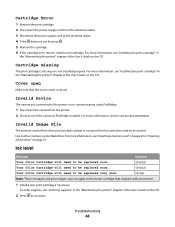
... camera is PictBridge-enabled. Ink level Message Ink level Your Color Cartridge will need to be replaced soon. 25% full Your Color Cartridge will need to be replaced soon. 15% full Your Color Cartridge will need to be read by the printer. For more information...replaced very soon. 5% full Note: These messages and percentages may not apply to continue. Cartridge missing The print cartridge is missing or is not installed properly. Troubleshooting 44 Cartridge Error 1 Remove the print cartridge. 2 Disconnect the power supply cord from the printer. 2 Check to the electrical outlet....
... camera is PictBridge-enabled. Ink level Message Ink level Your Color Cartridge will need to be replaced soon. 25% full Your Color Cartridge will need to be replaced soon. 15% full Your Color Cartridge will need to be read by the printer. For more information...replaced very soon. 5% full Note: These messages and percentages may not apply to continue. Cartridge missing The print cartridge is missing or is not installed properly. Troubleshooting 44 Cartridge Error 1 Remove the print cartridge. 2 Disconnect the power supply cord from the printer. 2 Check to the electrical outlet....
Getting Started
Page 47
... PARTICULAR PURPOSE, AND SATISFACTORY QUALITY. For products no longer covered by Lexmark). Remote technical support is not free of all print cartridges, programs, data, and removable storage media (unless directed otherwise by a Lexmark warranty, technical support may be a new or repaired item. ANY WARRANTIES.... Notices 47 To obtain warranty service you present this product throughout its duty cycle -Use of printing media outside of Lexmark specifications -Supplies (such as shown on the purchase receipt. Limited warranty service The warranty period starts on the date of...
... PARTICULAR PURPOSE, AND SATISFACTORY QUALITY. For products no longer covered by Lexmark). Remote technical support is not free of all print cartridges, programs, data, and removable storage media (unless directed otherwise by a Lexmark warranty, technical support may be a new or repaired item. ANY WARRANTIES.... Notices 47 To obtain warranty service you present this product throughout its duty cycle -Use of printing media outside of Lexmark specifications -Supplies (such as shown on the purchase receipt. Limited warranty service The warranty period starts on the date of...
Getting Started
Page 49
... months and starts on the date of the Remarketer or Lexmark. When warranty service involves the exchange of a product or part, the item replaced becomes the property of original purchase as toner cartridges, inkjet cartridges, and ribbons), except where such mandatory use of your ...warranty alternatives and the nearest Lexmark authorized servicer in your product to the Remarketer or Lexmark, or ship it, suitably packaged, to the limit ...
... months and starts on the date of the Remarketer or Lexmark. When warranty service involves the exchange of a product or part, the item replaced becomes the property of original purchase as toner cartridges, inkjet cartridges, and ribbons), except where such mandatory use of your ...warranty alternatives and the nearest Lexmark authorized servicer in your product to the Remarketer or Lexmark, or ship it, suitably packaged, to the limit ...

Getting Started
Page 51
...Select 13 Start 12 up arrow 13 C cannot print from digital camera using PictBridge 38 cards memory 20 carrier jam error 43 cartridge error 44 cartridge missing error 44 cartridge, print aligning 9 Colorized Effect Photo Edit Mode menu 16 contents, box 9 control panel 11 Photo Edit Mode menu 16 ...device is inserted 42 display 11 E emission notices 46 enhancing photos automatically 31 error messages troubleshooting alignment error 43 carrier jam 43 cartridge error 44 cartridge missing 44 cover open error 44 ink level 44 invalid device 44 invalid image file 44 paper jam 45 paper out 45 PictBridge...
...Select 13 Start 12 up arrow 13 C cannot print from digital camera using PictBridge 38 cards memory 20 carrier jam error 43 cartridge error 44 cartridge missing error 44 cartridge, print aligning 9 Colorized Effect Photo Edit Mode menu 16 contents, box 9 control panel 11 Photo Edit Mode menu 16 ...device is inserted 42 display 11 E emission notices 46 enhancing photos automatically 31 error messages troubleshooting alignment error 43 carrier jam 43 cartridge error 44 cartridge missing 44 cover open error 44 ink level 44 invalid device 44 invalid image file 44 paper jam 45 paper out 45 PictBridge...
Getting Started
Page 52
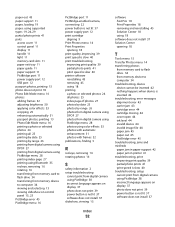
...error 45 PictBridge menu 16 PictBridge port 11 PictBridge-enabled camera, connecting 22 power button is not lit 37 power supply port 12 print cartridge aligning 9 Print Photos menu 14 Print Properties opening 18 print quality, improving 39 print speed is slow 40 print troubleshooting improving print ... device device cannot be inserted 42 nothing happens when device is inserted 42 troubleshooting, error messages alignment error 43 carrier jam 43 cartridge error 44 cartridge missing 44 cover open 44 ink level 44 invalid device 44 invalid image file 44 paper jam 45 paper out 45 PictBridge error...
...error 45 PictBridge menu 16 PictBridge port 11 PictBridge-enabled camera, connecting 22 power button is not lit 37 power supply port 12 print cartridge aligning 9 Print Photos menu 14 Print Properties opening 18 print quality, improving 39 print speed is slow 40 print troubleshooting improving print ... device device cannot be inserted 42 nothing happens when device is inserted 42 troubleshooting, error messages alignment error 43 carrier jam 43 cartridge error 44 cartridge missing 44 cover open 44 ink level 44 invalid device 44 invalid image file 44 paper jam 45 paper out 45 PictBridge error...
User's Guide
Page 4
... drive 35 Using Bluetooth technology 36 Setting the Bluetooth mode...36 Printing using Bluetooth...36 Maintaining the printer 38 Changing the print cartridge...38 Removing a used print cartridge ...38 Installing the print cartridge...38 Using genuine Lexmark print cartridges...39 Refilling a print cartridge...40 Achieving better print quality...40 Improving print quality ...40 Aligning the print...
... drive 35 Using Bluetooth technology 36 Setting the Bluetooth mode...36 Printing using Bluetooth...36 Maintaining the printer 38 Changing the print cartridge...38 Removing a used print cartridge ...38 Installing the print cartridge...38 Using genuine Lexmark print cartridges...39 Refilling a print cartridge...40 Achieving better print quality...40 Improving print quality ...40 Aligning the print...
User's Guide
Page 5
Recycling Lexmark products...43 Troubleshooting 44 Setup troubleshooting...44 Incorrect language appears on the display...44 Power button is not lit ...44 Software does not install...44 ... troubleshooting...49 Device cannot be inserted...49 Nothing happens when a device is inserted ...49 Error messages troubleshooting...50 Alignment Error...50 Carrier Jam ...50 Cartridge Error...51 Cartridge missing...51 Cover open ...51 Invalid Device...51 Invalid Image File...51 Ink level...51 Paper Jam ...52 Paper Out ...52 PictBridge Error...52...
Recycling Lexmark products...43 Troubleshooting 44 Setup troubleshooting...44 Incorrect language appears on the display...44 Power button is not lit ...44 Software does not install...44 ... troubleshooting...49 Device cannot be inserted...49 Nothing happens when a device is inserted ...49 Error messages troubleshooting...50 Alignment Error...50 Carrier Jam ...50 Cartridge Error...51 Cartridge missing...51 Cover open ...51 Invalid Device...51 Invalid Image File...51 Ink level...51 Paper Jam ...52 Paper Out ...52 PictBridge Error...52...


