Network Scan Drivers
Page 5
... in the path /usr/lexscan/docs/ after installation. b Select Driver Finder from a network-based printer. Introduction to www.lexmark.com. Introduction to the network scan driver The network scan driver provides a SANE (Scanner Access Now Easy) interface to allow scanning from the Drivers & Downloads list. External network adapters are logged on your...
... in the path /usr/lexscan/docs/ after installation. b Select Driver Finder from a network-based printer. Introduction to www.lexmark.com. Introduction to the network scan driver The network scan driver provides a SANE (Scanner Access Now Easy) interface to allow scanning from the Drivers & Downloads list. External network adapters are logged on your...
Network Scan Drivers
Page 6
... Fedora, Linpus Linux, SUSE Linux, Linux openSUSE, Red Hat Enterprise Linux, or Red Flag Linux Open a terminal window, and then type rpm -e lexmark-network-scan. b Select Driver Finder from the /etc/sane.d/dll.conf file. Scanning using a network printer 1 To use the network scan driver, ...open a terminal window, and then type dpkg -i network-scan-linux-glibc2-x86.deb. c Select the Linux distribution running on the scanner glass. 4 From the printer control panel, select your computer. 2 Double-click the package file or open a terminal window, and then type scanimage...
... Fedora, Linpus Linux, SUSE Linux, Linux openSUSE, Red Hat Enterprise Linux, or Red Flag Linux Open a terminal window, and then type rpm -e lexmark-network-scan. b Select Driver Finder from the /etc/sane.d/dll.conf file. Scanning using a network printer 1 To use the network scan driver, ...open a terminal window, and then type dpkg -i network-scan-linux-glibc2-x86.deb. c Select the Linux distribution running on the scanner glass. 4 From the printer control panel, select your computer. 2 Double-click the package file or open a terminal window, and then type scanimage...
Network Scan Drivers
Page 7
... then type xsane. Press Enter. 2 From the "device detection" dialog, navigate to: Available devices > select your printer > OK 3 From the "Network:scanner" dialog, click Window > Show standard options. 4 If necessary, adjust other options, and then click OK. 4 From the application toolbar, do either of ...Scan > Select Source. 2 From the "Device Used" menu, select your printer. 3 If necessary, select other scan settings. 5 From the "Network:scanner" dialog, click Scan. 6 Place your document in the Automatic Document Feeder (ADF) or on selecting a scan job from the printer control panel, see...
... then type xsane. Press Enter. 2 From the "device detection" dialog, navigate to: Available devices > select your printer > OK 3 From the "Network:scanner" dialog, click Window > Show standard options. 4 If necessary, adjust other options, and then click OK. 4 From the application toolbar, do either of ...Scan > Select Source. 2 From the "Device Used" menu, select your printer. 3 If necessary, select other scan settings. 5 From the "Network:scanner" dialog, click Scan. 6 Place your document in the Automatic Document Feeder (ADF) or on selecting a scan job from the printer control panel, see...
Network Scan Drivers
Page 8
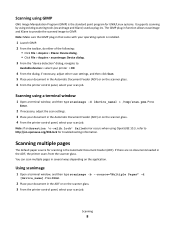
...scan multiple pages in function allows xscanimage and XSane to provide the scanned image to GIMP. The GIMP plug-in several ways depending on the scanner glass. 6 From the printer control panel, select your scan job. Using scanimage 1 Open a terminal window, and then type scanimage -b --...source="Multiple Pages" -d [device_name]. If there are no documents loaded in the ADF or on the scanner glass. 4 From the printer control panel, select your scan job. Scanning using GIMP GNU Image Manipulation Program (GIMP) is the standard paint program...
...scan multiple pages in function allows xscanimage and XSane to provide the scanned image to GIMP. The GIMP plug-in several ways depending on the scanner glass. 6 From the printer control panel, select your scan job. Using scanimage 1 Open a terminal window, and then type scanimage -b --...source="Multiple Pages" -d [device_name]. If there are no documents loaded in the ADF or on the scanner glass. 4 From the printer control panel, select your scan job. Scanning using GIMP GNU Image Manipulation Program (GIMP) is the standard paint program...
Network Scan Drivers
Page 9
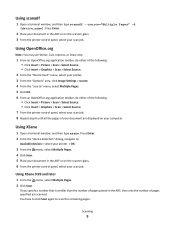
... Source. 7 From the printer control panel, select your scan job. 8 Repeat step 6 until all the pages of pages placed in the ADF or on the scanner glass. 3 From the printer control panel, select your scan job. Using XSane 0.99 and later 1 From the menu, select Multiple Pages. 2 Click Scan. Press Enter.... 2 Place your document in the ADF or on the scanner glass. 6 From the printer control panel, select your scan job. Using XSane 1 Open a terminal window, and then type xsane.
... Source. 7 From the printer control panel, select your scan job. 8 Repeat step 6 until all the pages of pages placed in the ADF or on the scanner glass. 3 From the printer control panel, select your scan job. Using XSane 0.99 and later 1 From the menu, select Multiple Pages. 2 Click Scan. Press Enter.... 2 Place your document in the ADF or on the scanner glass. 6 From the printer control panel, select your scan job. Using XSane 1 Open a terminal window, and then type xsane.
Network Scan Drivers
Page 10
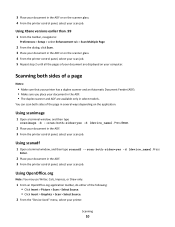
...navigate to: Preferences > Setup > select Enhancement tab > Scan Multiple Page 2 From the dialog, click Scan. 3 Place your document in the ADF or on the scanner glass. 4 From the printer control panel, select your scan job. 5 Repeat step 2 until all the pages of a page Notes: • Make sure that ... an Automatic Document Feeder (ADF). • Make sure you place your document in the ADF. • The duplex scanner and ADF are displayed on the scanner glass. 4 From the printer control panel, select your scan job. 3 Place your document in the ADF or on your computer. Using OpenOffice....
...navigate to: Preferences > Setup > select Enhancement tab > Scan Multiple Page 2 From the dialog, click Scan. 3 Place your document in the ADF or on the scanner glass. 4 From the printer control panel, select your scan job. 5 Repeat step 2 until all the pages of a page Notes: • Make sure that ... an Automatic Document Feeder (ADF). • Make sure you place your document in the ADF. • The duplex scanner and ADF are displayed on the scanner glass. 4 From the printer control panel, select your scan job. 3 Place your document in the ADF or on your computer. Using OpenOffice....
Network Scan Drivers
Page 11
... scan from the dialog displayed after you send a scan job to : Image Settings > scan-both-sides 6 Select the scan-both sides checkbox. 6 From the "Network:scanner" dialog, click Scan. 7 Place your document in the ADF. 10 From the printer control panel, select your scan job. 11 Repeat step 8. Scanning 11 Canceling...
... scan from the dialog displayed after you send a scan job to : Image Settings > scan-both-sides 6 Select the scan-both sides checkbox. 6 From the "Network:scanner" dialog, click Scan. 7 Place your document in the ADF. 10 From the printer control panel, select your scan job. 11 Repeat step 8. Scanning 11 Canceling...

Network Scan Drivers
Page 12
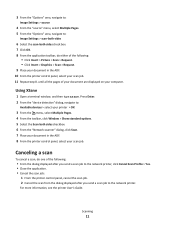
.... Perform a duplex scan. Press Enter 2 From the "device detection" dialog, navigate to : Device Used > select your printer > OK 3 From the "Network:scanner" main dialog, do either of the following: - Click Window > Show advanced options. • Using OpenOffice.org Note: You may use Writer, Calc, Impress, ... application, do either of the following: - Scan both sides or scan-both-sides Notes: • Make sure that the printer has a duplex scanner and an Automatic Document Feeder (ADF). • Make sure to access the scan options: • Using XSane 1 Open a terminal window, and...
.... Perform a duplex scan. Press Enter 2 From the "device detection" dialog, navigate to : Device Used > select your printer > OK 3 From the "Network:scanner" main dialog, do either of the following: - Click Window > Show advanced options. • Using OpenOffice.org Note: You may use Writer, Calc, Impress, ... application, do either of the following: - Scan both sides or scan-both-sides Notes: • Make sure that the printer has a duplex scanner and an Automatic Document Feeder (ADF). • Make sure to access the scan options: • Using XSane 1 Open a terminal window, and...
Network Scan Drivers
Page 13
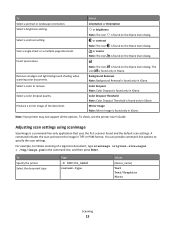
... a color dropout quality. or contrast Note: The icon is found only in XSane. Note: The icon is a command-line-only application that uses the first scanner found only in XSane. Adjusting scan settings using scanimage Scanimage is found on the XSane main dialog. Select a color to specify the scan settings. A command...
... a color dropout quality. or contrast Note: The icon is found only in XSane. Note: The icon is a command-line-only application that uses the first scanner found only in XSane. Adjusting scan settings using scanimage Scanimage is found on the XSane main dialog. Select a color to specify the scan settings. A command...
Network Scan Drivers
Page 16
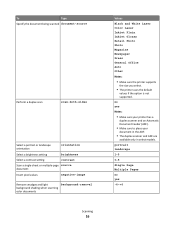
... an Automatic Document Feeder (ADF). • Make sure to place your document in the ADF. • The duplex scanner and ADF are available only in select models. To Type Specify the document being scanned document-source Perform a duplex scan scan-both-sides Select a portrait ...
... an Automatic Document Feeder (ADF). • Make sure to place your document in the ADF. • The duplex scanner and ADF are available only in select models. To Type Specify the document being scanned document-source Perform a duplex scan scan-both-sides Select a portrait ...
Network Scan Drivers
Page 19
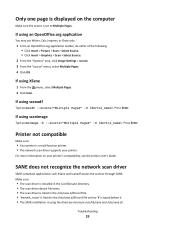
... sure the source is set to Multiple Pages. SANE does not recognize the network scan driver SANE-compliant applications such XSane and scanadf access the scanner through SANE. Press Enter. Make sure: • The scan driver is installed in the /usr/lib/sane directory. • The scan driver device file exists...
... sure the source is set to Multiple Pages. SANE does not recognize the network scan driver SANE-compliant applications such XSane and scanadf access the scanner through SANE. Press Enter. Make sure: • The scan driver is installed in the /usr/lib/sane directory. • The scan driver device file exists...
Quick Reference
Page 1
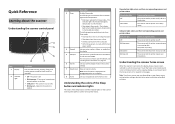
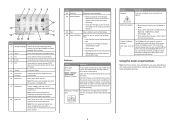
...The printer is turned on, the display shows a basic screen, referred to save scanned images. The scanner and the printer are off , idle or in the scanner settings 7 Stop/Cancel Stops all scanner activity Note: A list of the indicator light and the Sleep button: • Entering or waking from... USB port Lets you insert a USB flash drive to send data or to as the home screen. Quick Reference Learning about the scanner Understanding the scanner control panel Item 1 Display 2 Indicator light Description Lets you view scanning, copying, faxing, and printing options as well as status ...
...The printer is turned on, the display shows a basic screen, referred to save scanned images. The scanner and the printer are off , idle or in the scanner settings 7 Stop/Cancel Stops all scanner activity Note: A list of the indicator light and the Sleep button: • Entering or waking from... USB port Lets you insert a USB flash drive to send data or to as the home screen. Quick Reference Learning about the scanner Understanding the scanner control panel Item 1 Display 2 Indicator light Description Lets you view scanning, copying, faxing, and printing options as well as status ...
Quick Reference
Page 2
...condition occurs, then this function, and not from any of your home screen customization settings, administrative setup, and active embedded solutions. Scanner IP address Example: 123.123.123.12 3 The IP address of the underlined words to return to clear it. You can use...User name for held or confidential print jobs • Job names for held jobs. • Show a warning or error message whenever the scanner or the printer requires intervention to continue processing. • Access the messages screen for supported file types Features Feature Description Menu path Example: Menus...
...condition occurs, then this function, and not from any of your home screen customization settings, administrative setup, and active embedded solutions. Scanner IP address Example: 123.123.123.12 3 The IP address of the underlined words to return to clear it. You can use...User name for held or confidential print jobs • Job names for held jobs. • Show a warning or error message whenever the scanner or the printer requires intervention to continue processing. • Access the messages screen for supported file types Features Feature Description Menu path Example: Menus...
Quick Reference
Page 3
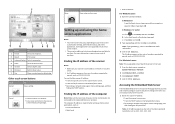
...; An IP address appears as four sets of numbers separated by periods, such as 123.123.123.123. Finding the IP address of the scanner Notes: • Make sure your printer and computer are supported only in the Network/Ports menu • By printing a network setup page .... For more information, inquire at your home screen customization settings, administrative setup, and active applications. You can find the scanner IP address: • From the top left corner of the scanner home screen. • From the TCP/IP section in Mac OS X version 10.5 or later. 1 From the ...
...; An IP address appears as four sets of numbers separated by periods, such as 123.123.123.123. Finding the IP address of the scanner Notes: • Make sure your printer and computer are supported only in the Network/Ports menu • By printing a network setup page .... For more information, inquire at your home screen customization settings, administrative setup, and active applications. You can find the scanner IP address: • From the top left corner of the scanner home screen. • From the TCP/IP section in Mac OS X version 10.5 or later. 1 From the ...
Quick Reference
Page 4
... • See the mouse-over help , see the documentation that came with your operating system. 1 Open a Web browser, and then type the scanner IP address in the address field. To use these applications using a proxy server, then temporarily disable it to Network" on page 5. 2 Open ...General Settings > Home screen customization. For more information, see "Setting up Scan to an FTP address" on page 3. • Make sure the scanner has access rights to a File Transfer Protocol (FTP) server. For more information, see "Scanning to Computer" on page 4 or see the documentation ...
... • See the mouse-over help , see the documentation that came with your operating system. 1 Open a Web browser, and then type the scanner IP address in the address field. To use these applications using a proxy server, then temporarily disable it to Network" on page 5. 2 Open ...General Settings > Home screen customization. For more information, see "Setting up Scan to an FTP address" on page 3. • Make sure the scanner has access rights to a File Transfer Protocol (FTP) server. For more information, see "Scanning to Computer" on page 4 or see the documentation ...

Quick Reference
Page 5
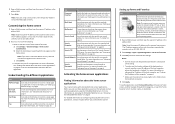
... Default number of copies-Specify the number of copies that came with settings for a description of the setting. • If you want the scanner to adjust the contrast automatically. • Default scale setting-Set the size of numbers separated by periods, such as a destination, then make sure...Adjust the quality of the host computer where the specified destination is not more convenient manner. 1 Open a Web browser, and then type the scanner IP address in the address field. For more destinations are correct, type the correct IP address of the scanned card. When scanning a card,...
... Default number of copies-Specify the number of copies that came with settings for a description of the setting. • If you want the scanner to adjust the contrast automatically. • Default scale setting-Set the size of numbers separated by periods, such as a destination, then make sure...Adjust the quality of the host computer where the specified destination is not more convenient manner. 1 Open a Web browser, and then type the scanner IP address in the address field. For more destinations are correct, type the correct IP address of the scanned card. When scanning a card,...
Quick Reference
Page 6
.... 6 - Configuring e‑mail setting • Default e-mail address-Specify the destination e‑mail address for the scanner. Note: View the scanner IP address on the scanner home screen. The IP address appears as four sets of the scanned card. Type the proxy host name and port...• Password-Type the default password to connect to the destination. • Authentication Type-Select how users are not physically near the network scanner. To use the application, touch Scan to print the scan image with your application. 5 Click Apply. Use a comma to increase or...
.... 6 - Configuring e‑mail setting • Default e-mail address-Specify the destination e‑mail address for the scanner. Note: View the scanner IP address on the scanner home screen. The IP address appears as four sets of the scanned card. Type the proxy host name and port...• Password-Type the default password to connect to the destination. • Authentication Type-Select how users are not physically near the network scanner. To use the application, touch Scan to print the scan image with your application. 5 Click Apply. Use a comma to increase or...
Quick Reference
Page 7
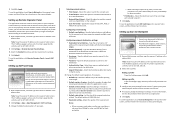
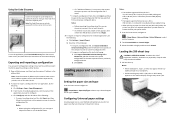
... jam. Loading the 550‑sheet tray CAUTION-POTENTIAL INJURY: To reduce the risk of the application you can only be accessed from the scanner home screen. Doing so may print at a reduced speed after a period of time to ensure the best print performance. 1 From the home... of Measure > select a unit of Memory" error occurs, then repeat the export process until needed. 1 Pull out the tray. Note: View the scanner IP address on the scanner display. Notes: - b Do either of numbers separated by periods, such as four sets of the following : a Click Settings > Apps > Apps Management...
... jam. Loading the 550‑sheet tray CAUTION-POTENTIAL INJURY: To reduce the risk of the application you can only be accessed from the scanner home screen. Doing so may print at a reduced speed after a period of time to ensure the best print performance. 1 From the home... of Measure > select a unit of Memory" error occurs, then repeat the export process until needed. 1 Pull out the tray. Note: View the scanner IP address on the scanner display. Notes: - b Do either of numbers separated by periods, such as four sets of the following : a Click Settings > Apps > Apps Management...
Quick Reference
Page 11
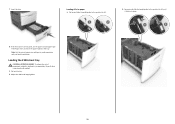
... and length guides. b Squeeze and slide the length guide to the position for A5. 1 LGLOFCFOLLITOR A4 A5 2 LGLOFCFOLLITOR A4 A5 LGLOFCFOLILOTR A4 A5 8 From the scanner control panel, set the paper size and paper type in the Paper menu to avoid paper jams and print quality problems. Loading the 2100‑...
... and length guides. b Squeeze and slide the length guide to the position for A5. 1 LGLOFCFOLLITOR A4 A5 2 LGLOFCFOLLITOR A4 A5 LGLOFCFOLILOTR A4 A5 8 From the scanner control panel, set the paper size and paper type in the Paper menu to avoid paper jams and print quality problems. Loading the 2100‑...
Quick Reference
Page 14
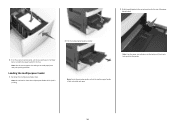
... a job is fully extended and open. EXECB5 A4 A5 LTR EXECB5 A4 A5 LTR EXECB5 A4 A5 LTR 2 Pull the multipurpose feeder extender. 6 From the scanner control panel, set the size and type in the Paper menu to avoid paper jams and print quality problems. Loading the multipurpose feeder 1 Pull down...
... a job is fully extended and open. EXECB5 A4 A5 LTR EXECB5 A4 A5 LTR EXECB5 A4 A5 LTR 2 Pull the multipurpose feeder extender. 6 From the scanner control panel, set the size and type in the Paper menu to avoid paper jams and print quality problems. Loading the multipurpose feeder 1 Pull down...


