Print Drivers for UNIX and LINUX Systems
Page 14
... packages, check the directory where you may be located in the /opt/lexmark, /usr/local/lexmark, /usr/spool/lp/lexmark, or /var/spool/lexmark directories. By default, the printer drivers are using Sun Solaris, run the uninstall script to remove some directories manually. Note: You must unlink the files before uninstalling the package. # /usr/lexprint...
... packages, check the directory where you may be located in the /opt/lexmark, /usr/local/lexmark, /usr/spool/lp/lexmark, or /var/spool/lexmark directories. By default, the printer drivers are using Sun Solaris, run the uninstall script to remove some directories manually. Note: You must unlink the files before uninstalling the package. # /usr/lexprint...
Tech Notes
Page 1
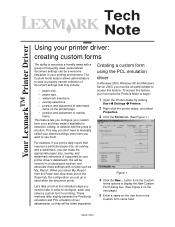
...; Printers. 2 Right-click the printer object, and select Properties. 3 Click the Forms tab. (See Figure 1.) Figure 1 4 Click the New... This way, you don't have to manually select your desired settings every time you must open the Printers folder to access this feature. Creating a custom form using the PCL emulation driver In...
...; Printers. 2 Right-click the printer object, and select Properties. 3 Click the Forms tab. (See Figure 1.) Figure 1 4 Click the New... This way, you don't have to manually select your desired settings every time you must open the Printers folder to access this feature. Creating a custom form using the PCL emulation driver In...
Tech Notes
Page 2
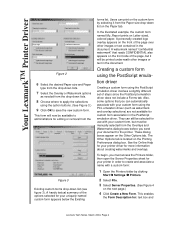
...in the document. These dialog boxes appear on Letter-sized, colored paper. See the Online Help for your printer driver for : text box and Lexmark Tech Notes, March 2004, Page 2 A personally created logo overlay appears on the front of steps since the PostScript emulation driver does not include a...down list (see figure 3). In the illustrated example, the custom form named My_Report prints on the Other Options tab. This form will be manually selected from the Figure 3 Existing custom forms drop-down list on the front side of the options selected for your printer in the document...
...in the document. These dialog boxes appear on Letter-sized, colored paper. See the Online Help for your printer driver for : text box and Lexmark Tech Notes, March 2004, Page 2 A personally created logo overlay appears on the front of steps since the PostScript emulation driver does not include a...down list (see figure 3). In the illustrated example, the custom form named My_Report prints on the Other Options tab. This form will be manually selected from the Figure 3 Existing custom forms drop-down list on the front side of the options selected for your printer in the document...
Universal Print Driver Version 2.0 White Paper
Page 4
... account code, and a department code. A driver configuration contains various document settings and printer options. Administrators can also manually choose a specific language from the Configuration tab in more consistent look and feel across different printer models. Connecting the ...ability to update itself to determine a printer model automatically. Introduction 4 Facilitates corporate sustainability initiatives Administrators can use the Lexmark Universal Print Drivers to a printer through USB or over a network, the driver automatically updates its configuration, showing only...
... account code, and a department code. A driver configuration contains various document settings and printer options. Administrators can also manually choose a specific language from the Configuration tab in more consistent look and feel across different printer models. Connecting the ...ability to update itself to determine a printer model automatically. Introduction 4 Facilitates corporate sustainability initiatives Administrators can use the Lexmark Universal Print Drivers to a printer through USB or over a network, the driver automatically updates its configuration, showing only...
Universal Print Driver Version 2.0 White Paper
Page 15
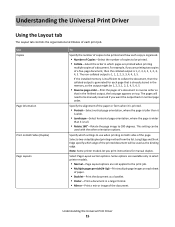
...that in a larger format. • Mirror-Print a mirror image of the document. Long Edge and Short Edge specify which settings to be manually reversed if you print instructions for each copy is organized. • Number of Copies-Select the number of copies to 180 degrees. Specify ... need to use when printing on top. If the installed memory is insufficient to collate the document, then the collated output is generated for manual duplex. Select a two‑sided (duplex) printing method from the list. Some options are available only in select printer models. •...
...that in a larger format. • Mirror-Print a mirror image of the document. Long Edge and Short Edge specify which settings to be manually reversed if you print instructions for each copy is organized. • Number of Copies-Select the number of copies to 180 degrees. Specify ... need to use when printing on top. If the installed memory is insufficient to collate the document, then the collated output is generated for manual duplex. Select a two‑sided (duplex) printing method from the list. Some options are available only in select printer models. •...
Universal Print Driver Version 2.0 White Paper
Page 16
... size," which automatically scales the page image to use with the printer. • Output Bin-Select the output bin to match a specific paper size, or manually scale the document image by a certain percentage. Notes: • Some options displayed on the Layout tab are selected in the print dialog of each print...
... size," which automatically scales the page image to use with the printer. • Output Bin-Select the output bin to match a specific paper size, or manually scale the document image by a certain percentage. Notes: • Some options displayed on the Layout tab are selected in the print dialog of each print...
Universal Print Driver Version 2.0 White Paper
Page 17
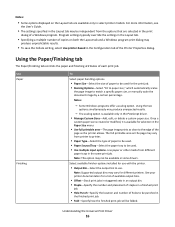
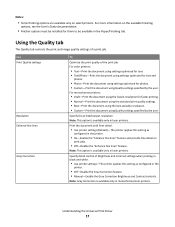
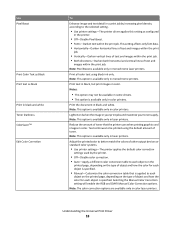
... document using Quality settings specified by the user. Note: Gray Correction is available only in the printer. • Off-Disable the Gray Correction feature. • Manual-Enable the Gray Correction Brightness and Contrast controls. Note: This option is available only in the Paper/Finishing tab. Specify detail control of Brightness and...
... document using Quality settings specified by the user. Note: Gray Correction is available only in the printer. • Off-Disable the Gray Correction feature. • Manual-Enable the Gray Correction Brightness and Contrast controls. Note: This option is available only in the Paper/Finishing tab. Specify detail control of Brightness and...
Universal Print Driver Version 2.0 White Paper
Page 18
...job. • Both directions-Darken both horizontal and vertical lines of object and how the color for each object is specified. • Manual-Customize the color conversion table that the printer uses when printing graphics and images in black and white. Print the document in color. Reduce... 18 Note: This option is available only in your print jobs and maximize your toner supply. Selecting the Manual Color Correction setting will enable the RGB and CMYK Manual Color Correction options. Lighten or darken the image in color printers. Print text in black, but print images...
...job. • Both directions-Darken both horizontal and vertical lines of object and how the color for each object is specified. • Manual-Customize the color conversion table that the printer uses when printing graphics and images in black and white. Print the document in color. Reduce... 18 Note: This option is available only in your print jobs and maximize your toner supply. Selecting the Manual Color Correction setting will enable the RGB and CMYK Manual Color Correction options. Lighten or darken the image in color printers. Print text in black, but print images...
Universal Print Driver Version 2.0 White Paper
Page 19
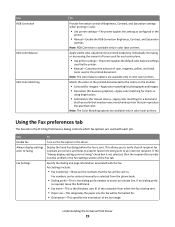
... associated with each color plane. • Use printer settings-The printer applies the default color balance settings used by the printer. • Manual-Customize the amount of cyan, magenta, yellow, and black toner used with the fax. Fax Settings include: • Fax number(s)-These are...color laser printers. Using the Fax preferences tab The Fax tab in color laser printers. Match the colors in the printer. • Manual-Enable the RGB Correction Brightness, Contrast, and Saturation controls. Use RGB Correction Edit Color Balance Edit Color Matching To Provide fine detail control...
... associated with each color plane. • Use printer settings-The printer applies the default color balance settings used by the printer. • Manual-Customize the amount of cyan, magenta, yellow, and black toner used with the fax. Fax Settings include: • Fax number(s)-These are...color laser printers. Using the Fax preferences tab The Fax tab in color laser printers. Match the colors in the printer. • Manual-Enable the RGB Correction Brightness, Contrast, and Saturation controls. Use RGB Correction Edit Color Balance Edit Color Matching To Provide fine detail control...
Universal Print Driver Version 2.0 White Paper
Page 25
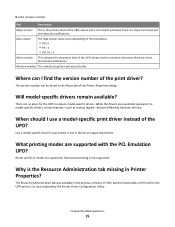
... available in the previous versions of UPD, but the functionality of this tab for the UPD to model‑specific drivers, certain features-such as manual duplex-behave differently between the two. Frequently asked questions 25 There are major functional and architectural modifications. While the drivers are minor functional modifications. The...
... available in the previous versions of UPD, but the functionality of this tab for the UPD to model‑specific drivers, certain features-such as manual duplex-behave differently between the two. Frequently asked questions 25 There are major functional and architectural modifications. While the drivers are minor functional modifications. The...
Quick Reference
Page 20
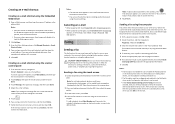
... touch Cancel, and then reenter the information. Faxing Sending a fax The fax function lets you to "print to fax," where the scanner will be entered manually or by using the address book. Sending a fax using the touch screen or keypad. You can be sent automatically as a fax rather than print it...
... touch Cancel, and then reenter the information. Faxing Sending a fax The fax function lets you to "print to fax," where the scanner will be entered manually or by using the address book. Sending a fax using the touch screen or keypad. You can be sent automatically as a fax rather than print it...
Quick Reference
Page 24
... printer reprints jammed pages. feeder, then 201] remove the toner cartridge and the imaging unit, and then remove the jammed paper. [x]‑page jam, clear manual feeder. [250] Remove all the way back. 2 1 Notes: • When Jam Assist is not under the bin arm, and then push the paper all paper...
... printer reprints jammed pages. feeder, then 201] remove the toner cartridge and the imaging unit, and then remove the jammed paper. [x]‑page jam, clear manual feeder. [250] Remove all the way back. 2 1 Notes: • When Jam Assist is not under the bin arm, and then push the paper all paper...
Quick Reference
Page 29
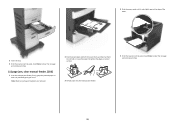
... edge of the paper. 3 Insert the tray. 4 From the scanner control panel, touch Done to clear the message and continue printing. [x]‑page jam, clear manual feeder. [250] 1 From the multipurpose feeder, firmly grasp the jammed paper on a level surface. 3 Reload paper into the multipurpose feeder. 5 From the scanner control panel...
... edge of the paper. 3 Insert the tray. 4 From the scanner control panel, touch Done to clear the message and continue printing. [x]‑page jam, clear manual feeder. [250] 1 From the multipurpose feeder, firmly grasp the jammed paper on a level surface. 3 Reload paper into the multipurpose feeder. 5 From the scanner control panel...
Copy Guide
Page 2
... not in one of the document. Sides (Duplex) This option lets you are in sequence when printing multiple copies of the trays, then touch Manual Feeder, and manually load the paper in value, hold the button for "Copy from" and "Copy to" are different, then the printer automatically adjusts the Scale setting...
... not in one of the document. Sides (Duplex) This option lets you are in sequence when printing multiple copies of the trays, then touch Manual Feeder, and manually load the paper in value, hold the button for "Copy from" and "Copy to" are different, then the printer automatically adjusts the Scale setting...
Fax Guide
Page 1
...) into the ADF or on the scanner glass. 2 If you scan items and fax them to one or more recipients. Fax numbers can be entered manually or by entering the fax number, using a shortcut number, or using the computer The printer driver fax option allows you need to dial an outside...
...) into the ADF or on the scanner glass. 2 If you scan items and fax them to one or more recipients. Fax numbers can be entered manually or by entering the fax number, using a shortcut number, or using the computer The printer driver fax option allows you need to dial an outside...
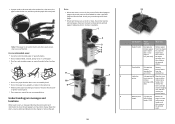
User's Guide
Page 5
... jam. [203 283 [x]‑page jam, remove tray 1 to clear duplex. [235-239 283 [x]‑page jam, open tray [x]. [24x]...285 [x]‑page jam, clear manual feeder. [250 286 [x]‑page jam, remove paper, open expander rear door.
... jam. [203 283 [x]‑page jam, remove tray 1 to clear duplex. [235-239 283 [x]‑page jam, open tray [x]. [24x]...285 [x]‑page jam, clear manual feeder. [250 286 [x]‑page jam, remove paper, open expander rear door.
User's Guide
Page 21
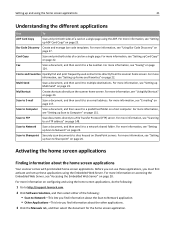
...MyShortcut Create shortcuts directly on the scanner home screen. Activating the home screen applications Finding information about the other applications. 3 Click the Manuals tab, and then select the document for the home screen application. For more information, see "Accessing the Embedded Web Server" on... on a host computer. For more information on configuring and using the home screen applications, do the following: 1 Go to http://support.lexmark.com. 2 Click Software Solutions, and then select either of the following: • Scan to Network-This lets you find and print...
...MyShortcut Create shortcuts directly on the scanner home screen. Activating the home screen applications Finding information about the other applications. 3 Click the Manuals tab, and then select the document for the home screen application. For more information, see "Accessing the Embedded Web Server" on... on a host computer. For more information on configuring and using the home screen applications, do the following: 1 Go to http://support.lexmark.com. 2 Click Software Solutions, and then select either of the following: • Scan to Network-This lets you find and print...
User's Guide
Page 53
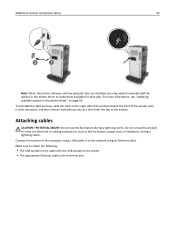
... port Do not set up this product or make them available for print jobs. Connect the scanner to the computer using a USB cable or to manually add the options in the printer driver" on page 56. To uninstall the optional trays, slide the latch on the printer • The appropriate Ethernet...
... port Do not set up this product or make them available for print jobs. Connect the scanner to the computer using a USB cable or to manually add the options in the printer driver" on page 56. To uninstall the optional trays, slide the latch on the printer • The appropriate Ethernet...
User's Guide
Page 56
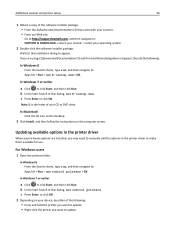
... control printers. Wait for use. c Press Enter or click OK. Note: D is the letter of your CD or DVD drive. If you may need to manually add the options in the printer driver When any hardware options are installed, you are using a Software and Documentation CD and the installation dialog does... the software installer package. • From the Software and Documentation CD that came with your scanner. • From our Web site: Go to http://support.lexmark.com, and then navigate to : Apps list > Run > type D:\setup.exe > OK.
... control printers. Wait for use. c Press Enter or click OK. Note: D is the letter of your CD or DVD drive. If you may need to manually add the options in the printer driver When any hardware options are installed, you are using a Software and Documentation CD and the installation dialog does... the software installer package. • From the Software and Documentation CD that came with your scanner. • From our Web site: Go to http://support.lexmark.com, and then navigate to : Apps list > Run > type D:\setup.exe > OK.
User's Guide
Page 57
... remember. To configure your scanner to connect to an Ethernet network, organize the following : • Click Update Now ‑ Ask Printer. • Under Configuration Options, manually add any installed hardware options, and then click OK. Use a new network cable when possible to identify your network automatically assigns IP addresses to computers...
... remember. To configure your scanner to connect to an Ethernet network, organize the following : • Click Update Now ‑ Ask Printer. • Under Configuration Options, manually add any installed hardware options, and then click OK. Use a new network cable when possible to identify your network automatically assigns IP addresses to computers...


