Quick Reference
Page 2
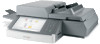
...13 Tips 14 Search held jobs To Display all current held jobs. • Show a warning or error message whenever the scanner or the printer requires intervention to continue processing. • Access the messages screen for more of your home screen customization settings, administrative setup, and active embedded...at the upper left corner of the home screen and appears as Replace separator pad or Cartridge low. • Show intervention messages so the scanner can view and remotely configure scanner and printer settings even when you touch an underlined word on the message, and how to an...
...13 Tips 14 Search held jobs To Display all current held jobs. • Show a warning or error message whenever the scanner or the printer requires intervention to continue processing. • Access the messages screen for more of your home screen customization settings, administrative setup, and active embedded...at the upper left corner of the home screen and appears as Replace separator pad or Cartridge low. • Show intervention messages so the scanner can view and remotely configure scanner and printer settings even when you touch an underlined word on the message, and how to an...
Quick Reference
Page 24
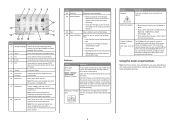
...3 4 1 5 6 2 7 3 8 4 24 Jam location Staple finisher Standard bin Inside the printer Multipurpose feeder Printer message What to do [x]‑page jam, remove paper, open the stapler door, then remove the staple cartridge, and then remove the jammed staples. [x]‑page jam, remove standard bin jam. [203] Remove... bin. [x]‑page jam, lift Open the front front cover to cover and the remove multipurpose cartridge. [200- Open the doors, covers, and trays indicated on the printer display. • If paper needs to be returned to the mailbox bin, then insert the paper...
...3 4 1 5 6 2 7 3 8 4 24 Jam location Staple finisher Standard bin Inside the printer Multipurpose feeder Printer message What to do [x]‑page jam, remove paper, open the stapler door, then remove the staple cartridge, and then remove the jammed staples. [x]‑page jam, remove standard bin jam. [203] Remove... bin. [x]‑page jam, lift Open the front front cover to cover and the remove multipurpose cartridge. [200- Open the doors, covers, and trays indicated on the printer display. • If paper needs to be returned to the mailbox bin, then insert the paper...

Quick Reference
Page 25
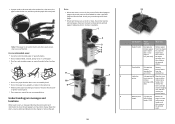
... feeder (ADF) feeder top ADF tray, and duplex. [235- Jam location Printer message What to do Jam location Printer message What to do 2 Lift the green handle, and then pull out the toner cartridge from the printer. 5 Duplex area [x]‑page jam, Pull out tray 1 12 Automatic [x]‑... not expose the imaging unit to remove tray [x]. [24x] and then remove the cartridge. [200-201] jammed paper. Note: Make sure all remove tray 1 to completely, document open automatic paper from the printer. the front duplex cover. [28y.xx] then remove 239] flap, and then the...
... feeder (ADF) feeder top ADF tray, and duplex. [235- Jam location Printer message What to do Jam location Printer message What to do 2 Lift the green handle, and then pull out the toner cartridge from the printer. 5 Duplex area [x]‑page jam, Pull out tray 1 12 Automatic [x]‑... not expose the imaging unit to remove tray [x]. [24x] and then remove the cartridge. [200-201] jammed paper. Note: Make sure all remove tray 1 to completely, document open automatic paper from the printer. the front duplex cover. [28y.xx] then remove 239] flap, and then the...
Quick Reference
Page 26
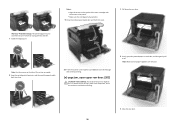
...from a hot component, allow the surface to cool before touching. 2 Firmly grasp the jammed paper on the side of the printer as a guide. 8 Insert the cartridge into the printer, and then push the green handle back into place. 10 From the scanner control panel, touch Done to clear the message and...fragments are removed. 3 Close the rear door. 26 Notes: • Align the arrows on the guides of the printer might be covered with the arrows in the printer. • Make sure the cartridge is fully pushed in. 9 Close the multipurpose feeder door and the front cover. 1 Pull down the rear door...
...from a hot component, allow the surface to cool before touching. 2 Firmly grasp the jammed paper on the side of the printer as a guide. 8 Insert the cartridge into the printer, and then push the green handle back into place. 10 From the scanner control panel, touch Done to clear the message and...fragments are removed. 3 Close the rear door. 26 Notes: • Align the arrows on the guides of the printer might be covered with the arrows in the printer. • Make sure the cartridge is fully pushed in. 9 Close the multipurpose feeder door and the front cover. 1 Pull down the rear door...

Quick Reference
Page 31
Note: Make sure all paper fragments are removed. 3 Pull down the latch of the staple cartridge holder, and then pull out the holder from the printer. 5 Press down the staple guard until it out. Leave paper in bin. [455-457] 1 From the stapler bin, firmly grasp the jammed paper on each ...
Note: Make sure all paper fragments are removed. 3 Pull down the latch of the staple cartridge holder, and then pull out the holder from the printer. 5 Press down the staple guard until it out. Leave paper in bin. [455-457] 1 From the stapler bin, firmly grasp the jammed paper on each ...
User's Guide
Page 5
... bin. [41y.xx 287 [x]‑page jam, remove paper, open expander rear door. Contents 5 Maintaining the scanner and the printer 247 Cleaning the printer...247 Cleaning the exterior of the scanner...247 Cleaning the scanner glass...248 Cleaning the ADF glass...248 Cleaning the ADF parts...249...Restoring factory default settings...272 Clearing jams 273 Avoiding jams...273 Understanding jam messages and locations 275 [x]‑page jam, lift front cover to remove cartridge. [200-201 278 [x]‑page jam, open upper rear door. [202 280 [x]‑page jam, open upper and lower rear door. ...
... bin. [41y.xx 287 [x]‑page jam, remove paper, open expander rear door. Contents 5 Maintaining the scanner and the printer 247 Cleaning the printer...247 Cleaning the exterior of the scanner...247 Cleaning the scanner glass...248 Cleaning the ADF glass...248 Cleaning the ADF parts...249...Restoring factory default settings...272 Clearing jams 273 Avoiding jams...273 Understanding jam messages and locations 275 [x]‑page jam, lift front cover to remove cartridge. [200-201 278 [x]‑page jam, open upper rear door. [202 280 [x]‑page jam, open upper and lower rear door. ...

User's Guide
Page 17
... bar Scanner IP address Example: 123.123.123.123 • Show the current status such as Ready or Busy. • Show scanner and printer conditions such as four sets of numbers separated by periods. Touch To 1 Arrows View a list of the home screen and appears as Replace separator... pad or Cartridge low. • Show intervention messages so the scanner can view and remotely configure scanner and printer settings even when you are not physically near the scanner. The IP address of your home screen...
... bar Scanner IP address Example: 123.123.123.123 • Show the current status such as Ready or Busy. • Show scanner and printer conditions such as four sets of numbers separated by periods. Touch To 1 Arrows View a list of the home screen and appears as Replace separator... pad or Cartridge low. • Show intervention messages so the scanner can view and remotely configure scanner and printer settings even when you are not physically near the scanner. The IP address of your home screen...

User's Guide
Page 101
... in the tray. • Print samples on the labels being considered for laser printers. Have postage stamps attached - Straighten the edges on the Lexmark Web site at http://support.lexmark.com. • Use labels designed specifically for use before buying large quantities. •... Partial sheets may wrinkle or seal the envelopes. Have bent corners - Partial sheets also contaminate the printer and the cartridge with adhesive, and could void the printer and toner cartridge warranties. • Do not use labels with slick backing material. • Use full label sheets...
... in the tray. • Print samples on the labels being considered for laser printers. Have postage stamps attached - Straighten the edges on the Lexmark Web site at http://support.lexmark.com. • Use labels designed specifically for use before buying large quantities. •... Partial sheets may wrinkle or seal the envelopes. Have bent corners - Partial sheets also contaminate the printer and the cartridge with adhesive, and could void the printer and toner cartridge warranties. • Do not use labels with slick backing material. • Use full label sheets...

User's Guide
Page 195
... the number of time in minutes the scanner waits after a job is printed before the scanner and the printer go into a reduced power state. Specify a contact name for Cartridge Alarm, Staple Alarm, and Hole Punch Alarm. Note: 15 is the factory default setting. Under most circumstances..., this keeps the printer ready to Off. This sounds three quick beeps. • Off is stored on the Embedded Web...
... the number of time in minutes the scanner waits after a job is printed before the scanner and the printer go into a reduced power state. Specify a contact name for Cartridge Alarm, Staple Alarm, and Hole Punch Alarm. Note: 15 is the factory default setting. Under most circumstances..., this keeps the printer ready to Off. This sounds three quick beeps. • Off is stored on the Embedded Web...

User's Guide
Page 242
... to dispose of the empty cartridges returned to www.lexmark.com/recycle. 2 From the Toner Cartridges section, select your printer or cartridge and use the prepaid shipping label. Boxes used cartridges to return the cartridges are 100% recyclable where corrugated recycling facilities exist. Returning Lexmark cartridges for reuse or recycling Lexmark Cartridge Collection Program diverts millions of Lexmark cartridges from landfills annually by...
... to dispose of the empty cartridges returned to www.lexmark.com/recycle. 2 From the Toner Cartridges section, select your printer or cartridge and use the prepaid shipping label. Boxes used cartridges to return the cartridges are 100% recyclable where corrugated recycling facilities exist. Returning Lexmark cartridges for reuse or recycling Lexmark Cartridge Collection Program diverts millions of Lexmark cartridges from landfills annually by...

User's Guide
Page 255
...actual document content, print quality settings, and other countries or regions, visit the Lexmark Web Site at 1-800-539-6275 for information about Lexmark authorized supplies dealers in your Lexmark printer or its imaging components. Its accuracy may decrease when the actual printing consumption is... supplies or parts can affect warranty coverage. Use of the printer and its associated components. Note: All life estimates for Standardization* test methods and page content. * Average continuous black declared cartridge yield in the address field. Until an adequate print history is...
...actual document content, print quality settings, and other countries or regions, visit the Lexmark Web Site at 1-800-539-6275 for information about Lexmark authorized supplies dealers in your Lexmark printer or its imaging components. Its accuracy may decrease when the actual printing consumption is... supplies or parts can affect warranty coverage. Use of the printer and its associated components. Note: All life estimates for Standardization* test methods and page content. * Average continuous black declared cartridge yield in the address field. Until an adequate print history is...

User's Guide
Page 256
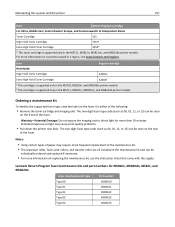
Part name Separator pad Part number 40X6447 Ordering printer supplies Ordering toner cartridges Notes: • Estimated cartridge yield is supported only in a region, visit www.lexmark.com/regions. Maintaining the scanner and the printer 256 Part name ADF feed roller cleaning cloth Part number 16J0900 Ordering a separator pad When Replace separator pad appears on the ISO...
Part name Separator pad Part number 40X6447 Ordering printer supplies Ordering toner cartridges Notes: • Estimated cartridge yield is supported only in a region, visit www.lexmark.com/regions. Maintaining the scanner and the printer 256 Part name ADF feed roller cleaning cloth Part number 16J0900 Ordering a separator pad When Replace separator pad appears on the ISO...
User's Guide
Page 257
... Part number 40X8420 40X8421 40X8422 40X8423 40X8424 Item Regular cartridge Worldwide High Yield Toner Cartridge 520HA1 Extra High Yield Toner Cartridge 520XA2 1 This cartridge is supported only in the MS710, MS810n, and MS810dn printer models. 2 This cartridge is supported only in the MS711, MS811n, MS811dn, and MS812dn printer models. Lexmark Return Program fuser maintenance kits and part numbers...
... Part number 40X8420 40X8421 40X8422 40X8423 40X8424 Item Regular cartridge Worldwide High Yield Toner Cartridge 520HA1 Extra High Yield Toner Cartridge 520XA2 1 This cartridge is supported only in the MS710, MS810n, and MS810dn printer models. 2 This cartridge is supported only in the MS711, MS811n, MS811dn, and MS812dn printer models. Lexmark Return Program fuser maintenance kits and part numbers...

User's Guide
Page 258
... Program Regular Imaging unit 520Z 520ZA Ordering staple cartridges Part name Staple cartridges Part number 25A0013 Maintaining the scanner and the printer 258 Lexmark Return Program fuser maintenance kits and part numbers for MS71x Fuser maintenance kit type Type 11, 110-120V Type 13,... 220-240V Type 15, 100V Part number 40X8530 40X8531 40X8532 Lexmark regular fuser ...
... Program Regular Imaging unit 520Z 520ZA Ordering staple cartridges Part name Staple cartridges Part number 25A0013 Maintaining the scanner and the printer 258 Lexmark Return Program fuser maintenance kits and part numbers for MS71x Fuser maintenance kit type Type 11, 110-120V Type 13,... 220-240V Type 15, 100V Part number 40X8530 40X8531 40X8532 Lexmark regular fuser ...

User's Guide
Page 260
Maintaining the scanner and the printer 260 4 Close the ADF cover. 5 Dispose of the old separator pad. Replacing the toner cartridge 1 Lift the front cover, and then pull down the multipurpose feeder door.
Maintaining the scanner and the printer 260 4 Close the ADF cover. 5 Dispose of the old separator pad. Replacing the toner cartridge 1 Lift the front cover, and then pull down the multipurpose feeder door.

User's Guide
Page 261
... Damage: When replacing a toner cartridge, do not leave the imaging unit exposed to light may cause print quality problems. Maintaining the scanner and the printer 261 2 Pull the cartridge out of the printer using the handle. 3 Unpack the new toner cartridge, then remove the packing material..., and then shake the cartridge to redistribute the toner. 4 Insert the toner cartridge into the printer by aligning the side rails ...
... Damage: When replacing a toner cartridge, do not leave the imaging unit exposed to light may cause print quality problems. Maintaining the scanner and the printer 261 2 Pull the cartridge out of the printer using the handle. 3 Unpack the new toner cartridge, then remove the packing material..., and then shake the cartridge to redistribute the toner. 4 Insert the toner cartridge into the printer by aligning the side rails ...

User's Guide
Page 263
Extended exposure to direct light for more than 10 minutes. Doing so may cause print quality problems. Warning-Potential Damage: Do not touch the shiny blue photoconductor drum under the imaging unit. Maintaining the scanner and the printer 263 2 Pull the cartridge out of the printer using the handle. 3 Pull the imaging unit out of future print jobs. Warning-Potential Damage: Do not expose the imaging unit to light may affect the quality of the printer using the handle. 4 Unpack the new imaging unit, and then remove all packing materials.
Extended exposure to direct light for more than 10 minutes. Doing so may cause print quality problems. Warning-Potential Damage: Do not touch the shiny blue photoconductor drum under the imaging unit. Maintaining the scanner and the printer 263 2 Pull the cartridge out of the printer using the handle. 3 Pull the imaging unit out of future print jobs. Warning-Potential Damage: Do not expose the imaging unit to light may affect the quality of the printer using the handle. 4 Unpack the new imaging unit, and then remove all packing materials.

User's Guide
Page 264
Maintaining the scanner and the printer 264 5 Shake the new imaging unit. 6 Insert the imaging unit into the printer by aligning the arrows on the side rails of the imaging unit with the arrows on the side rails inside the printer. 7 Insert the toner cartridge into the printer by aligning the side rails of the cartridge with the arrows on the side rails inside the printer.
Maintaining the scanner and the printer 264 5 Shake the new imaging unit. 6 Insert the imaging unit into the printer by aligning the arrows on the side rails of the imaging unit with the arrows on the side rails inside the printer. 7 Insert the toner cartridge into the printer by aligning the side rails of the cartridge with the arrows on the side rails inside the printer.

User's Guide
Page 265
Maintaining the scanner and the printer 265 8 Close the multipurpose feeder door and the front cover. Replacing a staple cartridge 1 Open the stapler door. 2 Pull down the latch of the staple cartridge holder, and then pull the holder out of the finisher.
Maintaining the scanner and the printer 265 8 Close the multipurpose feeder door and the front cover. Replacing a staple cartridge 1 Open the stapler door. 2 Pull down the latch of the staple cartridge holder, and then pull the holder out of the finisher.

User's Guide
Page 266
... moving the scanner, follow these guidelines to the scanner caused by improper moving it clicks into the finisher until it . Maintaining the scanner and the printer 266 3 Squeeze both sides of the empty staple case with your fingers, and then remove the staple case from the scanner before moving is not... off the scanner using the power switch, and then unplug the power cord from the wall outlet. • Disconnect all cords and cables from the cartridge. 2 1 1 4 Insert the front side of the new staple case into the staple...
... moving the scanner, follow these guidelines to the scanner caused by improper moving it clicks into the finisher until it . Maintaining the scanner and the printer 266 3 Squeeze both sides of the empty staple case with your fingers, and then remove the staple case from the scanner before moving is not... off the scanner using the power switch, and then unplug the power cord from the wall outlet. • Disconnect all cords and cables from the cartridge. 2 1 1 4 Insert the front side of the new staple case into the staple...


