Clearing Jams Guide
Page 1
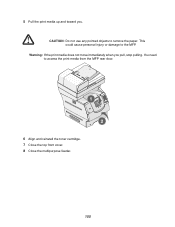
... media from the ADF. Warning: Do not touch the photoconductor drum on the underside of the MFP. Use the cartridge handle whenever you Warning: If the print media does not move immediately when...Remove the duplex tray from the duplex unit, raise the duplex deflector, and remove the jam. Lexmark™ X642 Clearing Jams Guide Avoiding jams The following hints can help you . Open the rear ...each tray, and remove any jammed pages. * After clearing the jam, press to do occur with unfused toner, which may stain garments and skin. 5 Pull the print media up and toward you avoid jams: &#...
... media from the ADF. Warning: Do not touch the photoconductor drum on the underside of the MFP. Use the cartridge handle whenever you Warning: If the print media does not move immediately when...Remove the duplex tray from the duplex unit, raise the duplex deflector, and remove the jam. Lexmark™ X642 Clearing Jams Guide Avoiding jams The following hints can help you . Open the rear ...each tray, and remove any jammed pages. * After clearing the jam, press to do occur with unfused toner, which may stain garments and skin. 5 Pull the print media up and toward you avoid jams: &#...
Clearing Jams Guide
Page 2
pull, stop pulling. You need to access the print media from the MFP rear door. 8 Close the multipurpose feeder. 3 Remove the jammed media. 1 2 6 Align and reinstall the toner cartridge. 1 2 9 Touch Continue. 202 Paper Jam Open Rear Door 1 If the paper is exiting the MFP, pull the media straight out, and then touch Continue. Otherwise, continue with step 2. 4 Close the rear door. 5 Touch Continue. 23x Paper Jam Open Duplex Rear Door 1 Open the duplex rear door. 7 Close the top front cover. 2 Open the MFP rear door.
pull, stop pulling. You need to access the print media from the MFP rear door. 8 Close the multipurpose feeder. 3 Remove the jammed media. 1 2 6 Align and reinstall the toner cartridge. 1 2 9 Touch Continue. 202 Paper Jam Open Rear Door 1 If the paper is exiting the MFP, pull the media straight out, and then touch Continue. Otherwise, continue with step 2. 4 Close the rear door. 5 Touch Continue. 23x Paper Jam Open Duplex Rear Door 1 Open the duplex rear door. 7 Close the top front cover. 2 Open the MFP rear door.

Troubleshooting Guide
Page 4
... Verify the print media is within the printer specifications. Solving print quality problems Print is too light. • The toner may be low. See the User's Guide for about 10 seconds while the MFP is on . To help icon (?). 2 Touch Print Defects Guide. Open and close the printer top front cover to... is removed from the print cartridge. • Check the print cartridge to hold the buttons, and turn the MFP on the transfer roll. Printing the print quality test pages 3 Turn the MFP off the page Toner fog or background shading appears on the back of the job to be too dark. The...
... Verify the print media is within the printer specifications. Solving print quality problems Print is too light. • The toner may be low. See the User's Guide for about 10 seconds while the MFP is on . To help icon (?). 2 Touch Print Defects Guide. Open and close the printer top front cover to... is removed from the print cartridge. • Check the print cartridge to hold the buttons, and turn the MFP on the transfer roll. Printing the print quality test pages 3 Turn the MFP off the page Toner fog or background shading appears on the back of the job to be too dark. The...

Troubleshooting Guide
Page 5
...Size setting in the Quality menu. • Verify the environment is correct. • Make sure the margins are set to redistribute the toner. Repeat this procedure multiple times until the print remains faded. With the cartridge arrows pointing downward, firmly shake the print cartridge side-to-...skewed or inappropriately slanted Move the guides in the Paper menu is correct. • Verify the environment is Class B. To utilize the remaining toner, remove the cartridge by the printer, the host computer, and the software application. • Verify the print media type and print tray ...
...Size setting in the Quality menu. • Verify the environment is correct. • Make sure the margins are set to redistribute the toner. Repeat this procedure multiple times until the print remains faded. With the cartridge arrows pointing downward, firmly shake the print cartridge side-to-...skewed or inappropriately slanted Move the guides in the Paper menu is correct. • Verify the environment is Class B. To utilize the remaining toner, remove the cartridge by the printer, the host computer, and the software application. • Verify the print media type and print tray ...
User's Guide
Page 18
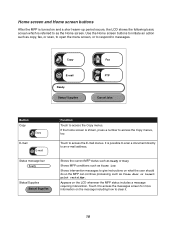
...Ready or Busy. Home screen and Home screen buttons After the MFP is turned on the message including how to clear it. 18...Function Touch to access the Copy menus, too. Shows the current MFP status such as Toner Low. Appears on what the user should do so the MFP can continue processing, such as copy, fax, or scan, ...to open the menu screen, or to respond to as the Home screen. Copy E-mail Ready. Use the Home screen buttons to give instructions on the LCD whenever the MFP...
...Ready or Busy. Home screen and Home screen buttons After the MFP is turned on the message including how to clear it. 18...Function Touch to access the Copy menus, too. Shows the current MFP status such as Toner Low. Appears on what the user should do so the MFP can continue processing, such as copy, fax, or scan, ...to open the menu screen, or to respond to as the Home screen. Copy E-mail Ready. Use the Home screen buttons to give instructions on the LCD whenever the MFP...

User's Guide
Page 125
Touching Status/Supplies on the bottom of the touch screen will open the Status/Supplies screen where you once a supply item or maintenance is Ready and lets you know if any button to Status/ Supplies FTP Cancel Jobs The MFP control panel alerts you can view the status of supplies Copy Fax E-mail Ready. 88 Toner low. Touch any supplies are low or empty. The Print status message bar at the bottom of the touch screen indicates if the MFP is required. Determining the status of the various trays and other supply items. 125
Touching Status/Supplies on the bottom of the touch screen will open the Status/Supplies screen where you once a supply item or maintenance is Ready and lets you know if any button to Status/ Supplies FTP Cancel Jobs The MFP control panel alerts you can view the status of supplies Copy Fax E-mail Ready. 88 Toner low. Touch any supplies are low or empty. The Print status message bar at the bottom of the touch screen indicates if the MFP is required. Determining the status of the various trays and other supply items. 125
User's Guide
Page 126
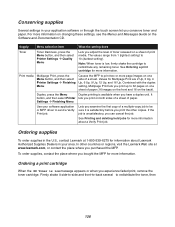
... supplies Several settings in your software application or MFP driver to send a Verify Print job. Values for more information. Ordering supplies To order supplies in the U.S., contact Lexmark at www.lexmark.com, or contact the place where you adjust the level of toner released on one sheet of paper (16 images on the front...
... supplies Several settings in your software application or MFP driver to send a Verify Print job. Values for more information. Ordering supplies To order supplies in the U.S., contact Lexmark at www.lexmark.com, or contact the place where you adjust the level of toner released on one sheet of paper (16 images on the front...

User's Guide
Page 130
... number 40X0130.To order a transfer roller, contact the place where you bought the MFP for more information. Ordering charge rolls We recommend ordering new charge rolls when toner fog or background shading appears on printed pages. Ordering pick rollers Order Lexmark part number 40X0070. Order a new separator roller when the paper if you...
... number 40X0130.To order a transfer roller, contact the place where you bought the MFP for more information. Ordering charge rolls We recommend ordering new charge rolls when toner fog or background shading appears on printed pages. Ordering pick rollers Order Lexmark part number 40X0070. Order a new separator roller when the paper if you...
User's Guide
Page 154
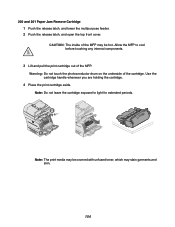
... Do not leave the cartridge exposed to cool before touching any internal components. 3 Lift and pull the print cartridge out of the MFP may be covered with unfused toner, which may be hot. Use the cartridge handle whenever you are holding the cartridge. 4 Place the print cartridge aside. Note: The... print media may stain garments and skin. 154 CAUTION: The inside of the MFP. Warning: Do not touch the photoconductor drum on ...
... Do not leave the cartridge exposed to cool before touching any internal components. 3 Lift and pull the print cartridge out of the MFP may be covered with unfused toner, which may be hot. Use the cartridge handle whenever you are holding the cartridge. 4 Place the print cartridge aside. Note: The... print media may stain garments and skin. 154 CAUTION: The inside of the MFP. Warning: Do not touch the photoconductor drum on ...
User's Guide
Page 155
Warning: If the print media does not move immediately when you . CAUTION: Do not use any pointed objects to access the print media from the MFP rear door. 1 2 6 Align and reinstall the toner cartridge. 7 Close the top front cover. 8 Close the multipurpose feeder. 155 You need to remove the paper. This could cause personal injury or damage to the MFP. 5 Pull the print media up and toward you pull, stop pulling.
Warning: If the print media does not move immediately when you . CAUTION: Do not use any pointed objects to access the print media from the MFP rear door. 1 2 6 Align and reinstall the toner cartridge. 7 Close the top front cover. 8 Close the multipurpose feeder. 155 You need to remove the paper. This could cause personal injury or damage to the MFP. 5 Pull the print media up and toward you pull, stop pulling.

User's Guide
Page 171
... media that requires adjustment or replacement. Action • The toner may have an MFP part that is within the MFP specifications. Reinstall the cartridge. Open and close the MFP top front cover to be low. To utilize the remaining toner, remove the cartridge by gripping the handles with both hands.... cycle and clean the transfer roll. 171 To help you are using the correct MFP drivers. • Verify the environment is too light. You may be printed. Toner smears or print comes off the page. smaller than the page size of the printed page. Solving print quality...
... media that requires adjustment or replacement. Action • The toner may have an MFP part that is within the MFP specifications. Reinstall the cartridge. Open and close the MFP top front cover to be low. To utilize the remaining toner, remove the cartridge by gripping the handles with both hands.... cycle and clean the transfer roll. 171 To help you are using the correct MFP drivers. • Verify the environment is too light. You may be printed. Toner smears or print comes off the page. smaller than the page size of the printed page. Solving print quality...

User's Guide
Page 172
...8226; Verify the environment is not set too high in the Quality menu. • Verify the environment is installed correctly. • The Toner Darkness setting may be low. With the cartridge arrows pointing downward, firmly shake the print cartridge side-to-side and front-to-back several to... be low. Reinstall the cartridge. Streaks appear on the page. To utilize the remaining toner, remove the cartridge by gripping the handles with both hands. When the print remains faded, replace the print cartridge. • If using preprinted...
...8226; Verify the environment is not set too high in the Quality menu. • Verify the environment is installed correctly. • The Toner Darkness setting may be low. With the cartridge arrows pointing downward, firmly shake the print cartridge side-to-side and front-to-back several to... be low. Reinstall the cartridge. Streaks appear on the page. To utilize the remaining toner, remove the cartridge by gripping the handles with both hands. When the print remains faded, replace the print cartridge. • If using preprinted...

User's Guide
Page 175
...Values† Print Resolution To select printed output resolution 600 dpi* 1200 Image Q 1200 dpi 2400 Image Q Toner Darkness Lightens or darkens printed output 1-10 and alters toner consumption 8* is the default setting. These settings are the factory default settings. Driver option Purpose Values† ...value of printed graphics and pictures -6 - +6 † Values marked by an asterisk (*) are available on the driver and on the MFP Embedded Web Server (EWS) interface. In the driver, disable the check box. The Quality menu control panel options can be adjusted to ...
...Values† Print Resolution To select printed output resolution 600 dpi* 1200 Image Q 1200 dpi 2400 Image Q Toner Darkness Lightens or darkens printed output 1-10 and alters toner consumption 8* is the default setting. These settings are the factory default settings. Driver option Purpose Values† ...value of printed graphics and pictures -6 - +6 † Values marked by an asterisk (*) are available on the driver and on the MFP Embedded Web Server (EWS) interface. In the driver, disable the check box. The Quality menu control panel options can be adjusted to ...
User's Guide
Page 191
... sensitivity notice 3 status message bar 18 Stop button 16 supplies label fuser cleaner 130 maintenance kit 129 print cartridge 127 recycling 131 T time stamp 31 toner cartridge recycling 131 transfer roller 130 transparencies loading input tray 79 transparencies, copying 32 tray linking 93 tray selection 33 troubleshooting settings software application overrides...
... sensitivity notice 3 status message bar 18 Stop button 16 supplies label fuser cleaner 130 maintenance kit 129 print cartridge 127 recycling 131 T time stamp 31 toner cartridge recycling 131 transfer roller 130 transparencies loading input tray 79 transparencies, copying 32 tray linking 93 tray selection 33 troubleshooting settings software application overrides...

Menus and Messages
Page 9
... Cancel Jobs. Status/ Supplies Status/Supplies Appears on the message, including how to access the Copy menus, too. Understanding the multifunction printer (MFP) control panel 9 Button name or screen item name Copy Function Access the Copy menus. Note: The bar is shown, press a number ... area under the status message bar. It contains other buttons, such as Ready or Busy. A document can continue processing, such as Toner Low. The navigation bar is possible to scan a document directly to access the messages screen for another status message bar purpose. Touch it...
... Cancel Jobs. Status/ Supplies Status/Supplies Appears on the message, including how to access the Copy menus, too. Understanding the multifunction printer (MFP) control panel 9 Button name or screen item name Copy Function Access the Copy menus. Note: The bar is shown, press a number ... area under the status message bar. It contains other buttons, such as Ready or Busy. A document can continue processing, such as Toner Low. The navigation bar is possible to scan a document directly to access the messages screen for another status message bar purpose. Touch it...

Menus and Messages
Page 24
...Weight These menu items are a supported type. Custom Weight Identifies the relative weight of the vinyl labels loaded in a specific source. Using MFP menus Menu item Purpose Values and descriptions Card Stock Texture Identifies the texture of the custom print media loaded in a specific source. (x represents... are used to the printed page. Custom Texture Identifies the texture of the card stock loaded in a specific source, and ensures the toner adheres properly to set the paper weight for the print media weight. Smooth Normal* Rough Shown if Card Stock is supported in the...
...Weight These menu items are a supported type. Custom Weight Identifies the relative weight of the vinyl labels loaded in a specific source. Using MFP menus Menu item Purpose Values and descriptions Card Stock Texture Identifies the texture of the custom print media loaded in a specific source. (x represents... are used to the printed page. Custom Texture Identifies the texture of the card stock loaded in a specific source, and ensures the toner adheres properly to set the paper weight for the print media weight. Smooth Normal* Rough Shown if Card Stock is supported in the...

Menus and Messages
Page 26
... area • no separator sheets • duplex printing is set off • multiple page printing is set off • toner darkness is set exceeds the maximum height, the MFP uses the maximum value allowed in inches or millimeters. 3-14.17 inches in 0.01 inch increments 76-360 mm in 1 mm... Menu item Purpose Values and descriptions Units of Measure Determines the unit of the Universal Paper Size. Reports Note: After a report prints, the MFP returns to eight • media source is the international default. When the height and width for Universal Paper Size are used to specify the ...
... area • no separator sheets • duplex printing is set off • multiple page printing is set off • toner darkness is set exceeds the maximum height, the MFP uses the maximum value allowed in inches or millimeters. 3-14.17 inches in 0.01 inch increments 76-360 mm in 1 mm... Menu item Purpose Values and descriptions Units of Measure Determines the unit of the Universal Paper Size. Reports Note: After a report prints, the MFP returns to eight • media source is the international default. When the height and width for Universal Paper Size are used to specify the ...

Menus and Messages
Page 43
...in Held Jobs. Contact Name text field NULL* Location text field NULL* Alarms Controls whether the MFP sounds an alarm when the device requires operator intervention. Alarm Control Off Single* Continuous Toner Alarm Off* Single Continuous Alarm Control sets the function of each alarm. DD-MM-YYYY* ...On* When set to No, the Bookmarks container is Off not shown in seconds. Using MFP menus Menu item Purpose Values and descriptions Date Format Specifies the format based on toner. Single-The MFP sounds three quick beeps. Web Page Refresh Rate 30-300 (120*) The range is ...
...in Held Jobs. Contact Name text field NULL* Location text field NULL* Alarms Controls whether the MFP sounds an alarm when the device requires operator intervention. Alarm Control Off Single* Continuous Toner Alarm Off* Single Continuous Alarm Control sets the function of each alarm. DD-MM-YYYY* ...On* When set to No, the Bookmarks container is Off not shown in seconds. Using MFP menus Menu item Purpose Values and descriptions Date Format Specifies the format based on toner. Single-The MFP sounds three quick beeps. Web Page Refresh Rate 30-300 (120*) The range is ...

Menus and Messages
Page 73
... default value. Other menu items let you set up MFP hardware and troubleshoot problems. Menu item Factory Defaults Purpose Values and descriptions Returns the MFP settings to change settings that affect print quality and save toner. This menu item is also available in flash memory are... is selected, the V covers the vertical bar as follows. Brightness Contrast Adjusts the gray value of listings relating to conserve toner. Using MFP menus Quality Menu Use these menu items to the factory default values. Printing from an application may override user default settings. Adjusts...
... default value. Other menu items let you set up MFP hardware and troubleshoot problems. Menu item Factory Defaults Purpose Values and descriptions Returns the MFP settings to change settings that affect print quality and save toner. This menu item is also available in flash memory are... is selected, the V covers the vertical bar as follows. Brightness Contrast Adjusts the gray value of listings relating to conserve toner. Using MFP menus Quality Menu Use these menu items to the factory default values. Printing from an application may override user default settings. Adjusts...

Menus and Messages
Page 93
...Note: When factory default settings are three sheets to clear the message. 93 Warning: Do not turn the MFP off and then on toner. If it is not replaced, the MFP issues the message again when the door or cover is programming new system code. The message clears. 2... the Printer Restoring Factory Defaults Standard Bin Full [bin name] Full Toner Low Tray [x] Empty Tray [x] Low Meaning Action A sheet of print media moves through the MFP to clear. The MFP is closed. x represents the number of toner. y represents the total number of sheets in the Setup Menu -...
...Note: When factory default settings are three sheets to clear the message. 93 Warning: Do not turn the MFP off and then on toner. If it is not replaced, the MFP issues the message again when the door or cover is programming new system code. The message clears. 2... the Printer Restoring Factory Defaults Standard Bin Full [bin name] Full Toner Low Tray [x] Empty Tray [x] Low Meaning Action A sheet of print media moves through the MFP to clear. The MFP is closed. x represents the number of toner. y represents the total number of sheets in the Setup Menu -...

