Setup Guide
Page 4
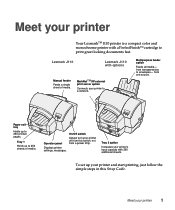
... To set up your printer off from a power strip. Lexmark J110 Lexmark J110 with a PerfectFinish™ cartridge to a network. MarkNetTM XP external print server option Connects your printer 1 Meet your printer to print great looking documents fast. Meet your printer's input capacity with 250...turn your printer and start printing, just follow the simple steps in this switch, not from this Setup Guide. from transparencies to 250 sheets of media. Tray 2 option Increases your printer Your LexmarkTM J110 printer is a compact color and monochrome printer with options...
... To set up your printer off from a power strip. Lexmark J110 Lexmark J110 with a PerfectFinish™ cartridge to a network. MarkNetTM XP external print server option Connects your printer 1 Meet your printer to print great looking documents fast. Meet your printer's input capacity with 250...turn your printer and start printing, just follow the simple steps in this switch, not from this Setup Guide. from transparencies to 250 sheets of media. Tray 2 option Increases your printer Your LexmarkTM J110 printer is a compact color and monochrome printer with options...
Setup Guide
Page 5
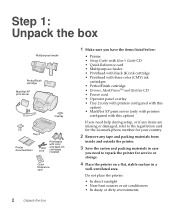
... In dusty or dirty environments Step 1: Unpack the box Multipurpose feeder PerfectFinish cartridge MarkNet XP print server Overlay CD Tray 2 Printer documentation Power cord Printheads with color and black ink cartridges installed Quick Reference card 2 Unpack the box 1 Make sure you have the items listed below: •..., or if any items are missing or damaged, refer to the registration card for the Lexmark phone number for your country. 2 Remove any tape and packing materials from inside and outside the printer. 3 Save the carton and packing materials in case you need to repack the...
... In dusty or dirty environments Step 1: Unpack the box Multipurpose feeder PerfectFinish cartridge MarkNet XP print server Overlay CD Tray 2 Printer documentation Power cord Printheads with color and black ink cartridges installed Quick Reference card 2 Unpack the box 1 Make sure you have the items listed below: •..., or if any items are missing or damaged, refer to the registration card for the Lexmark phone number for your country. 2 Remove any tape and packing materials from inside and outside the printer. 3 Save the carton and packing materials in case you need to repack the...
Setup Guide
Page 6
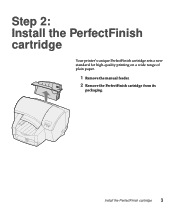
Install the PerfectFinish cartridge 3 Step 2: Install the PerfectFinish cartridge Your printer's unique PerfectFinish cartridge sets a new standard for high-quality printing on a wide range of plain paper. 1 Remove the manual feeder. 2 Remove the PerfectFinish cartridge from its packaging.
Install the PerfectFinish cartridge 3 Step 2: Install the PerfectFinish cartridge Your printer's unique PerfectFinish cartridge sets a new standard for high-quality printing on a wide range of plain paper. 1 Remove the manual feeder. 2 Remove the PerfectFinish cartridge from its packaging.
Setup Guide
Page 8
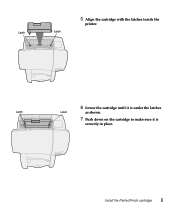
Install the PerfectFinish cartridge 5 5 Align the cartridge with the latches inside the printer. Latch Latch 6 Lower the cartridge until it is under the latches Latch Latch as shown. 7 Push down on the cartridge to make sure it is securely in place.
Install the PerfectFinish cartridge 5 5 Align the cartridge with the latches inside the printer. Latch Latch 6 Lower the cartridge until it is under the latches Latch Latch as shown. 7 Push down on the cartridge to make sure it is securely in place.
Setup Guide
Page 9
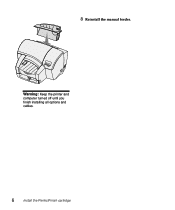
8 Reinstall the manual feeder. Warning: Keep the printer and computer turned off until you finish installing all options and cables. 6 Install the PerfectFinish cartridge
8 Reinstall the manual feeder. Warning: Keep the printer and computer turned off until you finish installing all options and cables. 6 Install the PerfectFinish cartridge
Setup Guide
Page 10
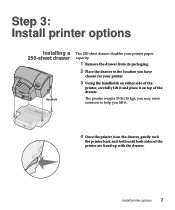
...35 lb (16 kg); Step 3: Install printer options Installing a 250-sheet drawer Handhold The 250-sheet drawer doubles your printer. 3 Using the handholds on either side of the printer, carefully lift it and place it . 4 Once the printer is on top of the printer are lined up with the drawer. you may... want someone to help you have chosen for your printer paper capacity. 1 Remove ...
...35 lb (16 kg); Step 3: Install printer options Installing a 250-sheet drawer Handhold The 250-sheet drawer doubles your printer. 3 Using the handholds on either side of the printer, carefully lift it and place it . 4 Once the printer is on top of the printer are lined up with the drawer. you may... want someone to help you have chosen for your printer paper capacity. 1 Remove ...
Setup Guide
Page 11
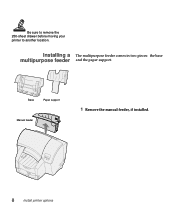
Installing a The multipurpose feeder comes in two pieces: the base multipurpose feeder and the paper support. Base Paper support Manual feeder 1 Remove the manual feeder, if installed. 8 Install printer options Be sure to remove the 250-sheet drawer before moving your printer to another location.
Installing a The multipurpose feeder comes in two pieces: the base multipurpose feeder and the paper support. Base Paper support Manual feeder 1 Remove the manual feeder, if installed. 8 Install printer options Be sure to remove the 250-sheet drawer before moving your printer to another location.
Setup Guide
Page 12
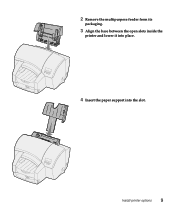
Install printer options 9 2 Remove the multipurpose feeder from its packaging. 3 Align the base between the open slots inside the printer and lower it into place. 4 Insert the paper support into the slot.
Install printer options 9 2 Remove the multipurpose feeder from its packaging. 3 Align the base between the open slots inside the printer and lower it into place. 4 Insert the paper support into the slot.
Setup Guide
Page 13
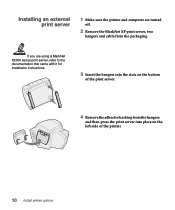
Installing an external print server 1 Make sure the printer and computer are using a MarkNet X2000 series print server, refer to the documentation that came with it for installation instructions. 3 Insert the hangers into the slots on the bottom of the print server. 4 Remove the adhesive backing from the packaging. If you are turned off. 2 Remove the MarkNet XP print server, two hangers and cable from the hangers and then press the print server into place on the left side of the printer. 10 Install printer options
Installing an external print server 1 Make sure the printer and computer are using a MarkNet X2000 series print server, refer to the documentation that came with it for installation instructions. 3 Insert the hangers into the slots on the bottom of the print server. 4 Remove the adhesive backing from the packaging. If you are turned off. 2 Remove the MarkNet XP print server, two hangers and cable from the hangers and then press the print server into place on the left side of the printer. 10 Install printer options

Setup Guide
Page 14
Install printer options 11 5 Plug one end of the parallel cable into the connector as shown. 6 Plug the other end of the parallel cable and the power jack into the MarkNet XP external print server.
Install printer options 11 5 Plug one end of the parallel cable into the connector as shown. 6 Plug the other end of the parallel cable and the power jack into the MarkNet XP external print server.
Setup Guide
Page 15
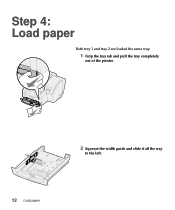
Step 4: Load paper Both tray 1 and tray 2 are loaded the same way. 1 Grip the tray tab and pull the tray completely out of the printer. 2 Squeeze the width guide and slide it all the way to the left. 12 Load paper
Step 4: Load paper Both tray 1 and tray 2 are loaded the same way. 1 Grip the tray tab and pull the tray completely out of the printer. 2 Squeeze the width guide and slide it all the way to the left. 12 Load paper
Setup Guide
Page 17
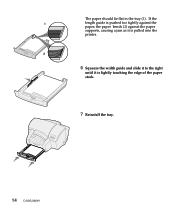
The paper should lie flat in the tray (1). If the 1 length guide is pushed too tightly against the paper, the paper bends (2) against the paper supports, causing a jam as it is pulled into the printer. 2 6 Squeeze the width guide and slide it to the right until it is lightly touching the edge of the paper stack. 7 Reinstall the tray. 14 Load paper
The paper should lie flat in the tray (1). If the 1 length guide is pushed too tightly against the paper, the paper bends (2) against the paper supports, causing a jam as it is pulled into the printer. 2 6 Squeeze the width guide and slide it to the right until it is lightly touching the edge of the paper stack. 7 Reinstall the tray. 14 Load paper

Setup Guide
Page 19
We recommend Lexmark part number 1329605 (10 ft) or 1247498 (20 ft). Clip Clip 1 Make sure the printer and computer (and any attached peripherals) are connecting your printer to a computer with RJ.45 connector). Tighten the cable screws securely. 16 Attach cables Attaching a parallel cable If you are...the connector on the back of the computer. Step 5: Attach cables You can connect your printer to your computer with either a: • Parallel cable • USB cable You can connect your printer to the network with an Ethernet cable (UTP cable with a parallel cable, use an ...
We recommend Lexmark part number 1329605 (10 ft) or 1247498 (20 ft). Clip Clip 1 Make sure the printer and computer (and any attached peripherals) are connecting your printer to a computer with RJ.45 connector). Tighten the cable screws securely. 16 Attach cables Attaching a parallel cable If you are...the connector on the back of the computer. Step 5: Attach cables You can connect your printer to your computer with either a: • Parallel cable • USB cable You can connect your printer to the network with an Ethernet cable (UTP cable with a parallel cable, use an ...
Setup Guide
Page 20
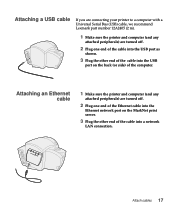
Attach cables 17 Attaching a USB cable If you are connecting your printer to a computer with a Universal Serial Bus (USB) cable, we recommend Lexmark part number 12A2405 (2 m). 1 Make sure the printer and computer (and any attached peripherals) are turned off . 2 Plug one end of the cable into the USB port as shown. 3 Plug the other...
Attach cables 17 Attaching a USB cable If you are connecting your printer to a computer with a Universal Serial Bus (USB) cable, we recommend Lexmark part number 12A2405 (2 m). 1 Make sure the printer and computer (and any attached peripherals) are turned off . 2 Plug one end of the cable into the USB port as shown. 3 Plug the other...
Setup Guide
Page 21
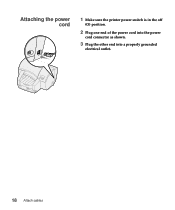
Attaching the power cord 1 Make sure the printer power switch is in the off (O) position. 2 Plug one end of the power cord into the power cord connector as shown. 3 Plug the other end into a properly grounded electrical outlet. 18 Attach cables
Attaching the power cord 1 Make sure the printer power switch is in the off (O) position. 2 Plug one end of the power cord into the power cord connector as shown. 3 Plug the other end into a properly grounded electrical outlet. 18 Attach cables
Setup Guide
Page 22
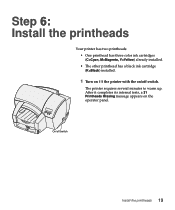
The printer requires several minutes to warm up. After it completes its internal tests, a 31 Printheads Missing message appears on /off switch Install the printheads 19 Step 6: Install the printheads Your printer has two printheads: • One printhead has three color ink cartridges (C=Cyan, M=Magenta, Y=Yellow) already installed. • The other printhead has a black ink cartridge (K=Black) installed. 1 Turn on (|) the printer with the on the operator panel. On/off switch.
The printer requires several minutes to warm up. After it completes its internal tests, a 31 Printheads Missing message appears on /off switch Install the printheads 19 Step 6: Install the printheads Your printer has two printheads: • One printhead has three color ink cartridges (C=Cyan, M=Magenta, Y=Yellow) already installed. • The other printhead has a black ink cartridge (K=Black) installed. 1 Turn on (|) the printer with the on the operator panel. On/off switch.
Setup Guide
Page 23
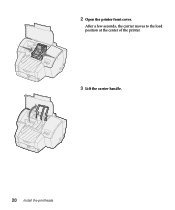
After a few seconds, the carrier moves to the load position at the center of the printer. 3 Lift the carrier handle. 20 Install the printheads 2 Open the printer front cover.
After a few seconds, the carrier moves to the load position at the center of the printer. 3 Lift the carrier handle. 20 Install the printheads 2 Open the printer front cover.
Setup Guide
Page 26
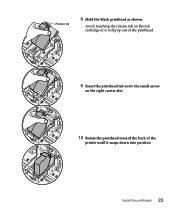
Release tab 8 Hold the black printhead as shown. Avoid touching the release tab on the ink cartridge or it will pop out of the printhead. 9 Insert the printhead tab under the small arrow on the right carrier slot. 10 Rotate the printhead toward the back of the printer until it snaps down into position Install the printheads 23
Release tab 8 Hold the black printhead as shown. Avoid touching the release tab on the ink cartridge or it will pop out of the printhead. 9 Insert the printhead tab under the small arrow on the right carrier slot. 10 Rotate the printhead toward the back of the printer until it snaps down into position Install the printheads 23
Setup Guide
Page 28
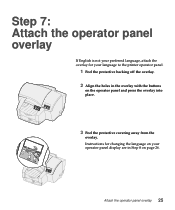
Instructions for your operator panel display are in the overlay with the buttons on page 26. Attach the operator panel overlay 25 Step 7: Attach the operator panel overlay If English is not your preferred language, attach the overlay for changing the language on your language to the printer operator panel. 1 Peel the protective backing off the overlay. 2 Align the holes in Step 8 on the operator panel and press the overlay into place. 3 Peel the protective covering away from the overlay.
Instructions for your operator panel display are in the overlay with the buttons on page 26. Attach the operator panel overlay 25 Step 7: Attach the operator panel overlay If English is not your preferred language, attach the overlay for changing the language on your language to the printer operator panel. 1 Peel the protective backing off the overlay. 2 Align the holes in Step 8 on the operator panel and press the overlay into place. 3 Peel the protective covering away from the overlay.

Setup Guide
Page 29
The printer resets and displays text in . 2 Press Menu> until Setup Menu appears on the operator panel display. 3 Press Select. 4 Press Menu> until Display Language appears on ... Ready. 26 Change the language Step 8: Change the language If English is turned on the operator panel before printing a menu settings page. 1 Make sure your printer is not your preferred language, change the language of the display. 7 Press Select.
The printer resets and displays text in . 2 Press Menu> until Setup Menu appears on the operator panel display. 3 Press Select. 4 Press Menu> until Display Language appears on ... Ready. 26 Change the language Step 8: Change the language If English is turned on the operator panel before printing a menu settings page. 1 Make sure your printer is not your preferred language, change the language of the display. 7 Press Select.


