Setup Guide
Page 4
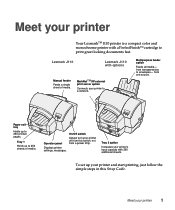
... server option Connects your printer 1 Meet your printer to a network. Tray 2 option Increases your printer Your LexmarkTM J110 printer is a compact color and monochrome printer with a PerfectFinish™ cartridge to envelopes- Tray 1 Holds up your printer off from a power strip. Meet your printer's input capacity with 250 additional sheets. from one source. Displays printer settings, messages. Lexmark J110 Lexmark J110 with options...
... server option Connects your printer 1 Meet your printer to a network. Tray 2 option Increases your printer Your LexmarkTM J110 printer is a compact color and monochrome printer with a PerfectFinish™ cartridge to envelopes- Tray 1 Holds up your printer off from a power strip. Meet your printer's input capacity with 250 additional sheets. from one source. Displays printer settings, messages. Lexmark J110 Lexmark J110 with options...
Setup Guide
Page 5
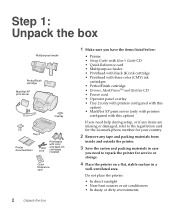
...8226; Multipurpose feeder • Printhead with black (K) ink cartridge • Printhead with three color (CMY) ink cartridges • PerfectFinish cartridge • Drivers, MarkVisionTM and Utilities CD • Power cord • Operator panel overlay • Tray 2 (only with printers configured with this option) • MarkNet XP print server... items are missing or damaged, refer to the registration card for the Lexmark phone number for your country. 2 Remove any tape and packing materials from inside and outside the printer. 3 Save the carton and packing materials in case you need to ...
...8226; Multipurpose feeder • Printhead with black (K) ink cartridge • Printhead with three color (CMY) ink cartridges • PerfectFinish cartridge • Drivers, MarkVisionTM and Utilities CD • Power cord • Operator panel overlay • Tray 2 (only with printers configured with this option) • MarkNet XP print server... items are missing or damaged, refer to the registration card for the Lexmark phone number for your country. 2 Remove any tape and packing materials from inside and outside the printer. 3 Save the carton and packing materials in case you need to ...
Setup Guide
Page 6
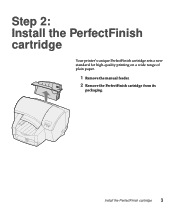
Step 2: Install the PerfectFinish cartridge Your printer's unique PerfectFinish cartridge sets a new standard for high-quality printing on a wide range of plain paper. 1 Remove the manual feeder. 2 Remove the PerfectFinish cartridge from its packaging. Install the PerfectFinish cartridge 3
Step 2: Install the PerfectFinish cartridge Your printer's unique PerfectFinish cartridge sets a new standard for high-quality printing on a wide range of plain paper. 1 Remove the manual feeder. 2 Remove the PerfectFinish cartridge from its packaging. Install the PerfectFinish cartridge 3
Setup Guide
Page 8
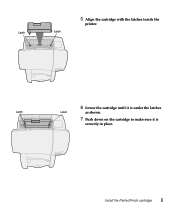
Install the PerfectFinish cartridge 5 5 Align the cartridge with the latches inside the printer. Latch Latch 6 Lower the cartridge until it is under the latches Latch Latch as shown. 7 Push down on the cartridge to make sure it is securely in place.
Install the PerfectFinish cartridge 5 5 Align the cartridge with the latches inside the printer. Latch Latch 6 Lower the cartridge until it is under the latches Latch Latch as shown. 7 Push down on the cartridge to make sure it is securely in place.
Setup Guide
Page 9
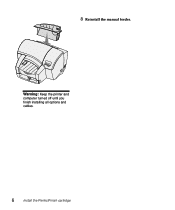
8 Reinstall the manual feeder. Warning: Keep the printer and computer turned off until you finish installing all options and cables. 6 Install the PerfectFinish cartridge
8 Reinstall the manual feeder. Warning: Keep the printer and computer turned off until you finish installing all options and cables. 6 Install the PerfectFinish cartridge
Setup Guide
Page 22
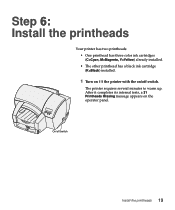
The printer requires several minutes to warm up. After it completes its internal tests, a 31 Printheads Missing message appears on /off switch Install the printheads 19 Step 6: Install the printheads Your printer has two printheads: • One printhead has three color ink cartridges (C=Cyan, M=Magenta, Y=Yellow) already installed. • The other printhead has a black ink cartridge (K=Black) installed. 1 Turn on (|) the printer with the on the operator panel. On/off switch.
The printer requires several minutes to warm up. After it completes its internal tests, a 31 Printheads Missing message appears on /off switch Install the printheads 19 Step 6: Install the printheads Your printer has two printheads: • One printhead has three color ink cartridges (C=Cyan, M=Magenta, Y=Yellow) already installed. • The other printhead has a black ink cartridge (K=Black) installed. 1 Turn on (|) the printer with the on the operator panel. On/off switch.
Setup Guide
Page 26
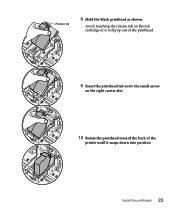
Avoid touching the release tab on the ink cartridge or it will pop out of the printhead. 9 Insert the printhead tab under the small arrow on the right carrier slot. 10 Rotate the printhead toward the back of the printer until it snaps down into position Install the printheads 23 Release tab 8 Hold the black printhead as shown.
Avoid touching the release tab on the ink cartridge or it will pop out of the printhead. 9 Insert the printhead tab under the small arrow on the right carrier slot. 10 Rotate the printhead toward the back of the printer until it snaps down into position Install the printheads 23 Release tab 8 Hold the black printhead as shown.

Setup Guide
Page 36
You are finished setting up your printer and are ready to print. Congratulations! Congratulations! 33 Use the User's Guide CD in the back of this book for: • Printing tips • Changing menu settings from the Windows driver, Macintosh driver, and the operator panel • Replacing ink cartridges, printheads and the PerfectFinish cartridge • Clearing paper jams • Troubleshooting Warning: If you move the printer, keep it level.
You are finished setting up your printer and are ready to print. Congratulations! Congratulations! 33 Use the User's Guide CD in the back of this book for: • Printing tips • Changing menu settings from the Windows driver, Macintosh driver, and the operator panel • Replacing ink cartridges, printheads and the PerfectFinish cartridge • Clearing paper jams • Troubleshooting Warning: If you move the printer, keep it level.
Setup Guide
Page 37
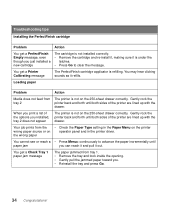
When you print a list of the options you installed, tray 2 does not appear The printer is refilling. You may hear clicking sounds as it refills. You get a Printer Calibrating message The PerfectFinish cartridge applicator is not on the 250-sheet drawer correctly. the wrong paper You cannot see or reach a • Press Menu> continuously...
When you print a list of the options you installed, tray 2 does not appear The printer is refilling. You may hear clicking sounds as it refills. You get a Printer Calibrating message The PerfectFinish cartridge applicator is not on the 250-sheet drawer correctly. the wrong paper You cannot see or reach a • Press Menu> continuously...

User's Guide
Page 10
... Holds up to envelopes- MarkNet™ Pro external print server option Connects your printer off from this switch, not from a power strip. 1 Overview Your Lexmark™ J110 printer is a compact color and monochrome printer with a PerfectFinish™ cartridge for printing great looking documents fast. Operator panel Displays printer settings, messages. Manual feeder Feeds a single sheet of media.
... Holds up to envelopes- MarkNet™ Pro external print server option Connects your printer off from this switch, not from a power strip. 1 Overview Your Lexmark™ J110 printer is a compact color and monochrome printer with a PerfectFinish™ cartridge for printing great looking documents fast. Operator panel Displays printer settings, messages. Manual feeder Feeds a single sheet of media.
User's Guide
Page 27
...reduce potential paper jams, we recommend you high-quality printing on a wide range of plain paper. 10 Choosing the right media Your printer's unique PerfectFinish cartridge gives you : • Try out a small amount of media before stacking. 18 To ensure you get the best print quality and... to be used in inkjet printers. • Remove each transparency or photo as it exits the printer and let it dry thoroughly before buying large quantities. •...
...reduce potential paper jams, we recommend you high-quality printing on a wide range of plain paper. 10 Choosing the right media Your printer's unique PerfectFinish cartridge gives you : • Try out a small amount of media before stacking. 18 To ensure you get the best print quality and... to be used in inkjet printers. • Remove each transparency or photo as it exits the printer and let it dry thoroughly before buying large quantities. •...
User's Guide
Page 42
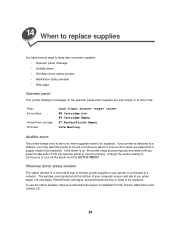
... turn off the alarm from the Drivers, MarkVision and Utilities CD. 33 Paper Ink cartridge PerfectFinish cartridge Printhead Load 88 Cartridge Low 89 Cartridge Empty 87 PerfectFinish Empty Life Warning Audible alarm The printer beeps once to alert you may want the printer to sound a continuous alarm to ensure other users are aware that a supply needs...
... turn off the alarm from the Drivers, MarkVision and Utilities CD. 33 Paper Ink cartridge PerfectFinish cartridge Printhead Load 88 Cartridge Low 89 Cartridge Empty 87 PerfectFinish Empty Life Warning Audible alarm The printer beeps once to alert you may want the printer to sound a continuous alarm to ensure other users are aware that a supply needs...
User's Guide
Page 44
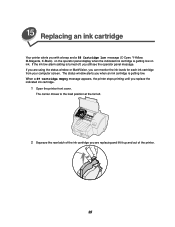
... you still see the operator panel message. 15 Replacing an ink cartridge Your printer alerts you with a beep and a 88 Cartridge Low message (C-Cyan, Y-Yellow, M-Magenta, K-Black) on ink. If you are replacing and lift it up and out of the ink cartridge you are using the status window or MarkVision, you can monitor... the ink low alarm setting is getting low. The carrier moves to the load position at the far left. 2 Squeeze the rear latch of the printer. 35 The status window alerts you when an ink cartridge is getting low on the operator panel display when the indicated ink...
... you still see the operator panel message. 15 Replacing an ink cartridge Your printer alerts you with a beep and a 88 Cartridge Low message (C-Cyan, Y-Yellow, M-Magenta, K-Black) on ink. If you are replacing and lift it up and out of the ink cartridge you are using the status window or MarkVision, you can monitor... the ink low alarm setting is getting low. The carrier moves to the load position at the far left. 2 Squeeze the rear latch of the printer. 35 The status window alerts you when an ink cartridge is getting low on the operator panel display when the indicated ink...
User's Guide
Page 47
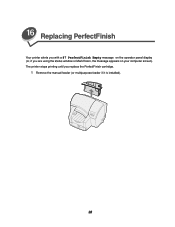
16 Replacing PerfectFinish Your printer alerts you with a 87 PerfectFinish Empty message on the operator panel display (or, if you replace the PerfectFinish cartridge. 1 Remove the manual feeder (or multipurpose feeder if it is installed). 38 The printer stops printing until you are using the status window or MarkVision, the message appears on your computer screen).
16 Replacing PerfectFinish Your printer alerts you with a 87 PerfectFinish Empty message on the operator panel display (or, if you replace the PerfectFinish cartridge. 1 Remove the manual feeder (or multipurpose feeder if it is installed). 38 The printer stops printing until you are using the status window or MarkVision, the message appears on your computer screen).

User's Guide
Page 48
2 Grip the PerfectFinish cartridge and firmly pull it out of the printer. 3 Remove the new PerfectFinish cartridge from its packaging. 4 Remove the tape covering the valve. 39
2 Grip the PerfectFinish cartridge and firmly pull it out of the printer. 3 Remove the new PerfectFinish cartridge from its packaging. 4 Remove the tape covering the valve. 39

User's Guide
Page 49
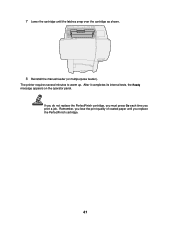
5 Hold the PerfectFinish cartridge so that the valve is on the left side. Latch Latch 40 Valve 6 Align the cartridge with the latches inside the printer.
5 Hold the PerfectFinish cartridge so that the valve is on the left side. Latch Latch 40 Valve 6 Align the cartridge with the latches inside the printer.
User's Guide
Page 50
If you do not replace the PerfectFinish cartridge, you must press Go each time you print a job. The printer requires several minutes to warm up. Remember, you lose the print quality of coated paper until the latches snap over the cartridge as shown. 8 Reinstall the manual feeder (or multipurpose feeder). 7 Lower the cartridge until you replace the PerfectFinish cartridge. 41 After it completes its internal tests, the Ready message appears on the operator panel.
If you do not replace the PerfectFinish cartridge, you must press Go each time you print a job. The printer requires several minutes to warm up. Remember, you lose the print quality of coated paper until the latches snap over the cartridge as shown. 8 Reinstall the manual feeder (or multipurpose feeder). 7 Lower the cartridge until you replace the PerfectFinish cartridge. 41 After it completes its internal tests, the Ready message appears on the operator panel.
User's Guide
Page 51
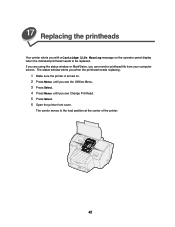
... turned on the operator panel display when the indicated printhead needs to the load position at the center of the printer. 42 The carrier moves to be replaced. If you are using the status window or MarkVision, you see the Utilities Menu. 3 Press Select. 4 Press Menu> ...until you can monitor printhead life from your computer screen. 17 Replacing the printheads Your printer alerts you with a Cartridge Life Warning message on . 2 Press Menu> until you see Change Printhead. 5 Press Select. 6 Open the...
... turned on the operator panel display when the indicated printhead needs to the load position at the center of the printer. 42 The carrier moves to be replaced. If you are using the status window or MarkVision, you see the Utilities Menu. 3 Press Select. 4 Press Menu> ...until you can monitor printhead life from your computer screen. 17 Replacing the printheads Your printer alerts you with a Cartridge Life Warning message on . 2 Press Menu> until you see Change Printhead. 5 Press Select. 6 Open the...
User's Guide
Page 67
..., if you installed the Windows driver status window, a message appears on your computer screen. Ink Cartridges 31 Missing Cartridge 31 Defective Ink Cartridge 32 Unsupported Cartridge 88 Cartridge Low 89 Cartridge Empty Cartridge Life Expired Cartridge Life Warning PerfectFinish 87 PerfectFinish Empty Printer Calibrating Printheads 31 Missing Printhead 32 Unsupported Printhead Paper 34 Short Paper Change Check MPF Connection...
..., if you installed the Windows driver status window, a message appears on your computer screen. Ink Cartridges 31 Missing Cartridge 31 Defective Ink Cartridge 32 Unsupported Cartridge 88 Cartridge Low 89 Cartridge Empty Cartridge Life Expired Cartridge Life Warning PerfectFinish 87 PerfectFinish Empty Printer Calibrating Printheads 31 Missing Printhead 32 Unsupported Printhead Paper 34 Short Paper Change Check MPF Connection...
User's Guide
Page 68
... almost empty. Ink Cartridges An ink cartridge message indicates a color ink cartridge (C=Cyan, M=Magenta or Y=Yellow) or a black ink cartridge (K=Black) needs attention. If the ink cartridge is not detected. Message:32 Unsupported Cartridge The ink cartridge is attached but not completely connected. Message:Check Tray x Connection Either the tray has been removed from the printer, or it is...
... almost empty. Ink Cartridges An ink cartridge message indicates a color ink cartridge (C=Cyan, M=Magenta or Y=Yellow) or a black ink cartridge (K=Black) needs attention. If the ink cartridge is not detected. Message:32 Unsupported Cartridge The ink cartridge is attached but not completely connected. Message:Check Tray x Connection Either the tray has been removed from the printer, or it is...


