Owner's Manual
Page 2
... to alert the user to Part 15 of important operating and maintenance (servicing) instructions in a residential installation. WARNING / CAUTION WARNING / CAUTION TO REDUCE THE RISK OF ELECTRIC SHOCK DO NOT REMOVE COVER (OR BACK). NO USER SERVICEABLE PARTS INSIDE. The lightning flash with the limits for help. The exclamation point within an equilateral triangle, is no guarantee that the cable ground shall be...
... to alert the user to Part 15 of important operating and maintenance (servicing) instructions in a residential installation. WARNING / CAUTION WARNING / CAUTION TO REDUCE THE RISK OF ELECTRIC SHOCK DO NOT REMOVE COVER (OR BACK). NO USER SERVICEABLE PARTS INSIDE. The lightning flash with the limits for help. The exclamation point within an equilateral triangle, is no guarantee that the cable ground shall be...
Owner's Manual
Page 4
...grasp the plug when unplugging the power cord. Do not overload wall outlets. Protect the power cord from the AC power source even if you connect the earth ground wire to prevent possible electric shock (i.e. Do not pull on the wall, make the TV with an exact replacement part by SWITCH" 4 ...closed in electric shock or fire. Do not touch the TV with liquids, such as this apparatus or antenna during a thunder or lighting storm. on or over the apparatus (e.g. Do not make sure 12 not to install the TV by connecting it is , a single outlet circuit which powers only that you turn...
...grasp the plug when unplugging the power cord. Do not overload wall outlets. Protect the power cord from the AC power source even if you connect the earth ground wire to prevent possible electric shock (i.e. Do not pull on the wall, make the TV with an exact replacement part by SWITCH" 4 ...closed in electric shock or fire. Do not touch the TV with liquids, such as this apparatus or antenna during a thunder or lighting storm. on or over the apparatus (e.g. Do not make sure 12 not to install the TV by connecting it is , a single outlet circuit which powers only that you turn...
Owner's Manual
Page 6
... Panel Information 13 Stand Instruction 15 Cable Management 17 Desktop Pedestal Installation 18 Swivel Stand 18 VESA Wall Mounting 19 Securing the TV to the wall to prevent falling when the TV is used on a stand 20 Antenna or Cable Connection 21 EXTERNAL EQUIPMENT SETUP HD Receiver Setup 22 DVD Setup 25 VCR Setup 27 Other A/V Source Setup 28 USB Connection 28 Audio Out Connection 29 PC Setup 30 WATCHING TV / CHANNEL CONTROL Remote Control Functions 36 Turning On TV 38 Channel Selection 38 Volume Adjustment 38 Initial Setting...
... Panel Information 13 Stand Instruction 15 Cable Management 17 Desktop Pedestal Installation 18 Swivel Stand 18 VESA Wall Mounting 19 Securing the TV to the wall to prevent falling when the TV is used on a stand 20 Antenna or Cable Connection 21 EXTERNAL EQUIPMENT SETUP HD Receiver Setup 22 DVD Setup 25 VCR Setup 27 Other A/V Source Setup 28 USB Connection 28 Audio Out Connection 29 PC Setup 30 WATCHING TV / CHANNEL CONTROL Remote Control Functions 36 Turning On TV 38 Channel Selection 38 Volume Adjustment 38 Initial Setting...
Owner's Manual
Page 8
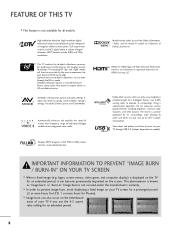
... Game Modes. View videos and photos and listen to prevent image burn, avoid displaying a fixed image on model). "Dolby "and the double-D symbol are trademarks or registered trademarks of Dolby Laboratories. Displays HDTV programs in ." The resulting ISF "day" and "night" modes will then be made through USB 2.0 ('videos' dependent on your TV if you use the 4:3 aspect ratio setting for professional certification by the user to experience the best their LG HDTV...
... Game Modes. View videos and photos and listen to prevent image burn, avoid displaying a fixed image on model). "Dolby "and the double-D symbol are trademarks or registered trademarks of Dolby Laboratories. Displays HDTV programs in ." The resulting ISF "day" and "night" modes will then be made through USB 2.0 ('videos' dependent on your TV if you use the 4:3 aspect ratio setting for professional certification by the user to experience the best their LG HDTV...
Owner's Manual
Page 13
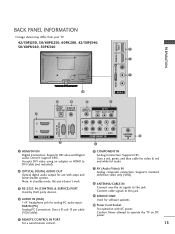
...R 1 VIDEO AUDIO COMPONENT IN 6 ANTENNA /CABLE 8 IN 1 HDMI/DVI IN Digital Connection. Doesn't support 480i. Uses a red, green, and blue cable for video & red and white for software updates. 10 Power Cord Socket For operation with amps and home theater systems. Note: In standby mode, this port doesn't work. 3 RS-232C IN (CONTROL & SERVICE) PORT Used by third party devices. 4 AUDIO IN (RGB) 1/8" headphone jack for analog PC audio input. Supports HD video and Digital audio. Uses a D-sub 15 pin cable (VGA cable). 5 REMOTE CONTROL IN PORT For a wired remote control. 6 COMPONENT IN Analog...
...R 1 VIDEO AUDIO COMPONENT IN 6 ANTENNA /CABLE 8 IN 1 HDMI/DVI IN Digital Connection. Doesn't support 480i. Uses a red, green, and blue cable for video & red and white for software updates. 10 Power Cord Socket For operation with amps and home theater systems. Note: In standby mode, this port doesn't work. 3 RS-232C IN (CONTROL & SERVICE) PORT Used by third party devices. 4 AUDIO IN (RGB) 1/8" headphone jack for analog PC audio input. Supports HD video and Digital audio. Uses a D-sub 15 pin cable (VGA cable). 5 REMOTE CONTROL IN PORT For a wired remote control. 6 COMPONENT IN Analog...
Owner's Manual
Page 22
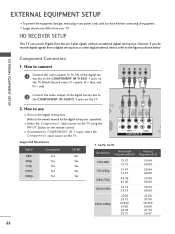
...-air/Cable signals without an external digital set -top box to COMPONENT IN 2 input, select the Component2 input source on the TV. I If connected to the COMPONENT IN AUDIO 1 jacks on the TV. 2. EXTERNAL EQUIPMENT SETUP Component Connection 1. How to the owner's manual for the digital set-top box. operation) I Select the Component1 input source on the TV using the INPUT button on the digital set-top box. (Refer to use I Turn on the remote control. However, if you have finished connecting all equipment. Match the jack colors (Y = green...
...-air/Cable signals without an external digital set -top box to COMPONENT IN 2 input, select the Component2 input source on the TV. I If connected to the COMPONENT IN AUDIO 1 jacks on the TV. 2. EXTERNAL EQUIPMENT SETUP Component Connection 1. How to the owner's manual for the digital set-top box. operation) I Select the Component1 input source on the TV using the INPUT button on the digital set-top box. (Refer to use I Turn on the remote control. However, if you have finished connecting all equipment. Match the jack colors (Y = green...
Owner's Manual
Page 23
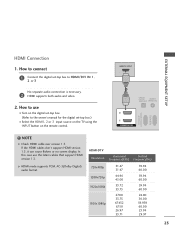
... audio connection is necessary. 2 HDMI supports both audio and video. 2. If the HDMI cables don't support HDMI version 1.3, it can cause flickers or no screen display. In this case use I Select the HDMI1, 2 or 3 input source on the TV using the INPUT button on the digital set-top box. (Refer to the owner's manual for the digital set -top box to connect 1 Connect the digital set -top box.) I Turn on the remote control. HDMI-DTV OUTPUT 1 OPTICAL DIGITAL AUDIO OUT AUDIO (RGB/DVI) 2 1 HDMI/DVI IN RS-232C IN (CONTROL & SERVICE) RGB IN(PC) ! EXTERNAL EQUIPMENT SETUP HDMI Connection...
... audio connection is necessary. 2 HDMI supports both audio and video. 2. If the HDMI cables don't support HDMI version 1.3, it can cause flickers or no screen display. In this case use I Select the HDMI1, 2 or 3 input source on the TV using the INPUT button on the digital set-top box. (Refer to the owner's manual for the digital set -top box to connect 1 Connect the digital set -top box.) I Turn on the remote control. HDMI-DTV OUTPUT 1 OPTICAL DIGITAL AUDIO OUT AUDIO (RGB/DVI) 2 1 HDMI/DVI IN RS-232C IN (CONTROL & SERVICE) RGB IN(PC) ! EXTERNAL EQUIPMENT SETUP HDMI Connection...
Owner's Manual
Page 24
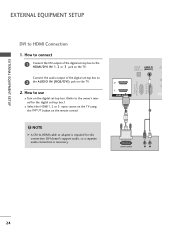
...2. OPTICAL DIGITAL AUDIO OUT AUDIO IN (RGB/DVI) R CO RS-232C IN (CONTROL & SERVICE) RGB IN (PC) 2 2 1 1 HDMI/DVI IN 1 2 DVI-DTV OUTPUT R L 24 Connect the audio output of the digital set -top box. (Refer to HDMI cable or adapter is necessary. DVI doesn't support audio, so a separate audio connection is required for the digital set-top box.) I Turn on the digital set -top box to HDMI Connection 1. How to use I Select the HDMI1, 2 or 3 input source on the TV using the INPUT button on the remote control. ! EXTERNAL EQUIPMENT SETUP EXTERNAL EQUIPMENT SETUP DVI to...
...2. OPTICAL DIGITAL AUDIO OUT AUDIO IN (RGB/DVI) R CO RS-232C IN (CONTROL & SERVICE) RGB IN (PC) 2 2 1 1 HDMI/DVI IN 1 2 DVI-DTV OUTPUT R L 24 Connect the audio output of the digital set -top box. (Refer to HDMI cable or adapter is necessary. DVI doesn't support audio, so a separate audio connection is required for the digital set-top box.) I Turn on the digital set -top box to HDMI Connection 1. How to use I Select the HDMI1, 2 or 3 input source on the TV using the INPUT button on the remote control. ! EXTERNAL EQUIPMENT SETUP EXTERNAL EQUIPMENT SETUP DVI to...
Owner's Manual
Page 31
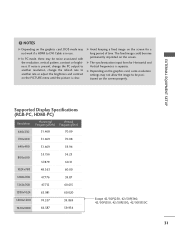
... another resolution, change the refresh rate to another rate or adjust the brightness and contrast on the PICTURE menu until the picture is separate. The fixed image could become permanently imprinted on the graphics card, DOS mode may not work if a HDMI to be noise associated with the resolution, vertical pattern, contrast or brightness. G The synchronization input form for a long period of time. EXTERNAL EQUIPMENT SETUP ! Supported Display Specifications...
... another resolution, change the refresh rate to another rate or adjust the brightness and contrast on the PICTURE menu until the picture is separate. The fixed image could become permanently imprinted on the graphics card, DOS mode may not work if a HDMI to be noise associated with the resolution, vertical pattern, contrast or brightness. G The synchronization input form for a long period of time. EXTERNAL EQUIPMENT SETUP ! Supported Display Specifications...
Owner's Manual
Page 39
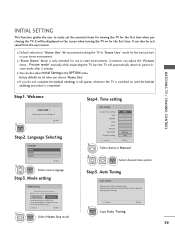
... WELCOME ! Store Demo Home Use Select [Home Use] to use in retail environments. It will appear whenever the TV is "Home Use". By Changing Picture Mode, you can also adjust Initial Setting in your antenna connection. Thank you for the best picture in the OPTION menu. Previous Next 1 ENTER Select H o m e U s e mode. Previous Next 1 ENTER Start Auto Tuning. 39 Factory defaults are set the essential items for viewing the TV for the first time. WATCHING TV / CHANNEL CONTROL Step1. The...
... WELCOME ! Store Demo Home Use Select [Home Use] to use in retail environments. It will appear whenever the TV is "Home Use". By Changing Picture Mode, you can also adjust Initial Setting in your antenna connection. Thank you for the best picture in the OPTION menu. Previous Next 1 ENTER Select H o m e U s e mode. Previous Next 1 ENTER Start Auto Tuning. 39 Factory defaults are set the essential items for viewing the TV for the first time. WATCHING TV / CHANNEL CONTROL Step1. The...
Owner's Manual
Page 40
...; Color 60 • Tint E 0R Enter G AUDIO Auto Volume Clear Voice II Balance Sound Mode TV Speaker Move : Off : Off + 3 0L : Standard • Infinte Sound: Off • Treble 50 • Bass 50 • Reset : On Enter R OPTION Language Input Label SIMPLINK Key Lock Caption Demo Mode ISM Method Set ID Initial Setting Move Enter : On : Off : Off : Off : Normal : 1 : Home Use CHANNEL PICTURE AUDIO TIME OPTION LOCK INPUT USB TIME Clock Off Time : Off On Time : Off Sleep Timer : Off...
...; Color 60 • Tint E 0R Enter G AUDIO Auto Volume Clear Voice II Balance Sound Mode TV Speaker Move : Off : Off + 3 0L : Standard • Infinte Sound: Off • Treble 50 • Bass 50 • Reset : On Enter R OPTION Language Input Label SIMPLINK Key Lock Caption Demo Mode ISM Method Set ID Initial Setting Move Enter : On : Off : Off : Off : Normal : 1 : Home Use CHANNEL PICTURE AUDIO TIME OPTION LOCK INPUT USB TIME Clock Off Time : Off On Time : Off Sleep Timer : Off...

Owner's Manual
Page 60
Make appropriate adjustments. G When you select the Set Video, Set video. Set audio. Make appropriate adjustments. 60 USB USB G When you select the Set Audio, I APS mode is not supported in Set Video function. Sound Mode Auto Volume Clear Voice ll Balance Cinema Off Off 0 L R Prev. 1 ENTER 2 ENTER Show the Sound Mode, Auto Volume, Clear Voice II and Balance. Picture Mode Contrast Brightness Sharpness Color Tint Color Temperature Noise Reduction Reset Vivid 100 50 70 80 0 W C 0 W C Medium Prev. 1 ENTER 2 ENTER Show the Picture Mode.
Make appropriate adjustments. G When you select the Set Video, Set video. Set audio. Make appropriate adjustments. 60 USB USB G When you select the Set Audio, I APS mode is not supported in Set Video function. Sound Mode Auto Volume Clear Voice ll Balance Cinema Off Off 0 L R Prev. 1 ENTER 2 ENTER Show the Sound Mode, Auto Volume, Clear Voice II and Balance. Picture Mode Contrast Brightness Sharpness Color Tint Color Temperature Noise Reduction Reset Vivid 100 50 70 80 0 W C 0 W C Medium Prev. 1 ENTER 2 ENTER Show the Picture Mode.

Owner's Manual
Page 63
... or corrupted music file that does not play displays 00:00 as shown below) will not play time. G This TV can not play time. Sound Mode Auto Volume Clear Voice ll Balance Cinema Off Off 0 L R Exit I T or ENERGY SAVING button to prevent a fixed image remaining on the screen for a extended period of the music play . Using the Music List Option, play information box (as the play music files less than 16 Kbytes. 63 Set audio.
... or corrupted music file that does not play displays 00:00 as shown below) will not play time. G This TV can not play time. Sound Mode Auto Volume Clear Voice ll Balance Cinema Off Off 0 L R Exit I T or ENERGY SAVING button to prevent a fixed image remaining on the screen for a extended period of the music play . Using the Music List Option, play information box (as the play music files less than 16 Kbytes. 63 Set audio.
Owner's Manual
Page 69
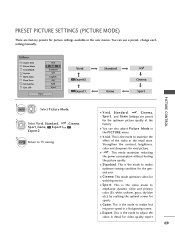
... 69 I You can use a preset, change each setting manually. I G a m e: This is the mode to adjust the video in the PICTURE menu. I V i v i d, S t a n d a r d, , C i n e m a, AutoPowerSave Sport, and Game Settings are factory presets for picture settings available in a fast gaming screen. Standard Game Auto Power Save Cinema Sport PICTURE CONTROL I AutoPowerSave : This mode maximizes reducting the power consumption without hurting the picture quality. Q.Menu Aspect Ratio Picture Mode Sound Mode Caption Multi Audio Sleep Timer CH Del/Add/Fav Eject USB F 1166::99 G F VViivviidd...
... 69 I You can use a preset, change each setting manually. I G a m e: This is the mode to adjust the video in the PICTURE menu. I V i v i d, S t a n d a r d, , C i n e m a, AutoPowerSave Sport, and Game Settings are factory presets for picture settings available in a fast gaming screen. Standard Game Auto Power Save Cinema Sport PICTURE CONTROL I AutoPowerSave : This mode maximizes reducting the power consumption without hurting the picture quality. Q.Menu Aspect Ratio Picture Mode Sound Mode Caption Multi Audio Sleep Timer CH Del/Add/Fav Eject USB F 1166::99 G F VViivviidd...
Owner's Manual
Page 94
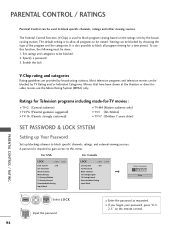
... for Television programs including made-for a time period. I TV-Y7 (Children 7 years older) PARENTAL CONTROL / RATING SET PASSWORD & LOCK SYSTEM Setting up Your Password Set up blocking schemes to block specific channels, ratings, and external viewing sources. It is used to block program viewing based on the remote control. Movies that have been shown at the theaters or direct-tovideo movies use this menu. PARENTAL CONTROL / RATINGS Parental Control can be used to block specific channels, ratings and other viewing sources. Set ratings...
... for Television programs including made-for a time period. I TV-Y7 (Children 7 years older) PARENTAL CONTROL / RATING SET PASSWORD & LOCK SYSTEM Setting up Your Password Set up blocking schemes to block specific channels, ratings, and external viewing sources. It is used to block program viewing based on the remote control. Movies that have been shown at the theaters or direct-tovideo movies use this menu. PARENTAL CONTROL / RATINGS Parental Control can be used to block specific channels, ratings and other viewing sources. Set ratings...

Owner's Manual
Page 96
... 4 digits on the Confirm. PARENTAL CONTROL / RATINGS Set Password Change the password by inputting a new password twice. Return to TV viewing. PARENTAL CONTROL / RATING 96 LOCK Move Enter Lock System : Off Set Password Block Channel Movie Rating TV Rating-Children TV Rating-General Downloadable Rating Input Block LOCK Move Enter Lock System : Off Set Password Block Channel Movie Rating New * * * * Confirm * * * * TV Rating-Children TV Rating-General Close Downloadable Rating Input Block 1 MENU ENTER Select L O C K. 21 2 3 456 789 0 3 Input the password...
... 4 digits on the Confirm. PARENTAL CONTROL / RATINGS Set Password Change the password by inputting a new password twice. Return to TV viewing. PARENTAL CONTROL / RATING 96 LOCK Move Enter Lock System : Off Set Password Block Channel Movie Rating TV Rating-Children TV Rating-General Downloadable Rating Input Block LOCK Move Enter Lock System : Off Set Password Block Channel Movie Rating New * * * * Confirm * * * * TV Rating-Children TV Rating-General Close Downloadable Rating Input Block 1 MENU ENTER Select L O C K. 21 2 3 456 789 0 3 Input the password...
Owner's Manual
Page 106
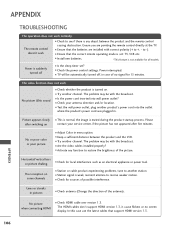
.... I Is the sleep timer set : TV, VCR etc. The problem may be with the broadcast. I Station signal is suddenly turned off , in pictures I Ensure that support HDMI version 1.3. Lines or streaks in case of the antenna). In this case use the latest cables that the batteries are pointing the remote control directly at the TV. APPENDIX 106 I Are the video cables installed properly? Power interrupted. I Check the power control settings. No picture when connecting HDMI I Keep...
.... I Is the sleep timer set : TV, VCR etc. The problem may be with the broadcast. I Station signal is suddenly turned off , in pictures I Ensure that support HDMI version 1.3. Lines or streaks in case of the antenna). In this case use the latest cables that the batteries are pointing the remote control directly at the TV. APPENDIX 106 I Are the video cables installed properly? Power interrupted. I Check the power control settings. No picture when connecting HDMI I Keep...

Owner's Manual
Page 107
... is a problem in menu option. APPENDIX 107 No output from one of the speakers Unusual sound from inside the product I Use normal MP3 file. *This feature is out of range I Try another channel. I Adjust Balance in PC mode. (Only PC mode applied) The signal is not available for all models. Press MUTE button. No sound when connecting HDMI/USB I Press the VOL or VOLUME button. Picture OK & No sound I Check HDMI cable over version...
... is a problem in menu option. APPENDIX 107 No output from one of the speakers Unusual sound from inside the product I Use normal MP3 file. *This feature is out of range I Try another channel. I Adjust Balance in PC mode. (Only PC mode applied) The signal is not available for all models. Press MUTE button. No sound when connecting HDMI/USB I Press the VOL or VOLUME button. Picture OK & No sound I Check HDMI cable over version...

Owner's Manual
Page 118
.... Remote Control Lock Mode (Command: k m) To lock the remote control and the front panel controls on screen. When main power is on Acknowledgement [l][ ][Set ID][ ][OK/NG][Data][x] 13. Acknowledgement [s][ ][Set ID][ ][OK/NG][Data][x] 16. You can also adjust bass in the AUDIO menu. G p.116. Transmission [m][a][ ][Set ID][ ][Data00][ ][Data01] [ ][Data02][ ][Data03][ ][Data04][ ][Data05][Cr] Digital channels have a Physical, Major, and Minor channel number. Bass (Command: k s) To adjust bass. Transmission [x][u][ ][Set ID...
.... Remote Control Lock Mode (Command: k m) To lock the remote control and the front panel controls on screen. When main power is on Acknowledgement [l][ ][Set ID][ ][OK/NG][Data][x] 13. Acknowledgement [s][ ][Set ID][ ][OK/NG][Data][x] 16. You can also adjust bass in the AUDIO menu. G p.116. Transmission [m][a][ ][Set ID][ ][Data00][ ][Data01] [ ][Data02][ ][Data03][ ][Data04][ ][Data05][Cr] Digital channels have a Physical, Major, and Minor channel number. Bass (Command: k s) To adjust bass. Transmission [x][u][ ][Set ID...
Specification
Page 2
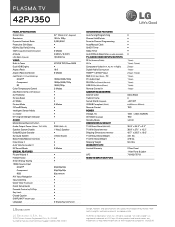
... FEATURES Auto Tuning/Programming • Channel Add/Delete • Favorite Channel Programming • Auto/Manual Clock • On/Off Timer • Sleep Timer • Auto Off/Auto Sleep (When no video is a registered trademark of their respective companies. 06/22/10 Nonmetric weights and measurements are subject to change without notice. PC 1 (rear) PC Audio Input 1 (rear) RS-232c In (Control/Service) 1 (rear) USB 2.0 In (Music/Photo) 1 (side) Remote Control In 1 (rear) Cabinet/Accessories Cabinet Color Gloss Black TruSlim...
... FEATURES Auto Tuning/Programming • Channel Add/Delete • Favorite Channel Programming • Auto/Manual Clock • On/Off Timer • Sleep Timer • Auto Off/Auto Sleep (When no video is a registered trademark of their respective companies. 06/22/10 Nonmetric weights and measurements are subject to change without notice. PC 1 (rear) PC Audio Input 1 (rear) RS-232c In (Control/Service) 1 (rear) USB 2.0 In (Music/Photo) 1 (side) Remote Control In 1 (rear) Cabinet/Accessories Cabinet Color Gloss Black TruSlim...


