Warranty (English)
Page 2
... TO PROVINCE. This warranty does not cover: • Customer instruction • Installation • Set up adjustments • Cosmetic damage • Damage due to service the Product • Products sold as fuses or batteries • Products where the factory applied serial number has been altered or removed REPAIR REPLACEMENT AS PROVIDED UNDER THIS WARRANTY IS YOUR EXCLUSIVE REMEDY. Contact Insignia: For customer service please call 1-877...
... TO PROVINCE. This warranty does not cover: • Customer instruction • Installation • Set up adjustments • Cosmetic damage • Damage due to service the Product • Products sold as fuses or batteries • Products where the factory applied serial number has been altered or removed REPAIR REPLACEMENT AS PROVIDED UNDER THIS WARRANTY IS YOUR EXCLUSIVE REMEDY. Contact Insignia: For customer service please call 1-877...
User Manual (English)
Page 3
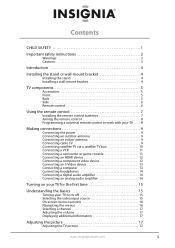
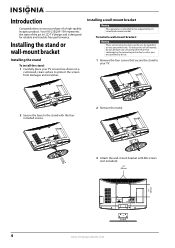
...the stand 4 Installing a wall-mount bracket 4 TV components 5 Accessories 5 Front 5 Back 5 Side 6 Remote control 6 Using the remote control 7 Installing the remote control batteries 7 Aiming the remote control 8 Programming a universal remote control to work with your TV . . . . 8 Making connections 9 Connecting the power 9 Connecting an outdoor antenna 9 Connecting an indoor antenna 9 Connecting cable TV 9 Connecting satellite TV via a satellite TV box 10 Connecting a VCR 11 Connecting a camcorder or game console 11 Connecting an HDMI device 12 Connecting a component video...
...the stand 4 Installing a wall-mount bracket 4 TV components 5 Accessories 5 Front 5 Back 5 Side 6 Remote control 6 Using the remote control 7 Installing the remote control batteries 7 Aiming the remote control 8 Programming a universal remote control to work with your TV . . . . 8 Making connections 9 Connecting the power 9 Connecting an outdoor antenna 9 Connecting an indoor antenna 9 Connecting cable TV 9 Connecting satellite TV via a satellite TV box 10 Connecting a VCR 11 Connecting a camcorder or game console 11 Connecting an HDMI device 12 Connecting a component video...
User Manual (English)
Page 4
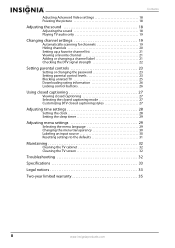
... Video settings 18 Freezing the picture 18 Adjusting the sound 18 Adjusting the sound 18 Playing TV audio only 19 Changing channel settings 19 Automatically scanning for channels 19 Hiding channels 20 Setting up a favorite channel list 21 Viewing a favorite channel 21 Adding or changing a channel label 21 Checking the DTV signal strength 22 Setting parental controls 23 Setting or changing the password 23 Setting parental control levels 23 Blocking unrated TV 25 Downloading rating information 26 Locking control buttons 26 Using closed captioning 27 Viewing closed captioning...
... Video settings 18 Freezing the picture 18 Adjusting the sound 18 Adjusting the sound 18 Playing TV audio only 19 Changing channel settings 19 Automatically scanning for channels 19 Hiding channels 20 Setting up a favorite channel list 21 Viewing a favorite channel 21 Adding or changing a channel label 21 Checking the DTV signal strength 22 Setting parental controls 23 Setting or changing the password 23 Setting parental control levels 23 Blocking unrated TV 25 Downloading rating information 26 Locking control buttons 26 Using closed captioning 27 Viewing closed captioning...

User Manual (English)
Page 5
... this TV manufacturer, listed in mind The issue The home theater entertainment experience is appropriate. Some wall mounts are not designed to be heavy. Use only a wall mount rated for proper use your flat panel display As you enjoy your TV. • Follow all instructions supplied by curious children. TVs that can easily be pushed, pulled over and cause injury. Use only a TV stand rated for the weight of your TV...
... this TV manufacturer, listed in mind The issue The home theater entertainment experience is appropriate. Some wall mounts are not designed to be heavy. Use only a wall mount rated for proper use your flat panel display As you enjoy your TV. • Follow all instructions supplied by curious children. TVs that can easily be pushed, pulled over and cause injury. Use only a TV stand rated for the weight of your TV...
User Manual (English)
Page 6
... operate normally, or has been dropped. 15 The mains plug is in the vicinity of time, unplug it can fall into such power lines or circuits. Class I apparatus. Make sure that your TV or hit, jolt, or press hard against the LCD panel. No user-serviceable parts are required, make absolutely sure that dangerous voltage constituting a risk of time. 14 Refer all instructions...
... operate normally, or has been dropped. 15 The mains plug is in the vicinity of time, unplug it can fall into such power lines or circuits. Class I apparatus. Make sure that your TV or hit, jolt, or press hard against the LCD panel. No user-serviceable parts are required, make absolutely sure that dangerous voltage constituting a risk of time. 14 Refer all instructions...
User Manual (English)
Page 7
... amount of power supplied to qualified service personnel under the following conditions: • When the power supply cord or plug is connected to your TV, make sure that the cable ground must be recycled and reused. Power source Operate your TV only from the type of power source indicated on the screen as practical. If you are not considered defects. Specifically, it on the TV if the TV is exposed to...
... amount of power supplied to qualified service personnel under the following conditions: • When the power supply cord or plug is connected to your TV, make sure that the cable ground must be recycled and reused. Power source Operate your TV only from the type of power source indicated on the screen as practical. If you are not considered defects. Specifically, it on the TV if the TV is exposed to...
User Manual (English)
Page 8
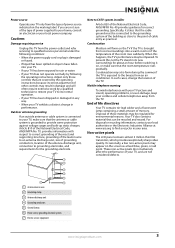
... that secure the stand to your TV. 2 Secure the base to be supported by qualified service personnel only. Your NS-L32Q09-10A represents the state of the art in the operating instructions unless you are for reliable and trouble-free performance. Installing the stand or wall-mount bracket Installing the stand To install the stand: 1 Carefully place your purchase of hazards, do so. 1 Remove the four screws that contained in LCD TV design and is...
... that secure the stand to your TV. 2 Secure the base to be supported by qualified service personnel only. Your NS-L32Q09-10A represents the state of the art in the operating instructions unless you are for reliable and trouble-free performance. Installing the stand or wall-mount bracket Installing the stand To install the stand: 1 Carefully place your purchase of hazards, do so. 1 Remove the four screws that contained in LCD TV design and is...
User Manual (English)
Page 9
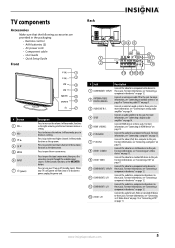
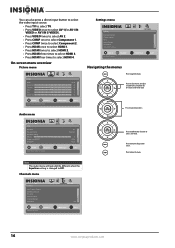
... packaging: • Remote control • AAA batteries (2) • AC power cord • Component cable • User Guide • Quick Setup Guide Front Back 1 2 34 5 6 7 8 9 # Button 1 VOL+ 2 VOL- 3 CH 4 CH 5 MENU 6 INPUT 7 (power) 1 2 3 4 5 6 7 Description Press to decrease the volume. Press to increase the volume. When your TV on page 9. 3 AUDIO OUT R / L Connect an external sound system to this jack. For more information, see "Connecting an outdoor antenna" on page 9 or "Connecting cable TV" on or off , power still flows...
... packaging: • Remote control • AAA batteries (2) • AC power cord • Component cable • User Guide • Quick Setup Guide Front Back 1 2 34 5 6 7 8 9 # Button 1 VOL+ 2 VOL- 3 CH 4 CH 5 MENU 6 INPUT 7 (power) 1 2 3 4 5 6 7 Description Press to decrease the volume. Press to increase the volume. When your TV on page 9. 3 AUDIO OUT R / L Connect an external sound system to this jack. For more information, see "Connecting an outdoor antenna" on page 9 or "Connecting cable TV" on or off , power still flows...
User Manual (English)
Page 11
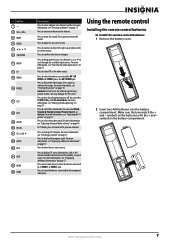
... decrease the volume. You may damage the TV screen. # Button 7- 8 VOL+/VOL- 9 MUTE 10 MENU 11 12 OK/ENTER 13 INPUT 14 TV 15 VIDEO 16 FREEZE 17 CCD 18 PICT 19 ZOOM 20 RECALL 21 CH /CH 22 GUIDE 23 EXIT 24 INFO 25 HDMI 26 COMP Description Press to mute the sound. Press to enter a digital sub-channel number. Press to close the on...
... decrease the volume. You may damage the TV screen. # Button 7- 8 VOL+/VOL- 9 MUTE 10 MENU 11 12 OK/ENTER 13 INPUT 14 TV 15 VIDEO 16 FREEZE 17 CCD 18 PICT 19 ZOOM 20 RECALL 21 CH /CH 22 GUIDE 23 EXIT 24 INFO 25 HDMI 26 COMP Description Press to mute the sound. Press to enter a digital sub-channel number. Press to close the on...
User Manual (English)
Page 13
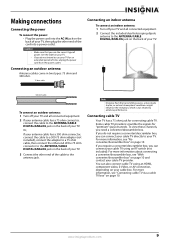
... period of your cable TV provider. You can also connect cable TV using an RF switch (not included). If you require a converter/descrambler box, you can connect your cable TV using an HDMI, component video, S-Video, or AV connection, depending on page 10 and contact your TV, then plug the other end of your TV. If you do not intend to antenna performance. Making connections Connecting the power To connect the power: • Plug the power cord into a power outlet.
... period of your cable TV provider. You can also connect cable TV using an RF switch (not included). If you require a converter/descrambler box, you can connect your cable TV using an HDMI, component video, S-Video, or AV connection, depending on page 10 and contact your TV, then plug the other end of your TV. If you do not intend to antenna performance. Making connections Connecting the power To connect the power: • Plug the power cord into a power outlet.
User Manual (English)
Page 14
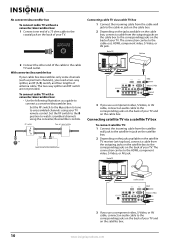
... channels), you need a two-way splitter, an RF (A/B) switch, and four lengths of your TV. The connection can be to the cable TV wall outlet. Connecting satellite TV via a cable TV box 1 Connect the incoming cable from the cable wall jack to the cable-in jack on the satellite box. 2 Depending on the jacks available on the satellite TV receiver (set signal splitter B Out In TV Cable converter/descrambler box HDMI Video or S-Video Component 3 If you use a component video, S-Video, or AV cable, connect an audio cable...
... channels), you need a two-way splitter, an RF (A/B) switch, and four lengths of your TV. The connection can be to the cable TV wall outlet. Connecting satellite TV via a cable TV box 1 Connect the incoming cable from the cable wall jack to the cable-in jack on the satellite box. 2 Depending on the jacks available on the satellite TV receiver (set signal splitter B Out In TV Cable converter/descrambler box HDMI Video or S-Video Component 3 If you use a component video, S-Video, or AV cable, connect an audio cable...
User Manual (English)
Page 19
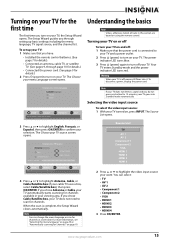
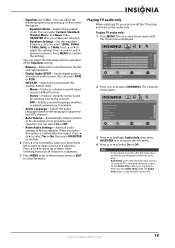
... your TV source Antenna Cable Cable/Satellite box 0 Analog Channels 0 Digital Channels Scan for channels MOVE OK ENTER SELECT MENU PREVIOUS Select Antenna If using the remote control. If you do not press any button for 15 minutes, your TV goes into it. Your TV enters Standby mode and the power indicator LED turns red. Note If your TV does not detect a signal and you chose Cable/Satellite box, your TV does not need to scan for channels. To set up basic settings including the menu language, TV signal source...
... your TV source Antenna Cable Cable/Satellite box 0 Analog Channels 0 Digital Channels Scan for channels MOVE OK ENTER SELECT MENU PREVIOUS Select Antenna If using the remote control. If you do not press any button for 15 minutes, your TV goes into it. Your TV enters Standby mode and the power indicator LED turns red. Note If your TV does not detect a signal and you chose Cable/Satellite box, your TV does not need to scan for channels. To set up basic settings including the menu language, TV signal source...
User Manual (English)
Page 20
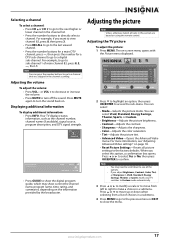
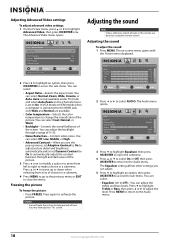
... Contrast Color Tint Sharpness PICTURE AUDIO CHANNELS SETTINGS Vivid 42 45 54 0 +5 MOVE OK ENTER SELECT Adjust settings to affect picture quality MENU PREVIOUS EXIT EXIT Audio menu Audio Equalizer Equalizer Mode Equalizer Setting Balance Digital Audio/SPDIF MTS/SAP PICTURE AUDIO CHANNELS SETTINGS On Standard 0 RAW Mono MOVE OK ENTER SELECT Adjust settings to affect sound quality MENU PREVIOUS EXIT EXIT Settings menu Settings Parental Controls Closed Caption Time Menu Settings Input labels Computer Settings PICTURE AUDIO CHANNELS SETTINGS MOVE OK ENTER SELECT Set various TV...
... Contrast Color Tint Sharpness PICTURE AUDIO CHANNELS SETTINGS Vivid 42 45 54 0 +5 MOVE OK ENTER SELECT Adjust settings to affect picture quality MENU PREVIOUS EXIT EXIT Audio menu Audio Equalizer Equalizer Mode Equalizer Setting Balance Digital Audio/SPDIF MTS/SAP PICTURE AUDIO CHANNELS SETTINGS On Standard 0 RAW Mono MOVE OK ENTER SELECT Adjust settings to affect sound quality MENU PREVIOUS EXIT EXIT Settings menu Settings Parental Controls Closed Caption Time Menu Settings Input labels Computer Settings PICTURE AUDIO CHANNELS SETTINGS MOVE OK ENTER SELECT Set various TV...
User Manual (English)
Page 21
... Default Sound On 2009 March 1 09:10PM • Press GUIDE to show the digital program guide, which may need to scroll down when selecting from left to right to make a choice in the channel list. • Press the number buttons to directly select a channel. For more information, see all picture settings to the factory defaults. Adjusting the volume To adjust the volume: • Press VOL - The on-screen menu opens with the Picture menu displayed...
... Default Sound On 2009 March 1 09:10PM • Press GUIDE to show the digital program guide, which may need to scroll down when selecting from left to right to make a choice in the channel list. • Press the number buttons to directly select a channel. For more information, see all picture settings to the factory defaults. Adjusting the volume To adjust the volume: • Press VOL - The on-screen menu opens with the Picture menu displayed...
User Manual (English)
Page 22
...; Color temperature-Selects the color temperature to access the sub-menu. Auto is only available under TV mode and when Auto Zoom on the Channels menu is connected to the HDMI jack, only Wide and Normal are based on -screen menu opens with the Picture menu displayed. You can adjust. 5 Press to highlight an option, then press OK/ENTER to the Audio menu. 18 www.insigniaproducts.com Picture Mode Brightness Contrast Color Tint Sharpness PICTURE AUDIO CHANNELS SETTINGS...
...; Color temperature-Selects the color temperature to access the sub-menu. Auto is only available under TV mode and when Auto Zoom on the Channels menu is connected to the HDMI jack, only Wide and Normal are based on -screen menu opens with the Picture menu displayed. You can adjust. 5 Press to highlight an option, then press OK/ENTER to the Audio menu. 18 www.insigniaproducts.com Picture Mode Brightness Contrast Color Tint Sharpness PICTURE AUDIO CHANNELS SETTINGS...
User Manual (English)
Page 23
... works only when the input source is TV and your selection. • Equalizer Settings-Set the equalizer frequency. You can turn off the TV picture and listen to the audio only. Press or to select CHANNELS. Press or to move from a list of the Equalizer setting: • Balance-Adjusts the sound between columns. To play TV audio only: 1 Press MENU. To exit Audio Only mode, press any button. Picture Mode Brightness Contrast Color Tint Sharpness PICTURE AUDIO CHANNELS SETTINGS...
... works only when the input source is TV and your selection. • Equalizer Settings-Set the equalizer frequency. You can turn off the TV picture and listen to the audio only. Press or to select CHANNELS. Press or to move from a list of the Equalizer setting: • Balance-Adjusts the sound between columns. To play TV audio only: 1 Press MENU. To exit Audio Only mode, press any button. Picture Mode Brightness Contrast Color Tint Sharpness PICTURE AUDIO CHANNELS SETTINGS...
User Manual (English)
Page 27
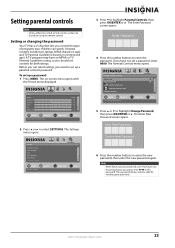
.... Settings Parental Controls Closed Caption Time Menu Settings Input labels Computer Settings PICTURE AUDIO CHANNELS SETTINGS MOVE OK ENTER SELECT Set various TV options MENU PREVIOUS EXIT EXIT 3 Press to enter the new password, then enter the new password again. Before you can watch. The Parental Controls menu opens. Parental controls include two ratings: MPAA (based on age) and TV Parental Guidelines (based on -screen menu opens with the Picture menu displayed. A TV program may have not set up a parental controls password. Enter Password 4 Press the number buttons to...
.... Settings Parental Controls Closed Caption Time Menu Settings Input labels Computer Settings PICTURE AUDIO CHANNELS SETTINGS MOVE OK ENTER SELECT Set various TV options MENU PREVIOUS EXIT EXIT 3 Press to enter the new password, then enter the new password again. Before you can watch. The Parental Controls menu opens. Parental controls include two ratings: MPAA (based on age) and TV Parental Guidelines (based on -screen menu opens with the Picture menu displayed. A TV program may have not set up a parental controls password. Enter Password 4 Press the number buttons to...
User Manual (English)
Page 28
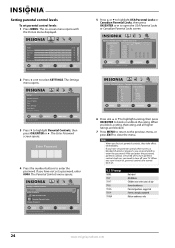
... on . Picture Mode Brightness Contrast Color Tint Sharpness PICTURE AUDIO CHANNELS SETTINGS Vivid 42 45 54 0 +5 MOVE OK ENTER SELECT Adjust settings to affect picture quality MENU PREVIOUS EXIT EXIT 2 Press or to open the USA Parental Locks or Canadian Parental Locks screen. The Settings menu opens. Settings Parental Controls PICTURE AUDIO CHANNELS SETTINGS Button Lock Off Block Unrated TV Off USA Parental Locks Canadian Parental Locks Change Password MOVE OK ENTER SELECT Lock or unlock the buttons on , you have set a password, enter 0000. To turn parental controls back...
... on . Picture Mode Brightness Contrast Color Tint Sharpness PICTURE AUDIO CHANNELS SETTINGS Vivid 42 45 54 0 +5 MOVE OK ENTER SELECT Adjust settings to affect picture quality MENU PREVIOUS EXIT EXIT 2 Press or to open the USA Parental Locks or Canadian Parental Locks screen. The Settings menu opens. Settings Parental Controls PICTURE AUDIO CHANNELS SETTINGS Button Lock Off Block Unrated TV Off USA Parental Locks Canadian Parental Locks Change Password MOVE OK ENTER SELECT Lock or unlock the buttons on , you have set a password, enter 0000. To turn parental controls back...
User Manual (English)
Page 36
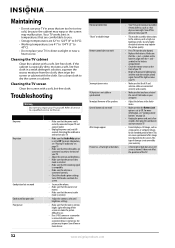
... work Snowy picture or noise VGA picture is set to Off. Problem No power No picture Good picture but no sound Good sound but poor color Poor picture Solution • Make sure that Audio Only option is not too bright. For more information, see "Locking control buttons" on the batteries align with the remote control signal. Turn off the device or move your TV. • Make sure that the A/V and antenna cables are connected...
... work Snowy picture or noise VGA picture is set to Off. Problem No power No picture Good picture but no sound Good sound but poor color Poor picture Solution • Make sure that Audio Only option is not too bright. For more information, see "Locking control buttons" on the batteries align with the remote control signal. Turn off the device or move your TV. • Make sure that the A/V and antenna cables are connected...
User Manual (English)
Page 39
...; Commercial use • Modification of any part of the Product, including the antenna • Plasma display panel damaged by an authorized Insignia repair center or store personnel, Insignia will have an Insignia-approved repair person dispatched to your original receipt and the Product to the address listed on the first call, an Insignia television (size and features to be determined by this warranty that requires service...
...; Commercial use • Modification of any part of the Product, including the antenna • Plasma display panel damaged by an authorized Insignia repair center or store personnel, Insignia will have an Insignia-approved repair person dispatched to your original receipt and the Product to the address listed on the first call, an Insignia television (size and features to be determined by this warranty that requires service...


