User Manual (English)
Page 3
... remote control batteries 7 Aiming the remote control 8 Programming a universal remote control to work with your TV . . . . 8 Making connections 9 Connecting the power 9 Connecting an outdoor antenna 9 Connecting an indoor antenna 9 Connecting cable TV 9 Connecting satellite TV via a satellite TV box 10 Connecting a VCR 11 Connecting a camcorder or game console 11 Connecting an HDMI device 12 Connecting...
... remote control batteries 7 Aiming the remote control 8 Programming a universal remote control to work with your TV . . . . 8 Making connections 9 Connecting the power 9 Connecting an outdoor antenna 9 Connecting an indoor antenna 9 Connecting cable TV 9 Connecting satellite TV via a satellite TV box 10 Connecting a VCR 11 Connecting a camcorder or game console 11 Connecting an HDMI device 12 Connecting...
User Manual (English)
Page 6
... as the original part. Warnings Electric shock hazard To reduce the risk of broken glass. • If the LCD panel is located on the back of the obsolete outlet. 10 Protect the power cord from tip-over. 13 Unplug this apparatus near any cover or expose the device to rain... plug must remain readily operable. 16 The apparatus with grounding-type plug is left unattended and unused for replacement of your TV or hit, jolt, or press hard against the LCD panel. Make sure that dangerous voltage constituting a risk of glass. No user-serviceable parts are provided for at plugs, ...
... as the original part. Warnings Electric shock hazard To reduce the risk of broken glass. • If the LCD panel is located on the back of the obsolete outlet. 10 Protect the power cord from tip-over. 13 Unplug this apparatus near any cover or expose the device to rain... plug must remain readily operable. 16 The apparatus with grounding-type plug is left unattended and unused for replacement of your TV or hit, jolt, or press hard against the LCD panel. Make sure that dangerous voltage constituting a risk of glass. No user-serviceable parts are provided for at plugs, ...
User Manual (English)
Page 9
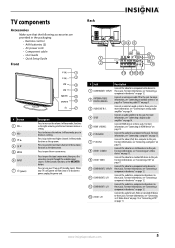
...13 AV IN 1 L/R Connect the audio for an S-Video device to these jacks. When your TV on page 12. 11 COMPONENT 2 L/R Connect the audio for a component video device to this jack. Press to 10 COMPONENT 2 Y/Pb/Pr these jacks. Press to these jacks. For more information, see "Connecting ...a computer" on page 13. 8 AV IN 1 S-VIDEO Connect the video for an S-Video or standard AV device to turn your TV is off (standby mode). For ...
...13 AV IN 1 L/R Connect the audio for an S-Video device to these jacks. When your TV on page 12. 11 COMPONENT 2 L/R Connect the audio for a component video device to this jack. Press to 10 COMPONENT 2 Y/Pb/Pr these jacks. Press to these jacks. For more information, see "Connecting ...a computer" on page 13. 8 AV IN 1 S-VIDEO Connect the video for an S-Video or standard AV device to turn your TV is off (standby mode). For ...
User Manual (English)
Page 10
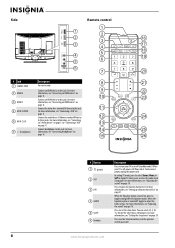
... AV device to this jack. In digital TV mode, press to select Stereo, Mono, or SAP. You can select Off, 5, 10, 15, 30, 60, 90, 120, 180, or 240 minutes. For more information, see "Connecting a VCR" on 22 page 12. 10 23 Connect an HDMI device to these jacks... "Connecting an HDMI device" on 14 25 page 14. 15 26 # Button 1 (power) 2 SAP 3 FAV 4 AUDIO 5 SLEEP 6 Numbers Description Press to this jack. In analog TV mode, press to select the audio track (language). Press to this jack. Side Remote control 1 1 2 2 3 16 3 4 17 18 4 5 19 6 5 6 7 20 #...
... AV device to this jack. In digital TV mode, press to select Stereo, Mono, or SAP. You can select Off, 5, 10, 15, 30, 60, 90, 120, 180, or 240 minutes. For more information, see "Connecting a VCR" on 22 page 12. 10 23 Connect an HDMI device to these jacks... "Connecting an HDMI device" on 14 25 page 14. 15 26 # Button 1 (power) 2 SAP 3 FAV 4 AUDIO 5 SLEEP 6 Numbers Description Press to this jack. In analog TV mode, press to select the audio track (language). Press to this jack. Side Remote control 1 1 2 2 3 16 3 4 17 18 4 5 19 6 5 6 7 20 #...
User Manual (English)
Page 11
... Caution: Do not freeze the video image for long periods of time. You may damage the TV screen. In TV mode, press to return to select the device connected the AV 1 IN VIDEO or S-VIDEO jack...to freeze the video image. For more information, see "Selecting a channel" on -screen menu. Press to select TV as the channel number, channel name (if available), or signal source. You can select Vivid, Standard, Energy .... symbols in the on page 18. # Button 7- 8 VOL+/VOL- 9 MUTE 10 MENU 11 12 OK/ENTER 13 INPUT 14 TV 15 VIDEO 16 FREEZE 17 CCD 18 PICT 19 ZOOM 20 RECALL 21 CH /CH 22...
... Caution: Do not freeze the video image for long periods of time. You may damage the TV screen. In TV mode, press to return to select the device connected the AV 1 IN VIDEO or S-VIDEO jack...to freeze the video image. For more information, see "Selecting a channel" on -screen menu. Press to select TV as the channel number, channel name (if available), or signal source. You can select Vivid, Standard, Energy .... symbols in the on page 18. # Button 7- 8 VOL+/VOL- 9 MUTE 10 MENU 11 12 OK/ENTER 13 INPUT 14 TV 15 VIDEO 16 FREEZE 17 CCD 18 PICT 19 ZOOM 20 RECALL 21 CH /CH 22...
User Manual (English)
Page 13
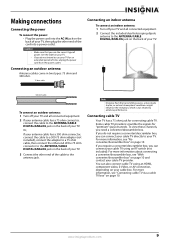
...insigniaproducts.com 9 For more information, see "With converter/descrambler box" on page 10. Cautions • Make sure that you need a converter/descrambler box. To view these channels, you use your cable TV provider. You can connect your cable box. Making connections Connecting the power To...outlet. For more information, see "No converter/descrambler box" on page 10 and contact your TV for an extended period of power. If you require a converter/descrambler box, you can also connect cable TV using an RF switch (not included). Connecting an outdoor antenna Antenna ...
...insigniaproducts.com 9 For more information, see "With converter/descrambler box" on page 10. Cautions • Make sure that you need a converter/descrambler box. To view these channels, you use your cable TV provider. You can connect your cable box. Making connections Connecting the power To...outlet. For more information, see "No converter/descrambler box" on page 10 and contact your TV for an extended period of power. If you require a converter/descrambler box, you can also connect cable TV using an RF switch (not included). Connecting an outdoor antenna Antenna ...
User Manual (English)
Page 14
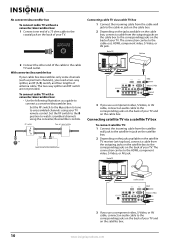
... box, connect a cable from the outgoing jacks on the satellite box to the corresponding jacks on the back of your TV and on the satellite box. 10 www.insigniaproducts.com To connect cable TV with a converter/descrambler box: • Use the following illustration as premium channels), you use a component video, S-Video, or AV...
... box, connect a cable from the outgoing jacks on the satellite box to the corresponding jacks on the back of your TV and on the satellite box. 10 www.insigniaproducts.com To connect cable TV with a converter/descrambler box: • Use the following illustration as premium channels), you use a component video, S-Video, or AV...
User Manual (English)
Page 19
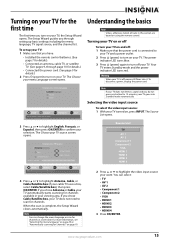
...otherwise noted, all tasks in your menu Language screen opens. Selecting the video input source To select the video input source: 1 With your TV, the Setup Wizard opens. The Source List opens. You can change the menu language or scan for channels at a later date. Turning on...Press (power) to scan for channels" on your TV. Your TV enters Standby mode and the power indicator LED turns red. Note If your TV does not detect a signal and you chose Cable/Satellite box, your TV is off : 1 Make sure that you through page 10 for details.) • Connected the power cord. (...
...otherwise noted, all tasks in your menu Language screen opens. Selecting the video input source To select the video input source: 1 With your TV, the Setup Wizard opens. The Source List opens. You can change the menu language or scan for channels at a later date. Turning on...Press (power) to scan for channels" on your TV. Your TV enters Standby mode and the power indicator LED turns red. Note If your TV does not detect a signal and you chose Cable/Satellite box, your TV is off : 1 Make sure that you through page 10 for details.) • Connected the power cord. (...
User Manual (English)
Page 25
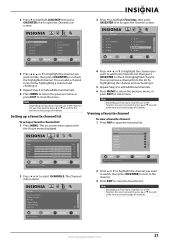
...ENTER to close the Favorites list. Channels Add/Skip Channel PICTURE AUDIO CHANNELS SETTINGS Ch 5-0 Ch 9-1 WWOR DT Ch 10-0 Ch 60-2 Ch 60-4 Ch 9-0 Ch 9-2 WNYW DT Ch 60-1 Ch 60-3 Ch 60-7 MOVE OK...Note Depending on -screen menu opens with the Picture menu displayed. The Channels menu opens. Favorites Ch 5-0 Ch 10-0 Ch 60-3 Ch 60-8 Ch 60-11 Ch 60-12 MOVE OK ENTER SELECT Add channels to create a.... 3 Press EXIT to the next or previous page of channels. Channels Favorites Ch 5-0 Ch 9-1 WWOR DT Ch 10-0 Ch 60-2 Ch 60-4 PICTURE AUDIO CHANNELS SETTINGS Ch 9-0 Ch 9-2 WNYW DT Ch 60-1 Ch 60-3 Ch...
...ENTER to close the Favorites list. Channels Add/Skip Channel PICTURE AUDIO CHANNELS SETTINGS Ch 5-0 Ch 9-1 WWOR DT Ch 10-0 Ch 60-2 Ch 60-4 Ch 9-0 Ch 9-2 WNYW DT Ch 60-1 Ch 60-3 Ch 60-7 MOVE OK...Note Depending on -screen menu opens with the Picture menu displayed. The Channels menu opens. Favorites Ch 5-0 Ch 10-0 Ch 60-3 Ch 60-8 Ch 60-11 Ch 60-12 MOVE OK ENTER SELECT Add channels to create a.... 3 Press EXIT to the next or previous page of channels. Channels Favorites Ch 5-0 Ch 9-1 WWOR DT Ch 10-0 Ch 60-2 Ch 60-4 PICTURE AUDIO CHANNELS SETTINGS Ch 9-0 Ch 9-2 WNYW DT Ch 60-1 Ch 60-3 Ch...
User Manual (English)
Page 33
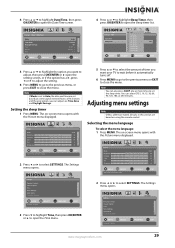
... a DTV channel, and the only options you can adjust are automatically set by TV source EXIT EXIT Settings Time Date/Time Sleep Time PICTUREOff AUDIO CHANNELS SETTINGS 5 minutes 10 minutes 15 minutes 30 minutes Off 60 minutes 90 minutes 120 minutes 180 minutes 240...Settings Parental Controls Closed Caption Time Menu Settings Input labels Computer Settings PICTURE AUDIO CHANNELS SETTINGS MOVE OK ENTER SELECT Set various TV options MENU PREVIOUS EXIT EXIT www.insigniaproducts.com 29 Picture Mode Brightness Contrast Color Tint Sharpness PICTURE AUDIO CHANNELS SETTINGS Vivid 42...
... a DTV channel, and the only options you can adjust are automatically set by TV source EXIT EXIT Settings Time Date/Time Sleep Time PICTUREOff AUDIO CHANNELS SETTINGS 5 minutes 10 minutes 15 minutes 30 minutes Off 60 minutes 90 minutes 120 minutes 180 minutes 240...Settings Parental Controls Closed Caption Time Menu Settings Input labels Computer Settings PICTURE AUDIO CHANNELS SETTINGS MOVE OK ENTER SELECT Set various TV options MENU PREVIOUS EXIT EXIT www.insigniaproducts.com 29 Picture Mode Brightness Contrast Color Tint Sharpness PICTURE AUDIO CHANNELS SETTINGS Vivid 42...

