User Manual (English)
Page 3
... remote control batteries 7 Aiming the remote control 8 Programming a universal remote control to work with your TV . . . . 8 Making connections 9 Connecting the power 9 Connecting an outdoor antenna 9 Connecting an indoor antenna 9 Connecting cable TV 9 Connecting satellite TV via a satellite TV box 10 Connecting a VCR 11 Connecting a camcorder or game console 11 Connecting an HDMI device 12 Connecting...
... remote control batteries 7 Aiming the remote control 8 Programming a universal remote control to work with your TV . . . . 8 Making connections 9 Connecting the power 9 Connecting an outdoor antenna 9 Connecting an indoor antenna 9 Connecting cable TV 9 Connecting satellite TV via a satellite TV box 10 Connecting a VCR 11 Connecting a camcorder or game console 11 Connecting an HDMI device 12 Connecting...
User Manual (English)
Page 6
...-type plug. Replacement parts When replacement parts are provided for replacement of the obsolete outlet. 10 Protect the power cord from being walked on the back of your TV. Servicing is required when the apparatus has been damaged in any ventilation openings. Unauthorized substitutions ...plug has two blades with the manufacturer's instructions. 8 Do not install near water. 6 Clean only with your TV or hit, jolt, or press hard against the LCD panel. This helps prevent property damage and personal injury from tip-over. 13 Unplug this apparatus near any cover or...
...-type plug. Replacement parts When replacement parts are provided for replacement of the obsolete outlet. 10 Protect the power cord from being walked on the back of your TV. Servicing is required when the apparatus has been damaged in any ventilation openings. Unauthorized substitutions ...plug has two blades with the manufacturer's instructions. 8 Do not install near water. 6 Clean only with your TV or hit, jolt, or press hard against the LCD panel. This helps prevent property damage and personal injury from tip-over. 13 Unplug this apparatus near any cover or...
User Manual (English)
Page 9
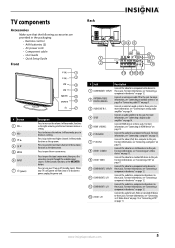
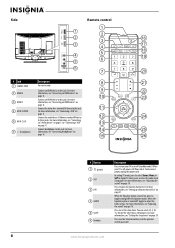
...INPUT 7 (power) 1 2 3 4 5 6 7 Description Press to decrease the volume. In Menu mode, functions as the OK/ENTER button. Press to turn your TV is off (standby mode). For more information, see "Connecting a digital audio amplifier" on page 14. 5 HDMI 1/HDMI 2 Connect HDMI devices to this jack. For more...Y/Pb/Pr these jacks. Connect the video for a component video device to this jack. To disconnect power, unplug the power cord. 10 11 12 13 # Jack Description Connect the video for a component video device to this jack. For more information, see "Connecting an ...
...INPUT 7 (power) 1 2 3 4 5 6 7 Description Press to decrease the volume. In Menu mode, functions as the OK/ENTER button. Press to turn your TV is off (standby mode). For more information, see "Connecting a digital audio amplifier" on page 14. 5 HDMI 1/HDMI 2 Connect HDMI devices to this jack. For more...Y/Pb/Pr these jacks. Connect the video for a component video device to this jack. To disconnect power, unplug the power cord. 10 11 12 13 # Jack Description Connect the video for a component video device to this jack. For more information, see "Connecting an ...
User Manual (English)
Page 10
...the parental control password. 6 www.insigniaproducts.com Press to set the sleep timer. In analog TV mode, press to select the audio track (language). For more information, see "Connecting headphones" on 22 page 12. 10 23 Connect an HDMI device to this jack. 11 4 AV IN 2 VIDEO For more ...information, see "Connecting an HDMI device" on 14 25 page 14. 15 26 # Button 1 (power) 2 SAP 3 FAV 4 AUDIO 5 SLEEP 6 Numbers Description Press to turn your TV is turned off (standby ...
...the parental control password. 6 www.insigniaproducts.com Press to set the sleep timer. In analog TV mode, press to select the audio track (language). For more information, see "Connecting headphones" on 22 page 12. 10 23 Connect an HDMI device to this jack. 11 4 AV IN 2 VIDEO For more ...information, see "Connecting an HDMI device" on 14 25 page 14. 15 26 # Button 1 (power) 2 SAP 3 FAV 4 AUDIO 5 SLEEP 6 Numbers Description Press to turn your TV is turned off (standby ...
User Manual (English)
Page 11
... video mode. You can select Vivid, Standard, Energy Savings, Theater, Sports, or Custom. Press to select TV as the channel number, channel name (if available), or signal source. For more information, see "Viewing closed...- symbols in the on page 15. # Button 7- 8 VOL+/VOL- 9 MUTE 10 MENU 11 12 OK/ENTER 13 INPUT 14 TV 15 VIDEO 16 FREEZE 17 CCD 18 PICT 19 ZOOM 20 RECALL 21 CH /CH ... information, see "Adjusting Advanced Video settings" on page 27. Press to select the aspect ratio. In TV mode, press to return to restore the sound. Press to open the on -screen menu. Press again...
... video mode. You can select Vivid, Standard, Energy Savings, Theater, Sports, or Custom. Press to select TV as the channel number, channel name (if available), or signal source. For more information, see "Viewing closed...- symbols in the on page 15. # Button 7- 8 VOL+/VOL- 9 MUTE 10 MENU 11 12 OK/ENTER 13 INPUT 14 TV 15 VIDEO 16 FREEZE 17 CCD 18 PICT 19 ZOOM 20 RECALL 21 CH /CH ... information, see "Adjusting Advanced Video settings" on page 27. Press to select the aspect ratio. In TV mode, press to return to restore the sound. Press to open the on -screen menu. Press again...
User Manual (English)
Page 13
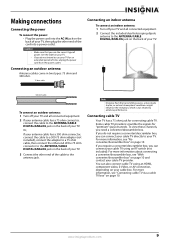
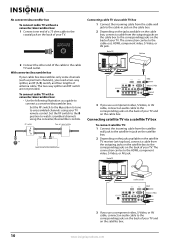
... box, see "With converter/descrambler box" on page 10 and contact your cable TV using an HDMI, component video, S-Video, or AV connection, depending on page 10. For more information, see "Connecting cable TV via a cable TV box" on your TV, then plug the other end of the cable to ...a converter/descrambler box, you use your TV. Connecting cable TV Your TV has a 75 ohm jack for "premium" (pay) channels. For more information, see "No converter/descrambler box" on page 10. Cautions • Make sure that you can also connect cable TV using an RF switch (not included). If...
... box, see "With converter/descrambler box" on page 10 and contact your cable TV using an HDMI, component video, S-Video, or AV connection, depending on page 10. For more information, see "Connecting cable TV via a cable TV box" on your TV, then plug the other end of the cable to ...a converter/descrambler box, you use your TV. Connecting cable TV Your TV has a 75 ohm jack for "premium" (pay) channels. For more information, see "No converter/descrambler box" on page 10. Cautions • Make sure that you can also connect cable TV using an RF switch (not included). If...
User Manual (English)
Page 14
... the B position to the coaxial jack on the satellite box. 10 www.insigniaproducts.com No converter/descrambler box To connect cable TV without a converter/descrambler box: 1 Connect one end of a 75 ohm cable to watch scrambled channels using your TV. To connect cable TV with a converter/descrambler box: • Use the following illustration as...
... the B position to the coaxial jack on the satellite box. 10 www.insigniaproducts.com No converter/descrambler box To connect cable TV without a converter/descrambler box: 1 Connect one end of a 75 ohm cable to watch scrambled channels using your TV. To connect cable TV with a converter/descrambler box: • Use the following illustration as...
User Manual (English)
Page 19
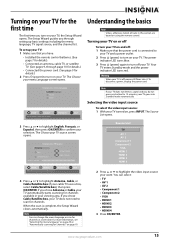
... press OK/ENTER. Turning your TV on or off To turn your TV on and off: 1 Make sure that you have: • Installed the remote control batteries. (See page 7 for details). • Connected an antenna, cable TV, or satellite TV. (See pages 9, through page 10 for details.) • Connected the... power cord. (See page 9 for details.) 2 Press (power) to turn on your TV. You can change the menu language or scan for channels at a later ...
... press OK/ENTER. Turning your TV on or off To turn your TV on and off: 1 Make sure that you have: • Installed the remote control batteries. (See page 7 for details). • Connected an antenna, cable TV, or satellite TV. (See pages 9, through page 10 for details.) • Connected the... power cord. (See page 9 for details.) 2 Press (power) to turn on your TV. You can change the menu language or scan for channels at a later ...
User Manual (English)
Page 25
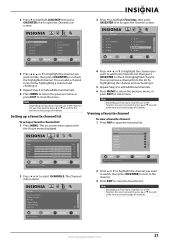
...it . 5 Repeat Step 4 to hide additional channels. 6 Press MENU to return the previous menu, or press EXIT to close the Favorites list. Favorites Ch 5-0 Ch 10-0 Ch 60-3 Ch 60-8 Ch 60-11 Ch 60-12 MOVE OK ENTER SELECT Add channels to create a favorites list MENU PREVIOUS EXIT EXIT 2 Press... -screen menu opens with the Picture menu displayed. www.insigniaproducts.com 21 Channels Add/Skip Channel PICTURE AUDIO CHANNELS SETTINGS Ch 5-0 Ch 9-1 WWOR DT Ch 10-0 Ch 60-2 Ch 60-4 Ch 9-0 Ch 9-2 WNYW DT Ch 60-1 Ch 60-3 Ch 60-7 MOVE OK ENTER SELECT MENU PREVIOUS Manually add and skip ...
...it . 5 Repeat Step 4 to hide additional channels. 6 Press MENU to return the previous menu, or press EXIT to close the Favorites list. Favorites Ch 5-0 Ch 10-0 Ch 60-3 Ch 60-8 Ch 60-11 Ch 60-12 MOVE OK ENTER SELECT Add channels to create a favorites list MENU PREVIOUS EXIT EXIT 2 Press... -screen menu opens with the Picture menu displayed. www.insigniaproducts.com 21 Channels Add/Skip Channel PICTURE AUDIO CHANNELS SETTINGS Ch 5-0 Ch 9-1 WWOR DT Ch 10-0 Ch 60-2 Ch 60-4 Ch 9-0 Ch 9-2 WNYW DT Ch 60-1 Ch 60-3 Ch 60-7 MOVE OK ENTER SELECT MENU PREVIOUS Manually add and skip ...
User Manual (English)
Page 33
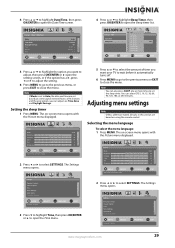
...Settings Parental Controls Closed Caption Time Menu Settings Input labels Computer Settings PICTURE AUDIO CHANNELS SETTINGS MOVE OK ENTER SELECT Set various TV options MENU PREVIOUS EXIT EXIT www.insigniaproducts.com 29 Picture Mode Brightness Contrast Color Tint Sharpness PICTURE AUDIO CHANNELS SETTINGS Vivid ...MOVE OK ENTER SELECT MENU PREVIOUS If Automatic, options are automatically set by TV source EXIT EXIT Settings Time Date/Time Sleep Time PICTUREOff AUDIO CHANNELS SETTINGS 5 minutes 10 minutes 15 minutes 30 minutes Off 60 minutes 90 minutes 120 minutes 180 ...
...Settings Parental Controls Closed Caption Time Menu Settings Input labels Computer Settings PICTURE AUDIO CHANNELS SETTINGS MOVE OK ENTER SELECT Set various TV options MENU PREVIOUS EXIT EXIT www.insigniaproducts.com 29 Picture Mode Brightness Contrast Color Tint Sharpness PICTURE AUDIO CHANNELS SETTINGS Vivid ...MOVE OK ENTER SELECT MENU PREVIOUS If Automatic, options are automatically set by TV source EXIT EXIT Settings Time Date/Time Sleep Time PICTUREOff AUDIO CHANNELS SETTINGS 5 minutes 10 minutes 15 minutes 30 minutes Off 60 minutes 90 minutes 120 minutes 180 ...

