
Warranty (English)
Page 1
...be loaned to you until your purchase of the Product ("Warranty Period"). www.insigniaproducts.com 1 The purchase date is only available to Insignia television consumers residing in its sole option): (1) repair the Product with new or rebuilt parts; Make sure that you put the Product...warranty does not cover refurbished Product. If you purchased the Product from the date of your TV is the warranty valid? If you notify Insignia during the Warranty Period. Should the Insignia-approved repair person not correct the issue on the web site. Where is repaired and returned...
...be loaned to you until your purchase of the Product ("Warranty Period"). www.insigniaproducts.com 1 The purchase date is only available to Insignia television consumers residing in its sole option): (1) repair the Product with new or rebuilt parts; Make sure that you put the Product...warranty does not cover refurbished Product. If you purchased the Product from the date of your TV is the warranty valid? If you notify Insignia during the Warranty Period. Should the Insignia-approved repair person not correct the issue on the web site. Where is repaired and returned...
User Manual (English)
Page 3
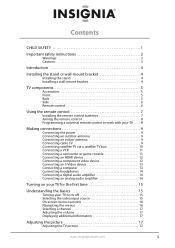
Contents CHILD SAFETY 1 Important safety instructions 2 Warnings 2 Cautions 3 Introduction 4 Installing the stand or wall-mount bracket 4 Installing the stand 4 Installing a wall-mount bracket 4 TV components 5 Accessories 5 Front 5 Back 5 Side 6 Remote control 6 Using the remote control 7 Installing the remote control batteries 7 Aiming the remote control 8 Programming a universal remote control to ...
Contents CHILD SAFETY 1 Important safety instructions 2 Warnings 2 Cautions 3 Introduction 4 Installing the stand or wall-mount bracket 4 Installing the stand 4 Installing a wall-mount bracket 4 TV components 5 Accessories 5 Front 5 Back 5 Side 6 Remote control 6 Using the remote control 7 Installing the remote control batteries 7 Aiming the remote control 8 Programming a universal remote control to ...
User Manual (English)
Page 4
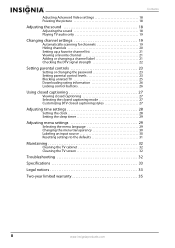
...DTV signal strength 22 Setting parental controls 23 Setting or changing the password 23 Setting parental control levels 23 Blocking unrated TV 25 Downloading rating information 26 Locking control buttons 26 Using closed captioning 27 Viewing closed captioning 27 Selecting the closed ...language 29 Changing the menu transparency 30 Labeling an input source 30 Resetting settings to the defaults 31 Maintaining 32 Cleaning the TV cabinet 32 Cleaning the TV screen 32 Troubleshooting 32 Specifications 33 Legal notices 33 Two-year limited warranty 35 ii www.insigniaproducts...
...DTV signal strength 22 Setting parental controls 23 Setting or changing the password 23 Setting parental control levels 23 Blocking unrated TV 25 Downloading rating information 26 Locking control buttons 26 Using closed captioning 27 Viewing closed captioning 27 Selecting the closed ...language 29 Changing the menu transparency 30 Labeling an input source 30 Resetting settings to the defaults 31 Maintaining 32 Cleaning the TV cabinet 32 Cleaning the TV screen 32 Troubleshooting 32 Specifications 33 Legal notices 33 Two-year limited warranty 35 ii www.insigniaproducts...

User Manual (English)
Page 5
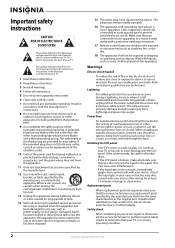
... consumer electronics industry are committed to the manufacturer's recommendations. f CHILD SAFETY It makes a difference how and where you use of this TV manufacturer, listed in mind The issue The home theater entertainment experience is appropriate. Make sure that you route all instructions supplied by curious...chests, or carts may fall over , or knocked down. • Make sure that you place or install the TV where it cannot be pulled or grabbed by the TV and wall mount manufacturers. • If you have any doubts about your ability to walls backed with entertainment system ...
... consumer electronics industry are committed to the manufacturer's recommendations. f CHILD SAFETY It makes a difference how and where you use of this TV manufacturer, listed in mind The issue The home theater entertainment experience is appropriate. Make sure that you route all instructions supplied by curious...chests, or carts may fall over , or knocked down. • Make sure that you place or install the TV where it cannot be pulled or grabbed by the TV and wall mount manufacturers. • If you have any doubts about your ability to walls backed with entertainment system ...
User Manual (English)
Page 6
... type plug has two blades and a third grounding prong. If the provided plug does not fit into your outlet, consult an electrician for your TV. Handling the LCD panel • Your TV's screen is located on the apparatus. Install in your eyes or touches your skin, consult with your...helps prevent property damage and personal injury from touching such power lines or circuits as vases, shall be located in your TV or hit, jolt, or press hard against the LCD panel. This symbol indicates that dangerous voltage constituting a risk of fire or electric shock, do not touch the liquid...
... type plug has two blades and a third grounding prong. If the provided plug does not fit into your outlet, consult an electrician for your TV. Handling the LCD panel • Your TV's screen is located on the apparatus. Install in your eyes or touches your skin, consult with your...helps prevent property damage and personal injury from touching such power lines or circuits as vases, shall be located in your TV or hit, jolt, or press hard against the LCD panel. This symbol indicates that dangerous voltage constituting a risk of fire or electric shock, do not touch the liquid...
User Manual (English)
Page 7
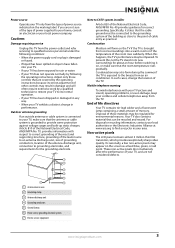
...screen as practical. In such cases, change in performance. Disposal of these materials may also form during the summer if the TV is exposed to the breeze from an air conditioner. For disposal or recycling information, contact your local authorities or the Electronic Industries... the operating instructions. Non-active pixels The LCD panel contains almost 3 million thin film transistors, which provide exceptionally sharp video quality. Condensation Moisture will often require extensive work by a qualified technician to restore your TV to its new surroundings for about an hour...
...screen as practical. In such cases, change in performance. Disposal of these materials may also form during the summer if the TV is exposed to the breeze from an air conditioner. For disposal or recycling information, contact your local authorities or the Electronic Industries... the operating instructions. Non-active pixels The LCD panel contains almost 3 million thin film transistors, which provide exceptionally sharp video quality. Condensation Moisture will often require extensive work by a qualified technician to restore your TV to its new surroundings for about an hour...
User Manual (English)
Page 8
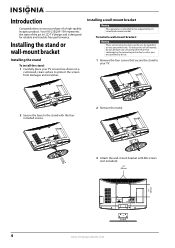
Installing the stand or wall-mount bracket Installing the stand To install the stand: 1 Carefully place your TV screen face-down on your TV. 2 Secure the base to the stand with the four included screws. 2 Remove the stand. 3 Attach the wall-mount bracket with M6 screws (not...to your purchase of a high-quality Insignia product. Installing a wall-mount bracket Warning This apparatus is designed for use by UL Listed wall mount bracket. Your NS-L32Q09-10A represents the state of hazards, do so. 1 Remove the four screws that contained in LCD TV design and is intended to protect the...
Installing the stand or wall-mount bracket Installing the stand To install the stand: 1 Carefully place your TV screen face-down on your TV. 2 Secure the base to the stand with the four included screws. 2 Remove the stand. 3 Attach the wall-mount bracket with M6 screws (not...to your purchase of a high-quality Insignia product. Installing a wall-mount bracket Warning This apparatus is designed for use by UL Listed wall mount bracket. Your NS-L32Q09-10A represents the state of hazards, do so. 1 Remove the four screws that contained in LCD TV design and is intended to protect the...
User Manual (English)
Page 9
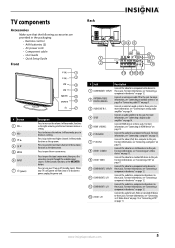
.... For more information, see "Connecting a component video device" on page 9. 3 AUDIO OUT R / L Connect an external sound system to turn your TV is off (standby mode). www.insigniaproducts.com 5 Press to these jacks. For more information, see "Connecting an S-Video device" on page 13. 7 ... page 14. 5 HDMI 1/HDMI 2 Connect HDMI devices to open the input source menu, then press the arrow keys to these jacks. TV components Accessories Make sure that the following accessories are provided in the packaging: • Remote control • AAA batteries (2) • AC...
.... For more information, see "Connecting a component video device" on page 9. 3 AUDIO OUT R / L Connect an external sound system to turn your TV is off (standby mode). www.insigniaproducts.com 5 Press to these jacks. For more information, see "Connecting an S-Video device" on page 13. 7 ... page 14. 5 HDMI 1/HDMI 2 Connect HDMI devices to open the input source menu, then press the arrow keys to these jacks. TV components Accessories Make sure that the following accessories are provided in the packaging: • Remote control • AAA batteries (2) • AC...
User Manual (English)
Page 10
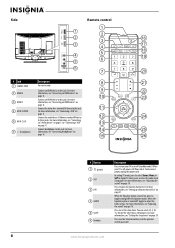
... 9 2 HDMI 4 information, see "Adjusting the sound" on page 18. In analog TV mode, press to open the favorite channel list. For more information, see "Adjusting the ...to select the audio track (language). To disconnect power, unplug the power cord. In digital TV mode, press to set the sleep timer. For more information, see "Connecting a VCR" on or off (standby mode). ...When your TV on page 11. You can select Off, 5, 10, 15, 30, 60, 90, 120, 180, or 240 minutes...
... 9 2 HDMI 4 information, see "Adjusting the sound" on page 18. In analog TV mode, press to open the favorite channel list. For more information, see "Adjusting the ...to select the audio track (language). To disconnect power, unplug the power cord. In digital TV mode, press to set the sleep timer. For more information, see "Connecting a VCR" on or off (standby mode). ...When your TV on page 11. You can select Off, 5, 10, 15, 30, 60, 90, 120, 180, or 240 minutes...
User Manual (English)
Page 11
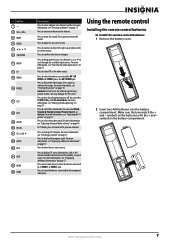
... mode. www.insigniaproducts.com 7 Press to move left, right, up the Source List, then press or to restore the sound. Press to display TV status information, such as the video source. For more information, see "Freezing the picture" on or off. Press to close the on page 27.... Press to confirm selections or changes. Press to turn closed captioning" on -screen menu. Press to freeze the video image. You may damage the TV screen. Make sure that you match the + and - For more information, see "Viewing closed captioning on page 18. You can select CC Off,...
... mode. www.insigniaproducts.com 7 Press to move left, right, up the Source List, then press or to restore the sound. Press to display TV status information, such as the video source. For more information, see "Freezing the picture" on or off. Press to close the on page 27.... Press to confirm selections or changes. Press to turn closed captioning" on -screen menu. Press to freeze the video image. You may damage the TV screen. Make sure that you match the + and - For more information, see "Viewing closed captioning on page 18. You can select CC Off,...
User Manual (English)
Page 12
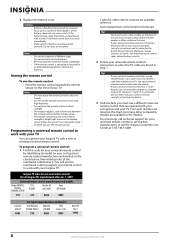
...heat registers, or fire. • Battery chemicals can cause a rash. Either move your universal remote control's instructions to program your Insignia TV. Insignia TV codes for universal remote controls (for the brands Orion, Emerson, Memorex, Sansui, Sylvania, or Zenith. See your...instructions for an extended period of the numbered code below , then making note of time, remove the batteries. If chemicals touch your Insignia TV with high humidity. Notes Do not mix batteries of correctly. If the batteries leak, clean the battery compartment with your remote control ...
...heat registers, or fire. • Battery chemicals can cause a rash. Either move your universal remote control's instructions to program your Insignia TV. Insignia TV codes for universal remote controls (for the brands Orion, Emerson, Memorex, Sansui, Sylvania, or Zenith. See your...instructions for an extended period of the numbered code below , then making note of time, remove the batteries. If chemicals touch your Insignia TV with high humidity. Notes Do not mix batteries of correctly. If the batteries leak, clean the battery compartment with your remote control ...
User Manual (English)
Page 13
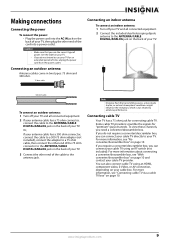
...), connect the adapter to a 75 ohm cable, then connect the other end of the cord into the AC IN jack on the back of your TV, then plug the other end of the cable to the antenna jack. To view these channels, you can also connect cable... an RF switch (not included). For more information about connecting a converter/descrambler box, see "With converter/descrambler box" on page 10 and contact your cable TV using an HDMI, component video, S-Video, or AV connection, depending on the back of power. www.insigniaproducts.com 9 Connecting an outdoor antenna Antenna cables come...
...), connect the adapter to a 75 ohm cable, then connect the other end of the cord into the AC IN jack on the back of your TV, then plug the other end of the cable to the antenna jack. To view these channels, you can also connect cable... an RF switch (not included). For more information about connecting a converter/descrambler box, see "With converter/descrambler box" on page 10 and contact your cable TV using an HDMI, component video, S-Video, or AV connection, depending on the back of power. www.insigniaproducts.com 9 Connecting an outdoor antenna Antenna cables come...
User Manual (English)
Page 14
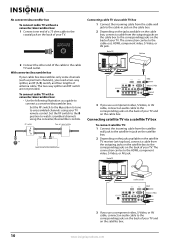
... a converter/descrambler box: 1 Connect one end of a 75 ohm cable to the coaxial jack on the back of your TV. Connecting cable TV via a satellite TV box To connect satellite TV: 1 Connect the incoming cable from the satellite wall jack to the satellite-in jack on the cable box. 2 Depending on the jacks ... audio cable to the corresponding jacks on the back of the cable to the corresponding jacks on the cable box to the cable TV wall outlet. Back of TV Cable box 2 Connect the other end of your cable box descrambles only some channels (such as a guide to watch scrambled channels using...
... a converter/descrambler box: 1 Connect one end of a 75 ohm cable to the coaxial jack on the back of your TV. Connecting cable TV via a satellite TV box To connect satellite TV: 1 Connect the incoming cable from the satellite wall jack to the satellite-in jack on the cable box. 2 Depending on the jacks ... audio cable to the corresponding jacks on the back of the cable to the corresponding jacks on the cable box to the cable TV wall outlet. Back of TV Cable box 2 Connect the other end of your cable box descrambles only some channels (such as a guide to watch scrambled channels using...

User Manual (English)
Page 15
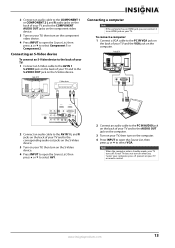
...select AV1. 5 Insert a videotape into the VCR, then press PLAY. 2 Connect the other end of your TV. www.insigniaproducts.com 11 Note If a device is connected to select AV2. To assign the audio jacks to... the AV IN 1 VIDEO jack, unplug the S-Video device. 3 Turn on your TV. Back of TV VCR Connecting a camcorder or game console To connect a camcorder or game console: 1 Connect an AV cable ... to the VIDEO OUT and AUDIO OUT jacks on the camcorder or game console. 3 Turn on your TV, then turn on the VCR. 4 Press INPUT to open the Source List, then press or to the...
...select AV1. 5 Insert a videotape into the VCR, then press PLAY. 2 Connect the other end of your TV. www.insigniaproducts.com 11 Note If a device is connected to select AV2. To assign the audio jacks to... the AV IN 1 VIDEO jack, unplug the S-Video device. 3 Turn on your TV. Back of TV VCR Connecting a camcorder or game console To connect a camcorder or game console: 1 Connect an AV cable ... to the VIDEO OUT and AUDIO OUT jacks on the camcorder or game console. 3 Turn on your TV, then turn on the VCR. 4 Press INPUT to open the Source List, then press or to the...

User Manual (English)
Page 16
...4 jack on the HDMI device. 3 Press INPUT to open the Source List, then press or to the COMPONENT OUT video jacks on the side of TV Component video device 12 www.insigniaproducts.com Connecting a component video device To connect a component video device: 1 Connect a component video cable to the COMPONENT ...1 or COMPONENT 2 Y, Pb, and Pr jacks on the back of TV HDMI device 2 Turn on your TV and to select HDMI 3 or HDMI 4. Side of your TV, then turn on the DVI device. Note You cannot connect a DVI device to the HDMI OUT jack on...
...4 jack on the HDMI device. 3 Press INPUT to open the Source List, then press or to the COMPONENT OUT video jacks on the side of TV Component video device 12 www.insigniaproducts.com Connecting a component video device To connect a component video device: 1 Connect a component video cable to the COMPONENT ...1 or COMPONENT 2 Y, Pb, and Pr jacks on the back of TV HDMI device 2 Turn on your TV and to select HDMI 3 or HDMI 4. Side of your TV, then turn on the DVI device. Note You cannot connect a DVI device to the HDMI OUT jack on...
User Manual (English)
Page 17
... to the corresponding audio out jacks on the S-Video device. 3 Turn on the back of your TV turns off. Back of your TV and to the AUDIO OUT jack on the computer. 3 Turn on your TV, then turn on the S-Video device. 4 Press INPUT to open the Source List, then press or to... select AV1. 2 Connect an audio cable to the PC IN AUDIO jack on the back of TV S-Video device Connecting a computer Note If the computer has an HDMI jack, you "wake" your computer, press (power) on your...
... to the corresponding audio out jacks on the S-Video device. 3 Turn on the back of your TV turns off. Back of your TV and to the AUDIO OUT jack on the computer. 3 Turn on your TV, then turn on the S-Video device. 4 Press INPUT to open the Source List, then press or to... select AV1. 2 Connect an audio cable to the PC IN AUDIO jack on the back of TV S-Video device Connecting a computer Note If the computer has an HDMI jack, you "wake" your computer, press (power) on your...
User Manual (English)
Page 18
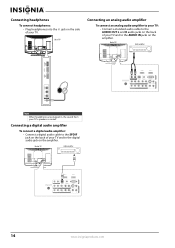
... a standard audio cable to the AUDIO OUT L and R audio jacks on the back of your TV and to the AUDIO IN jacks on the amplifier. Back of your TV and to the digital audio jack on the amplifier. Connecting headphones To connect headphones: • Plug headphones... into the jack on the side of your TV's speakers is muted. Back of TV Audio amplifier Note When headphones are plugged in, the sound from your TV. Connecting a digital audio amplifier To connect a digital audio amplifier: • Connect a digital...
... a standard audio cable to the AUDIO OUT L and R audio jacks on the back of your TV and to the AUDIO IN jacks on the amplifier. Back of your TV and to the digital audio jack on the amplifier. Connecting headphones To connect headphones: • Plug headphones... into the jack on the side of your TV's speakers is muted. Back of TV Audio amplifier Note When headphones are plugged in, the sound from your TV. Connecting a digital audio amplifier To connect a digital audio amplifier: • Connect a digital...
User Manual (English)
Page 19
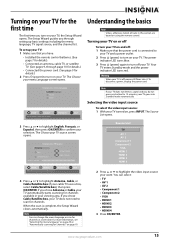
...; HDMI 3 • HDMI 4 3 Press OK/ENTER. The power indicator LED turns blue. 3 Press (power) again to turn off : 1 Make sure that you turn on your TV, the Setup Wizard opens. You can change the menu language or scan for channels at a later date. The Choose your menu Language screen opens. Turning... your TV on or off To turn your TV on and off your TV. Turning on your TV for the first time The first time you have: • Installed the remote control batteries. (See page 7 for...
...; HDMI 3 • HDMI 4 3 Press OK/ENTER. The power indicator LED turns blue. 3 Press (power) again to turn off : 1 Make sure that you turn on your TV, the Setup Wizard opens. You can change the menu language or scan for channels at a later date. The Choose your menu Language screen opens. Turning... your TV on or off To turn your TV on and off your TV. Turning on your TV for the first time The first time you have: • Installed the remote control batteries. (See page 7 for...
User Manual (English)
Page 20
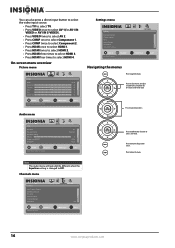
... menu Settings Parental Controls Closed Caption Time Menu Settings Input labels Computer Settings PICTURE AUDIO CHANNELS SETTINGS MOVE OK ENTER SELECT Set various TV options MENU PREVIOUS EXIT EXIT Navigating the menus Press to close the menu. Channels menu Channels Auto Channel Search Add/Skip Channels Favorites...to move the on-screen cursor left or right. You can also press a direct input button to select the video input source. • Press TV to select TV. • Press VIDEO once to select AV 1(for AV1 IN VIDEO or AV1 IN S-VIDEO). • Press VIDEO twice to select AV 2....
... menu Settings Parental Controls Closed Caption Time Menu Settings Input labels Computer Settings PICTURE AUDIO CHANNELS SETTINGS MOVE OK ENTER SELECT Set various TV options MENU PREVIOUS EXIT EXIT Navigating the menus Press to close the menu. Channels menu Channels Auto Channel Search Add/Skip Channels Favorites...to move the on-screen cursor left or right. You can also press a direct input button to select the video input source. • Press TV to select TV. • Press VIDEO once to select AV 1(for AV1 IN VIDEO or AV1 IN S-VIDEO). • Press VIDEO twice to select AV 2....
User Manual (English)
Page 21
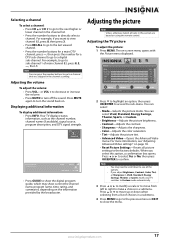
Adjusting the volume To adjust the volume: • Press VOL - Adjusting the TV picture To adjust the picture: 1 Press MENU. You can press the number buttons to...then press OK/ENTER to turn the sound back on page 18. • Reset Picture Settings-Resets all the options. Your TV displays status information, such as the channel number, channel name (if available), signal source, program description, and DTV signal ... to make a choice in Vivid, Standard, Energy Savings, Theater, or Sports mode, your TV switches to Custom mode automatically. 3 Press or to modify a scale or to confirm.
Adjusting the volume To adjust the volume: • Press VOL - Adjusting the TV picture To adjust the picture: 1 Press MENU. You can press the number buttons to...then press OK/ENTER to turn the sound back on page 18. • Reset Picture Settings-Resets all the options. Your TV displays status information, such as the channel number, channel name (if available), signal source, program description, and DTV signal ... to make a choice in Vivid, Standard, Energy Savings, Theater, or Sports mode, your TV switches to Custom mode automatically. 3 Press or to modify a scale or to confirm.


