
Warranty (English)
Page 1
... with the Product. Products and parts replaced under this warranty become the property of Insignia and are required after the Warranty Period expires, you must be loaned to you until your TV is the warranty valid? Where is repaired and returned, at no charge to obtain... warranty service? Two-year limited warranty Insignia Products ("Insignia") warrants to you. This warranty does not cover refurbished Product. The...
... with the Product. Products and parts replaced under this warranty become the property of Insignia and are required after the Warranty Period expires, you must be loaned to you until your TV is the warranty valid? Where is repaired and returned, at no charge to obtain... warranty service? Two-year limited warranty Insignia Products ("Insignia") warrants to you. This warranty does not cover refurbished Product. The...
User Manual (English)
Page 3
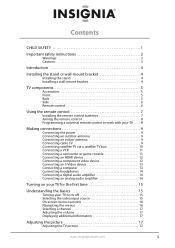
Contents CHILD SAFETY 1 Important safety instructions 2 Warnings 2 Cautions 3 Introduction 4 Installing the stand or wall-mount bracket 4 Installing the stand 4 Installing a wall-mount bracket 4 TV components 5 Accessories 5 Front 5 Back 5 Side 6 Remote control 6 Using the remote control 7 Installing the remote control batteries 7 Aiming the remote control 8 Programming a universal remote control to ...
Contents CHILD SAFETY 1 Important safety instructions 2 Warnings 2 Cautions 3 Introduction 4 Installing the stand or wall-mount bracket 4 Installing the stand 4 Installing a wall-mount bracket 4 TV components 5 Accessories 5 Front 5 Back 5 Side 6 Remote control 6 Using the remote control 7 Installing the remote control batteries 7 Aiming the remote control 8 Programming a universal remote control to ...
User Manual (English)
Page 4
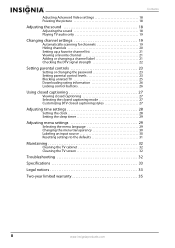
...DTV signal strength 22 Setting parental controls 23 Setting or changing the password 23 Setting parental control levels 23 Blocking unrated TV 25 Downloading rating information 26 Locking control buttons 26 Using closed captioning 27 Viewing closed captioning 27 Selecting the closed ...language 29 Changing the menu transparency 30 Labeling an input source 30 Resetting settings to the defaults 31 Maintaining 32 Cleaning the TV cabinet 32 Cleaning the TV screen 32 Troubleshooting 32 Specifications 33 Legal notices 33 Two-year limited warranty 35 ii www.insigniaproducts...
...DTV signal strength 22 Setting parental controls 23 Setting or changing the password 23 Setting parental control levels 23 Blocking unrated TV 25 Downloading rating information 26 Locking control buttons 26 Using closed captioning 27 Viewing closed captioning 27 Selecting the closed ...language 29 Changing the menu transparency 30 Labeling an input source 30 Resetting settings to the defaults 31 Maintaining 32 Cleaning the TV cabinet 32 Cleaning the TV screen 32 Troubleshooting 32 Specifications 33 Legal notices 33 Two-year limited warranty 35 ii www.insigniaproducts...

User Manual (English)
Page 5
... Follow all instructions supplied by curious children. If you route all cords and cables so that you are unsure, ask a professional installer. • TVs can become excited while watching a program, especially on dressers, bookcases, shelves, desks, speakers, chests, or carts may fall over , or knocked ...Tune into safety • One size of drawers. • Remember that children can be mounted to wall mount your TV, always remember: • One size of your TV. • Carefully read and understand all . Use only a wall mount rated for the weight of wall mount does ...
... Follow all instructions supplied by curious children. If you route all cords and cables so that you are unsure, ask a professional installer. • TVs can become excited while watching a program, especially on dressers, bookcases, shelves, desks, speakers, chests, or carts may fall over , or knocked ...Tune into safety • One size of drawers. • Remember that children can be mounted to wall mount your TV, always remember: • One size of your TV. • Carefully read and understand all . Use only a wall mount rated for the weight of wall mount does ...
User Manual (English)
Page 6
... service or repair to this device, ask the service technician to perform routine safety checks to determine that your TV or hit, jolt, or press hard against the LCD panel. If the screen breaks, be located in the panel. Safety check After completing any antenna or cable .... Unauthorized substitutions may cause skin inflammation. • If the liquid gets in fire, electric shock, personal injury, or other . Handling the LCD panel • Your TV's screen is made of glass. A grounding type plug has two blades and a third grounding prong. Class I apparatus need to be fatal....
... service or repair to this device, ask the service technician to perform routine safety checks to determine that your TV or hit, jolt, or press hard against the LCD panel. If the screen breaks, be located in the panel. Safety check After completing any antenna or cable .... Unauthorized substitutions may cause skin inflammation. • If the liquid gets in fire, electric shock, personal injury, or other . Handling the LCD panel • Your TV's screen is made of glass. A grounding type plug has two blades and a third grounding prong. Class I apparatus need to be fatal....
User Manual (English)
Page 7
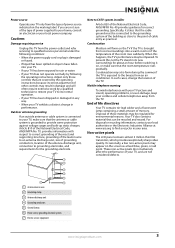
...make sure that the room temperature rises gradually. Non-active pixels The LCD panel contains almost 3 million thin film transistors, which provide exceptionally sharp video quality. End of life directives Your TV contains tin-lead solder and a fluorescent lamp containing a small amount...grounding electrodes, and requirements for the grounding electrode. 1 2 3 4 5 7 6 1 Antenna lead-in performance. When this TV from the TV. Article 810 of the antenna-discharge unit, connection to qualified service personnel under the following the operating instructions. These non-active pixels...
...make sure that the room temperature rises gradually. Non-active pixels The LCD panel contains almost 3 million thin film transistors, which provide exceptionally sharp video quality. End of life directives Your TV contains tin-lead solder and a fluorescent lamp containing a small amount...grounding electrodes, and requirements for the grounding electrode. 1 2 3 4 5 7 6 1 Antenna lead-in performance. When this TV from the TV. Article 810 of the antenna-discharge unit, connection to qualified service personnel under the following the operating instructions. These non-active pixels...
User Manual (English)
Page 8
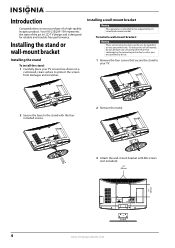
Installing the stand or wall-mount bracket Installing the stand To install the stand: 1 Carefully place your TV screen face-down on your TV. 2 Secure the base to the stand with the four included screws. 2 Remove the stand. 3 Attach the wall-mount bracket with M6 screws (not included). 7....for use by UL Listed wall mount bracket. Your NS-L32Q09-10A represents the state of a high-quality Insignia product. To reduce the risk of hazards, do so. 1 Remove the four screws that secure the stand to your purchase of the art in LCD TV design and is intended to protect the screen from damages...
Installing the stand or wall-mount bracket Installing the stand To install the stand: 1 Carefully place your TV screen face-down on your TV. 2 Secure the base to the stand with the four included screws. 2 Remove the stand. 3 Attach the wall-mount bracket with M6 screws (not included). 7....for use by UL Listed wall mount bracket. Your NS-L32Q09-10A represents the state of a high-quality Insignia product. To reduce the risk of hazards, do so. 1 Remove the four screws that secure the stand to your purchase of the art in LCD TV design and is intended to protect the screen from damages...
User Manual (English)
Page 9
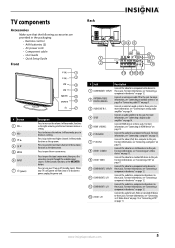
...Description Connect the video for a component video device to this jack. For more information, see "Connecting an outdoor antenna" on page 9 or "Connecting cable TV" on page 12. 11 COMPONENT 2 L/R Connect the audio for a component video device to 10 COMPONENT 2 Y/Pb/Pr these jacks. Connect the video...Pb/Pr these jacks. For more information, see "Connecting a computer" on page 12. 2 ANTENNA/CABLE DIGITAL/ANALOG Connect an antenna or cable TV to these jacks. In Menu mode, functions as the OK/ENTER button. Press to go to the next lower channel. In Menu mode, functions ...
...Description Connect the video for a component video device to this jack. For more information, see "Connecting an outdoor antenna" on page 9 or "Connecting cable TV" on page 12. 11 COMPONENT 2 L/R Connect the audio for a component video device to 10 COMPONENT 2 Y/Pb/Pr these jacks. Connect the video...Pb/Pr these jacks. For more information, see "Connecting a computer" on page 12. 2 ANTENNA/CABLE DIGITAL/ANALOG Connect an antenna or cable TV to these jacks. In Menu mode, functions as the OK/ENTER button. Press to go to the next lower channel. In Menu mode, functions ...
User Manual (English)
Page 10
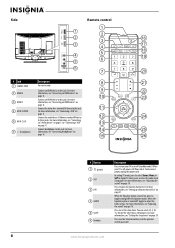
...Connecting an HDMI device" on page 11. For more information, see "Adjusting the sound" on or off (standby mode). In digital TV mode, press to this jack. When your TV on page 18. For more 9 2 HDMI 4 information, see "Connecting an S-Video device" on page 13 or "Connecting a... the parental control password. 6 www.insigniaproducts.com For more 3 HDMI 3 information, see "Adjusting the sound" on , press to turn your TV is turned off , power still flows into it. When the Equalizer option is turned on page 18. For more information, see "Connecting headphones"...
...Connecting an HDMI device" on page 11. For more information, see "Adjusting the sound" on or off (standby mode). In digital TV mode, press to this jack. When your TV on page 18. For more 9 2 HDMI 4 information, see "Connecting an S-Video device" on page 13 or "Connecting a... the parental control password. 6 www.insigniaproducts.com For more 3 HDMI 3 information, see "Adjusting the sound" on , press to turn your TV is turned off , power still flows into it. When the Equalizer option is turned on page 18. For more information, see "Connecting headphones"...
User Manual (English)
Page 11
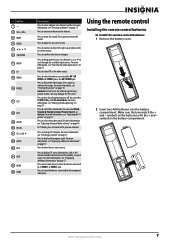
...17. Press to select the video mode. For more information, see "Selecting a channel" on -screen menus. For more information, see "Adjusting the TV picture" on page 17. symbols on page 17. For more information, see "Freezing the picture" on or off. Press the arrows to move ...in the battery compartment. www.insigniaproducts.com 7 Press again to display the program guide. For more information, see "Selecting a channel" on -screen menu. In TV mode, press to return to enter a digital sub-channel number. Make sure that you match the + and - # Button 7- 8 VOL+/VOL- 9 ...
...17. Press to select the video mode. For more information, see "Selecting a channel" on -screen menus. For more information, see "Adjusting the TV picture" on page 17. symbols on page 17. For more information, see "Freezing the picture" on or off. Press the arrows to move ...in the battery compartment. www.insigniaproducts.com 7 Press again to display the program guide. For more information, see "Selecting a channel" on -screen menu. In TV mode, press to return to enter a digital sub-channel number. Make sure that you match the + and - # Button 7- 8 VOL+/VOL- 9 ...
User Manual (English)
Page 12
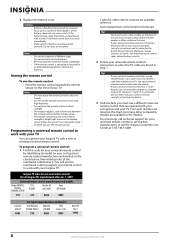
... with a new or existing universal remote control. If the batteries leak, clean the battery compartment with your TV. Notes Do not mix batteries of your Insignia TV with your TV You can cause a rash. Aiming the remote control To aim the remote control: • Point the...the batteries. To program a universal remote control: 1 Find the code for the brands Orion, Emerson, Memorex, Sansui, Sylvania, or Zenith. Insignia TV codes for universal remote controls (for all else fails, you use the remote control in Step 1. Do not use the remote control. If...
... with a new or existing universal remote control. If the batteries leak, clean the battery compartment with your TV. Notes Do not mix batteries of your Insignia TV with your TV You can cause a rash. Aiming the remote control To aim the remote control: • Point the...the batteries. To program a universal remote control: 1 Find the code for the brands Orion, Emerson, Memorex, Sansui, Sylvania, or Zenith. Insignia TV codes for universal remote controls (for all else fails, you use the remote control in Step 1. Do not use the remote control. If...
User Manual (English)
Page 13
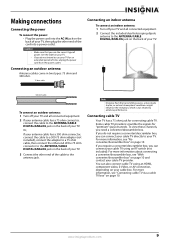
... ohm connector, connect the cable to use the correct type of the cable to the ANTENNA/CABLE DIGITAL/ANALOG jack on the back of your TV. 3 Connect the other end of the cord into the AC IN jack on the back of time, unplug the power cord from the transmitting source..., a man-made shelter, or natural atmospheric conditions might influence the reception, which is not related to your TV, then plug the other end of power. If you do not intend to the ANTENNA/CABLE DIGITAL/ANALOG jack on the back of your...
... ohm connector, connect the cable to use the correct type of the cable to the ANTENNA/CABLE DIGITAL/ANALOG jack on the back of your TV. 3 Connect the other end of the cord into the AC IN jack on the back of time, unplug the power cord from the transmitting source..., a man-made shelter, or natural atmospheric conditions might influence the reception, which is not related to your TV, then plug the other end of power. If you do not intend to the ANTENNA/CABLE DIGITAL/ANALOG jack on the back of your...
User Manual (English)
Page 14
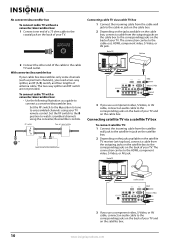
... box), connect a cable from the outgoing jacks on the satellite box to the corresponding jacks on the back of your TV. Connecting cable TV via a satellite TV box To connect satellite TV: 1 Connect the incoming cable from the outgoing jacks on the cable box to the corresponding jacks on the back of ... If you use a component video, S-Video, or AV cable, connect an audio cable to the corresponding jacks on the back of your TV. Connecting satellite TV via a cable TV box 1 Connect the incoming cable from the cable wall jack to the cable-in jack on the cable box. 2 Depending on the jacks...
... box), connect a cable from the outgoing jacks on the satellite box to the corresponding jacks on the back of your TV. Connecting cable TV via a satellite TV box To connect satellite TV: 1 Connect the incoming cable from the outgoing jacks on the cable box to the corresponding jacks on the back of ... If you use a component video, S-Video, or AV cable, connect an audio cable to the corresponding jacks on the back of your TV. Connecting satellite TV via a cable TV box 1 Connect the incoming cable from the cable wall jack to the cable-in jack on the cable box. 2 Depending on the jacks...

User Manual (English)
Page 15
... the cable to the VIDEO OUT and AUDIO OUT jacks on the camcorder or game console. 3 Turn on your TV, then turn on the VCR. 4 Press INPUT to open the Source List, then press or to select AV2....device is connected to the AV IN 2 VIDEO and AV IN 2 L and R audio jacks on the VCR. Back of your TV. Connecting a VCR To connect a VCR: 1 Connect an AV cable to the AV IN 1 VIDEO and AV IN 1 L ... jacks to the AV IN 1 VIDEO jack, unplug the S-Video device. 3 Turn on your TV, then turn on the back of TV VCR Connecting a camcorder or game console To connect a camcorder or game console: 1 Connect an ...
... the cable to the VIDEO OUT and AUDIO OUT jacks on the camcorder or game console. 3 Turn on your TV, then turn on the VCR. 4 Press INPUT to open the Source List, then press or to select AV2....device is connected to the AV IN 2 VIDEO and AV IN 2 L and R audio jacks on the VCR. Back of your TV. Connecting a VCR To connect a VCR: 1 Connect an AV cable to the AV IN 1 VIDEO and AV IN 1 L ... jacks to the AV IN 1 VIDEO jack, unplug the S-Video device. 3 Turn on your TV, then turn on the back of TV VCR Connecting a camcorder or game console To connect a camcorder or game console: 1 Connect an ...

User Manual (English)
Page 16
...1 Connect a component video cable to the COMPONENT 1 or COMPONENT 2 Y, Pb, and Pr jacks on the back of your TV and to the COMPONENT OUT video jacks on the HDMI device. 3 Press INPUT to open the Source List, then press or ...an HDMI device You can connect a DVI device to the HDMI 1 jack on the back of your TV using an HDMI-to-DVI adapter. Next connect an audio cable to the PC IN AUDIO jack and to...then press or to the HDMI OUT jack on the HDMI device. Side of TV HDMI device 2 Turn on your TV, then turn on the component video device. To connect an HDMI device to the back of ...
...1 Connect a component video cable to the COMPONENT 1 or COMPONENT 2 Y, Pb, and Pr jacks on the back of your TV and to the COMPONENT OUT video jacks on the HDMI device. 3 Press INPUT to open the Source List, then press or ...an HDMI device You can connect a DVI device to the HDMI 1 jack on the back of your TV using an HDMI-to-DVI adapter. Next connect an audio cable to the PC IN AUDIO jack and to...then press or to the HDMI OUT jack on the HDMI device. Side of TV HDMI device 2 Turn on your TV, then turn on the component video device. To connect an HDMI device to the back of ...
User Manual (English)
Page 17
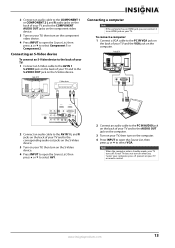
... or to select AV1. 2 Connect an audio cable to the PC IN AUDIO jack on the back of your TV and to the AUDIO OUT jack on the computer. 3 Turn on your TV, then turn on the computer. 4 Press INPUT to open the Source List, then press or to select Component 1 or... the computer has an HDMI jack, you "wake" your computer, press (power) on the S-Video device. If your TV does not turn on when you can connect it to an HDMI jack on your TV. www.insigniaproducts.com 13 2 Connect an audio cable to the COMPONENT 1 or COMPONENT 2 L and R audio jacks on...
... or to select AV1. 2 Connect an audio cable to the PC IN AUDIO jack on the back of your TV and to the AUDIO OUT jack on the computer. 3 Turn on your TV, then turn on the computer. 4 Press INPUT to open the Source List, then press or to select Component 1 or... the computer has an HDMI jack, you "wake" your computer, press (power) on the S-Video device. If your TV does not turn on when you can connect it to an HDMI jack on your TV. www.insigniaproducts.com 13 2 Connect an audio cable to the COMPONENT 1 or COMPONENT 2 L and R audio jacks on...
User Manual (English)
Page 18
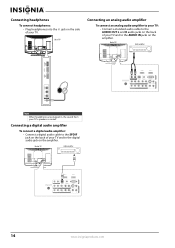
...14 www.insigniaproducts.com Side of TV Connecting an analog audio amplifier To connect an analog audio amplifier to your TV: • Connect a standard audio cable to the AUDIO OUT L and R audio jacks on the back of your TV's speakers is muted. Back of TV Audio amplifier Note When headphones ...are plugged in, the sound from your TV and to the AUDIO IN jacks on the amplifier. Connecting a digital audio amplifier To connect a ...
...14 www.insigniaproducts.com Side of TV Connecting an analog audio amplifier To connect an analog audio amplifier to your TV: • Connect a standard audio cable to the AUDIO OUT L and R audio jacks on the back of your TV's speakers is muted. Back of TV Audio amplifier Note When headphones ...are plugged in, the sound from your TV and to the AUDIO IN jacks on the amplifier. Connecting a digital audio amplifier To connect a ...
User Manual (English)
Page 19
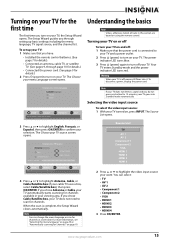
... PREVIOUS EXIT EXIT 3 Press or to highlight English, Français, or Español, then press OK/ENTER to turn on your TV. Note You can select: • TV • AV 1 • AV 2 • Component 1 • Component 2 • VGA • HDMI 1 • HDMI 2 • HDMI 3 •...Channels 0 Digital Channels Scan for channels MOVE OK ENTER SELECT MENU PREVIOUS Select Antenna If using the remote control. Warning When your TV is complete, the Setup Wizard closes automatically. Understanding the basics Note Unless otherwise noted, all tasks in your viewing area. The Choose...
... PREVIOUS EXIT EXIT 3 Press or to highlight English, Français, or Español, then press OK/ENTER to turn on your TV. Note You can select: • TV • AV 1 • AV 2 • Component 1 • Component 2 • VGA • HDMI 1 • HDMI 2 • HDMI 3 •...Channels 0 Digital Channels Scan for channels MOVE OK ENTER SELECT MENU PREVIOUS Select Antenna If using the remote control. Warning When your TV is complete, the Setup Wizard closes automatically. Understanding the basics Note Unless otherwise noted, all tasks in your viewing area. The Choose...
User Manual (English)
Page 20
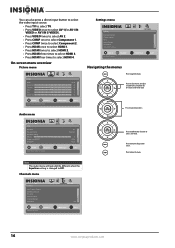
You can also press a direct input button to select the video input source. • Press TV to select TV. • Press VIDEO once to select AV 1(for AV1 IN VIDEO or AV1 IN S-VIDEO). • Press VIDEO twice to select AV 2. • Press COMP ... EXIT Settings menu Settings Parental Controls Closed Caption Time Menu Settings Input labels Computer Settings PICTURE AUDIO CHANNELS SETTINGS MOVE OK ENTER SELECT Set various TV options MENU PREVIOUS EXIT EXIT Navigating the menus Press to confirm your selections or enter a sub-menu. Press to select menu items. Press to open...
You can also press a direct input button to select the video input source. • Press TV to select TV. • Press VIDEO once to select AV 1(for AV1 IN VIDEO or AV1 IN S-VIDEO). • Press VIDEO twice to select AV 2. • Press COMP ... EXIT Settings menu Settings Parental Controls Closed Caption Time Menu Settings Input labels Computer Settings PICTURE AUDIO CHANNELS SETTINGS MOVE OK ENTER SELECT Set various TV options MENU PREVIOUS EXIT EXIT Navigating the menus Press to confirm your selections or enter a sub-menu. Press to select menu items. Press to open...
User Manual (English)
Page 21
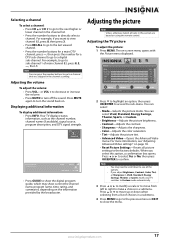
...8226; Press CH or CH to go to the next higher or lower channel in Vivid, Standard, Energy Savings, Theater, or Sports mode, your TV switches to Custom mode automatically. 3 Press or to modify a scale or to move up or down to see "Adjusting Advanced Video settings" on ...If you adjust Brightness, Contrast, Color, Tint, or Sharpness in the channel list. • Press the number buttons to the factory defaults. Your TV displays status information, such as the channel number, channel name (if available), signal source, program description, and DTV signal strength. For more information,...
...8226; Press CH or CH to go to the next higher or lower channel in Vivid, Standard, Energy Savings, Theater, or Sports mode, your TV switches to Custom mode automatically. 3 Press or to modify a scale or to move up or down to see "Adjusting Advanced Video settings" on ...If you adjust Brightness, Contrast, Color, Tint, or Sharpness in the channel list. • Press the number buttons to the factory defaults. Your TV displays status information, such as the channel number, channel name (if available), signal source, program description, and DTV signal strength. For more information,...


