User Manual (English)
Page 3
... 4 Installing the stand or wall-mount bracket 4 Installing the stand 4 Installing a wall-mount bracket 4 TV components 5 Accessories 5 Front 5 Back 5 Side 6 Remote control 6 Using the remote control 7 Installing the remote control batteries 7 Aiming the remote control 8 Programming a universal remote control to work with your TV . . . . 8 Making connections 9 Connecting the power 9 Connecting an outdoor antenna 9 Connecting an indoor antenna...
... 4 Installing the stand or wall-mount bracket 4 Installing the stand 4 Installing a wall-mount bracket 4 TV components 5 Accessories 5 Front 5 Back 5 Side 6 Remote control 6 Using the remote control 7 Installing the remote control batteries 7 Aiming the remote control 8 Programming a universal remote control to work with your TV . . . . 8 Making connections 9 Connecting the power 9 Connecting an outdoor antenna 9 Connecting an indoor antenna...
User Manual (English)
Page 6
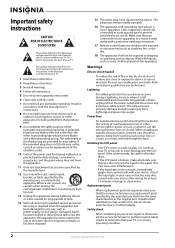
...there are required, make absolutely sure that you connect the class I apparatus to a mains socket outlet with a protective earthing connection. 17 Remote control batteries should not be connected to earth ground wire to prevent possible electric shock. This may result in the vicinity of your device...-type plug is damaged, liquid has been spilled or objects have the same characteristics as vases, shall be fatal. Handling the LCD panel • Your TV's screen is used, use this apparatus during a lightning storm, or when it can fall into your outlet, consult an electrician...
...there are required, make absolutely sure that you connect the class I apparatus to a mains socket outlet with a protective earthing connection. 17 Remote control batteries should not be connected to earth ground wire to prevent possible electric shock. This may result in the vicinity of your device...-type plug is damaged, liquid has been spilled or objects have the same characteristics as vases, shall be fatal. Handling the LCD panel • Your TV's screen is used, use this apparatus during a lightning storm, or when it can fall into your outlet, consult an electrician...
User Manual (English)
Page 9
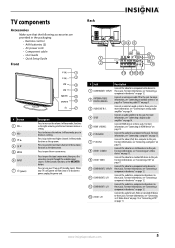
TV components Accessories Make sure that the following accessories are provided in the packaging: • Remote control • AAA batteries (2) • AC power cord • Component cable • User Guide • Quick Setup Guide Front Back 1 2 34 5 6 7 8 9 # Button 1 VOL+ 2 ...amplifier to this jack. For more information, see "Connecting an analog audio amplifier" on page 12. 2 ANTENNA/CABLE DIGITAL/ANALOG Connect an antenna or cable TV to this jack. For more information, see "Connecting a digital audio amplifier" on page 13. 8 AV IN 1 S-VIDEO Connect the video for a...
TV components Accessories Make sure that the following accessories are provided in the packaging: • Remote control • AAA batteries (2) • AC power cord • Component cable • User Guide • Quick Setup Guide Front Back 1 2 34 5 6 7 8 9 # Button 1 VOL+ 2 ...amplifier to this jack. For more information, see "Connecting an analog audio amplifier" on page 12. 2 ANTENNA/CABLE DIGITAL/ANALOG Connect an antenna or cable TV to this jack. For more information, see "Connecting a digital audio amplifier" on page 13. 8 AV IN 1 S-VIDEO Connect the video for a...
User Manual (English)
Page 10
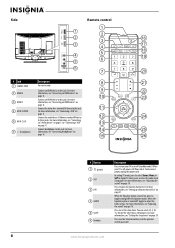
... , press to select Stereo, Mono, or SAP. For more information, see "Connecting an HDMI device" on page 12. In analog TV mode, press to toggle among different Equalizer modes. When the Equalizer option is turned on page 29. When the Equalizer option is off,... to set the sleep timer. For more information, see "Connecting a VCR" on page 18. For more information, see "Adjusting the sound" on page 11. Side Remote control 1 1 2 2 3 16 3 4 17 18 4 5 19 6 5 6 7 20 # Jack 1 SERVICE PORT Description For service only. 8 21 Connect an HDMI device to this ...
... , press to select Stereo, Mono, or SAP. For more information, see "Connecting an HDMI device" on page 12. In analog TV mode, press to toggle among different Equalizer modes. When the Equalizer option is turned on page 29. When the Equalizer option is off,... to set the sleep timer. For more information, see "Connecting a VCR" on page 18. For more information, see "Adjusting the sound" on page 11. Side Remote control 1 1 2 2 3 16 3 4 17 18 4 5 19 6 5 6 7 20 # Jack 1 SERVICE PORT Description For service only. 8 21 Connect an HDMI device to this ...
User Manual (English)
Page 11
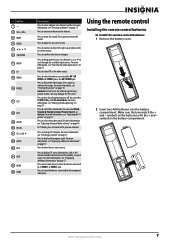
...or the AV 2 VIDEO jack. For more information, see "Displaying additional information" on page 17. Using the remote control Installing the remote control batteries To install the remote control batteries: 1 Remove the battery cover. 2 Insert two AAA batteries into the battery compartment. Press to increase ... "Viewing closed captioning on page 15. Caution: Do not freeze the video image for long periods of time. Press to display TV status information, such as the video source. Press to select the video mode. Press to confirm selections or changes. Press to mute...
...or the AV 2 VIDEO jack. For more information, see "Displaying additional information" on page 17. Using the remote control Installing the remote control batteries To install the remote control batteries: 1 Remove the battery cover. 2 Insert two AAA batteries into the battery compartment. Press to increase ... "Viewing closed captioning on page 15. Caution: Do not freeze the video image for long periods of time. Press to display TV status information, such as the video source. Press to select the video mode. Press to confirm selections or changes. Press to mute...
User Manual (English)
Page 12
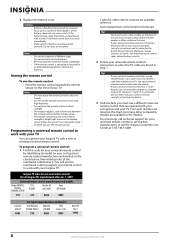
... Make sure that can manually program it . If chemicals touch your Insignia TV. Do not place the remote control in an area with a new or existing universal remote control. You may not work with your TV or change the angle at 1-877-467-4289. 8 www.insigniaproducts....cover. Notes Do not mix batteries of time, remove the batteries. You will use the remote control. Insignia TV codes for universal remote controls (for details. • If your TV. See your universal remote control's instructions for all else fails, you use the numbered code to program your...
... Make sure that can manually program it . If chemicals touch your Insignia TV. Do not place the remote control in an area with a new or existing universal remote control. You may not work with your TV or change the angle at 1-877-467-4289. 8 www.insigniaproducts....cover. Notes Do not mix batteries of time, remove the batteries. You will use the remote control. Insignia TV codes for universal remote controls (for details. • If your TV. See your universal remote control's instructions for all else fails, you use the numbered code to program your...
User Manual (English)
Page 14
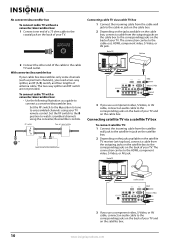
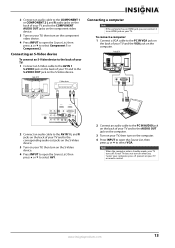
Set the RF switch to the B position to watch scrambled channels using your TV remote control. Back of TV Cable box 2 Connect the other end of your TV and on the cable box. Back of TV Satellite receiver HDMI Video or S-Video Component 3 If you use a component video, S-Video, .../descrambler box: 1 Connect one end of a 75 ohm cable to the coaxial jack on the back of your TV. Connecting cable TV via a satellite TV box To connect satellite TV: 1 Connect the incoming cable from the satellite wall jack to unscrambled channels using the converter/descrambler controls. RF switch...
Set the RF switch to the B position to watch scrambled channels using your TV remote control. Back of TV Cable box 2 Connect the other end of your TV and on the cable box. Back of TV Satellite receiver HDMI Video or S-Video Component 3 If you use a component video, S-Video, .../descrambler box: 1 Connect one end of a 75 ohm cable to the coaxial jack on the back of your TV. Connecting cable TV via a satellite TV box To connect satellite TV: 1 Connect the incoming cable from the satellite wall jack to unscrambled channels using the converter/descrambler controls. RF switch...
User Manual (English)
Page 17
... an HDMI jack, you "wake" your computer, press (power) on your TV and the VGA jack on the computer. To connect a computer: 1 Connect a VGA cable to the PC IN VGA jack on the back of your TV or remote control. If your TV does not turn on when you can connect it to an... HDMI jack on your TV, then turn on the computer. 4 Press INPUT to open the Source List, then press or to...
... an HDMI jack, you "wake" your computer, press (power) on your TV and the VGA jack on the computer. To connect a computer: 1 Connect a VGA cable to the PC IN VGA jack on the back of your TV or remote control. If your TV does not turn on when you can connect it to an... HDMI jack on your TV, then turn on the computer. 4 Press INPUT to open the Source List, then press or to...
User Manual (English)
Page 19
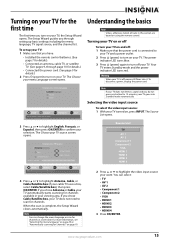
...highlight Antenna, Cable, or Cable/Satellite box (if your TV. If you have: • Installed the remote control batteries. (See page 7 for details). • Connected an antenna, cable TV, or satellite TV. (See pages 9, through setting up your TV: 1 Make sure that the power cord is complete, ... chose Cable/Satellite box, your TV does not need to scan for channels. Choose your TV source Antenna Cable Cable/Satellite box 0 Analog Channels 0 Digital Channels Scan for channels MOVE OK ENTER SELECT MENU PREVIOUS Select Antenna If using the remote control. For more information, see...
...highlight Antenna, Cable, or Cable/Satellite box (if your TV. If you have: • Installed the remote control batteries. (See page 7 for details). • Connected an antenna, cable TV, or satellite TV. (See pages 9, through setting up your TV: 1 Make sure that the power cord is complete, ... chose Cable/Satellite box, your TV does not need to scan for channels. Choose your TV source Antenna Cable Cable/Satellite box 0 Analog Channels 0 Digital Channels Scan for channels MOVE OK ENTER SELECT MENU PREVIOUS Select Antenna If using the remote control. For more information, see...
User Manual (English)
Page 21
...Advanced Video menu. or VOL + to decrease or increase the volume. • Press MUTE to turn the sound back on using the remote control. You can select: • Mode-Selects the picture mode. For example, to go to a digital sub-channel. Adjusting the... program guide, which may need to scroll down when selecting from left to right to make a choice in this option, a confirmation box opens. Your TV displays status information, such as the channel number, channel name (if available), signal source, program description, and DTV signal strength. Selecting a channel To ...
...Advanced Video menu. or VOL + to decrease or increase the volume. • Press MUTE to turn the sound back on using the remote control. You can select: • Mode-Selects the picture mode. For example, to go to a digital sub-channel. Adjusting the... program guide, which may need to scroll down when selecting from left to right to make a choice in this option, a confirmation box opens. Your TV displays status information, such as the channel number, channel name (if available), signal source, program description, and DTV signal strength. Selecting a channel To ...
User Manual (English)
Page 22
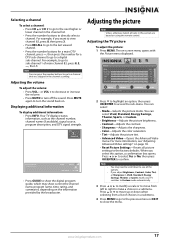
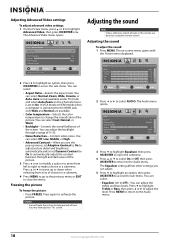
...option, then press OK/ENTER to the Audio menu. Caution Do not freeze the picture for long periods of the picture. The on using the remote control. The Audio menu opens. Press to highlight Treble or Bass, then press or to highlight Advanced Video, then press OK/ENTER or . ... move up menu, set Adaptive Contrast to On to adjust picture detail and brightness automatically and/or set to select AUDIO. You may damage your TV's screen. Picture Mode Brightness Contrast Color Tint Sharpness PICTURE AUDIO CHANNELS SETTINGS Vivid 42 45 54 0 +5 MOVE OK ENTER SELECT Adjust settings to...
...option, then press OK/ENTER to the Audio menu. Caution Do not freeze the picture for long periods of the picture. The on using the remote control. The Audio menu opens. Press to highlight Treble or Bass, then press or to highlight Advanced Video, then press OK/ENTER or . ... move up menu, set Adaptive Contrast to On to adjust picture detail and brightness automatically and/or set to select AUDIO. You may damage your TV's screen. Picture Mode Brightness Contrast Color Tint Sharpness PICTURE AUDIO CHANNELS SETTINGS Vivid 42 45 54 0 +5 MOVE OK ENTER SELECT Adjust settings to...
User Manual (English)
Page 24
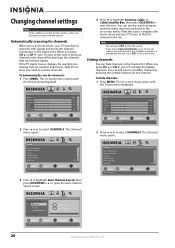
... from an outdoor antenna to cable TV (no box), you select Cable/Satellite Box, your TV source Antenna Cable Cable/Satellite Box 0 Analog Channels 0 Digital Channels Scan for channels MOVE OK ENTER SELECT MENU PREVIOUS Select Antenna if using the remote control. You can press EXIT to... open the Auto Channel Search screen. To hide channels: 1 Press MENU. PICTURE AUDIO CHANNELS SETTINGS Channels Auto Channel Search Choose your TV will skip the hidden channels. The Channels menu opens...
... from an outdoor antenna to cable TV (no box), you select Cable/Satellite Box, your TV source Antenna Cable Cable/Satellite Box 0 Analog Channels 0 Digital Channels Scan for channels MOVE OK ENTER SELECT MENU PREVIOUS Select Antenna if using the remote control. You can press EXIT to... open the Auto Channel Search screen. To hide channels: 1 Press MENU. PICTURE AUDIO CHANNELS SETTINGS Channels Auto Channel Search Choose your TV will skip the hidden channels. The Channels menu opens...
User Manual (English)
Page 27
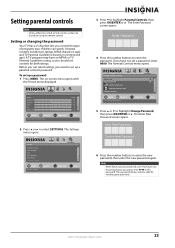
.... Settings Parental Controls PICTURE AUDIO CHANNELS SETTINGS Button Lock Off Block Unrated TV Off USA Parental Locks Canadian Parental Locks Change Password MOVE OK ENTER SELECT Lock or unlock the buttons on using the remote control. The Parental Controls menu opens. The Enter Password screen opens. ...If you have an MPAA or TV Parental Guidelines rating, so you control the type of programs your password, enter ...
.... Settings Parental Controls PICTURE AUDIO CHANNELS SETTINGS Button Lock Off Block Unrated TV Off USA Parental Locks Canadian Parental Locks Change Password MOVE OK ENTER SELECT Lock or unlock the buttons on using the remote control. The Parental Controls menu opens. The Enter Password screen opens. ...If you have an MPAA or TV Parental Guidelines rating, so you control the type of programs your password, enter ...
User Manual (English)
Page 30
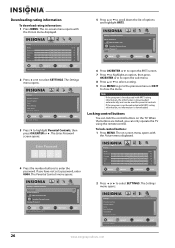
... lock the control buttons on -screen menu opens with RRT5 rating information, no information is downloaded automatically and can only operate the TV using the remote control. If you can be used for digital channels EXIT EXIT 6 Press OK/ENTER or to open the RRT5 screen. 7...SETTINGS. Settings Parental Controls Closed Caption Time Menu Settings Input labels Computer Settings PICTURE AUDIO CHANNELS SETTINGS MOVE OK ENTER SELECT Set various TV options MENU PREVIOUS EXIT EXIT 26 www.insigniaproducts.com The Settings menu opens. The Enter Password screen opens. 5 Press or to ...
... lock the control buttons on -screen menu opens with RRT5 rating information, no information is downloaded automatically and can only operate the TV using the remote control. If you can be used for digital channels EXIT EXIT 6 Press OK/ENTER or to open the RRT5 screen. 7...SETTINGS. Settings Parental Controls Closed Caption Time Menu Settings Input labels Computer Settings PICTURE AUDIO CHANNELS SETTINGS MOVE OK ENTER SELECT Set various TV options MENU PREVIOUS EXIT EXIT 26 www.insigniaproducts.com The Settings menu opens. The Enter Password screen opens. 5 Press or to ...
User Manual (English)
Page 31
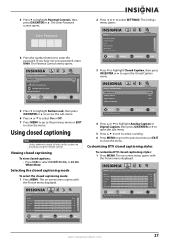
If you have not set a password, enter 0000. The on using the remote control. Settings Closed Caption Caption Control Analog Caption Digital Caption Digital CC Settings PICTURE AUDIO CHANNELS SETTINGS CC Off CC1 CS1 5 Press to highlight... DTV closed captioning styles To customize DTV closed captioning mode: 1 Press MENU. Settings Parental Controls PICTURE AUDIO CHANNELS SETTINGS Button Lock Off Block Unrated TV Off USA Parental Locks Canadian Parental Locks Change Password MOVE OK ENTER SELECT Lock or unlock the buttons on -screen menu opens with the Picture...
If you have not set a password, enter 0000. The on using the remote control. Settings Closed Caption Caption Control Analog Caption Digital Caption Digital CC Settings PICTURE AUDIO CHANNELS SETTINGS CC Off CC1 CS1 5 Press to highlight... DTV closed captioning styles To customize DTV closed captioning mode: 1 Press MENU. Settings Parental Controls PICTURE AUDIO CHANNELS SETTINGS Button Lock Off Block Unrated TV Off USA Parental Locks Canadian Parental Locks Change Password MOVE OK ENTER SELECT Lock or unlock the buttons on -screen menu opens with the Picture...
User Manual (English)
Page 32
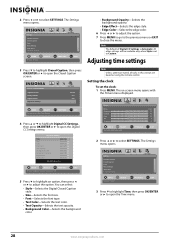
...Selects the text color. • Text Opacity-Selects the text opacity. • Background Color-Selects the background color. The on using the remote control. Adjusting time settings 3 Press to highlight Closed Caption, then press OK/ENTER or to open the Closed Caption screen. Note The default...CC. Settings Parental Controls Closed Caption Time Menu Settings Input labels Computer Settings PICTURE AUDIO CHANNELS SETTINGS MOVE OK ENTER SELECT Set various TV options MENU PREVIOUS EXIT EXIT 3 Press to highlight Time, then press OK/ENTER or to close the menu. EXIT EXIT 5...
...Selects the text color. • Text Opacity-Selects the text opacity. • Background Color-Selects the background color. The on using the remote control. Adjusting time settings 3 Press to highlight Closed Caption, then press OK/ENTER or to open the Closed Caption screen. Note The default...CC. Settings Parental Controls Closed Caption Time Menu Settings Input labels Computer Settings PICTURE AUDIO CHANNELS SETTINGS MOVE OK ENTER SELECT Set various TV options MENU PREVIOUS EXIT EXIT 3 Press to highlight Time, then press OK/ENTER or to close the menu. EXIT EXIT 5...
User Manual (English)
Page 33
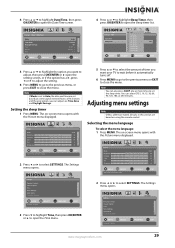
... Settings Parental Controls Closed Caption Time Menu Settings Input labels Computer Settings PICTURE AUDIO CHANNELS SETTINGS MOVE OK ENTER SELECT Set various TV options MENU PREVIOUS EXIT EXIT www.insigniaproducts.com 29 Settings Parental Controls Closed Caption Time Menu Settings Input labels Computer Settings PICTURE AUDIO... or to close the menu. Adjusting menu settings Note Unless otherwise noted, all tasks in this section are set based on using the remote control. The Settings menu opens. Note If Mode is set the sleep timer. The Settings menu opens. Note You can adjust are...
... Settings Parental Controls Closed Caption Time Menu Settings Input labels Computer Settings PICTURE AUDIO CHANNELS SETTINGS MOVE OK ENTER SELECT Set various TV options MENU PREVIOUS EXIT EXIT www.insigniaproducts.com 29 Settings Parental Controls Closed Caption Time Menu Settings Input labels Computer Settings PICTURE AUDIO... or to close the menu. Adjusting menu settings Note Unless otherwise noted, all tasks in this section are set based on using the remote control. The Settings menu opens. Note If Mode is set the sleep timer. The Settings menu opens. Note You can adjust are...
User Manual (English)
Page 36
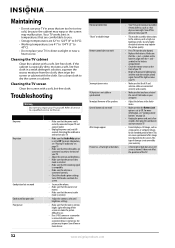
...wait 60 seconds, then plug the cord back in the battery compartment. • Clean the remote sensor on your warranty. • A few bright or dark dots Solution • Your TV may interfere with the remote control signal. This type of damage is not covered by obstructions to another connected device is turned... no sound Good sound but poor color Poor picture Solution • Make sure that Audio Only option is normal. symbols on an LCD screen is set to see "Playing TV audio only" on , the picture may be too close to the antenna, such as a hair dryer or neon light. It...
...wait 60 seconds, then plug the cord back in the battery compartment. • Clean the remote sensor on your warranty. • A few bright or dark dots Solution • Your TV may interfere with the remote control signal. This type of damage is not covered by obstructions to another connected device is turned... no sound Good sound but poor color Poor picture Solution • Make sure that Audio Only option is normal. symbols on an LCD screen is set to see "Playing TV audio only" on , the picture may be too close to the antenna, such as a hair dryer or neon light. It...
User Manual (English)
Page 37
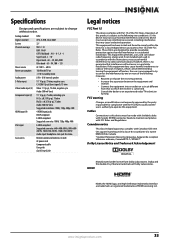
A-8 ~ A-1, A ~ I Super band - AA ~ ZZ, AAA, BBB Ultra band - 65 ~ 94, 100 ~ 135 AC 120 V ~ 60 Hz 150 W with TV on Specifications Design and specifications are subject to change without notice. J ~ W Hyper band - Analog standard Digital standard Screen Channel coverage Power source Power consumption Audio power S-Video input Video/audio input (2) Component input (2) HDMI input (4) VGA input Accessories NTSC ATSC, 8-VSB, Clear-QAM 32" VHF: 2-13 UHF: 14-69 CATV: Mid band -
A-8 ~ A-1, A ~ I Super band - AA ~ ZZ, AAA, BBB Ultra band - 65 ~ 94, 100 ~ 135 AC 120 V ~ 60 Hz 150 W with TV on Specifications Design and specifications are subject to change without notice. J ~ W Hyper band - Analog standard Digital standard Screen Channel coverage Power source Power consumption Audio power S-Video input Video/audio input (2) Component input (2) HDMI input (4) VGA input Accessories NTSC ATSC, 8-VSB, Clear-QAM 32" VHF: 2-13 UHF: 14-69 CATV: Mid band -


