
User Manual
Page 2
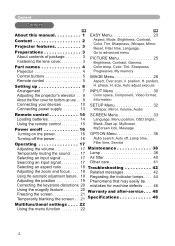
... 3 Fastening the lens cover 3 Part names 4 Projector 4 Control buttons 5 Remote control 5 Setting up 6 Arrangement 7 Adjusting the projector's elevator . . 8 About the filter cover for bottom-up , MyScreen, Power on/off 16 MyScreen lock, Message Turning on the power 16 OPTION Menu 36 Turning off the power 16 Auto search, Auto off, Lamp time, Operating 17 Filter time, Service Adjusting the volume 17 Maintenance 38 Temporarily muting the sound . . . . 17 Lamp 38 Selecting an input signal 17 Air filter 40 Searcting an input signal 17 Other...
... 3 Fastening the lens cover 3 Part names 4 Projector 4 Control buttons 5 Remote control 5 Setting up 6 Arrangement 7 Adjusting the projector's elevator . . 8 About the filter cover for bottom-up , MyScreen, Power on/off 16 MyScreen lock, Message Turning on the power 16 OPTION Menu 36 Turning off the power 16 Auto search, Auto off, Lamp time, Operating 17 Filter time, Service Adjusting the volume 17 Maintenance 38 Temporarily muting the sound . . . . 17 Lamp 38 Selecting an input signal 17 Air filter 40 Searcting an input signal 17 Other...
User Manual
Page 3
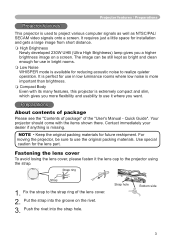
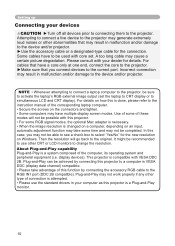
... a little space for future reshipment. The image can be sure to the projector using the strap. NOTE • Keep the original packing materials for installation and gets a large image from short distance. High Brightness Newly developed 230W UHB (Ultra High Brightness) lamp gives you want. For moving the projector, be still kept as NTSC/PAL/ SECAM video signals onto a screen. Strap ring Strap 1.
... a little space for future reshipment. The image can be sure to the projector using the strap. NOTE • Keep the original packing materials for installation and gets a large image from short distance. High Brightness Newly developed 230W UHB (Ultra High Brightness) lamp gives you want. For moving the projector, be still kept as NTSC/PAL/ SECAM video signals onto a screen. Strap ring Strap 1.
User Manual
Page 6
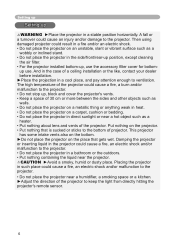
... place the projector near the projector. The high temperature of the projector could result in the side/front/rear-up position, except cleaning the air filter. • For the projector installed bottom-up, use . Put nothing on the projector. • Put nothing containing the liquid near a humidifier, a smoking space or a kitchen. ►Adjust the direction of projector. Then using damaged projector could...
... place the projector near the projector. The high temperature of the projector could result in the side/front/rear-up position, except cleaning the air filter. • For the projector installed bottom-up, use . Put nothing on the projector. • Put nothing containing the liquid near a humidifier, a smoking space or a kitchen. ►Adjust the direction of projector. Then using damaged projector could...
User Manual
Page 9
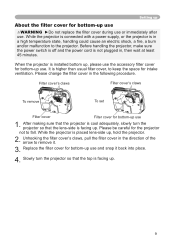
... Filter cover's claws To remove To set Filter cover Filter cover for intake ventilation. While the projector is connected with a power supply, or the projector is facing up use . Unhooking the filter cover's claws, pull the filter cover in the following procedure. Please change the filter cover in the direction of the arrow to keep the space for bottom-up use 1. When the projector is not plugged in a high temperature...
... Filter cover's claws To remove To set Filter cover Filter cover for intake ventilation. While the projector is connected with a power supply, or the projector is facing up use . Unhooking the filter cover's claws, pull the filter cover in the following procedure. Please change the filter cover in the direction of the arrow to keep the space for bottom-up use 1. When the projector is not plugged in a high temperature...
User Manual
Page 10
... to the instruction manual of the computer, its operating system and peripheral equipment (i.e. In this projector is a system composed of the corresponding laptop computer. • Secure the screws on Windows. It might be recommended to use the standard drivers in malfunction and/or damage to simultaneous LCD and CRT display). Use of some RGB signal modes, the optional Mac adapter is necessary. • When the image resolution is...
... to the instruction manual of the computer, its operating system and peripheral equipment (i.e. In this projector is a system composed of the corresponding laptop computer. • Secure the screws on Windows. It might be recommended to use the standard drivers in malfunction and/or damage to simultaneous LCD and CRT display). Use of some RGB signal modes, the optional Mac adapter is necessary. • When the image resolution is...
User Manual
Page 15
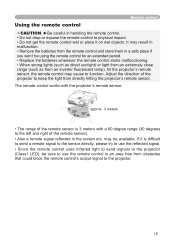
... of the projector to keep the light from an inverter fluorescent lamp), hit the projector's remote sensor, the remote control may result in malfunction. • Remove the batteries from the remote control and store them in the screen etc. It may cause to function. Remote control Using the remote control CAUTION ►Be careful in an area free from obstacles that could block the remote control's output signal to the projector. 15
... of the projector to keep the light from an inverter fluorescent lamp), hit the projector's remote sensor, the remote control may result in malfunction. • Remove the batteries from the remote control and store them in the screen etc. It may cause to function. Remote control Using the remote control CAUTION ►Be careful in an area free from obstacles that could block the remote control's output signal to the projector. 15
User Manual
Page 16
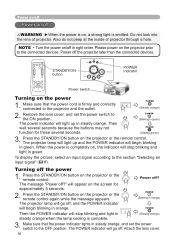
... power 1. Press the STANDBY/ON button on the projector or the remote control again while the message appears. POWER (Blinking in orange) POWER Then the POWER indicator will stop blinking and light in steady orange, and set the power switch to the ON position. POWER (Steady orange) 2. POWER (Blinking in orange. To display the picture, select an input signal according to the connected devices. Press the STANDBY/ON button on the projector or the remote control. Make sure that the power indicator lights in green. Remove the lens cover, and set the power switch...
... power 1. Press the STANDBY/ON button on the projector or the remote control again while the message appears. POWER (Blinking in orange) POWER Then the POWER indicator will stop blinking and light in steady orange, and set the power switch to the ON position. POWER (Steady orange) 2. POWER (Blinking in orange. To display the picture, select an input signal according to the connected devices. Press the STANDBY/ON button on the projector or the remote control. Make sure that the power indicator lights in green. Remove the lens cover, and set the power switch...
User Manual
Page 17
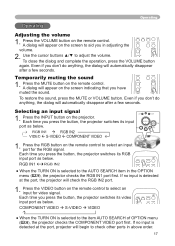
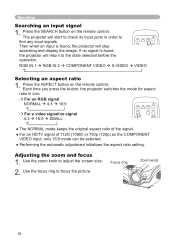
... INPUT button on the remote control to the item AUTO SEARCH of OPTION FREEZE menu KEYSTONE (36), the projector checks the COMPONENT VIDEO port first. If no input is selected to select an input for the RGB signal. VIDEO RGB SEARCH ASPECT AUTO BLANK MAGNIFY ON VOLUME 2. Use the cursor buttons ▲/▼ to the AUTO SEARCH item in adjusting the volume. Each time you press the button, the projector switches its input port...
... INPUT button on the remote control to the item AUTO SEARCH of OPTION FREEZE menu KEYSTONE (36), the projector checks the COMPONENT VIDEO port first. If no input is selected to select an input for the RGB signal. VIDEO RGB SEARCH ASPECT AUTO BLANK MAGNIFY ON VOLUME 2. Use the cursor buttons ▲/▼ to the AUTO SEARCH item in adjusting the volume. Each time you press the button, the projector switches its input port...
User Manual
Page 18
Then when an input is found , the projector will start to check its input ports in order to the state selected before the operation. Press the ASPECT button on the remote control. Use the zoom knob to focus the picture. 18 Focus ring ESC RESET Zoom knob 2. POSITION MENU ● Performing the automatic adjustment initializes the aspect ratio setting.ENTER Adjusting the zoom and focus 1. Use the focus ring to adjust the screen size. VIDEO RGB SEARCH ASPECT AUTO BLANK MAGNIFY...
Then when an input is found , the projector will start to check its input ports in order to the state selected before the operation. Press the ASPECT button on the remote control. Use the zoom knob to focus the picture. 18 Focus ring ESC RESET Zoom knob 2. POSITION MENU ● Performing the automatic adjustment initializes the aspect ratio setting.ENTER Adjusting the zoom and focus 1. Use the focus ring to adjust the screen size. VIDEO RGB SEARCH ASPECT AUTO BLANK MAGNIFY...

User Manual
Page 22
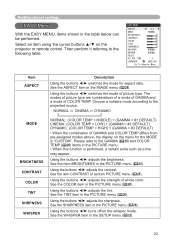
...:SELECT PICTURE IMAGE INPUT SETUP SCREEN OPTION EASY MENU BRIGHTNESS +0 CONTRAST +0 GAMMA DEFAULT 1 COLOR TEMP 6500K COLOR +0 TINT 0 SHARPNESS +0 PROGRESSIVE TURN OFF MY MEMORY SAVE 1 EASY MENU 3. In the Advanced MENU ASPECT 4:3 MODE NORMAL BRIGHTNESS +0 CONTRAST +0 COLOR +0 TINT +0 SHARPNESS +3 WHISPER NORMAL 2. The operation menu of the cursor buttons on the remote control during the operation. FREEZE KEYSTONE ENTER button Cursor buttons POSITION MENU ENTER VIDEO RGB...
...:SELECT PICTURE IMAGE INPUT SETUP SCREEN OPTION EASY MENU BRIGHTNESS +0 CONTRAST +0 GAMMA DEFAULT 1 COLOR TEMP 6500K COLOR +0 TINT 0 SHARPNESS +0 PROGRESSIVE TURN OFF MY MEMORY SAVE 1 EASY MENU 3. In the Advanced MENU ASPECT 4:3 MODE NORMAL BRIGHTNESS +0 CONTRAST +0 COLOR +0 TINT +0 SHARPNESS +3 WHISPER NORMAL 2. The operation menu of the cursor buttons on the remote control during the operation. FREEZE KEYSTONE ENTER button Cursor buttons POSITION MENU ENTER VIDEO RGB...
User Manual
Page 23
...) and COLOR TEMP (26) items in the SETUP menu (32). 23 Using the buttons ◄/► adjusts the strength of COLOR TEMP. Using the buttons ◄/► turns off/on the projector or remote control. Multifunctional settings EASY Menu With the EASY MENU, items shown in the IMAGE menu (28). EASY MENU ASPECT 4:3 MODE NORMAL BRIGHTNESS +0 CONTRAST +0 COLOR +0 TINT +0 SHARPNESS +3 WHISPER NORMAL MIRROR NORMAL RESET FILTER TIME 0 LANGUAGE ENGLISH Go To Advance Menu... NORMAL...
...) and COLOR TEMP (26) items in the SETUP menu (32). 23 Using the buttons ◄/► adjusts the strength of COLOR TEMP. Using the buttons ◄/► turns off/on the projector or remote control. Multifunctional settings EASY Menu With the EASY MENU, items shown in the IMAGE menu (28). EASY MENU ASPECT 4:3 MODE NORMAL BRIGHTNESS +0 CONTRAST +0 COLOR +0 TINT +0 SHARPNESS +3 WHISPER NORMAL MIRROR NORMAL RESET FILTER TIME 0 LANGUAGE ENGLISH Go To Advance Menu... NORMAL...
User Manual
Page 26
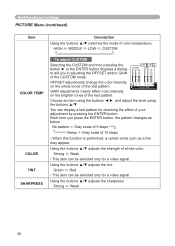
... an item using the buttons ◄/►, and adjust the level using the buttons ▲/▼. Green Red • This item can display a test pattern for a video signal. Using the buttons ▲/▼ adjusts the strength of color temperature. COLOR TEMP GAIN adjustments mainly affect color intensity on the whole tones of the CUSTOM mode. Multifunctional settings PICTURE Menu (continued) Item Description Using the buttons ▲/▼ switches the mode of whole color. Each time you in adjusting the...
... an item using the buttons ◄/►, and adjust the level using the buttons ▲/▼. Green Red • This item can display a test pattern for a video signal. Using the buttons ▲/▼ adjusts the strength of color temperature. COLOR TEMP GAIN adjustments mainly affect color intensity on the whole tones of the CUSTOM mode. Multifunctional settings PICTURE Menu (continued) Item Description Using the buttons ▲/▼ switches the mode of whole color. Each time you in adjusting the...

User Manual
Page 30
... buttons ▲/▼ on the projector or remote control, and press the cursor button ► on the projector or remote control, or the ENTER button on the input signal. 30 an irregular picture, a color lack), please select the mode depending on the remote control to select a suitable mode except AUTO. Using the buttons ▲/▼ switches the function of COMPONENT VIDEO port. For details, contact your dealer. Using the buttons ▲/▼ switches the mode for color space. AUTO...
... buttons ▲/▼ on the projector or remote control, and press the cursor button ► on the projector or remote control, or the ENTER button on the input signal. 30 an irregular picture, a color lack), please select the mode depending on the remote control to select a suitable mode except AUTO. Using the buttons ▲/▼ switches the function of COMPONENT VIDEO port. For details, contact your dealer. Using the buttons ▲/▼ switches the mode for color space. AUTO...
User Manual
Page 32
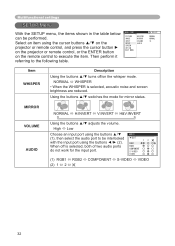
..., both of two audio ports do not work for mirror status. Using the buttons ▲/▼ switches the mode for the input port. MIRROR NORMAL H:INVERT V:INVERT H&V:INVERT VOLUME AUDIO Using the buttons ▲/▼ adjusts the volume. Multifunctional settings SETUP Menu With the SETUP menu, the items shown in the table below can be interlocked with the input port using the buttons ◄/► (2). MENU [RGB] :SELECT PICTURE IMAGE INPUT SETUP SCREEN OPTION EASY MENU WHISPER NORMAL MIRROR NORMAL...
..., both of two audio ports do not work for mirror status. Using the buttons ▲/▼ switches the mode for the input port. MIRROR NORMAL H:INVERT V:INVERT H&V:INVERT VOLUME AUDIO Using the buttons ▲/▼ adjusts the volume. Multifunctional settings SETUP Menu With the SETUP menu, the items shown in the table below can be interlocked with the input port using the buttons ◄/► (2). MENU [RGB] :SELECT PICTURE IMAGE INPUT SETUP SCREEN OPTION EASY MENU WHISPER NORMAL MIRROR NORMAL...
User Manual
Page 36
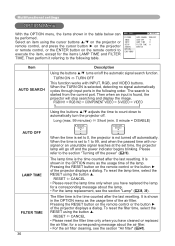
... settings OPTION Menu With the OPTION menu, the items shown in the OPTION menu as the usage time of the lamp. When the TURN ON is shown in the table below can MENU [RGB] :SELECT be performed. PICTURE IMAGE Select an item using the cursor buttons ▲/▼ on the projector or INPUT remote control, and press the cursor button ► on the projector SETUP SCREEN AUTO SEARCH TURN OFF AUTO OFF 0 LAMP TIME 0 FILTER TIME 0 SERVICE or remote control...
... settings OPTION Menu With the OPTION menu, the items shown in the OPTION menu as the usage time of the lamp. When the TURN ON is shown in the table below can MENU [RGB] :SELECT be performed. PICTURE IMAGE Select an item using the cursor buttons ▲/▼ on the projector or INPUT remote control, and press the cursor button ► on the projector SETUP SCREEN AUTO SEARCH TURN OFF AUTO OFF 0 LAMP TIME 0 FILTER TIME 0 SERVICE or remote control...

User Manual
Page 37
... • Depending on the basic setting. KEY LOCK Using the buttons ▲/▼ turns on the remote control. FILTER MESSAGE Use the ▲/▼ button to set the timer for the interval to show the message for use to the projector, environment around the projector, etc., the automatic adjustment may not work correctly. Note that the projector is noisier when the HIGH is chosen. Select a color element of air filter, especially when...
... • Depending on the basic setting. KEY LOCK Using the buttons ▲/▼ turns on the remote control. FILTER MESSAGE Use the ▲/▼ button to set the timer for the interval to show the message for use to the projector, environment around the projector, etc., the automatic adjustment may not work correctly. Note that the projector is noisier when the HIGH is chosen. Select a color element of air filter, especially when...
User Manual
Page 42
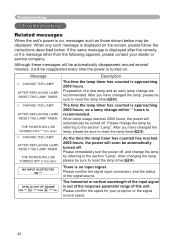
... the signal input connection, and the status of a new lamp and an early lamp change within ** hours is displayed after the remedy, or if a message other than the following appears, please contact your projector or the signal source specs. 42 Message CHANGE THE LAMP. CHANGE THE LAMP. The time the lamp timer has counted is approaching 2000 hours, so a lamp change are recommended. When any such message is displayed on , messages such as those shown below . AFTER REPLACING LAMP, RESET THE LAMP TIMER. THE POWER...
... the signal input connection, and the status of a new lamp and an early lamp change within ** hours is displayed after the remedy, or if a message other than the following appears, please contact your projector or the signal source specs. 42 Message CHANGE THE LAMP. CHANGE THE LAMP. The time the lamp timer has counted is approaching 2000 hours, so a lamp change are recommended. When any such message is displayed on , messages such as those shown below . AFTER REPLACING LAMP, RESET THE LAMP TIMER. THE POWER...
User Manual
Page 44
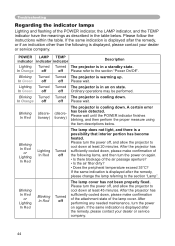
... change the lamp referring to the section "Power On/Off". Blinking Turned Turned The projector is displayed after the remedy, please contact your dealer or service company. In Orange off off Please wait. Blinking Turned Turned The projector is in a standby state. In Green off off The lamp cover has not been properly fixed. Please turn the power on state. Please follow the instructions within the table. Blinking In Red or Lighting In Red Lighting...
... change the lamp referring to the section "Power On/Off". Blinking Turned Turned The projector is displayed after the remedy, please contact your dealer or service company. In Orange off off Please wait. Blinking Turned Turned The projector is in a standby state. In Green off off The lamp cover has not been properly fixed. Please turn the power on state. Please follow the instructions within the table. Blinking In Red or Lighting In Red Lighting...

User Manual
Page 45
... dealer or service company. After the projector has sufficiently cooled down , please make confirmation of the following items, and then turn the power off , and clean or change the air filter referring to 35°C). Lighting In Green Simultaneous blinking in Red It is time to HIGH. Troubleshooting Regarding the indicator lamps (continued) POWER LAMP TEMP indicator indicator indicator Description Blinking In Red or Lighting In Red Turned off Lighting In Red There is...
... dealer or service company. After the projector has sufficiently cooled down , please make confirmation of the following items, and then turn the power off , and clean or change the air filter referring to 35°C). Lighting In Green Simultaneous blinking in Red It is time to HIGH. Troubleshooting Regarding the indicator lamps (continued) POWER LAMP TEMP indicator indicator indicator Description Blinking In Red or Lighting In Red Turned off Lighting In Red There is...
User Manual
Page 46
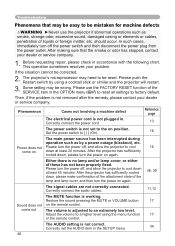
... signal cables are not correctly connected. Before requesting repair, please check in the SETUP menu. Then, if the problem is no lamp and/or lamp cover, or either of the lamp and lamp cover, and then turn the power on again. Either there is not removed after the remedy, please contact your dealer or service company. If the situation cannot be mistaken for machine defects WARNING ►Never use the FACTORY RESET...
... signal cables are not correctly connected. Before requesting repair, please check in the SETUP menu. Then, if the problem is no lamp and/or lamp cover, or either of the lamp and lamp cover, and then turn the power on again. Either there is not removed after the remedy, please contact your dealer or service company. If the situation cannot be mistaken for machine defects WARNING ►Never use the FACTORY RESET...


