
User Manual
Page 1
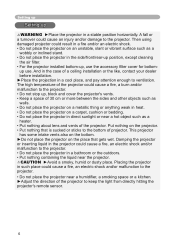
After reading them, store them in a safe place for purchasing this projector. About this manual. Trademark acknowledgment • VGA and XGA are registered trademarks of International Business Machines Corporation. • Apple and Mac are registered trademarks of ... symbol indicates information that may appear in personal injury or physical damage due to incorrect handling. Please refer to change without express written consent. Projector CP-X444/CP-X440 User's Manual -
After reading them, store them in a safe place for purchasing this projector. About this manual. Trademark acknowledgment • VGA and XGA are registered trademarks of International Business Machines Corporation. • Apple and Mac are registered trademarks of ... symbol indicates information that may appear in personal injury or physical damage due to incorrect handling. Please refer to change without express written consent. Projector CP-X444/CP-X440 User's Manual -
User Manual
Page 2
... 3 Preparations 3 About contents of package 3 Fastening the lens cover 3 Part names 4 Projector 4 Control buttons 5 Remote control 5 Setting up use . . 9 Connecting your devices 10 Connecting power supply 13 EASY Menu 23 Aspect, ...indicator lamps. . . . 44 Adjusting the position 19 Phenomena that may easily be Correcting the keystone distortions 20 mistaken for bottom-up 6 Arrangement 7 Adjusting the projector's elevator . . 8 About the filter cover for machine defects . . . . 46 Using the magnify feature Freezing the screen Temporarily blanking the screen ...
... 3 Preparations 3 About contents of package 3 Fastening the lens cover 3 Part names 4 Projector 4 Control buttons 5 Remote control 5 Setting up use . . 9 Connecting your devices 10 Connecting power supply 13 EASY Menu 23 Aspect, ...indicator lamps. . . . 44 Adjusting the position 19 Phenomena that may easily be Correcting the keystone distortions 20 mistaken for bottom-up 6 Arrangement 7 Adjusting the projector's elevator . . 8 About the filter cover for machine defects . . . . 46 Using the magnify feature Freezing the screen Temporarily blanking the screen ...
User Manual
Page 3
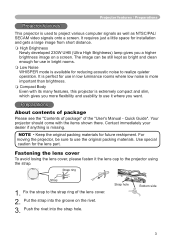
...realize quieter operation. NOTE • Keep the original packing materials for the lens part. The image can be sure to the projector using the strap. Contact immediately your dealer if anything is used to project various computer signals as well as bright and clean enough...mode is extremely compact and slim, which gives you a higher brightness image on the rivet. 3. Strap hole Bottom side 3 Projector features / Preparations Projector features This projector is missing. It is perfect for use in low luminance rooms where low noise is more flexibility and usability to the ...
...realize quieter operation. NOTE • Keep the original packing materials for the lens part. The image can be sure to the projector using the strap. Contact immediately your dealer if anything is used to project various computer signals as well as bright and clean enough...mode is extremely compact and slim, which gives you a higher brightness image on the rivet. 3. Strap hole Bottom side 3 Projector features / Preparations Projector features This projector is missing. It is perfect for use in low luminance rooms where low noise is more flexibility and usability to the ...
User Manual
Page 4
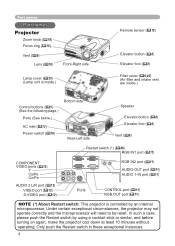
.... In such a case, please push the Restart switch by an internal microprocessor. Only push the Restart switch in these exceptional instances. 4 Part names Part names Projector Zoom knob (18) Focus ring (18) Vent (6) Lens (16) Front-Right side Lamp cover (39) (Lamp unit is inside.) ...(11) AUDIO 1-IN port (11) R-AUDIO 2-L VIDEO S-VIDEO Ports CONTROL port (11) RGB OUT port (11) NOTE (*) About Restart switch: This projector is controlled by using a cocktail stick or similar, and before turning on again, make the...
.... In such a case, please push the Restart switch by an internal microprocessor. Only push the Restart switch in these exceptional instances. 4 Part names Part names Projector Zoom knob (18) Focus ring (18) Vent (6) Lens (16) Front-Right side Lamp cover (39) (Lamp unit is inside.) ...(11) AUDIO 1-IN port (11) R-AUDIO 2-L VIDEO S-VIDEO Ports CONTROL port (11) RGB OUT port (11) NOTE (*) About Restart switch: This projector is controlled by using a cocktail stick or similar, and before turning on again, make the...
User Manual
Page 6
...30 cm or more between the sides and other objects such as walls. • Do not place the projector on a metallic thing or anything weak in heat. • Do not place the projector on an unstable, slant or vibrant surface such as a wobbly or inclined stand. • Do not place... intake vents also on the bottom. ►Do not place the projector on the projector. • Put nothing about lens and vents of the projector. Put nothing containing the liquid near the projector. Setting up Setting up WARNING ►Place the projector in such place could cause a fire, an electric shock ...
...30 cm or more between the sides and other objects such as walls. • Do not place the projector on a metallic thing or anything weak in heat. • Do not place the projector on an unstable, slant or vibrant surface such as a wobbly or inclined stand. • Do not place... intake vents also on the bottom. ►Do not place the projector on the projector. • Put nothing about lens and vents of the projector. Put nothing containing the liquid near the projector. Setting up Setting up WARNING ►Place the projector in such place could cause a fire, an electric shock ...
User Manual
Page 7
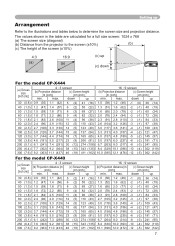
... the illustrations and tables below to the screen (±10%) (b) (c) The height of the screen (±10%) 4:3 (a) 16:9 (a) (c) up (c) down For the model CP-X444 (a) Screen size [inch (m)] 4 : 3 screen (b) Projection distance (c) Screen height [m (inch)] [cm (inch)] min. max. down up 30 (0.8) 0.9 (35... model CP-X440 (a) Screen size [inch (m)] 4 : 3 screen (b) Projection distance [m (inch)] (c) Screen height [cm (inch)] min. The values shown in the table are calculated for a full size screen: 1024 x 768 (a) The screen size (diagonal) (b) Distance from the projector to ...
... the illustrations and tables below to the screen (±10%) (b) (c) The height of the screen (±10%) 4:3 (a) 16:9 (a) (c) up (c) down For the model CP-X444 (a) Screen size [inch (m)] 4 : 3 screen (b) Projection distance (c) Screen height [m (inch)] [cm (inch)] min. max. down up 30 (0.8) 0.9 (35... model CP-X440 (a) Screen size [inch (m)] 4 : 3 screen (b) Projection distance [m (inch)] (c) Screen height [cm (inch)] min. The values shown in the table are calculated for a full size screen: 1024 x 768 (a) The screen size (diagonal) (b) Distance from the projector to ...
User Manual
Page 8
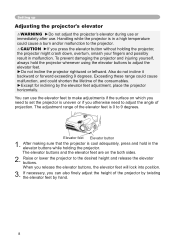
...button 1. When you press the elevator button without holding the projector. Handling while the projector is uneven or if you otherwise need to set the projector is in the elevator buttons while holding the projector, the projector might crash down, overturn, smash your fingers and ...can also finely adjust the height of projection. After making sure that the projector is 0 to 9 degrees. Setting up Adjusting the projector's elevator WARNING ►Do not adjust the projector's elevator during use or immediately after use the elevator feet to make adjustments if the...
...button 1. When you press the elevator button without holding the projector. Handling while the projector is uneven or if you otherwise need to set the projector is in the elevator buttons while holding the projector, the projector might crash down, overturn, smash your fingers and ...can also finely adjust the height of projection. After making sure that the projector is 0 to 9 degrees. Setting up Adjusting the projector's elevator WARNING ►Do not adjust the projector's elevator during use or immediately after use the elevator feet to make adjustments if the...
User Manual
Page 9
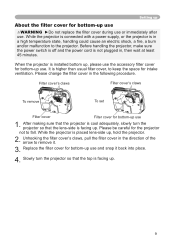
... it back into place. 4. Please be careful for intake ventilation. Slowly turn the projector so that the top is facing up , hold the projector. 2. While the projector is connected with a power supply, or the projector is installed bottom up, please use 1. Please change the filter cover in ...handling could cause an electric shock, a fire, a burn and/or malfunction to fall. After making sure that the projector is cool adequately, slowly turn the projector so that the lens-side is facing up use the accessory filter cover for bottom-up . 9 Before handling the...
... it back into place. 4. Please be careful for intake ventilation. Slowly turn the projector so that the top is facing up , hold the projector. 2. While the projector is connected with a power supply, or the projector is installed bottom up, please use 1. Please change the filter cover in ...handling could cause an electric shock, a fire, a burn and/or malfunction to fall. After making sure that the projector is cool adequately, slowly turn the projector so that the lens-side is facing up use the accessory filter cover for bottom-up . 9 Before handling the...
User Manual
Page 10
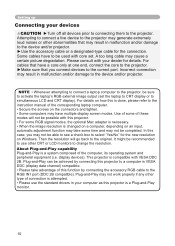
...may generate extremely loud noises or other CRT or LCD monitors to a computer is compatible with this function by connecting this projector to change the resolution. Setting up Connecting your dealer for details. Incorrect connection may cause a certain picture degradation. Then... the resolution will not be completed. This projector is VESA DDC (display data channel) compatible. • Please take some of the computer, its operating system and peripheral equipment ...
...may generate extremely loud noises or other CRT or LCD monitors to a computer is compatible with this function by connecting this projector to change the resolution. Setting up Connecting your dealer for details. Incorrect connection may cause a certain picture degradation. Then... the resolution will not be completed. This projector is VESA DDC (display data channel) compatible. • Please take some of the computer, its operating system and peripheral equipment ...

User Manual
Page 13
... caution when connecting the power cord, as incorrect or faulty connections may result in fire and/or electrical shock. • Only use with the projector. Connector of the...
... caution when connecting the power cord, as incorrect or faulty connections may result in fire and/or electrical shock. • Only use with the projector. Connector of the...
User Manual
Page 15
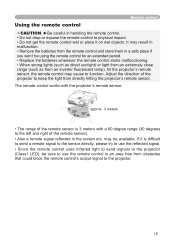
... the sensor directly, please try to use the reflected signal. • Since the remote control uses infrared light to send signals to the projector (Class1 LED), be sure to use the remote control in an area free from obstacles that could block the remote control's output signal to keep... the light from an inverter fluorescent lamp), hit the projector's remote sensor, the remote control may cause to the left and right of the remote sensor). • Also a remote signal reflected in the...
... the sensor directly, please try to use the reflected signal. • Since the remote control uses infrared light to send signals to the projector (Class1 LED), be sure to use the remote control in an area free from obstacles that could block the remote control's output signal to keep... the light from an inverter fluorescent lamp), hit the projector's remote sensor, the remote control may cause to the left and right of the remote sensor). • Also a remote signal reflected in the...
User Manual
Page 16
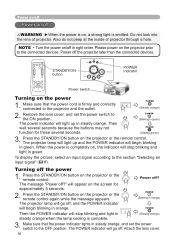
... right order. The power indicator will light up and the POWER indicator will begin blinking in orange. Press the STANDBY/ON button on the projector or the remote control again while the message appears. Power off the power 1. Make sure that the power indicator lights in steady orange,... and set the power switch to the OFF position. The projector lamp will light up in green. To display the picture, select an input signal according to the connected devices. POWER (Blinking in orange) POWER...
... right order. The power indicator will light up and the POWER indicator will begin blinking in orange. Press the STANDBY/ON button on the projector or the remote control again while the message appears. Power off the power 1. Make sure that the power indicator lights in steady orange,... and set the power switch to the OFF position. The projector lamp will light up in green. To display the picture, select an input signal according to the connected devices. POWER (Blinking in orange) POWER...
User Manual
Page 17
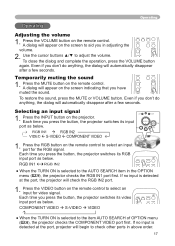
...don't do anything , the dialog will begin to the AUTO SEARCH item in above order. Even if you press the button, the projector switches its video input port as below . Operating Operating Adjusting the volume 1. RGB IN1 RGB IN2 VIDEO RGB SEARCH ASPECT... AUTO BLANK ● When the TURN ON is detected at the port, the projector will automatically disappear after a few seconds. POSITION MENU ENTER 17 ESC RESET Press the MUTE button on the remote control. POSITION MENU ...
...don't do anything , the dialog will begin to the AUTO SEARCH item in above order. Even if you press the button, the projector switches its video input port as below . Operating Operating Adjusting the volume 1. RGB IN1 RGB IN2 VIDEO RGB SEARCH ASPECT... AUTO BLANK ● When the TURN ON is detected at the port, the projector will automatically disappear after a few seconds. POSITION MENU ENTER 17 ESC RESET Press the MUTE button on the remote control. POSITION MENU ...
User Manual
Page 18
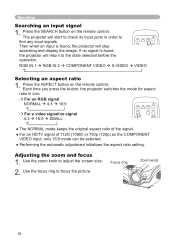
...Selecting an aspect ratio ENTER 1. POSITION MENU ● Performing the automatic adjustment initializes the aspect ratio setting.ENTER Adjusting the zoom and focus 1. The projector will start to check its input ports in turn. For an RGB signal NORMAL 4:3 16:9 VIDEO RGB SEARCH &#...61606; For a video signal/no signal is found , the projector will stop searching and display the image. FREEZE KEYSTONE ● For an HDTV signal of the signal. Use the focus ring to adjust the screen...
...Selecting an aspect ratio ENTER 1. POSITION MENU ● Performing the automatic adjustment initializes the aspect ratio setting.ENTER Adjusting the zoom and focus 1. The projector will start to check its input ports in turn. For an RGB signal NORMAL 4:3 16:9 VIDEO RGB SEARCH &#...61606; For a video signal/no signal is found , the projector will stop searching and display the image. FREEZE KEYSTONE ● For an HDTV signal of the signal. Use the focus ring to adjust the screen...
User Manual
Page 20
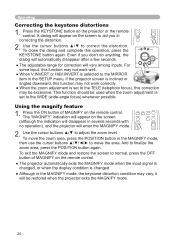
...will be used when the zoom adjustment is changed. ● Although in several seconds with MAGNIFY VOLUME ON no operation), and the projector will vary among inputs. Use the cursor buttons ▲/▼ to finalize POSITION theMENU zoom area, press the POSITION button ...the screen to the TELE (telephoto focus), this operation, press the KEYSTONE button again. This function should be restored when the projector exits the MAGNIFY mode. 20 Operating VIDEO RGB SEARCH ASPECT AUTO BLANK Correcting the keystone distortions MAGNIFY ON VOLUME 1. Press the KEYSTONE...
...will be used when the zoom adjustment is changed. ● Although in several seconds with MAGNIFY VOLUME ON no operation), and the projector will vary among inputs. Use the cursor buttons ▲/▼ to finalize POSITION theMENU zoom area, press the POSITION button ...the screen to the TELE (telephoto focus), this operation, press the KEYSTONE button again. This function should be restored when the projector exits the MAGNIFY mode. 20 Operating VIDEO RGB SEARCH ASPECT AUTO BLANK Correcting the keystone distortions MAGNIFY ON VOLUME 1. Press the KEYSTONE...
User Manual
Page 21
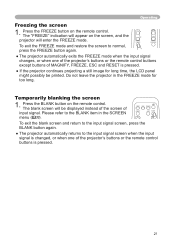
... contMErNoU l buttons is presseEdSC. ENTER ESC RESET 21 Press the FREEZE button on the screen, and the MAGNIFY ON OFF VOLUME MUTE projector will enter the FREEZE mode. FREEZE KEYSTONE To exit the FREEZE mode and restore the screen to the BLANK item in the FREEZE mode... the LCD panel might possibly be displayed instead of the screen of MAGNIFY, FREEZE, ESC and RESET is pressed. RESET ● If the projector continues projecting a still image for too long. The blank screen will appear on the remote control. Please refer to normal, press the FREEZE button...
... contMErNoU l buttons is presseEdSC. ENTER ESC RESET 21 Press the FREEZE button on the screen, and the MAGNIFY ON OFF VOLUME MUTE projector will enter the FREEZE mode. FREEZE KEYSTONE To exit the FREEZE mode and restore the screen to the BLANK item in the FREEZE mode... the LCD panel might possibly be displayed instead of the screen of MAGNIFY, FREEZE, ESC and RESET is pressed. RESET ● If the projector continues projecting a still image for too long. The blank screen will appear on the remote control. Please refer to normal, press the FREEZE button...

User Manual
Page 22
... you want to change it to the Advanced MENU, select the "Go to select an item. Then press the cursor button ► on the projector or remote control, or the ENTER button on the remote control again to reset the operation, press the RESET button on the remote control. 5. In...▲/▼ to operate the item. ● When you want to change it to the previous display, press the cursor button ◄ on the projector or remote control, or the ESC button on the remote control during the operation. Go To Advance Menu... FREEZE KEYSTONE ENTER button Cursor buttons POSITION...
... you want to change it to the Advanced MENU, select the "Go to select an item. Then press the cursor button ► on the projector or remote control, or the ENTER button on the remote control again to reset the operation, press the RESET button on the remote control. 5. In...▲/▼ to operate the item. ● When you want to change it to the previous display, press the cursor button ◄ on the projector or remote control, or the ESC button on the remote control during the operation. Go To Advance Menu... FREEZE KEYSTONE ENTER button Cursor buttons POSITION...
User Manual
Page 23
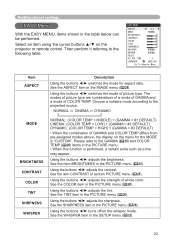
See the ASPECT item in the SETUP menu (32). 23 Using the buttons ◄/► turns off/on the projector or remote control. EASY MENU ASPECT 4:3 MODE NORMAL BRIGHTNESS +0 CONTRAST +0 COLOR +0 TINT +0 SHARPNESS +3 WHISPER NORMAL MIRROR NORMAL RESET FILTER TIME 0 LANGUAGE ENGLISH Go To Advance ...
See the ASPECT item in the SETUP menu (32). 23 Using the buttons ◄/► turns off/on the projector or remote control. EASY MENU ASPECT 4:3 MODE NORMAL BRIGHTNESS +0 CONTRAST +0 COLOR +0 TINT +0 SHARPNESS +3 WHISPER NORMAL MIRROR NORMAL RESET FILTER TIME 0 LANGUAGE ENGLISH Go To Advance ...
User Manual
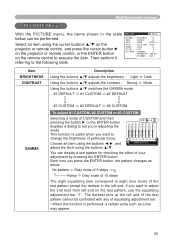
Page 25
... an item using the buttons ◄/►, and adjust the level using the cursor buttons ▲/▼ on the projector or remote control, and press the cursor button ► on the projector or remote control, or the ENTER button on the test pattern, use the equalizing adjustment bar "1". If you want to...
... an item using the buttons ◄/►, and adjust the level using the cursor buttons ▲/▼ on the projector or remote control, and press the cursor button ► on the projector or remote control, or the ENTER button on the test pattern, use the equalizing adjustment bar "1". If you want to...

User Manual
Page 27
... ► or the ENTER button performs each function. LOAD1 LOAD2 LOAD3 LOAD4 MY MEMORY SAVE4 SAVE3 SAVE2 SAVE1 This projector has 4 numbered memories for a quick moving object. TV FILM TURN OFF • This function is performed only for an interlaced signal of a VIDEO...
... ► or the ENTER button performs each function. LOAD1 LOAD2 LOAD3 LOAD4 MY MEMORY SAVE4 SAVE3 SAVE2 SAVE1 This projector has 4 numbered memories for a quick moving object. TV FILM TURN OFF • This function is performed only for an interlaced signal of a VIDEO...


