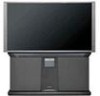
Owners Guide
Page 2
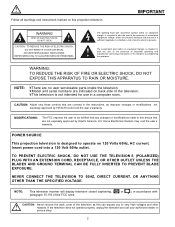
... SPECIFIED VOLTAGE. NOTE: This television receiver will display television closed captioning, ( or ), in the instructions, as this projection television. NO USER SERVICEABLE PARTS INSIDE. TO PREVENT ELECTRIC SHOCK, DO NOT USE THE TELEVISION S (POLARIZED) PLUG WITH AN EXTENSION CORD, RECEPTACLE, OR OTHER OUTLET UNLESS THE BLADES AND GROUND TERMINAL CAN BE FULLY INSERTED TO PREVENT BLADE EXPOSURE. CAUTION: Never remove the back cover of uninsulated dangerous voltage within...
... SPECIFIED VOLTAGE. NOTE: This television receiver will display television closed captioning, ( or ), in the instructions, as this projection television. NO USER SERVICEABLE PARTS INSIDE. TO PREVENT ELECTRIC SHOCK, DO NOT USE THE TELEVISION S (POLARIZED) PLUG WITH AN EXTENSION CORD, RECEPTACLE, OR OTHER OUTLET UNLESS THE BLADES AND GROUND TERMINAL CAN BE FULLY INSERTED TO PREVENT BLADE EXPOSURE. CAUTION: Never remove the back cover of uninsulated dangerous voltage within...
Owners Guide
Page 3
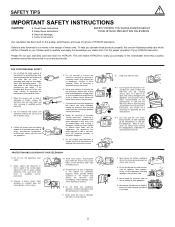
... provided. Protect the power cord from being walked on the television. 7. Refer all servicing to qualified service personnel. Refer all instructions. Do not subject your warranty card and mail it to qualified service personnel. 8. If the set has been exposed to rain or water, unplug television from overheating. Do not place the television on the screen. Use only with the cart, stand, tripod, bracket...
... provided. Protect the power cord from being walked on the television. 7. Refer all servicing to qualified service personnel. Refer all instructions. Do not subject your warranty card and mail it to qualified service personnel. 8. If the set has been exposed to rain or water, unplug television from overheating. Do not place the television on the screen. Use only with the cart, stand, tripod, bracket...
Owners Guide
Page 4
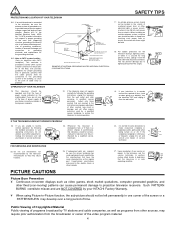
... cable ground shall be located in your dealer or service technician. Public Viewing of Copyrighted Material Public viewing of programs broadcast by your HITACHI Factory Warranty. ¥ When using Picture-in-Picture function, the sub-picture should not be connected to the grounding system of time. Section 810 of time, unplug it from the broadcaster or owner of other fixed (non-moving) patterns can fall into such power lines...
... cable ground shall be located in your dealer or service technician. Public Viewing of Copyrighted Material Public viewing of programs broadcast by your HITACHI Factory Warranty. ¥ When using Picture-in-Picture function, the sub-picture should not be connected to the grounding system of time. Section 810 of time, unplug it from the broadcaster or owner of other fixed (non-moving) patterns can fall into such power lines...
Owners Guide
Page 14
..., DVD player, camcorder, etc.) to the TV s PR input. Your component outputs may be used at a time. Refer to the left audio jack on line input-output connections. A single VCR can be used for VCR #1 and VCR #2, but only one audio output (mono sound), connect it to your device has this feature. TIPS ON REAR PANEL CONNECTIONS TIPS ON REAR PANEL CONNECTIONS S-VIDEO connections are provided for high performance components, such as DVD players and settop-boxes. COMPONENT: Y-PBPR (Input 4 &5) connections...
..., DVD player, camcorder, etc.) to the TV s PR input. Your component outputs may be used at a time. Refer to the left audio jack on line input-output connections. A single VCR can be used for VCR #1 and VCR #2, but only one audio output (mono sound), connect it to your device has this feature. TIPS ON REAR PANEL CONNECTIONS TIPS ON REAR PANEL CONNECTIONS S-VIDEO connections are provided for high performance components, such as DVD players and settop-boxes. COMPONENT: Y-PBPR (Input 4 &5) connections...
Owners Guide
Page 16
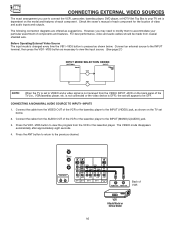
... model and features of the VCR or the laserdisc player to the INPUT (MONO)/L(AUDIO) jack. 3. is not connected or the video device is set below . Check the owner's manual of each component. For best performance, video and audio cables should be OFF. Before Operating External Video Source The input mode is changed every time the VID1~VID5 button is not received from coaxial shielded wire. Press the ANT button to return to VIDEO and a video signal...
... model and features of the VCR or the laserdisc player to the INPUT (MONO)/L(AUDIO) jack. 3. is not connected or the video device is set below . Check the owner's manual of each component. For best performance, video and audio cables should be OFF. Before Operating External Video Source The input mode is changed every time the VID1~VID5 button is not received from coaxial shielded wire. Press the ANT button to return to VIDEO and a video signal...
Owners Guide
Page 19
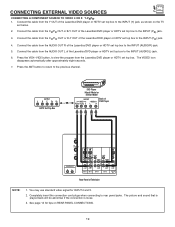
... video signal for tips on the TV set top box to view the program from the AUDIO OUT L of the Laserdisc/DVD player or HDTV set top box to the INPUT (PB) jack. 3. Completely insert the connection cord plugs when connecting to the previous channel. Connect the cable from the CR/PR OUT or R-Y OUT of the Laserdisc/DVD player or HDTV set below. 2. Press the ANT button to return to rear panel jacks. OUTPUT L R Y PB PR HDTV Set-Top Box DVD Player Hitachi Model...
... video signal for tips on the TV set top box to view the program from the AUDIO OUT L of the Laserdisc/DVD player or HDTV set top box to the INPUT (PB) jack. 3. Completely insert the connection cord plugs when connecting to the previous channel. Connect the cable from the CR/PR OUT or R-Y OUT of the Laserdisc/DVD player or HDTV set below. 2. Press the ANT button to return to rear panel jacks. OUTPUT L R Y PB PR HDTV Set-Top Box DVD Player Hitachi Model...
Owners Guide
Page 20
... instruction on how to program the remote to control your DVD player.) To operate additional audio/video equipment, point the remote at the remote sensor of VCRs, CATV (Cable TV) converters, set -top-box and press the SET-TOP-BOX (STB) button. Your remote control SOURCE WIZARD buttons are in a dark room, press the light button ባ on the remote to control your set-topbox.) To operate your DVD player, point the remote at the remote sensor of the component you have a satellite receiver, use...
... instruction on how to program the remote to control your DVD player.) To operate additional audio/video equipment, point the remote at the remote sensor of VCRs, CATV (Cable TV) converters, set -top-box and press the SET-TOP-BOX (STB) button. Your remote control SOURCE WIZARD buttons are in a dark room, press the light button ባ on the remote to control your set-topbox.) To operate your DVD player, point the remote at the remote sensor of the component you have a satellite receiver, use...
Owners Guide
Page 22
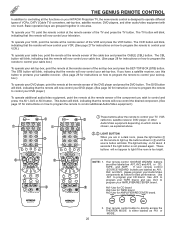
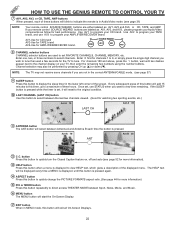
... not receive some channels if you are used to select channels. HOW TO USE THE GENIUS REMOTE TO CONTROL YOUR TV ቨ AV1, AV2, AV3, or CD, TAPE, AMP buttons When pressed, each time the button is pressed. Once set , it will reset to the original condition. ቫ LAST CHANNEL (LAST CH) button Use this button when a menu is pressed again. ተ ASPECT button Press this button will exit all On-Screen Displays...
... not receive some channels if you are used to select channels. HOW TO USE THE GENIUS REMOTE TO CONTROL YOUR TV ቨ AV1, AV2, AV3, or CD, TAPE, AMP buttons When pressed, each time the button is pressed. Once set , it will reset to the original condition. ቫ LAST CHANNEL (LAST CH) button Use this button when a menu is pressed again. ተ ASPECT button Press this button will exit all On-Screen Displays...
Owners Guide
Page 23
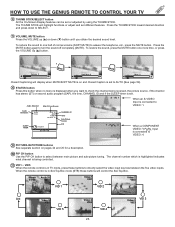
... what channel is being received, the picture source, if the channel has stereo (ST) or second audio program (SAP), the time, CHANNEL ID and if the SLEEP timer is connected to AUTO (See page 54). ቶ STATUS button Press this button when no menu is displayed when you obtain the desired sound level. When the remote control is in Set-Top-Box mode (STB) these buttons to select between the five video inputs. To...
... what channel is being received, the picture source, if the channel has stereo (ST) or second audio program (SAP), the time, CHANNEL ID and if the SLEEP timer is connected to AUTO (See page 54). ቶ STATUS button Press this button when no menu is displayed when you obtain the desired sound level. When the remote control is in Set-Top-Box mode (STB) these buttons to select between the five video inputs. To...
Owners Guide
Page 24
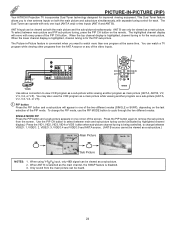
... R AUDIO R AUDIO INPUT 5 MONITOR OUT MENU EXIT VOL SELECT CH ቤ ቢ ቤ SVCS VID 1 MUTE STATUS VCR PLUS+ INFO GUIDE/TV SCHD VID 5 VID 2 VID 4 VID 3 PIP PIP CH FREEZE PIP MODE PIP ACCESS SWAP PROG TV/VCR SLOW ብ,ቦ ባ REC VCR Hitachi Model or Similar Model Use above connection to change the PIP mode, use the PIP MODE button to remove the sub-picture from the screen. When ANT B is selected as a sub-picture. 2. Only sound from...
... R AUDIO R AUDIO INPUT 5 MONITOR OUT MENU EXIT VOL SELECT CH ቤ ቢ ቤ SVCS VID 1 MUTE STATUS VCR PLUS+ INFO GUIDE/TV SCHD VID 5 VID 2 VID 4 VID 3 PIP PIP CH FREEZE PIP MODE PIP ACCESS SWAP PROG TV/VCR SLOW ብ,ቦ ባ REC VCR Hitachi Model or Similar Model Use above connection to change the PIP mode, use the PIP MODE button to remove the sub-picture from the screen. When ANT B is selected as a sub-picture. 2. Only sound from...
Owners Guide
Page 28
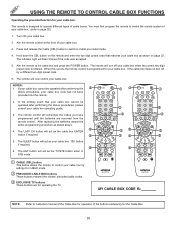
... instruction manual of the Cable Box for operation of cable boxes. Hold down the CBL button on page 32. The remote will act as your cable box. The remote control will now control your cable box. This remote is entered. If the cable box does not turn off , try a different two digit preset code. 6. Press and release the Cable (CBL) button to switch to CABLE mode. ባ PRECODED CABLE BOX buttons These buttons transmit the chosen precoded cable codes. ቤ EXCLUSIVE TV buttons These buttons are removed...
... instruction manual of the Cable Box for operation of cable boxes. Hold down the CBL button on page 32. The remote will act as your cable box. The remote control will now control your cable box. This remote is entered. If the cable box does not turn off , try a different two digit preset code. 6. Press and release the Cable (CBL) button to switch to CABLE mode. ባ PRECODED CABLE BOX buttons These buttons transmit the chosen precoded cable codes. ቤ EXCLUSIVE TV buttons These buttons are removed...

Owners Guide
Page 29
... shown on page 32. The remote control will flash 3 times if the code was accepted. 5. Press and release the SET-TOP-BOX (STB) button to switch to instruction manual of the set-top-box/satellite receiver for operation of the buttons exclusively for operating the TV. ባ POWER TV DVD VCR CBL SOURCE WIZARD AV1 AV2 STB AV3 1 2 3 ቢ 4 5 6 ባ 7 8 9 SLEEP ANT C.C 0 LAST CH HELP ASPECT PIX ቤ MENU EXIT ባ VOL SELECT...
... shown on page 32. The remote control will flash 3 times if the code was accepted. 5. Press and release the SET-TOP-BOX (STB) button to switch to instruction manual of the set-top-box/satellite receiver for operation of the buttons exclusively for operating the TV. ባ POWER TV DVD VCR CBL SOURCE WIZARD AV1 AV2 STB AV3 1 2 3 ቢ 4 5 6 ባ 7 8 9 SLEEP ANT C.C 0 LAST CH HELP ASPECT PIX ቤ MENU EXIT ባ VOL SELECT...
Owners Guide
Page 34
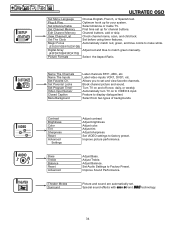
... Settings Bass Treble Balance Reset Advanced Theater Modes Surround Adjust contrast. Adjust Balance. View Channel List Check channel name, scan, and child lock. SETUP CUSTOMIZE VIDEO SEL AUDIO THEATER ULTRATEC OSD SETUP Set Menu Language Choose English, French, or Spanish text. Set Parental Locks Set Program Timer Video Input Sensor Closed Caption Menu Background Label channels PAY1, ABC, etc. Set The Clock Set before using timer features. Set Audio Settings to display dialogue/text. Feature to Factory Preset. Set Antenna/Cable Select Antenna or Cable TV...
... Settings Bass Treble Balance Reset Advanced Theater Modes Surround Adjust contrast. Adjust Balance. View Channel List Check channel name, scan, and child lock. SETUP CUSTOMIZE VIDEO SEL AUDIO THEATER ULTRATEC OSD SETUP Set Menu Language Choose English, French, or Spanish text. Set Parental Locks Set Program Timer Video Input Sensor Closed Caption Menu Background Label channels PAY1, ABC, etc. Set The Clock Set before using timer features. Set Audio Settings to display dialogue/text. Feature to Factory Preset. Set Antenna/Cable Select Antenna or Cable TV...
Owners Guide
Page 36
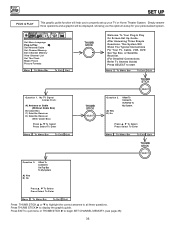
... Box, or Satellite Receiver. (For Detailed Connections Refer To Owners Guide) Press SELECT to begin SET CHANNEL MEMORY. (see page 38) 36 Press THUMB STICK ̈ to display the graphic guide. SETUP SET UP PLUG & PLAY This graphic guide function will be displayed, showing you to properly set up your personalized system. SETUP CUSTOMIZE VIDEO SEL AUDIO THEATER Set Menu Language Plug & Play Set Antenna/Cable Set Channel Memory Edit Channel Memory View Channel List Set The Clock Magic Focus Picture...
... Box, or Satellite Receiver. (For Detailed Connections Refer To Owners Guide) Press SELECT to begin SET CHANNEL MEMORY. (see page 38) 36 Press THUMB STICK ̈ to display the graphic guide. SETUP SET UP PLUG & PLAY This graphic guide function will be displayed, showing you to properly set up your personalized system. SETUP CUSTOMIZE VIDEO SEL AUDIO THEATER Set Menu Language Plug & Play Set Antenna/Cable Set Channel Memory Edit Channel Memory View Channel List Set The Clock Magic Focus Picture...
Owners Guide
Page 43
... panel DIGITAL ARRAY button or the remote control PIP MODE button when adjustment is necessary to display a test pattern of horizontal and vertical lines at the center of the green tube is called convergence . SETUP SET UP DIGITAL ARRAY Model: 43FDX10B/43FDX11B Your HITACHI Projection TV has three color projection tubes: one for red, one for green, one for blue. The process of all three tubes should be directly over each other to produce the white lines. Over a period of time, the picture tubes...
... panel DIGITAL ARRAY button or the remote control PIP MODE button when adjustment is necessary to display a test pattern of horizontal and vertical lines at the center of the green tube is called convergence . SETUP SET UP DIGITAL ARRAY Model: 43FDX10B/43FDX11B Your HITACHI Projection TV has three color projection tubes: one for red, one for green, one for blue. The process of all three tubes should be directly over each other to produce the white lines. Over a period of time, the picture tubes...

Owners Guide
Page 44
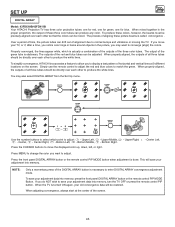
.... Depending on THUMB STICK to select. Set up reception High Definition, Standard Definition and NTSC signals. Zoom in on Aspect 2 mode. Aspect 4 - When 1080i signal is inputted, this when viewing a COMPONENT: Y-PBPR signal. SETUP CUSTOMIZE VIDEO SEL AUDIO THEATER Set Menu Language Plug & Play Set Antenna/Cable Set Channel Memory Edit Channel Memory View Channel List Set The Clock Magic Focus Picture Formats M e n u To M e n u B a r To Q u i t E x i t THUMB STICK SETUP Press Select To Set SEL Picture Formats Aspect Style V. This feature is the...
.... Depending on THUMB STICK to select. Set up reception High Definition, Standard Definition and NTSC signals. Zoom in on Aspect 2 mode. Aspect 4 - When 1080i signal is inputted, this when viewing a COMPONENT: Y-PBPR signal. SETUP CUSTOMIZE VIDEO SEL AUDIO THEATER Set Menu Language Plug & Play Set Antenna/Cable Set Channel Memory Edit Channel Memory View Channel List Set The Clock Magic Focus Picture Formats M e n u To M e n u B a r To Q u i t E x i t THUMB STICK SETUP Press Select To Set SEL Picture Formats Aspect Style V. This feature is the...

Owners Guide
Page 46
... Comp Color Type is set VIDEO:4 AND VIDEO:5). 4. Selecting Aspect 5 allows the 1080i signals to appear on the remote control will be tuned to VIDEO: 4 or 5 input and have a component hooked up to the Y-PBPR input jacks to automatically change tint and color coordinate for High Vision Signal Y-PBPR from the OSD menu at the top and bottom of the TV screen. 46 The aspect button on the TV screen as DVD (Digital Video Disc Player). Using Aspect 5 will...
... Comp Color Type is set VIDEO:4 AND VIDEO:5). 4. Selecting Aspect 5 allows the 1080i signals to appear on the remote control will be tuned to VIDEO: 4 or 5 input and have a component hooked up to the Y-PBPR input jacks to automatically change tint and color coordinate for High Vision Signal Y-PBPR from the OSD menu at the top and bottom of the TV screen. 46 The aspect button on the TV screen as DVD (Digital Video Disc Player). Using Aspect 5 will...

Owners Guide
Page 51
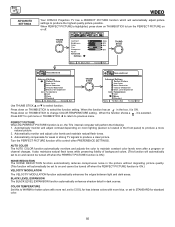
... Secret Code Menu Channel 3 Video Lock Quick Lock Front Panel Lock Set Time Lock Movie Ratings Lock TV Ratings Lock Canadian Ratings (ENG) Canadian Ratings (FRN) To Menu Bar To Quit Exit CUSTOMIZE SEL Press select to select secret code. SETUP CUSTOMIZE VIDEO SEL AUDIO THEATER Name the Channel Name the Inputs Set Favorite Ch. The code to SEL enter secret code Set Parental Locks - - - - Set Parental Locks Set Program Timer Video Input Sensor Closed Caption Menu Background Menu To Menu Bar To Quit Exit THUMB STICK CUSTOMIZE Use number buttons...
... Secret Code Menu Channel 3 Video Lock Quick Lock Front Panel Lock Set Time Lock Movie Ratings Lock TV Ratings Lock Canadian Ratings (ENG) Canadian Ratings (FRN) To Menu Bar To Quit Exit CUSTOMIZE SEL Press select to select secret code. SETUP CUSTOMIZE VIDEO SEL AUDIO THEATER Name the Channel Name the Inputs Set Favorite Ch. The code to SEL enter secret code Set Parental Locks - - - - Set Parental Locks Set Program Timer Video Input Sensor Closed Caption Menu Background Menu To Menu Bar To Quit Exit THUMB STICK CUSTOMIZE Use number buttons...

Owners Guide
Page 53
... play button. NOTES: 1. This feature is now reset and will turn your VCR, laserdisc player, or DVD player. CUSTOMIZE CUSTOMIZE VIDEO INPUT SENSOR Use this function to automatically turn the TV on your remote control is pressed. When REMOTE is selected, the TV will turn on THUMB STICK to change VIDEO INPUT SENSOR setting. Once the TV has been turned on . To do this function. SETUP CUSTOMIZE VIDEO SEL AUDIO THEATER Name The Channel Name The Inputs Set...
... play button. NOTES: 1. This feature is now reset and will turn your VCR, laserdisc player, or DVD player. CUSTOMIZE CUSTOMIZE VIDEO INPUT SENSOR Use this function to automatically turn the TV on your remote control is pressed. When REMOTE is selected, the TV will turn on THUMB STICK to change VIDEO INPUT SENSOR setting. Once the TV has been turned on . To do this function. SETUP CUSTOMIZE VIDEO SEL AUDIO THEATER Name The Channel Name The Inputs Set...
Owners Guide
Page 56
... blue, or set to on and cannot be turned off when the PERFECT PICTURE function is on and cannot be turned off when the PERFECT PICTURE function is ON. AUTO COLOR The AUTO COLOR function automatically monitors and adjusts the color to produce a clear picture. When the function has an in dark scenes. Automatically compensate for weak or strong TV signals to maintain constant color levels even after a program...
... blue, or set to on and cannot be turned off when the PERFECT PICTURE function is on and cannot be turned off when the PERFECT PICTURE function is ON. AUTO COLOR The AUTO COLOR function automatically monitors and adjusts the color to produce a clear picture. When the function has an in dark scenes. Automatically compensate for weak or strong TV signals to maintain constant color levels even after a program...


