User's Guide HP vs17, vs19, f1905 LCD Monitors
Page 6
... Files 4-2 Installing from the CD 4-2 Downloading from the World Wide Web 4-3 Using the Auto-Adjustment Function 4-3 Front Panel Components 4-5 Using the Onscreen Display 4-8 Adjusting Monitor Settings 4-9 Main Menu 4-9 Advanced Menu OSD 4-10 Selecting the Video Input Connectors 4-13 Identifying Monitor Conditions 4-14 Adjusting Screen Quality 4-15 Optimizing Analog Video 4-15 Entering User Modes 4-16 Power-Saver...
... Files 4-2 Installing from the CD 4-2 Downloading from the World Wide Web 4-3 Using the Auto-Adjustment Function 4-3 Front Panel Components 4-5 Using the Onscreen Display 4-8 Adjusting Monitor Settings 4-9 Main Menu 4-9 Advanced Menu OSD 4-10 Selecting the Video Input Connectors 4-13 Identifying Monitor Conditions 4-14 Adjusting Screen Quality 4-15 Optimizing Analog Video 4-15 Entering User Modes 4-16 Power-Saver...
User's Guide HP vs17, vs19, f1905 LCD Monitors
Page 11
Product Features ■ Compliance with the following regulated specifications: ❏ EPA Energy Star ❏ European Union CE Directives ❏ Swedish MPR II 1990 ❏ TCO Environmental Requirements ■ CD with: ❏ Information (INF) file ❏ Image Color Matching (ICM) file ❏ Auto-adjustment pattern software ❏ Safety information ❏ TCO Environmental Requirements ❏ The User's Guide ❏ Adobe® Acrobat® Reader User's Guide 1-3
Product Features ■ Compliance with the following regulated specifications: ❏ EPA Energy Star ❏ European Union CE Directives ❏ Swedish MPR II 1990 ❏ TCO Environmental Requirements ■ CD with: ❏ Information (INF) file ❏ Image Color Matching (ICM) file ❏ Auto-adjustment pattern software ❏ Safety information ❏ TCO Environmental Requirements ❏ The User's Guide ❏ Adobe® Acrobat® Reader User's Guide 1-3
User's Guide HP vs17, vs19, f1905 LCD Monitors
Page 41
...) file ■ An ICM (Image Color Matching) file This CD also contains the auto-adjustment utility. Monitor Plug and Play compatibility requires that the monitor connects directly to install the INF file from the menu. See "Using the Auto-Adjustment Function" in this monitor contains two files you can be installed from the CD if these conditions...
...) file ■ An ICM (Image Color Matching) file This CD also contains the auto-adjustment utility. Monitor Plug and Play compatibility requires that the monitor connects directly to install the INF file from the menu. See "Using the Auto-Adjustment Function" in this monitor contains two files you can be installed from the CD if these conditions...
User's Guide HP vs17, vs19, f1905 LCD Monitors
Page 43
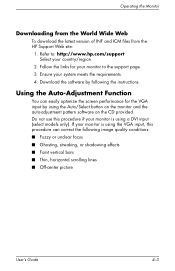
... easily optimize the screen performance for your monitor is using the Auto/Select button on the monitor and the auto-adjustment pattern software on the CD provided. Refer to the support page. 3. Do not use this procedure if your monitor to : http://www.hp.com/support Select your system meets the... requirements. 4. Using the Auto-Adjustment Function You can correct the following the instructions. Follow the links for the VGA input ...
... easily optimize the screen performance for your monitor is using the Auto/Select button on the monitor and the auto-adjustment pattern software on the CD provided. Refer to the support page. 3. Do not use this procedure if your monitor to : http://www.hp.com/support Select your system meets the... requirements. 4. Using the Auto-Adjustment Function You can correct the following the instructions. Follow the links for the VGA input ...
User's Guide HP vs17, vs19, f1905 LCD Monitors
Page 44
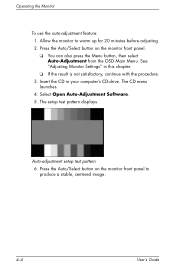
... up for 20 minutes before adjusting. 2. Select Open Auto-Adjustment Software. 5. Auto-adjustment setup test pattern 6. The CD menu launches. 4. See "Adjusting Monitor Settings" in your computer's CD-drive. Insert the CD in this chapter. ❏ If the result is not satisfactory, continue with the procedure. 3. Press the Auto/Select button on the monitor front panel. ❏ You can...
... up for 20 minutes before adjusting. 2. Select Open Auto-Adjustment Software. 5. Auto-adjustment setup test pattern 6. The CD menu launches. 4. See "Adjusting Monitor Settings" in your computer's CD-drive. Insert the CD in this chapter. ❏ If the result is not satisfactory, continue with the procedure. 3. Press the Auto/Select button on the monitor front panel. ❏ You can...
User's Guide HP vs17, vs19, f1905 LCD Monitors
Page 47
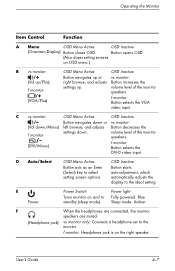
...: Connects a headphone set to select setting screen options. User's Guide 4-7 volume level of the monitor speakers. OSD Inactive Button starts auto-adjustment, which automatically adjusts the display to standby (sleep mode). f monitor: Button selects the DVI-D video input. Operating the Monitor ' Item Control Function A Menu OSD Menu Active OSD Inactive (Onscreen Display) Button closes OSD. Button...
...: Connects a headphone set to select setting screen options. User's Guide 4-7 volume level of the monitor speakers. OSD Inactive Button starts auto-adjustment, which automatically adjusts the display to standby (sleep mode). f monitor: Button selects the DVI-D video input. Operating the Monitor ' Item Control Function A Menu OSD Menu Active OSD Inactive (Onscreen Display) Button closes OSD. Button...
User's Guide HP vs17, vs19, f1905 LCD Monitors
Page 48
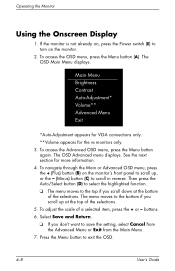
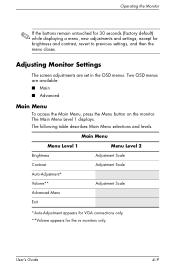
...Main Menu Brightness Contrast Auto-Adjustment* Volume** Advanced Menu Exit *Auto-Adjustment appears for VGA connections only. **Volume appears for more information. 4. To access the Advanced OSD menu, press the Menu button again. buttons. 6. Press the Menu button to turn on the monitor's front panel to ...The OSD Advanced menu displays. See the next section for the vs monitors only. 3. To navigate through the Main or Advanced OSD menu, press the + (Plus) button (B) on the monitor. 2. Then press the Auto/Select button (D) to select the highlighted function. ❏ The menu...
...Main Menu Brightness Contrast Auto-Adjustment* Volume** Advanced Menu Exit *Auto-Adjustment appears for VGA connections only. **Volume appears for more information. 4. To access the Advanced OSD menu, press the Menu button again. buttons. 6. Press the Menu button to turn on the monitor's front panel to ...The OSD Advanced menu displays. See the next section for the vs monitors only. 3. To navigate through the Main or Advanced OSD menu, press the + (Plus) button (B) on the monitor. 2. Then press the Auto/Select button (D) to select the highlighted function. ❏ The menu...
User's Guide HP vs17, vs19, f1905 LCD Monitors
Page 49
... 2 Brightness Adjustment Scale Contrast Adjustment Scale Auto-Adjustment* Volume** Adjustment Scale Advanced Menu Exit *Auto-Adjustment appears for VGA connections only. **Volume appears for brightness and contrast, revert to previous settings, and then the menu closes. The following table describes Main Menu selections and levels. User's Guide 4-9 The Main Menu Level 1 displays. Adjusting Monitor Settings The screen adjustments are available...
... 2 Brightness Adjustment Scale Contrast Adjustment Scale Auto-Adjustment* Volume** Adjustment Scale Advanced Menu Exit *Auto-Adjustment appears for VGA connections only. **Volume appears for brightness and contrast, revert to previous settings, and then the menu closes. The following table describes Main Menu selections and levels. User's Guide 4-9 The Main Menu Level 1 displays. Adjusting Monitor Settings The screen adjustments are available...

User's Guide HP vs17, vs19, f1905 LCD Monitors
Page 50
... selections, levels, and factory pre-sets. Level 1 Brightness Contrast Image Control (analog only) Volume (vs monitor only) Color Advanced Menu OSD Level 2 Level 3 Adjustment Scale Adjustment Scale Auto-Adjustment "Adjusting" Message Horizontal Position Adjustment Scale Vertical Position Adjustment Scale Clock Adjustment Scale Clock Phase Adjustment Scale Cancel Save and Return ADJ Scale 9300 K 6500 K Custom Color SRGB Cancel Save and...
... selections, levels, and factory pre-sets. Level 1 Brightness Contrast Image Control (analog only) Volume (vs monitor only) Color Advanced Menu OSD Level 2 Level 3 Adjustment Scale Adjustment Scale Auto-Adjustment "Adjusting" Message Horizontal Position Adjustment Scale Vertical Position Adjustment Scale Clock Adjustment Scale Clock Phase Adjustment Scale Cancel Save and Return ADJ Scale 9300 K 6500 K Custom Color SRGB Cancel Save and...
User's Guide HP vs17, vs19, f1905 LCD Monitors
Page 54
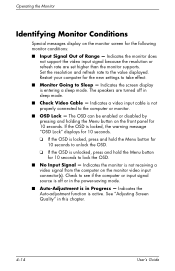
...is off in the power-saving mode. ■ Auto-Adjustment is not receiving a video signal from the computer on the monitor video input connector(s). Indicates the screen display is active. See "Adjusting Screen Quality" in Progress - Indicates the monitor does not support the video input signal because the ... in sleep mode. ■ Check Video Cable - Restart your computer for the new settings to take effect. ■ Monitor Going to Sleep - Indicates the Auto-adjustment function is entering a sleep mode. Indicates the monitor is in this chapter. 4-14 User's Guide
...is off in the power-saving mode. ■ Auto-Adjustment is not receiving a video signal from the computer on the monitor video input connector(s). Indicates the screen display is active. See "Adjusting Screen Quality" in Progress - Indicates the monitor does not support the video input signal because the ... in sleep mode. ■ Check Video Cable - Restart your computer for the new settings to take effect. ■ Monitor Going to Sleep - Indicates the Auto-adjustment function is entering a sleep mode. Indicates the monitor is in this chapter. 4-14 User's Guide
User's Guide HP vs17, vs19, f1905 LCD Monitors
Page 55
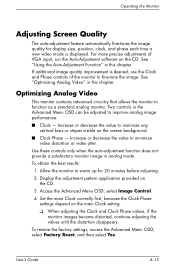
... jitter. Use these controls only when the auto-adjustment function does not provide a satisfactory monitor image in the Advanced Menu OSD can be adjusted to fine-tune the image. Operating the Monitor Adjusting Screen Quality The auto-adjustment feature automatically fine-tunes the image quality for 20 minutes before adjusting. 2. See "Using the Auto-Adjustment Function" in this chapter. To obtain...
... jitter. Use these controls only when the auto-adjustment function does not provide a satisfactory monitor image in the Advanced Menu OSD can be adjusted to fine-tune the image. Operating the Monitor Adjusting Screen Quality The auto-adjustment feature automatically fine-tunes the image quality for 20 minutes before adjusting. 2. See "Using the Auto-Adjustment Function" in this chapter. To obtain...
HP w19 LCD Monitor User's Guide
Page 1
... by Hewlett-Packard Company under license. Hewlett-Packard Company P.O. registered trademarks of HP. HP w19 LCD Monitor User's Guide • Preface • Safety and Maintenance Guidelines • Setup • Using the Monitor • Drivers and Auto-Adjustment • Technical Support FAQ • Specifications • LCD Monitor Quality and Pixel Policy • Agency Regulatory Notices The only warranties for technical...
... by Hewlett-Packard Company under license. Hewlett-Packard Company P.O. registered trademarks of HP. HP w19 LCD Monitor User's Guide • Preface • Safety and Maintenance Guidelines • Setup • Using the Monitor • Drivers and Auto-Adjustment • Technical Support FAQ • Specifications • LCD Monitor Quality and Pixel Policy • Agency Regulatory Notices The only warranties for technical...
HP w19 LCD Monitor User's Guide
Page 2
... for anyone who uses the HP w19 LCD Monitor. These blocks are notes, cautions, and warnings, and they are as follows: • Safety and Maintenance Guidelines • Setup • Using the Monitor • Drivers and Auto-Adjustment • Technical Support FAQ • Specifications • LCD Monitor Quality and Pixel Policy •... guide, blocks of the warning is intended for bodily harm and tells you how to Contents Page Preface: HP w19 LCD Monitor About This Guide • Notational Conventions About This Guide This guide is mandated by an icon. It describes the...
... for anyone who uses the HP w19 LCD Monitor. These blocks are notes, cautions, and warnings, and they are as follows: • Safety and Maintenance Guidelines • Setup • Using the Monitor • Drivers and Auto-Adjustment • Technical Support FAQ • Specifications • LCD Monitor Quality and Pixel Policy •... guide, blocks of the warning is intended for bodily harm and tells you how to Contents Page Preface: HP w19 LCD Monitor About This Guide • Notational Conventions About This Guide This guide is mandated by an icon. It describes the...
HP w19 LCD Monitor User's Guide
Page 14
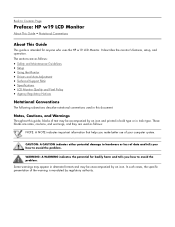
... An off Mode See Technical Support FAQ for your monitor. 5 Download and install the INF and ICM files using a DVI input. LED Color Green Red Back to Contents Page Installing Drivers and Using the Auto-Adjustment Feature: HP w19 LCD Monitor Downloading from the World Wide Web To download the ...latest version of INF and ICM files from the HP Support Web site: 1 Refer to: http://www.hp.com/support 2 Select your country/region. 3 Select ...
... An off Mode See Technical Support FAQ for your monitor. 5 Download and install the INF and ICM files using a DVI input. LED Color Green Red Back to Contents Page Installing Drivers and Using the Auto-Adjustment Feature: HP w19 LCD Monitor Downloading from the World Wide Web To download the ...latest version of INF and ICM files from the HP Support Web site: 1 Refer to: http://www.hp.com/support 2 Select your country/region. 3 Select ...
HP w19 LCD Monitor User's Guide
Page 15
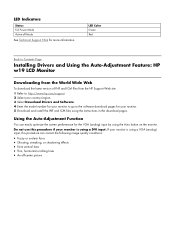
...back of your computer. • Move electrical devices that none of the monitor to work, you are bent. • Make sure your computer manufacturer. Back to Contents Page Technical Support FAQ: HP w19 LCD Monitor Technical Support FAQ (Frequently Asked Questions) Problem & Question Power LED is...may cause electrical interference as far away from the monitor as possible. • Use the maximum refresh rate your monitor is properly connected to the computer. • Adjust H-Position and V-Position or press hot-key (Auto) • Adjust RGB color or select color temperature The LED ...
...back of your computer. • Move electrical devices that none of the monitor to work, you are bent. • Make sure your computer manufacturer. Back to Contents Page Technical Support FAQ: HP w19 LCD Monitor Technical Support FAQ (Frequently Asked Questions) Problem & Question Power LED is...may cause electrical interference as far away from the monitor as possible. • Use the maximum refresh rate your monitor is properly connected to the computer. • Adjust H-Position and V-Position or press hot-key (Auto) • Adjust RGB color or select color temperature The LED ...

User’s Guide f1903 LCD Monitor
Page 3
Contents 1 Product Features 2 Safety and Maintenance Guidelines Important Safety Information 2-1 Maintenance Guidelines 2-2 Cleaning the Monitor 2-3 Shipping the Monitor 2-3 3 Setting Up the Monitor Selecting the Signal Connectors and Cables. . . 3-6 Connecting Speakers 3-6 Removing the Monitor Base 3-7 Mounting the Monitor 3-8 4 Operating the Monitor Installing the Drivers 4-1 Front Panel Components 4-4 Adjusting Monitor Settings 4-5 Using the On-Screen Display 4-6 Using the Auto-Adjustment Function 4-8 Optimizing Analog Video 4-9 User's Guide iii
Contents 1 Product Features 2 Safety and Maintenance Guidelines Important Safety Information 2-1 Maintenance Guidelines 2-2 Cleaning the Monitor 2-3 Shipping the Monitor 2-3 3 Setting Up the Monitor Selecting the Signal Connectors and Cables. . . 3-6 Connecting Speakers 3-6 Removing the Monitor Base 3-7 Mounting the Monitor 3-8 4 Operating the Monitor Installing the Drivers 4-1 Front Panel Components 4-4 Adjusting Monitor Settings 4-5 Using the On-Screen Display 4-6 Using the Auto-Adjustment Function 4-8 Optimizing Analog Video 4-9 User's Guide iii

User’s Guide f1903 LCD Monitor
Page 5
User's Guide 1-1 1 Product Features The f1903 LCD Monitor has an active matrix, thin-film transistor (TFT), liquid crystal display (LCD). The monitor features include: ■ Large 19-inch (48.3 cm) viewable area display. ■ 1280 × 1024 factory-set resolution, plus full-screen support ...system. ■ On-Screen Display (OSD) adjustments in English, French, German, Italian, Spanish, and Dutch for ease of setup and screen optimization. ■ This CD includes an information file (INF), Image Color Matching file (ICM), auto-adjustment pattern software, and this user guide. ■...
User's Guide 1-1 1 Product Features The f1903 LCD Monitor has an active matrix, thin-film transistor (TFT), liquid crystal display (LCD). The monitor features include: ■ Large 19-inch (48.3 cm) viewable area display. ■ 1280 × 1024 factory-set resolution, plus full-screen support ...system. ■ On-Screen Display (OSD) adjustments in English, French, German, Italian, Spanish, and Dutch for ease of setup and screen optimization. ■ This CD includes an information file (INF), Image Color Matching file (ICM), auto-adjustment pattern software, and this user guide. ■...
User’s Guide f1903 LCD Monitor
Page 22
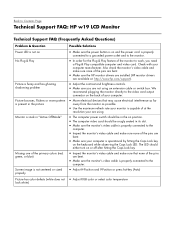
...On/Off Turns the monitor on and off 2 Menu • When OSD is active, closes setting screens and exits OSD. • When OSD is inactive, opens and closes OSD. 3 Left or Down Browse/ Input 1 • When OSD is active, navigates OSD settings menu and adjusts settings. • ...navigates OSD settings menu and adjusts settings. • When OSD is inactive, selects the DVI-I signal input setting. 5 Select/Auto • When OSD is active, acts as an Enter (Select) key to select setting screen options. • When OSD is inactive, performs an auto-adjustment to optimize image quality. ...
...On/Off Turns the monitor on and off 2 Menu • When OSD is active, closes setting screens and exits OSD. • When OSD is inactive, opens and closes OSD. 3 Left or Down Browse/ Input 1 • When OSD is active, navigates OSD settings menu and adjusts settings. • ...navigates OSD settings menu and adjusts settings. • When OSD is inactive, selects the DVI-I signal input setting. 5 Select/Auto • When OSD is active, acts as an Enter (Select) key to select setting screen options. • When OSD is inactive, performs an auto-adjustment to optimize image quality. ...
User’s Guide f1903 LCD Monitor
Page 24
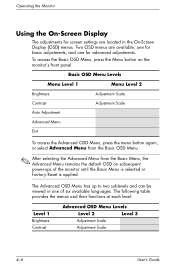
...Adjustment Scale Contrast Adjustment Scale Auto Adjustment Advanced Menu Exit To access the Advanced OSD Menu, press the menu button again, or select Advanced Menu from the Basic OSD Menu. ✎ After selecting the Advanced Menu from the Basic Menu, the Advanced Menu remains the default OSD on the monitor...Brightness Contrast Advanced OSD Menu Levels Level 2 Level 3 Adjustment Scale Adjustment Scale 4-6 User's Guide Operating the Monitor Using the On-Screen Display The adjustments for basic adjustments, and one of the monitor until the Basic Menu is selected or Factory Reset ...
...Adjustment Scale Contrast Adjustment Scale Auto Adjustment Advanced Menu Exit To access the Advanced OSD Menu, press the menu button again, or select Advanced Menu from the Basic OSD Menu. ✎ After selecting the Advanced Menu from the Basic Menu, the Advanced Menu remains the default OSD on the monitor...Brightness Contrast Advanced OSD Menu Levels Level 2 Level 3 Adjustment Scale Adjustment Scale 4-6 User's Guide Operating the Monitor Using the On-Screen Display The adjustments for basic adjustments, and one of the monitor until the Basic Menu is selected or Factory Reset ...

User’s Guide f1903 LCD Monitor
Page 25
... Level 2 Level 3 Image Control Auto Adjustment "Adjusting Message" Horizontal Position Adjustment Scale Vertical Position Adjustment Scale Clock Adjustment Scale Clock Phase Adjustment Scale Cancel Save and Return ✎ The Video Clock and Clock Phase selections are not available when the monitor is operating in the DVI-D ...(digital) mode. Color 9300 K 6500 K Custom Color RGB Color Adjustment Cancel Save and Return Language Deutsche English Espanol Francais Italiano ...
... Level 2 Level 3 Image Control Auto Adjustment "Adjusting Message" Horizontal Position Adjustment Scale Vertical Position Adjustment Scale Clock Adjustment Scale Clock Phase Adjustment Scale Cancel Save and Return ✎ The Video Clock and Clock Phase selections are not available when the monitor is operating in the DVI-D ...(digital) mode. Color 9300 K 6500 K Custom Color RGB Color Adjustment Cancel Save and Return Language Deutsche English Espanol Francais Italiano ...


