
User's Guide HP vs17, vs19, f1905 LCD Monitors
Page 50
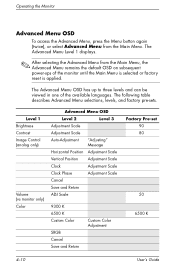
... selecting the Advanced Menu from the Main Menu. The following table describes Advanced Menu selections, levels, and factory pre-sets. Level 1 Brightness Contrast Image Control (analog only) Volume (vs monitor only) Color Advanced Menu OSD Level 2 Level 3 Adjustment Scale Adjustment Scale Auto-Adjustment "Adjusting" Message ...Color SRGB Cancel Save and Return Custom Color Adjustment Factory Pre-set 90 80 50 6500 K 4-10 User's Guide The Advanced Menu OSD has up to three levels and can be viewed in one of the monitor until the Main Menu is selected or factory reset is applied.
... selecting the Advanced Menu from the Main Menu. The following table describes Advanced Menu selections, levels, and factory pre-sets. Level 1 Brightness Contrast Image Control (analog only) Volume (vs monitor only) Color Advanced Menu OSD Level 2 Level 3 Adjustment Scale Adjustment Scale Auto-Adjustment "Adjusting" Message ...Color SRGB Cancel Save and Return Custom Color Adjustment Factory Pre-set 90 80 50 6500 K 4-10 User's Guide The Advanced Menu OSD has up to three levels and can be viewed in one of the monitor until the Main Menu is selected or factory reset is applied.
User's Guide HP vs17, vs19, f1905 LCD Monitors
Page 52
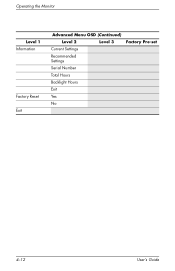
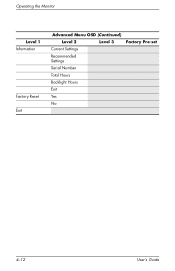
Operating the Monitor Level 1 Information Factory Reset Exit Advanced Menu OSD (Continued) Level 2 Level 3 Current Settings Recommended Settings Serial Number Total Hours Backlight Hours Exit Yes No Factory Pre-set 4-12 User's Guide
Operating the Monitor Level 1 Information Factory Reset Exit Advanced Menu OSD (Continued) Level 2 Level 3 Current Settings Recommended Settings Serial Number Total Hours Backlight Hours Exit Yes No Factory Pre-set 4-12 User's Guide
User's Guide HP vs17, vs19, f1905 LCD Monitors
Page 55
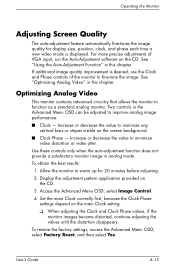
...jitter. Allow the monitor to improve analog image performance: ■ Clock - Set the main Clock correctly first, because the Clock Phase settings depend on the CD. 3. Two controls in analog mode. To restore the factory settings, access the Advanced Menu OSD, select Factory Reset, and then select... Yes. Increase or decrease the value to fine-tune the image. For more precise adjustments of the monitor to minimize any vertical bars or stripes visible on...
...jitter. Allow the monitor to improve analog image performance: ■ Clock - Set the main Clock correctly first, because the Clock Phase settings depend on the CD. 3. Two controls in analog mode. To restore the factory settings, access the Advanced Menu OSD, select Factory Reset, and then select... Yes. Increase or decrease the value to fine-tune the image. For more precise adjustments of the monitor to minimize any vertical bars or stripes visible on...
User’s Guide f1903 LCD Monitor
Page 24
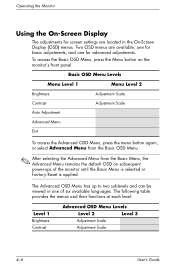
one for basic adjustments, and one of the monitor until the Basic Menu is selected or Factory Reset is applied. To access the Basic OSD Menu, press the Menu button on subsequent power-ups of six available languages. Two OSD menus are located ... Scale 4-6 User's Guide The Advanced OSD Menu has up to two sublevels and can be viewed in the On-Screen Display (OSD) menus. Operating the Monitor Using the On-Screen Display The adjustments for advanced adjustments. Basic OSD Menu Levels Menu Level 1 Menu Level 2 Brightness Adjustment Scale Contrast Adjustment Scale Auto...
one for basic adjustments, and one of the monitor until the Basic Menu is selected or Factory Reset is applied. To access the Basic OSD Menu, press the Menu button on subsequent power-ups of six available languages. Two OSD menus are located ... Scale 4-6 User's Guide The Advanced OSD Menu has up to two sublevels and can be viewed in the On-Screen Display (OSD) menus. Operating the Monitor Using the On-Screen Display The adjustments for advanced adjustments. Basic OSD Menu Levels Menu Level 1 Menu Level 2 Brightness Adjustment Scale Contrast Adjustment Scale Auto...
User’s Guide f1903 LCD Monitor
Page 26
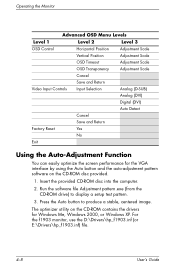
...Monitor Advanced OSD Menu Levels Level 1 Level 2 Level 3 OSD Control Horizontal Position Adjustment Scale Vertical Position Adjustment Scale OSD Timeout Adjustment Scale OSD Transparency Adjustment Scale Cancel Save and Return Video Input Controls Input Selection Analog (D-SUB) Analog (DVI) Digital (DVI) Auto Detect Cancel Save and Return Factory Reset... 2000, or Windows XP. Press the Auto button to display a setup test pattern. 3. For the f1903 monitor, use the D:\Drivers\hp_f1903.inf (or E:\Drivers\hp_f1903.inf) file. 4-8 User's Guide The optimizer utility ...
...Monitor Advanced OSD Menu Levels Level 1 Level 2 Level 3 OSD Control Horizontal Position Adjustment Scale Vertical Position Adjustment Scale OSD Timeout Adjustment Scale OSD Transparency Adjustment Scale Cancel Save and Return Video Input Controls Input Selection Analog (D-SUB) Analog (DVI) Digital (DVI) Auto Detect Cancel Save and Return Factory Reset... 2000, or Windows XP. Press the Auto button to display a setup test pattern. 3. For the f1903 monitor, use the D:\Drivers\hp_f1903.inf (or E:\Drivers\hp_f1903.inf) file. 4-8 User's Guide The optimizer utility ...
User’s Guide f1903 LCD Monitor
Page 27
...value to improve image performance: Clock and Clock Phase. Increase or decrease the value to function as a standard monitor. To restore the factory settings, select Yes from the Factory Reset menu in the on-screen display can be set correctly since the Clock Phase settings are dependent on the ...CD-ROM. ✎ When adjusting the Clock and Clock Phase values, if the monitor images become distorted, continue adjusting the values until the distortion ...
...value to improve image performance: Clock and Clock Phase. Increase or decrease the value to function as a standard monitor. To restore the factory settings, select Yes from the Factory Reset menu in the on-screen display can be set correctly since the Clock Phase settings are dependent on the ...CD-ROM. ✎ When adjusting the Clock and Clock Phase values, if the monitor images become distorted, continue adjusting the values until the distortion ...
User's Guide - HP vs15, vs17, vs19, f1705, f1905 LCD Monitor
Page 50
... Scale Cancel Save and Return ADJ Scale 9300 K 6500 K Custom Color SRGB Cancel Save and Return Custom Color Adjustment Factory Pre-set 90 80 50 6500 K 4-10 User's Guide Operating the Monitor Advanced Menu OSD To access the Advanced Menu, press the Menu button again (twice), or select Advanced Menu from the... selecting the Advanced Menu from the Main Menu. The Advanced Menu OSD has up to three levels and can be viewed in one of the monitor until the Main Menu is selected or factory reset is applied.
... Scale Cancel Save and Return ADJ Scale 9300 K 6500 K Custom Color SRGB Cancel Save and Return Custom Color Adjustment Factory Pre-set 90 80 50 6500 K 4-10 User's Guide Operating the Monitor Advanced Menu OSD To access the Advanced Menu, press the Menu button again (twice), or select Advanced Menu from the... selecting the Advanced Menu from the Main Menu. The Advanced Menu OSD has up to three levels and can be viewed in one of the monitor until the Main Menu is selected or factory reset is applied.
User's Guide - HP vs15, vs17, vs19, f1705, f1905 LCD Monitor
Page 52
Operating the Monitor Level 1 Information Factory Reset Exit Advanced Menu OSD (Continued) Level 2 Level 3 Current Settings Recommended Settings Serial Number Total Hours Backlight Hours Exit Yes No Factory Pre-set 4-12 User's Guide
Operating the Monitor Level 1 Information Factory Reset Exit Advanced Menu OSD (Continued) Level 2 Level 3 Current Settings Recommended Settings Serial Number Total Hours Backlight Hours Exit Yes No Factory Pre-set 4-12 User's Guide

User's Guide - HP vs15, vs17, vs19, f1705, f1905 LCD Monitor
Page 55
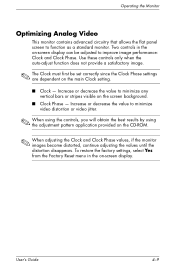
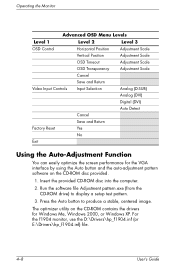
... when the auto-adjustment function does not provide a satisfactory monitor image in the Advanced Menu OSD can be adjusted to fine-tune the image. To restore the factory settings, access the Advanced Menu OSD, select Factory Reset, and then select Yes. Increase or decrease the value to... visible on the CD. Set the main Clock correctly first, because the Clock Phase settings depend on the CD. 3. Operating the Monitor Adjusting Screen Quality The auto-adjustment feature automatically fine-tunes the image quality for 20 minutes before adjusting. 2. See "Optimizing Analog Video...
... when the auto-adjustment function does not provide a satisfactory monitor image in the Advanced Menu OSD can be adjusted to fine-tune the image. To restore the factory settings, access the Advanced Menu OSD, select Factory Reset, and then select Yes. Increase or decrease the value to... visible on the CD. Set the main Clock correctly first, because the Clock Phase settings depend on the CD. 3. Operating the Monitor Adjusting Screen Quality The auto-adjustment feature automatically fine-tunes the image quality for 20 minutes before adjusting. 2. See "Optimizing Analog Video...

User's Guide f1904 LCD Monitor
Page 24
... After selecting the Advanced Menu from the Basic Menu, the Advanced Menu remains the default OSD on the monitor's front panel. The following table provides the menus and their functions at each level: Level 1 Brightness ...Contrast Advanced OSD Menu Levels Level 2 Level 3 Adjustment Scale Adjustment Scale 4-6 User's Guide Operating the Monitor Using the On-Screen Display The adjustments for screen settings are available; The Advanced OSD Menu has up ...in one for basic adjustments, and one of the monitor until the Basic Menu is selected or Factory Reset is applied.
... After selecting the Advanced Menu from the Basic Menu, the Advanced Menu remains the default OSD on the monitor's front panel. The following table provides the menus and their functions at each level: Level 1 Brightness ...Contrast Advanced OSD Menu Levels Level 2 Level 3 Adjustment Scale Adjustment Scale 4-6 User's Guide Operating the Monitor Using the On-Screen Display The adjustments for screen settings are available; The Advanced OSD Menu has up ...in one for basic adjustments, and one of the monitor until the Basic Menu is selected or Factory Reset is applied.
User's Guide f1904 LCD Monitor
Page 26
...CD-ROM disc into the computer. 2. The optimizer utility on the CD-ROM disc provided. 1. For the f1904 monitor, use the D:\Drivers\hp_f1904.inf (or E:\Drivers\hp_f1904.inf) file. 4-8 User's Guide Run the software file ...Monitor Advanced OSD Menu Levels Level 1 Level 2 Level 3 OSD Control Horizontal Position Adjustment Scale Vertical Position Adjustment Scale OSD Timeout Adjustment Scale OSD Transparency Adjustment Scale Cancel Save and Return Video Input Controls Input Selection Analog (D-SUB) Analog (DVI) Digital (DVI) Auto Detect Cancel Save and Return Factory Reset...
...CD-ROM disc into the computer. 2. The optimizer utility on the CD-ROM disc provided. 1. For the f1904 monitor, use the D:\Drivers\hp_f1904.inf (or E:\Drivers\hp_f1904.inf) file. 4-8 User's Guide Run the software file ...Monitor Advanced OSD Menu Levels Level 1 Level 2 Level 3 OSD Control Horizontal Position Adjustment Scale Vertical Position Adjustment Scale OSD Timeout Adjustment Scale OSD Transparency Adjustment Scale Cancel Save and Return Video Input Controls Input Selection Analog (D-SUB) Analog (DVI) Digital (DVI) Auto Detect Cancel Save and Return Factory Reset...

User's Guide f1904 LCD Monitor
Page 27
...settings are dependent on the screen background. ■ Clock Phase - To restore the factory settings, select Yes from the Factory Reset menu in the on -screen display. Operating the Monitor Optimizing Analog Video This monitor contains advanced circuitry that allows the flat panel screen to minimize video distortion or video... pattern application provided on the CD-ROM. ✎ When adjusting the Clock and Clock Phase values, if the monitor images become distorted, continue adjusting the values until the distortion disappears. Increase or decrease the value to function as a standard...
...settings are dependent on the screen background. ■ Clock Phase - To restore the factory settings, select Yes from the Factory Reset menu in the on -screen display. Operating the Monitor Optimizing Analog Video This monitor contains advanced circuitry that allows the flat panel screen to minimize video distortion or video... pattern application provided on the CD-ROM. ✎ When adjusting the Clock and Clock Phase values, if the monitor images become distorted, continue adjusting the values until the distortion disappears. Increase or decrease the value to function as a standard...


