User's Guide HP vs17, vs19, f1905 LCD Monitors
Page 6
... 4-2 Downloading from the World Wide Web 4-3 Using the Auto-Adjustment Function 4-3 Front Panel Components 4-5 Using the Onscreen Display 4-8 Adjusting Monitor Settings 4-9 Main Menu 4-9 Advanced Menu OSD 4-10 Selecting the Video Input Connectors 4-13 Identifying Monitor Conditions 4-14 Adjusting Screen Quality 4-15 Optimizing Analog Video 4-15 Entering User Modes 4-16 Power-Saver Feature 4-17 A Troubleshooting...
... 4-2 Downloading from the World Wide Web 4-3 Using the Auto-Adjustment Function 4-3 Front Panel Components 4-5 Using the Onscreen Display 4-8 Adjusting Monitor Settings 4-9 Main Menu 4-9 Advanced Menu OSD 4-10 Selecting the Video Input Connectors 4-13 Identifying Monitor Conditions 4-14 Adjusting Screen Quality 4-15 Optimizing Analog Video 4-15 Entering User Modes 4-16 Power-Saver Feature 4-17 A Troubleshooting...
User's Guide HP vs17, vs19, f1905 LCD Monitors
Page 41
... card is Microsoft® Windows® Plug and Play compatible, and the monitor will work through separate BNC-type connectors or through distribution buffers or boxes. The INF file enables the computer to install the INF file from the menu. Plug and Play does not work correctly without installing the INF file...
... card is Microsoft® Windows® Plug and Play compatible, and the monitor will work through separate BNC-type connectors or through distribution buffers or boxes. The INF file enables the computer to install the INF file from the menu. Plug and Play does not work correctly without installing the INF file...
User's Guide HP vs17, vs19, f1905 LCD Monitors
Page 42
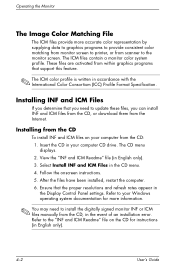
... CD: 1. Select Install INF and ICM Files in English only). 3. The ICM files contain a monitor color system profile. Refer to your computer CD drive. Follow the onscreen instructions. 5. The CD menu displays. 2. Refer to install the digitally signed monitor INF or ICM files manually from the CD To install INF and ICM files...
... CD: 1. Select Install INF and ICM Files in English only). 3. The ICM files contain a monitor color system profile. Refer to your computer CD drive. Follow the onscreen instructions. 5. The CD menu displays. 2. Refer to install the digitally signed monitor INF or ICM files manually from the CD To install INF and ICM files...
User's Guide HP vs17, vs19, f1905 LCD Monitors
Page 44
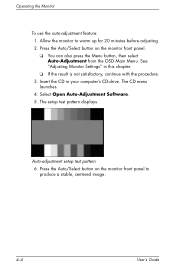
..." in your computer's CD-drive. The CD menu launches. 4. Insert the CD in this chapter. ❏ If the result is not satisfactory, continue with the procedure. 3. Press the Auto/Select button on the monitor front panel to warm up for 20 minutes before adjusting. 2. ... Software. 5. Operating the Monitor To use the auto-adjustment feature: 1. Auto-adjustment setup test pattern 6. Allow the monitor to produce a stable, centered image. 4-4 User's Guide Press the Auto/Select button on the monitor front panel. ❏ You can also press the Menu button, then select Auto-...
..." in your computer's CD-drive. The CD menu launches. 4. Insert the CD in this chapter. ❏ If the result is not satisfactory, continue with the procedure. 3. Press the Auto/Select button on the monitor front panel to warm up for 20 minutes before adjusting. 2. ... Software. 5. Operating the Monitor To use the auto-adjustment feature: 1. Auto-adjustment setup test pattern 6. Allow the monitor to produce a stable, centered image. 4-4 User's Guide Press the Auto/Select button on the monitor front panel. ❏ You can also press the Menu button, then select Auto-...
User's Guide HP vs17, vs19, f1905 LCD Monitors
Page 47
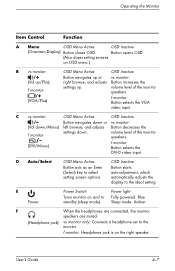
... selects the VGA video input. OSD Inactive Button starts auto-adjustment, which automatically adjusts the display to standby (sleep mode). f monitor: Headphone jack is on OSD menu.) B vs monitor: /+ (Vol up/Plus) f monitor: /+ (VGA/Plus) OSD Menu Active Button navigates up or right browse, and adjusts settings up. User's Guide 4-7 Button navigates down or vs...
... selects the VGA video input. OSD Inactive Button starts auto-adjustment, which automatically adjusts the display to standby (sleep mode). f monitor: Headphone jack is on OSD menu.) B vs monitor: /+ (Vol up/Plus) f monitor: /+ (VGA/Plus) OSD Menu Active Button navigates up or right browse, and adjusts settings up. User's Guide 4-7 Button navigates down or vs...
User's Guide HP vs17, vs19, f1905 LCD Monitors
Page 48
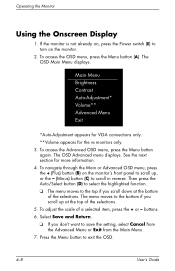
...and Return. ❏ If you don't want to turn on the monitor's front panel to scroll up at the bottom of the selections. To access the OSD menu, press the Menu button (A). The OSD Advanced menu displays. The menu moves to the top if you scroll up , or the - (Minus...scale of the selections. 5. The OSD Main Menu displays. To navigate through the Main or Advanced OSD menu, press the + (Plus) button (B) on the monitor. 2. Press the Menu button to scroll in reverse. Main Menu Brightness Contrast Auto-Adjustment* Volume** Advanced Menu Exit *Auto-Adjustment appears for VGA connections ...
...and Return. ❏ If you don't want to turn on the monitor's front panel to scroll up at the bottom of the selections. To access the OSD menu, press the Menu button (A). The OSD Advanced menu displays. The menu moves to the top if you scroll up , or the - (Minus...scale of the selections. 5. The OSD Main Menu displays. To navigate through the Main or Advanced OSD menu, press the + (Plus) button (B) on the monitor. 2. Press the Menu button to scroll in reverse. Main Menu Brightness Contrast Auto-Adjustment* Volume** Advanced Menu Exit *Auto-Adjustment appears for VGA connections ...
User's Guide HP vs17, vs19, f1905 LCD Monitors
Page 49
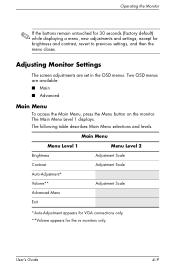
...seconds (factory default) while displaying a menu, new adjustments and settings, except for the vs monitors only. Main Menu Menu Level 1 Menu Level 2 Brightness Adjustment Scale Contrast Adjustment Scale Auto-Adjustment* Volume** Adjustment Scale Advanced Menu Exit *Auto-Adjustment appears for VGA ... then the menu closes. Adjusting Monitor Settings The screen adjustments are available: ■ Main ■ Advanced Main Menu To access the Main Menu, press the Menu button on the monitor. The following table describes Main Menu selections and levels. The Main Menu Level 1 ...
...seconds (factory default) while displaying a menu, new adjustments and settings, except for the vs monitors only. Main Menu Menu Level 1 Menu Level 2 Brightness Adjustment Scale Contrast Adjustment Scale Auto-Adjustment* Volume** Adjustment Scale Advanced Menu Exit *Auto-Adjustment appears for VGA ... then the menu closes. Adjusting Monitor Settings The screen adjustments are available: ■ Main ■ Advanced Main Menu To access the Main Menu, press the Menu button on the monitor. The following table describes Main Menu selections and levels. The Main Menu Level 1 ...

User's Guide HP vs17, vs19, f1905 LCD Monitors
Page 50
...Menu from the Main Menu. Operating the Monitor Advanced Menu OSD To access the Advanced Menu, press the Menu button again (twice), or select Advanced Menu from the Main Menu, the Advanced Menu remains the default OSD on subsequent power-ups of the available languages. The following table describes Advanced Menu... selections, levels, and factory pre-sets. Level 1 Brightness Contrast Image Control (analog only) Volume (vs monitor only) Color Advanced Menu OSD Level 2 Level 3 Adjustment Scale Adjustment Scale Auto...
...Menu from the Main Menu. Operating the Monitor Advanced Menu OSD To access the Advanced Menu, press the Menu button again (twice), or select Advanced Menu from the Main Menu, the Advanced Menu remains the default OSD on subsequent power-ups of the available languages. The following table describes Advanced Menu... selections, levels, and factory pre-sets. Level 1 Brightness Contrast Image Control (analog only) Volume (vs monitor only) Color Advanced Menu OSD Level 2 Level 3 Adjustment Scale Adjustment Scale Auto...
User's Guide HP vs17, vs19, f1905 LCD Monitors
Page 51
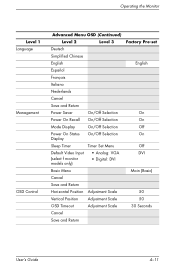
Operating the Monitor Level 1 Language Management OSD Control Advanced Menu OSD (Continued) Level 2 Level 3 Deutsch Simplified Chinese English Español Français Italiano Nederlands Cancel Save and Return Power Saver ... Selection Mode Display On/Off Selection Power On Status Display On/Off Selection Sleep Timer Timer Set Menu Default Video Input (select f monitor models only) • Analog: VGA • Digital: DVI Basic Menu Cancel Save and Return Horizontal Position Adjustment Scale Vertical Position Adjustment Scale OSD Timeout Adjustment Scale Cancel ...
Operating the Monitor Level 1 Language Management OSD Control Advanced Menu OSD (Continued) Level 2 Level 3 Deutsch Simplified Chinese English Español Français Italiano Nederlands Cancel Save and Return Power Saver ... Selection Mode Display On/Off Selection Power On Status Display On/Off Selection Sleep Timer Timer Set Menu Default Video Input (select f monitor models only) • Analog: VGA • Digital: DVI Basic Menu Cancel Save and Return Horizontal Position Adjustment Scale Vertical Position Adjustment Scale OSD Timeout Adjustment Scale Cancel ...
User's Guide HP vs17, vs19, f1905 LCD Monitors
Page 52
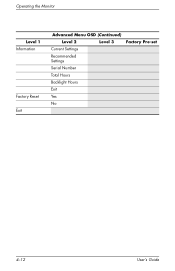
Operating the Monitor Level 1 Information Factory Reset Exit Advanced Menu OSD (Continued) Level 2 Level 3 Current Settings Recommended Settings Serial Number Total Hours Backlight Hours Exit Yes No Factory Pre-set 4-12 User's Guide
Operating the Monitor Level 1 Information Factory Reset Exit Advanced Menu OSD (Continued) Level 2 Level 3 Current Settings Recommended Settings Serial Number Total Hours Backlight Hours Exit Yes No Factory Pre-set 4-12 User's Guide
User's Guide HP vs17, vs19, f1905 LCD Monitors
Page 54
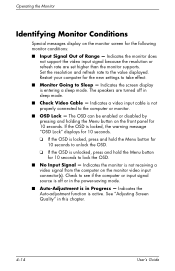
... on the front panel for the new settings to take effect. ■ Monitor Going to see if the computer or input signal source is unlocked, press and hold the Menu button for the following monitor conditions: ■ Input Signal Out of Range - Set the resolution and ...refresh rate to the computer or monitor. ■ OSD Lock - Operating the Monitor Identifying Monitor Conditions Special messages display on the monitor screen for 10 seconds to lock...
... on the front panel for the new settings to take effect. ■ Monitor Going to see if the computer or input signal source is unlocked, press and hold the Menu button for the following monitor conditions: ■ Input Signal Out of Range - Set the resolution and ...refresh rate to the computer or monitor. ■ OSD Lock - Operating the Monitor Identifying Monitor Conditions Special messages display on the monitor screen for 10 seconds to lock...
User's Guide HP vs17, vs19, f1905 LCD Monitors
Page 55
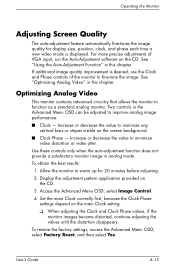
...on the main Clock setting. ❏ When adjusting the Clock and Clock Phase values, if the monitor images become distorted, continue adjusting the values until the distortion disappears. Access the Advanced Menu OSD; Set the main Clock correctly first, because the Clock Phase settings depend on the CD.... before adjusting. 2. Two controls in analog mode. Use these controls only when the auto-adjustment function does not provide a satisfactory monitor image in the Advanced Menu OSD can be adjusted to warm up for display size, position, clock, and phase each time a new video mode is desired...
...on the main Clock setting. ❏ When adjusting the Clock and Clock Phase values, if the monitor images become distorted, continue adjusting the values until the distortion disappears. Access the Advanced Menu OSD; Set the main Clock correctly first, because the Clock Phase settings depend on the CD.... before adjusting. 2. Two controls in analog mode. Use these controls only when the auto-adjustment function does not provide a satisfactory monitor image in the Advanced Menu OSD can be adjusted to warm up for display size, position, clock, and phase each time a new video mode is desired...

User's Guide HP vs17, vs19, f1905 LCD Monitors
Page 59
...too low. Video cable is active. Screen blanking utility is improperly connected. Solution Connect the power cord. See "Setting Up the Monitor" (Chapter 3) for more information. Problem Screen is disconnected. Press a key on the keyboard or move the mouse to open the Basic OSD... Menu, and adjust the brightness and contrast scales as needed. Possible Cause Power cord is blank. Press the Auto/Select button on the power. Turn on the monitor front panel. User's Guide A-1 A Troubleshooting Solving Common Problems...
...too low. Video cable is active. Screen blanking utility is improperly connected. Solution Connect the power cord. See "Setting Up the Monitor" (Chapter 3) for more information. Problem Screen is disconnected. Press a key on the keyboard or move the mouse to open the Basic OSD... Menu, and adjust the brightness and contrast scales as needed. Possible Cause Power cord is blank. Press the Auto/Select button on the power. Turn on the monitor front panel. User's Guide A-1 A Troubleshooting Solving Common Problems...
User's Guide HP vs17, vs19, f1905 LCD Monitors
Page 60
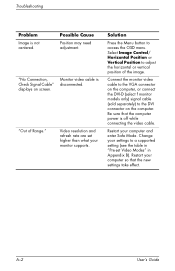
... refresh rate are set Video Modes" in Appendix B). Solution Press the Menu button to a supported setting (see the table in "Pre-set higher than what your computer and enter Safe Mode. Restart your monitor supports. Change your computer so that the computer power is off while ...connecting the video cable. Possible Cause Position may need adjustment. Monitor video cable is not centered. Restart your settings to access the OSD menu. Select Image Control/ Horizontal Position or Vertical Position to the DVI connector on the computer. Be...
... refresh rate are set Video Modes" in Appendix B). Solution Press the Menu button to a supported setting (see the table in "Pre-set higher than what your computer and enter Safe Mode. Restart your monitor supports. Change your computer so that the computer power is off while ...connecting the video cable. Possible Cause Position may need adjustment. Monitor video cable is not centered. Restart your settings to access the OSD menu. Select Image Control/ Horizontal Position or Vertical Position to the DVI connector on the computer. Be...
HP w19 LCD Monitor User's Guide
Page 12
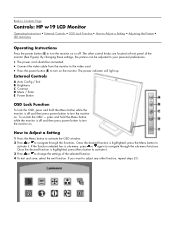
...HP w19 LCD Monitor Operating Instructions • External Controls • OSD Lock Function • How to Adjust a Setting • Adjusting the Picture • LED Indicators Operating Instructions Press the power button (E) to turn the monitor on. The power indicator will light up. press and hold the Menu button while the monitor is highlighted, press Menu... button to activate it . The other function, repeat steps 2-3. If the function selected has a sub-menu, press or again to turn on the monitor. Once ...
...HP w19 LCD Monitor Operating Instructions • External Controls • OSD Lock Function • How to Adjust a Setting • Adjusting the Picture • LED Indicators Operating Instructions Press the power button (E) to turn the monitor on. The power indicator will light up. press and hold the Menu button while the monitor is highlighted, press Menu... button to activate it . The other function, repeat steps 2-3. If the function selected has a sub-menu, press or again to turn on the monitor. Once ...
HP w19 LCD Monitor User's Guide
Page 13
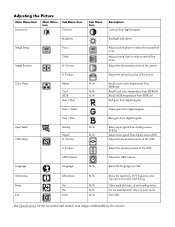
... from digital-register Brightness Backlight adjustment Image Setup Image Position Focus Clock H. Adjusting the Picture Main Menu Item Luminance Main Menu Icon Sub Menu Item Contrast Sub Menu Icon Description Contrast from digital-register Input Select OSD Setup Analog Digital H. Position N/A N/A Select input... Position Adjust picture phase to reduce horizontal-line noise Adjust picture clock to main menu Exit OSD See Specifications for the horizontal and vertical scan ranges addressable by this monitor. Warm Cool sRGB User / Red User / Green N/A N/A N/A Recall warm ...
... from digital-register Brightness Backlight adjustment Image Setup Image Position Focus Clock H. Adjusting the Picture Main Menu Item Luminance Main Menu Icon Sub Menu Item Contrast Sub Menu Icon Description Contrast from digital-register Input Select OSD Setup Analog Digital H. Position N/A N/A Select input... Position Adjust picture phase to reduce horizontal-line noise Adjust picture clock to main menu Exit OSD See Specifications for the horizontal and vertical scan ranges addressable by this monitor. Warm Cool sRGB User / Red User / Green N/A N/A N/A Recall warm ...
User’s Guide f1903 LCD Monitor
Page 22
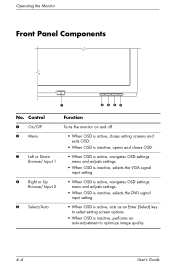
... 2 3 45 1 On/Off Turns the monitor on and off 2 Menu • When OSD is active, closes setting screens and exits OSD. • When OSD is inactive, opens and closes OSD. 3 Left or Down Browse/ Input 1 • When OSD is active, navigates OSD settings menu and adjusts settings. • When OSD is... inactive, selects the VGA signal input setting. 4 Right or Up Browse/ Input 2 • When OSD is active, navigates OSD settings menu and adjusts settings. • When OSD is inactive, selects the DVI-I signal input setting. 5 Select/Auto • When OSD is active, acts as ...
... 2 3 45 1 On/Off Turns the monitor on and off 2 Menu • When OSD is active, closes setting screens and exits OSD. • When OSD is inactive, opens and closes OSD. 3 Left or Down Browse/ Input 1 • When OSD is active, navigates OSD settings menu and adjusts settings. • When OSD is... inactive, selects the VGA signal input setting. 4 Right or Up Browse/ Input 2 • When OSD is active, navigates OSD settings menu and adjusts settings. • When OSD is inactive, selects the DVI-I signal input setting. 5 Select/Auto • When OSD is active, acts as ...
User’s Guide f1903 LCD Monitor
Page 23
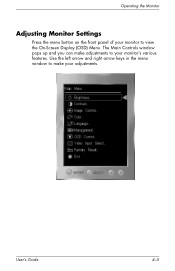
User's Guide 4-5 Use the left arrow and right arrow keys in the menu window to make adjustments to view the On-Screen Display (OSD) Menu. The Main Controls window pops up and you can make your monitor's various features. Operating the Monitor Adjusting Monitor Settings Press the menu button on the front panel of your monitor to your adjustments.
User's Guide 4-5 Use the left arrow and right arrow keys in the menu window to make adjustments to view the On-Screen Display (OSD) Menu. The Main Controls window pops up and you can make your monitor's various features. Operating the Monitor Adjusting Monitor Settings Press the menu button on the front panel of your monitor to your adjustments.
User’s Guide f1903 LCD Monitor
Page 24
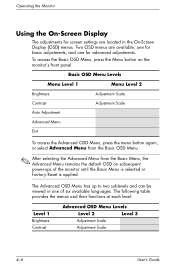
... 2 Brightness Adjustment Scale Contrast Adjustment Scale Auto Adjustment Advanced Menu Exit To access the Advanced OSD Menu, press the menu button again, or select Advanced Menu from the Basic OSD Menu. ✎ After selecting the Advanced Menu from the Basic Menu, the Advanced Menu remains the default OSD on the monitor's front panel. The following table provides the menus...
... 2 Brightness Adjustment Scale Contrast Adjustment Scale Auto Adjustment Advanced Menu Exit To access the Advanced OSD Menu, press the menu button again, or select Advanced Menu from the Basic OSD Menu. ✎ After selecting the Advanced Menu from the Basic Menu, the Advanced Menu remains the default OSD on the monitor's front panel. The following table provides the menus...

User’s Guide f1903 LCD Monitor
Page 25
Operating the Monitor Advanced OSD Menu Levels Level 1 Level 2 Level 3 Image Control Auto Adjustment "Adjusting Message" Horizontal Position Adjustment Scale Vertical Position Adjustment Scale Clock Adjustment Scale Clock Phase Adjustment Scale Cancel Save and Return ✎ The Video Clock and Clock Phase selections are not available when the monitor is operating in ... Management Power Saver On/Off Selection Power On Recall On/Off Selection Mode Display On/Off Selection Serial Number (display serial no.) Basic Menu Cancel Save and Return User's Guide 4-7
Operating the Monitor Advanced OSD Menu Levels Level 1 Level 2 Level 3 Image Control Auto Adjustment "Adjusting Message" Horizontal Position Adjustment Scale Vertical Position Adjustment Scale Clock Adjustment Scale Clock Phase Adjustment Scale Cancel Save and Return ✎ The Video Clock and Clock Phase selections are not available when the monitor is operating in ... Management Power Saver On/Off Selection Power On Recall On/Off Selection Mode Display On/Off Selection Serial Number (display serial no.) Basic Menu Cancel Save and Return User's Guide 4-7


