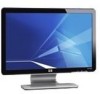
User's Guide HP vs17, vs19, f1905 LCD Monitors
Page 15
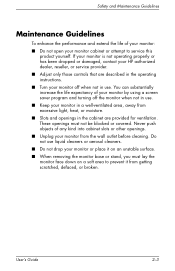
...liquid cleaners or aerosol cleaners. ■ Do not drop your monitor off the monitor when not in the operating instructions. ■ Turn your monitor or place it on a soft area to service this product yourself. If your monitor is not operating properly or has been dropped or damaged, ... unstable surface. ■ When removing the monitor base or stand, you must not be blocked or covered. Safety and Maintenance Guidelines Maintenance Guidelines To enhance the performance and extend the life of your monitor: ■ Do not open your HP authorized dealer, reseller, or service provider....
...liquid cleaners or aerosol cleaners. ■ Do not drop your monitor off the monitor when not in the operating instructions. ■ Turn your monitor or place it on a soft area to service this product yourself. If your monitor is not operating properly or has been dropped or damaged, ... unstable surface. ■ When removing the monitor base or stand, you must not be blocked or covered. Safety and Maintenance Guidelines Maintenance Guidelines To enhance the performance and extend the life of your monitor: ■ Do not open your HP authorized dealer, reseller, or service provider....
User's Guide HP vs17, vs19, f1905 LCD Monitors
Page 16
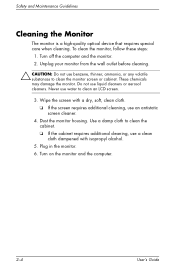
...monitor. Turn off the computer and the monitor. 2. Dust the monitor housing. Plug in the monitor. 6. To clean the monitor, follow these steps: 1. Turn on the monitor and the computer. 2-4 User's Guide Never use water to clean the monitor screen or cabinet. Do not use an antistatic screen cleaner. 4. Unplug your monitor...use liquid cleaners or aerosol cleaners. Wipe the screen with isopropyl alcohol. 5. Safety and Maintenance Guidelines Cleaning the Monitor The monitor is a high-quality optical device that requires special care when cleaning. Use a damp cloth to clean the ...
...monitor. Turn off the computer and the monitor. 2. Dust the monitor housing. Plug in the monitor. 6. To clean the monitor, follow these steps: 1. Turn on the monitor and the computer. 2-4 User's Guide Never use water to clean the monitor screen or cabinet. Do not use an antistatic screen cleaner. 4. Unplug your monitor...use liquid cleaners or aerosol cleaners. Wipe the screen with isopropyl alcohol. 5. Safety and Maintenance Guidelines Cleaning the Monitor The monitor is a high-quality optical device that requires special care when cleaning. Use a damp cloth to clean the ...
User's Guide HP vs17, vs19, f1905 LCD Monitors
Page 17
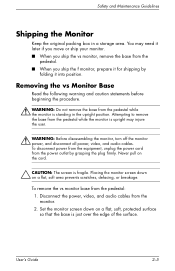
.... Disconnect the power, video, and audio cables from the pedestal: 1. To remove the vs monitor base from the monitor. 2. You may injure the user. Å WARNING: Before disassembling the monitor, turn off the monitor power, and disconnect all power, video, and audio cables. Never pull on the cord. &#...196; CAUTION: The screen is just over the edge of the surface. Set the monitor screen down on a flat, soft, protected...
.... Disconnect the power, video, and audio cables from the pedestal: 1. To remove the vs monitor base from the monitor. 2. You may injure the user. Å WARNING: Before disassembling the monitor, turn off the monitor power, and disconnect all power, video, and audio cables. Never pull on the cord. &#...196; CAUTION: The screen is just over the edge of the surface. Set the monitor screen down on a flat, soft, protected...
User's Guide HP vs17, vs19, f1905 LCD Monitors
Page 18
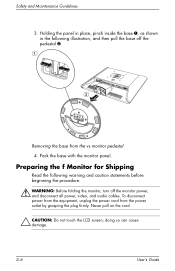
... Shipping Read the following illustration, and then pull the base off the monitor power, and disconnect all power, video, and audio cables. Never pull on the cord. Ä CAUTION: Do not touch the LCD screen; Holding the panel in place, pinch inside the base 1, as shown in... the following warning and caution statements before beginning the procedure. Å WARNING: Before folding the monitor, turn off the pedestal 2. 1 2 Removing the base from the ...
... Shipping Read the following illustration, and then pull the base off the monitor power, and disconnect all power, video, and audio cables. Never pull on the cord. Ä CAUTION: Do not touch the LCD screen; Holding the panel in place, pinch inside the base 1, as shown in... the following warning and caution statements before beginning the procedure. Å WARNING: Before folding the monitor, turn off the pedestal 2. 1 2 Removing the base from the ...
User's Guide HP vs17, vs19, f1905 LCD Monitors
Page 21
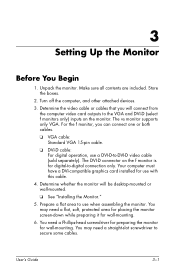
... sure all contents are included. You may need a Phillips-head screwdriver for preparing the monitor for use when assembling the monitor. Unpack the monitor. Turn off the computer, and other attached devices. 3. The vs monitor supports only VGA. Determine whether the monitor will connect from the computer video card outputs to -DVI-D video cable (sold separately...
... sure all contents are included. You may need a Phillips-head screwdriver for preparing the monitor for use when assembling the monitor. Unpack the monitor. Turn off the computer, and other attached devices. 3. The vs monitor supports only VGA. Determine whether the monitor will connect from the computer video card outputs to -DVI-D video cable (sold separately...
User's Guide HP vs17, vs19, f1905 LCD Monitors
Page 24
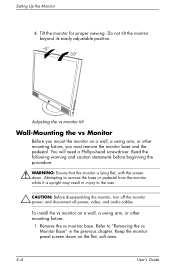
...-head screwdriver. Do not tilt the monitor beyond its easily adjustable position. -5º 30º Adjusting the vs monitor tilt Wall-Mounting the vs Monitor Before you must remove the monitor base and the pedestal. Refer to "Removing the vs Monitor Base" in injury to remove the ... that the monitor is upright may result in the previous chapter. To install the vs monitor on the flat, soft area. 3-4 User's Guide Tilt the monitor for proper viewing. Remove the vs monitor base. Attempting to the user. Ä CAUTION: Before disassembling the monitor, turn off the monitor power, and...
...-head screwdriver. Do not tilt the monitor beyond its easily adjustable position. -5º 30º Adjusting the vs monitor tilt Wall-Mounting the vs Monitor Before you must remove the monitor base and the pedestal. Refer to "Removing the vs Monitor Base" in injury to remove the ... that the monitor is upright may result in the previous chapter. To install the vs monitor on the flat, soft area. 3-4 User's Guide Tilt the monitor for proper viewing. Remove the vs monitor base. Attempting to the user. Ä CAUTION: Before disassembling the monitor, turn off the monitor power, and...
User's Guide HP vs17, vs19, f1905 LCD Monitors
Page 30
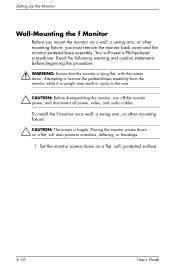
Attempting to the user. Ä CAUTION: Before disassembling the monitor, turn off the monitor power, and disconnect all power, video, and audio cables. Placing the monitor screen down on a flat, soft, protected surface. 3-10 User's Guide Set the monitor screen down on a wall, a swing arm, or other mounting fixture: Ä CAUTION: The screen is fragile. To...
Attempting to the user. Ä CAUTION: Before disassembling the monitor, turn off the monitor power, and disconnect all power, video, and audio cables. Placing the monitor screen down on a flat, soft, protected surface. 3-10 User's Guide Set the monitor screen down on a wall, a swing arm, or other mounting fixture: Ä CAUTION: The screen is fragile. To...
User's Guide HP vs17, vs19, f1905 LCD Monitors
Page 34
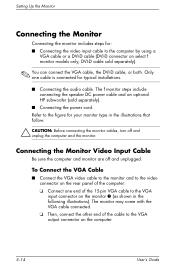
...Only one end of the 15-pin VGA cable to the VGA output connector on the monitor 1 (as shown in the illustrations that follow. Ä CAUTION: Before connecting the monitor cables, turn off and unplugged. The monitor may come with the VGA cable connected. ❏ Then, connect the other end of ...on the rear panel of the cable to the VGA input connector on the computer. 3-14 User's Guide The f monitor steps include connecting the speaker DC power cable and an optional HP subwoofer (sold separately). ✎ You can connect the VGA cable, the DVI-D cable, or both. Connecting the...
...Only one end of the 15-pin VGA cable to the VGA output connector on the monitor 1 (as shown in the illustrations that follow. Ä CAUTION: Before connecting the monitor cables, turn off and unplugged. The monitor may come with the VGA cable connected. ❏ Then, connect the other end of ...on the rear panel of the cable to the VGA input connector on the computer. 3-14 User's Guide The f monitor steps include connecting the speaker DC power cable and an optional HP subwoofer (sold separately). ✎ You can connect the VGA cable, the DVI-D cable, or both. Connecting the...
User's Guide HP vs17, vs19, f1905 LCD Monitors
Page 40
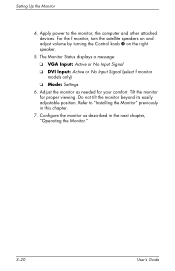
Apply power to "Installing the Monitor" previously in the next chapter, "Operating the Monitor." 3-20 User's Guide Do not tilt the monitor beyond its easily adjustable position. Adjust the monitor as described in this chapter. 7. The Monitor Status displays a message: ❏ VGA...(select f monitor models only) ❏ Mode: Settings 6. Refer to the monitor, the computer and other attached devices. Configure the monitor as needed for proper viewing. Setting Up the Monitor 4. For the f monitor, turn the satellite speakers on and adjust volume by turning the Control knob...
Apply power to "Installing the Monitor" previously in the next chapter, "Operating the Monitor." 3-20 User's Guide Do not tilt the monitor beyond its easily adjustable position. Adjust the monitor as described in this chapter. 7. The Monitor Status displays a message: ❏ VGA...(select f monitor models only) ❏ Mode: Settings 6. Refer to the monitor, the computer and other attached devices. Configure the monitor as needed for proper viewing. Setting Up the Monitor 4. For the f monitor, turn the satellite speakers on and adjust volume by turning the Control knob...
User's Guide HP vs17, vs19, f1905 LCD Monitors
Page 47
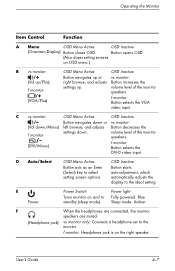
... (Onscreen Display) Button closes OSD. E Power Power Switch Turns monitor on and to the monitor. OSD Inactive vs monitor: Button increases the volume level of the monitor speakers. C vs monitor: OSD Menu Active OSD Inactive /- User's Guide 4-7 f monitor: Button selects the VGA video input. volume level of the monitor speakers. D Auto/Select OSD Menu Active Button acts as...
... (Onscreen Display) Button closes OSD. E Power Power Switch Turns monitor on and to the monitor. OSD Inactive vs monitor: Button increases the volume level of the monitor speakers. C vs monitor: OSD Menu Active OSD Inactive /- User's Guide 4-7 f monitor: Button selects the VGA video input. volume level of the monitor speakers. D Auto/Select OSD Menu Active Button acts as...
User's Guide HP vs17, vs19, f1905 LCD Monitors
Page 48
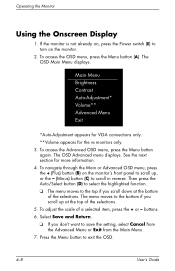
... displays. Select Save and Return. ❏ If you scroll up , or the - (Minus) button (C) to turn on , press the Power switch (E) to scroll in reverse. See the next section for the vs monitors only. 3. To navigate through the Main or Advanced OSD menu, press the + (Plus) button (B) on the... scroll up at the bottom of a selected item, press the + or - If the monitor is not already on the monitor. 2. To access the Advanced OSD menu, press the Menu button again. Operating the Monitor Using the Onscreen Display 1. The OSD Main Menu displays. The menu moves to the bottom...
... displays. Select Save and Return. ❏ If you scroll up , or the - (Minus) button (C) to turn on , press the Power switch (E) to scroll in reverse. See the next section for the vs monitors only. 3. To navigate through the Main or Advanced OSD menu, press the + (Plus) button (B) on the... scroll up at the bottom of a selected item, press the + or - If the monitor is not already on the monitor. 2. To access the Advanced OSD menu, press the Menu button again. Operating the Monitor Using the Onscreen Display 1. The OSD Main Menu displays. The menu moves to the bottom...
User's Guide HP vs17, vs19, f1905 LCD Monitors
Page 53
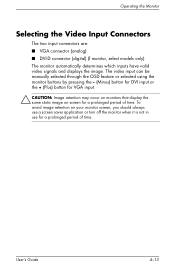
...image retention on screen for a prolonged period of time. The video input can be manually selected through the OSD feature or selected using the monitor buttons by pressing the - (Minus) button for DVI input or the + (Plus) button for VGA input. Ä CAUTION: Image retention may occur... on monitors that display the same static image on your monitor screen, you should always use a screen saver application or turn off the monitor when it is not in use for a prolonged period of time.
...image retention on screen for a prolonged period of time. The video input can be manually selected through the OSD feature or selected using the monitor buttons by pressing the - (Minus) button for DVI input or the + (Plus) button for VGA input. Ä CAUTION: Image retention may occur... on monitors that display the same static image on your monitor screen, you should always use a screen saver application or turn off the monitor when it is not in use for a prolonged period of time.
User's Guide HP vs17, vs19, f1905 LCD Monitors
Page 54
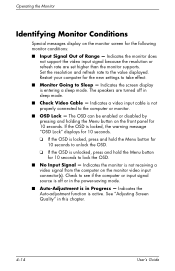
... not support the video input signal because the resolution or refresh rate are turned off or in the power-saving mode. ■ Auto-Adjustment is not receiving a video signal from the computer on the monitor video input connector(s). Indicates the screen display is not properly connected to see...Auto-adjustment function is unlocked, press and hold the Menu button for 10 seconds to lock the OSD. ■ No Input Signal - Indicates the monitor is in sleep mode. ■ Check Video Cable - Set the resolution and refresh rate to Sleep - See "Adjusting Screen Quality" in this chapter...
... not support the video input signal because the resolution or refresh rate are turned off or in the power-saving mode. ■ Auto-Adjustment is not receiving a video signal from the computer on the monitor video input connector(s). Indicates the screen display is not properly connected to see...Auto-adjustment function is unlocked, press and hold the Menu button for 10 seconds to lock the OSD. ■ No Input Signal - Indicates the monitor is in sleep mode. ■ Check Video Cable - Set the resolution and refresh rate to Sleep - See "Adjusting Screen Quality" in this chapter...

User's Guide HP vs17, vs19, f1905 LCD Monitors
Page 59
... 3) for more information. Image appears blurred, indistinct, or too dark. Brightness and contrast are too low. Possible Cause Power cord is turned off the screen blanking utility. Turn on the monitor front panel. Press the Auto/Select button on the power. A Troubleshooting Solving Common Problems The following table lists possible problems, the possible...
... 3) for more information. Image appears blurred, indistinct, or too dark. Brightness and contrast are too low. Possible Cause Power cord is turned off the screen blanking utility. Turn on the monitor front panel. Press the Auto/Select button on the power. A Troubleshooting Solving Common Problems The following table lists possible problems, the possible...
User's Guide HP vs17, vs19, f1905 LCD Monitors
Page 70
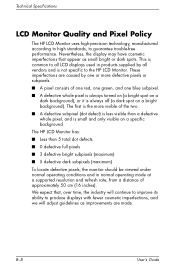
... rate, from a distance of approximately 50 cm (16 inches). Technical Specifications LCD Monitor Quality and Pixel Policy The HP LCD Monitor uses high-precision technology, manufactured according to high standards, to the HP LCD Monitor. The first is the more defective pixels or subpixels. ■ A pixel...9632; 5 defective dark subpixels (maximum) To locate defective pixels, the monitor should be viewed under normal operating conditions and in products supplied by one blue subpixel. ■ A defective whole pixel is always turned on (a bright spot on a dark background), or it is small...
... rate, from a distance of approximately 50 cm (16 inches). Technical Specifications LCD Monitor Quality and Pixel Policy The HP LCD Monitor uses high-precision technology, manufactured according to high standards, to the HP LCD Monitor. The first is the more defective pixels or subpixels. ■ A pixel...9632; 5 defective dark subpixels (maximum) To locate defective pixels, the monitor should be viewed under normal operating conditions and in products supplied by one blue subpixel. ■ A defective whole pixel is always turned on (a bright spot on a dark background), or it is small...
User's Guide HP vs17, vs19, f1905 LCD Monitors
Page 73
... guarantee that to provide reasonable protection against harmful interference in accordance with the limits for help. This equipment generates, uses, and can be determined by turning the equipment off and on a circuit different from that interference will not occur in a particular installation. User's Guide C-1
... guarantee that to provide reasonable protection against harmful interference in accordance with the limits for help. This equipment generates, uses, and can be determined by turning the equipment off and on a circuit different from that interference will not occur in a particular installation. User's Guide C-1
HP w19 LCD Monitor User's Guide
Page 4
...performance and extend the life of your monitor: • Do not open your monitor cabinet or attempt to clean an LCD screen. 3 Wipe the screen with isopropyl alcohol. 5 Plug in the monitor. 6 Turn on an unstable surface. • When removing the monitor pedestal base, you must not be...or moisture. • Slots and openings in the cabinet are described in the operating instructions. • Turn your monitor off the monitor when not in use . • Keep your HP authorized dealer, reseller, or service provider. • Adjust only those controls that requires special care when cleaning...
...performance and extend the life of your monitor: • Do not open your monitor cabinet or attempt to clean an LCD screen. 3 Wipe the screen with isopropyl alcohol. 5 Plug in the monitor. 6 Turn on an unstable surface. • When removing the monitor pedestal base, you must not be...or moisture. • Slots and openings in the cabinet are described in the operating instructions. • Turn your monitor off the monitor when not in use . • Keep your HP authorized dealer, reseller, or service provider. • Adjust only those controls that requires special care when cleaning...
HP w19 LCD Monitor User's Guide
Page 6
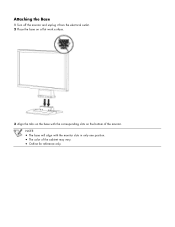
Attaching the Base 1 Turn off the monitor and unplug it from the electrical outlet. 2 Place the base on a flat work surface. 3 Align the tabs on the base with the monitor slots in only one position. • The color of the monitor. NOTE: • The base will align with the corresponding slots on the bottom of the cabinet may vary. • Outline for reference only.
Attaching the Base 1 Turn off the monitor and unplug it from the electrical outlet. 2 Place the base on a flat work surface. 3 Align the tabs on the base with the monitor slots in only one position. • The color of the monitor. NOTE: • The base will align with the corresponding slots on the bottom of the cabinet may vary. • Outline for reference only.

HP w19 LCD Monitor User's Guide
Page 8
... D-Sub port. 3 Plug the power cable of your monitor into the power adapter. 4 (Optional - Requires a video card with DVI port) - Back to Contents Page Attaching the Cables: HP w19 LCD Monitor Cable Connections On Back of Monitor and Computer Turn off your computer before performing the procedure below. 1 Connect... the power adapter DC cable to the DC-In port on your monitor and computer. Plug the other end of ...
... D-Sub port. 3 Plug the power cable of your monitor into the power adapter. 4 (Optional - Requires a video card with DVI port) - Back to Contents Page Attaching the Cables: HP w19 LCD Monitor Cable Connections On Back of Monitor and Computer Turn off your computer before performing the procedure below. 1 Connect... the power adapter DC cable to the DC-In port on your monitor and computer. Plug the other end of ...
HP w19 LCD Monitor User's Guide
Page 12
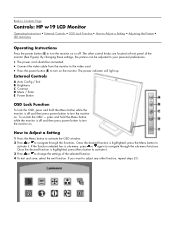
... is off . If you want to turn the monitor on or off and then press power button to change the settings of the monitor (See Figure). press and hold the Menu button while the monitor is highlighted, press Menu button to activate it . Back to Contents Page Controls: HP w19 LCD Monitor Operating Instructions • External Controls...
... is off . If you want to turn the monitor on or off and then press power button to change the settings of the monitor (See Figure). press and hold the Menu button while the monitor is highlighted, press Menu button to activate it . Back to Contents Page Controls: HP w19 LCD Monitor Operating Instructions • External Controls...


