User's Guide HP vs17, vs19, f1905 LCD Monitors
Page 10
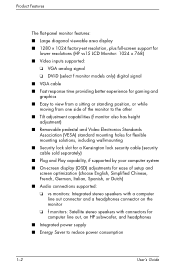
...-screen support for lower resolutions (HP vs15 LCD Monitor: 1024 x 768) ■ Video inputs supported: ❏ VGA analog signal ❏ DVI-D (select f monitor models only) digital signal ■ VGA cable ■ Fast response time providing better experience for gaming and graphics ■ Easy to view from a sitting or standing position, or while moving from one side of the monitor to the other ■ Tilt adjustment capabilities (f monitor also has height adjustment) ■ Removable pedestal and Video Electronics Standards Association (VESA) standard mounting...
...-screen support for lower resolutions (HP vs15 LCD Monitor: 1024 x 768) ■ Video inputs supported: ❏ VGA analog signal ❏ DVI-D (select f monitor models only) digital signal ■ VGA cable ■ Fast response time providing better experience for gaming and graphics ■ Easy to view from a sitting or standing position, or while moving from one side of the monitor to the other ■ Tilt adjustment capabilities (f monitor also has height adjustment) ■ Removable pedestal and Video Electronics Standards Association (VESA) standard mounting...
User's Guide HP vs17, vs19, f1905 LCD Monitors
Page 42
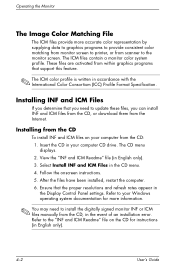
... from within graphics programs that you need to install the digitally signed monitor INF or ICM files manually from the CD, in accordance with the International Color Consortium (ICC) Profile Format Specification. Insert the CD in the CD menu. 4. Select Install INF and ICM Files in your Windows operating system documentation for instructions (in English only). 4-2 User's Guide Refer to the "INF and ICM...
... from within graphics programs that you need to install the digitally signed monitor INF or ICM files manually from the CD, in accordance with the International Color Consortium (ICC) Profile Format Specification. Insert the CD in the CD menu. 4. Select Install INF and ICM Files in your Windows operating system documentation for instructions (in English only). 4-2 User's Guide Refer to the "INF and ICM...
User's Guide HP vs17, vs19, f1905 LCD Monitors
Page 54
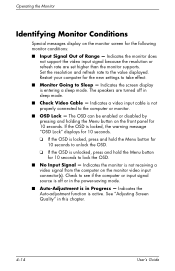
... displayed. Indicates the Auto-adjustment function is in this chapter. 4-14 User's Guide See "Adjusting Screen Quality" in Progress - Set the resolution and refresh rate to see if the computer or input signal source is unlocked, press and hold the Menu button for the following monitor conditions: ■ Input Signal Out of Range - The speakers are set higher than the monitor supports. Indicates the monitor does not support the video input signal because the resolution or refresh rate are turned off or in the power-saving mode...
... displayed. Indicates the Auto-adjustment function is in this chapter. 4-14 User's Guide See "Adjusting Screen Quality" in Progress - Set the resolution and refresh rate to see if the computer or input signal source is unlocked, press and hold the Menu button for the following monitor conditions: ■ Input Signal Out of Range - The speakers are set higher than the monitor supports. Indicates the monitor does not support the video input signal because the resolution or refresh rate are turned off or in the power-saving mode...
User's Guide HP vs17, vs19, f1905 LCD Monitors
Page 55
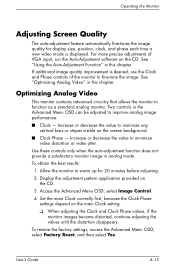
... and Phase controls of VGA input, run the Auto-Adjustment software on the screen background. ■ Clock Phase - Allow the monitor to function as a standard analog monitor. Set the main Clock correctly first, because the Clock Phase settings depend on the CD. 3. User's Guide 4-15 See "Using the Auto-Adjustment Function" in analog mode. To restore the factory settings, access the Advanced Menu OSD, select Factory Reset, and then select Yes. If additional image quality improvement...
... and Phase controls of VGA input, run the Auto-Adjustment software on the screen background. ■ Clock Phase - Allow the monitor to function as a standard analog monitor. Set the main Clock correctly first, because the Clock Phase settings depend on the CD. 3. User's Guide 4-15 See "Using the Auto-Adjustment Function" in analog mode. To restore the factory settings, access the Advanced Menu OSD, select Factory Reset, and then select Yes. If additional image quality improvement...
User's Guide HP vs17, vs19, f1905 LCD Monitors
Page 69
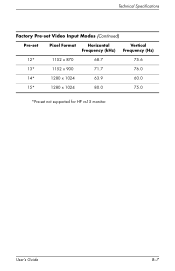
User's Guide B-7 Technical Specifications Factory Pre-set Video Input Modes (Continued) Pre-set Pixel Format Horizontal Frequency (kHz) Vertical Frequency (Hz) 12* 1152 x 870 68.7 75.6 13* 1152 x 900 71.7 76.0 14* 1280 x 1024 63.9 60.0 15* 1280 x 1024 80.0 75.0 *Pre-set not supported for HP vs15 monitor.
User's Guide B-7 Technical Specifications Factory Pre-set Video Input Modes (Continued) Pre-set Pixel Format Horizontal Frequency (kHz) Vertical Frequency (Hz) 12* 1152 x 870 68.7 75.6 13* 1152 x 900 71.7 76.0 14* 1280 x 1024 63.9 60.0 15* 1280 x 1024 80.0 75.0 *Pre-set not supported for HP vs15 monitor.
HP w19 LCD Monitor User's Guide
Page 1
... by copyright law. HP w19 LCD Monitor User's Guide • Preface • Safety and Maintenance Guidelines • Setup • Using the Monitor • Drivers and Auto-Adjustment • Technical Support FAQ • Specifications • LCD Monitor Quality and Pixel Policy • Agency Regulatory Notices The only warranties for HP products and services are set forth in this document may be photocopied, reproduced, or translated to change without the prior written...
... by copyright law. HP w19 LCD Monitor User's Guide • Preface • Safety and Maintenance Guidelines • Setup • Using the Monitor • Drivers and Auto-Adjustment • Technical Support FAQ • Specifications • LCD Monitor Quality and Pixel Policy • Agency Regulatory Notices The only warranties for HP products and services are set forth in this document may be photocopied, reproduced, or translated to change without the prior written...
HP w19 LCD Monitor User's Guide
Page 2
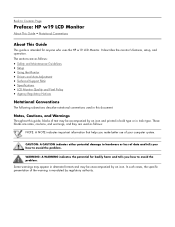
...: • Safety and Maintenance Guidelines • Setup • Using the Monitor • Drivers and Auto-Adjustment • Technical Support FAQ • Specifications • LCD Monitor Quality and Pixel Policy • Agency Regulatory Notices Notational Conventions The following subsections describe notational conventions used as follows: NOTE: A NOTE indicates important information that helps you how to avoid the problem. CAUTION: A CAUTION indicates either potential damage to...
...: • Safety and Maintenance Guidelines • Setup • Using the Monitor • Drivers and Auto-Adjustment • Technical Support FAQ • Specifications • LCD Monitor Quality and Pixel Policy • Agency Regulatory Notices Notational Conventions The following subsections describe notational conventions used as follows: NOTE: A NOTE indicates important information that helps you how to avoid the problem. CAUTION: A CAUTION indicates either potential damage to...
HP w19 LCD Monitor User's Guide
Page 3
... power cord set to a grounded (earthed) power outlet. The grounding plug is designed for use with your monitor. Connect the equipment to use only a power source and connection compatible with this monitor, as having this monitor. WARNING: For your PC, connect all power strips provide surge protection; CAUTION: To protect your monitor, as well as your safety, be specifically labeled as indicated on the power cord. Use a power strip whose manufacturer offers a damage replacement...
... power cord set to a grounded (earthed) power outlet. The grounding plug is designed for use with your monitor. Connect the equipment to use only a power source and connection compatible with this monitor, as having this monitor. WARNING: For your PC, connect all power strips provide surge protection; CAUTION: To protect your monitor, as well as your safety, be specifically labeled as indicated on the power cord. Use a power strip whose manufacturer offers a damage replacement...
HP w19 LCD Monitor User's Guide
Page 12
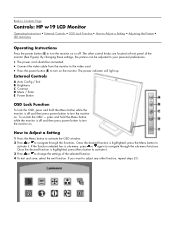
... Page Controls: HP w19 LCD Monitor Operating Instructions • External Controls • OSD Lock Function • How to Adjust a Setting • Adjusting the Picture • LED Indicators Operating Instructions Press the power button (E) to turn on the monitor. External Controls A Auto Config / Exit B Brightness C Contrast D Menu / Enter E Power Button OSD Lock Function To lock the OSD, press and hold the Menu button while the monitor is highlighted, press Menu button to activate it . Once the desired function is off and then press power button to change the settings...
... Page Controls: HP w19 LCD Monitor Operating Instructions • External Controls • OSD Lock Function • How to Adjust a Setting • Adjusting the Picture • LED Indicators Operating Instructions Press the power button (E) to turn on the monitor. External Controls A Auto Config / Exit B Brightness C Contrast D Menu / Enter E Power Button OSD Lock Function To lock the OSD, press and hold the Menu button while the monitor is highlighted, press Menu button to activate it . Once the desired function is off and then press power button to change the settings...
HP w19 LCD Monitor User's Guide
Page 15
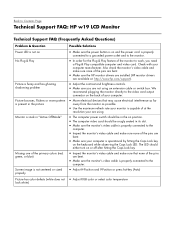
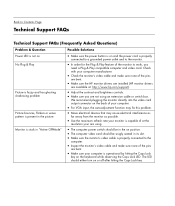
... Lock LED. Back to Contents Page Technical Support FAQ: HP w19 LCD Monitor Technical Support FAQ (Frequently Asked Questions) Problem & Question Power LED is not on No Plug & Play Picture is fuzzy and has ghosting shadowing problem Picture bounces, flickers or wave pattern is present in the picture Monitor is stuck in "Active Off-Mode" Missing one of the primary colors (red, green, or blue) Screen image is not centered or sized properly Picture has color defects (white...
... Lock LED. Back to Contents Page Technical Support FAQ: HP w19 LCD Monitor Technical Support FAQ (Frequently Asked Questions) Problem & Question Power LED is not on No Plug & Play Picture is fuzzy and has ghosting shadowing problem Picture bounces, flickers or wave pattern is present in the picture Monitor is stuck in "Active Off-Mode" Missing one of the primary colors (red, green, or blue) Screen image is not centered or sized properly Picture has color defects (white...
HP w19 LCD Monitor User's Guide
Page 16
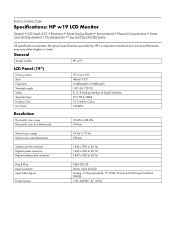
... lower. General Model number HP w19 LCD Panel (19") Driving system Size Pixel pitch Viewable angle Video Separate Sync. Display Color Dot Clock TFT Color LCD 48cm(19.0") 0.285mm(H) x 0.285mm(V) 150° (H) 130°(V) R, G, B Analog lnterface & Digital Interface H/V TTL & TMDS 16.2 million Colors 135MHz Resolution Horizontal scan range Horizontal scan size (Maximum) 30 kHz to 83 kHz 410mm Vertical scan range Vertical scan size (Maximum) 55 Hz to Contents Page Specifications: HP w19 LCD Monitor General • LCD Panel (19") • Resolution • Preset Display Modes •...
... lower. General Model number HP w19 LCD Panel (19") Driving system Size Pixel pitch Viewable angle Video Separate Sync. Display Color Dot Clock TFT Color LCD 48cm(19.0") 0.285mm(H) x 0.285mm(V) 150° (H) 130°(V) R, G, B Analog lnterface & Digital Interface H/V TTL & TMDS 16.2 million Colors 135MHz Resolution Horizontal scan range Horizontal scan size (Maximum) 30 kHz to 83 kHz 410mm Vertical scan range Vertical scan size (Maximum) 55 Hz to Contents Page Specifications: HP w19 LCD Monitor General • LCD Panel (19") • Resolution • Preset Display Modes •...
User’s Guide f1903 LCD Monitor
Page 19
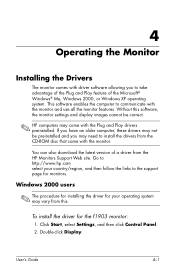
... operating system may vary from the HP Monitors Support Web site. Without this . Windows 2000 users ✎ The procedure for installing the driver for your country/region, and then follow the links to communicate with the Plug and Play drivers preinstalled. User's Guide 4-1 To install the driver for monitors. Click Start, select Settings, and then click Control Panel. 2. This software enables the computer to the support page for the f1903...
... operating system may vary from the HP Monitors Support Web site. Without this . Windows 2000 users ✎ The procedure for installing the driver for your country/region, and then follow the links to communicate with the Plug and Play drivers preinstalled. User's Guide 4-1 To install the driver for monitors. Click Start, select Settings, and then click Control Panel. 2. This software enables the computer to the support page for the f1903...

User’s Guide f1903 LCD Monitor
Page 20
..., and select the Monitor tab. 5. Click Next to install the selected monitor. 4-2 User's Guide Click Next to install the selected monitor. Operating the Monitor 3. Click Start, select Settings, and then click Control Panel. 2. Click Properties. 6. Click the Driver tab. 7. Click Next. 9. Find and open the hp_f1903.inf file on the CD-ROM disc in the Drivers directory, and click OK. 10. Click the Change button. 7. Select the...
..., and select the Monitor tab. 5. Click Next to install the selected monitor. 4-2 User's Guide Click Next to install the selected monitor. Operating the Monitor 3. Click Start, select Settings, and then click Control Panel. 2. Click Properties. 6. Click the Driver tab. 7. Click Next. 9. Find and open the hp_f1903.inf file on the CD-ROM disc in the Drivers directory, and click OK. 10. Click the Change button. 7. Select the...

User’s Guide f1903 LCD Monitor
Page 21
... the Monitor tab. 8. To install the driver for your operating system may vary. Click Have Disk. 14. Click Browse. 15. Click Next to the Microsoft Windows information that came with the computer. Click Start. 2. Click Display. 5. Select the Settings tab. 6. Select the Install from a list or specific location box and then click Next. 12. Click Update Driver. 11. Click the Advanced button. 7. User's Guide 4-3
... the Monitor tab. 8. To install the driver for your operating system may vary. Click Have Disk. 14. Click Browse. 15. Click Next to the Microsoft Windows information that came with the computer. Click Start. 2. Click Display. 5. Select the Settings tab. 6. Select the Install from a list or specific location box and then click Next. 12. Click Update Driver. 11. Click the Advanced button. 7. User's Guide 4-3

User's Guide - HP vs15, vs17, vs19, f1705, f1905 LCD Monitor
Page 42
... in your Windows operating system documentation for instructions (in the event of an installation error. Operating the Monitor The Image Color Matching File The ICM files provide more information. ✎ You may need to the monitor screen. Installing INF and ICM Files If you determine that you need to install the digitally signed monitor INF or ICM files manually from the CD, in English only). 4-2 User's Guide Select Install INF...
... in your Windows operating system documentation for instructions (in the event of an installation error. Operating the Monitor The Image Color Matching File The ICM files provide more information. ✎ You may need to the monitor screen. Installing INF and ICM Files If you determine that you need to install the digitally signed monitor INF or ICM files manually from the CD, in English only). 4-2 User's Guide Select Install INF...

User's Guide - HP vs15, vs17, vs19, f1705, f1905 LCD Monitor
Page 69
Technical Specifications Factory Pre-set Video Input Modes (Continued) Pre-set Pixel Format Horizontal Frequency (kHz) Vertical Frequency (Hz) 12* 1152 x 870 68.7 75.6 13* 1152 x 900 71.7 76.0 14* 1280 x 1024 63.9 60.0 15* 1280 x 1024 80.0 75.0 *Pre-set not supported for HP vs15 monitor. User's Guide B-7
Technical Specifications Factory Pre-set Video Input Modes (Continued) Pre-set Pixel Format Horizontal Frequency (kHz) Vertical Frequency (Hz) 12* 1152 x 870 68.7 75.6 13* 1152 x 900 71.7 76.0 14* 1280 x 1024 63.9 60.0 15* 1280 x 1024 80.0 75.0 *Pre-set not supported for HP vs15 monitor. User's Guide B-7

User's Guide f1904 LCD Monitor
Page 19
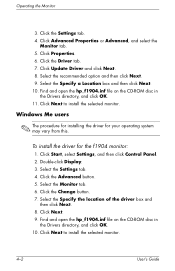
... Plug and Play feature of a driver from this software, the monitor settings and display images cannot be preinstalled and you may vary from the HP Monitors Support Web site. You can also download the latest version of the Microsoft® Windows® Me, Windows 2000, or Windows XP operating system. Click Start, select Settings, and then click Control Panel. 2. Windows 2000 users ✎ The procedure for installing the driver for the f1904 monitor...
... Plug and Play feature of a driver from this software, the monitor settings and display images cannot be preinstalled and you may vary from the HP Monitors Support Web site. You can also download the latest version of the Microsoft® Windows® Me, Windows 2000, or Windows XP operating system. Click Start, select Settings, and then click Control Panel. 2. Windows 2000 users ✎ The procedure for installing the driver for the f1904 monitor...
User's Guide f1904 LCD Monitor
Page 20
..., and select the Monitor tab. 5. Find and open the hp_f1904.inf file on the CD-ROM disc in the Drivers directory, and click OK. 10. Click Next to install the selected monitor. 4-2 User's Guide Select the Specify a Location box and then click Next. 10. Click Next. 9. Operating the Monitor 3. Select the Settings tab. 4. Click the Change button. 7. Click Update Driver and click Next...
..., and select the Monitor tab. 5. Find and open the hp_f1904.inf file on the CD-ROM disc in the Drivers directory, and click OK. 10. Click Next to install the selected monitor. 4-2 User's Guide Select the Specify a Location box and then click Next. 10. Click Next. 9. Operating the Monitor 3. Select the Settings tab. 4. Click the Change button. 7. Click Update Driver and click Next...
User's Guide f1904 LCD Monitor
Page 21
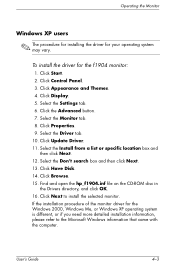
... the computer. User's Guide 4-3 Operating the Monitor Windows XP users ✎ The procedure for installing the driver for the f1904 monitor: 1. Select the Driver tab. 10. Select the Install from a list or specific location box and then click Next. 12. Click Start. 2. Click Properties. 9. Click Browse. 15. Select the Don't search box and then click Next. 13. Find and open the hp_f1904.inf...
... the computer. User's Guide 4-3 Operating the Monitor Windows XP users ✎ The procedure for installing the driver for the f1904 monitor: 1. Select the Driver tab. 10. Select the Install from a list or specific location box and then click Next. 12. Click Start. 2. Click Properties. 9. Click Browse. 15. Select the Don't search box and then click Next. 13. Find and open the hp_f1904.inf...
w19b, w19e, w19ev, W19q LCD Monitor - User's Guide
Page 18
... power button is on and the power cord is properly connected to a grounded power outlet and to the monitor. • In order for the Plug & Play feature of the monitor to the computer. • Inspect the monitor's video cable and make sure none of the pins are bent. • Make sure the HP monitor drivers are installed (HP monitor drivers are available at the resolution your are not using an extension cable or switch box. Check...
... power button is on and the power cord is properly connected to a grounded power outlet and to the monitor. • In order for the Plug & Play feature of the monitor to the computer. • Inspect the monitor's video cable and make sure none of the pins are bent. • Make sure the HP monitor drivers are installed (HP monitor drivers are available at the resolution your are not using an extension cable or switch box. Check...


