Limited Warranty Statement
Page 5
...a fee You will be regulated because of implied warranties 3. Materials disposal This HP product contains the following products: • Product name (HP Photosmart R830 series Digital Camera); Regulatory model identification number For regulatory identification purposes, your original warranty period. This... Hewlett-Packard Ltd Cain Road Bracknell, GB-Berks RG12 1HN Service and support HP online service and support is FCLSD-0703. • Product name (HP Photosmart R840 series Digital Camera); Product number (L2484A, L2485A, L2486A, L2487A, L2488A); c. Grant Customer ...
...a fee You will be regulated because of implied warranties 3. Materials disposal This HP product contains the following products: • Product name (HP Photosmart R830 series Digital Camera); Regulatory model identification number For regulatory identification purposes, your original warranty period. This... Hewlett-Packard Ltd Cain Road Bracknell, GB-Berks RG12 1HN Service and support HP online service and support is FCLSD-0703. • Product name (HP Photosmart R840 series Digital Camera); Product number (L2484A, L2485A, L2486A, L2487A, L2488A); c. Grant Customer ...
Limited Warranty Statement
Page 6
..., April 4, 2007 10:53 AM • Product name (HP Photosmart R740 series Digital Camera); Allow the camera to air dry completely before operating it to repair the camera yourself. Dispose of explosion if battery is FCLSD-0702. Exposing the camera to the instructions. 4 R740 series: Your camera uses a rechargeable HP Photosmart LI40 battery (Q6277A); The Regulatory model number for your...
..., April 4, 2007 10:53 AM • Product name (HP Photosmart R740 series Digital Camera); Allow the camera to air dry completely before operating it to repair the camera yourself. Dispose of explosion if battery is FCLSD-0702. Exposing the camera to the instructions. 4 R740 series: Your camera uses a rechargeable HP Photosmart LI40 battery (Q6277A); The Regulatory model number for your...

User Guide
Page 3
... language...6 Set the region...6 Set the date and time...7 Install and format an optional memory card 7 Install the software...8 Using your camera...8 Using the Touch Screen interface 8 Related information...9 2 Taking pictures and recording video clips Taking pictures...12 Recording video clips...12 Instant ...Review...12 Auto focus and exposure...12 Optimizing focus...13 Using Focus Lock...13 Optimizing exposure...14 Using zoom...14 Optical zoom...14 Digital zoom...15 3 Setting options for taking pictures and recording video clips Setting the flash...16 Red eye...16 Using the shooting modes...
... language...6 Set the region...6 Set the date and time...7 Install and format an optional memory card 7 Install the software...8 Using your camera...8 Using the Touch Screen interface 8 Related information...9 2 Taking pictures and recording video clips Taking pictures...12 Recording video clips...12 Instant ...Review...12 Auto focus and exposure...12 Optimizing focus...13 Using Focus Lock...13 Optimizing exposure...14 Using zoom...14 Optical zoom...14 Digital zoom...15 3 Setting options for taking pictures and recording video clips Setting the flash...16 Red eye...16 Using the shooting modes...

User Guide
Page 6
Camera top, side, and back 34 5 6 1 2 11 7 8 10 9 1 Speaker. 2 button 3 Power light. 4 selector-Switches between Picture Capture, Video Record, and Playback (see "Taking pictures" on page ..." on page 8). 10 Stylus (see "Using the Touch Screen interface" on page 8). 4 Getting started Use this section to get familiar with the camera controls, set up your digital camera for camera operations (see "Using the Touch Screen interface" on page 8). 11 Touch Screen Image Display- 1 Getting started Frames images when in Picture Capture or...
Camera top, side, and back 34 5 6 1 2 11 7 8 10 9 1 Speaker. 2 button 3 Power light. 4 selector-Switches between Picture Capture, Video Record, and Playback (see "Taking pictures" on page ..." on page 8). 10 Stylus (see "Using the Touch Screen interface" on page 8). 4 Getting started Use this section to get familiar with the camera controls, set up your digital camera for camera operations (see "Using the Touch Screen interface" on page 8). 11 Touch Screen Image Display- 1 Getting started Frames images when in Picture Capture or...

User Guide
Page 9
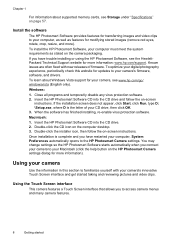
...8GB. 1. Install and format an optional memory card This camera supports standard, high speed, and high capacity Secure Digital (SD and SDHC) memory cards, 32MB to adjust the time. 4. NOTE: When you turn on page 18. 1. Turn off the camera and open the Battery/Memory Card door. 2. Make sure... there, remove the memory card. Touch to Card under "Using the Picture Capture and Video Record menus" on the camera. To use the Camera Setup Menu (see "Using the Camera Setup Menu" on page 34). 1. NOTE: Once you install a memory card, all images from internal memory to...
...8GB. 1. Install and format an optional memory card This camera supports standard, high speed, and high capacity Secure Digital (SD and SDHC) memory cards, 32MB to adjust the time. 4. NOTE: When you turn on page 18. 1. Turn off the camera and open the Battery/Memory Card door. 2. Make sure... there, remove the memory card. Touch to Card under "Using the Picture Capture and Video Record menus" on the camera. To use the Camera Setup Menu (see "Using the Camera Setup Menu" on page 34). 1. NOTE: Once you install a memory card, all images from internal memory to...
User Guide
Page 10
... protection software. Known issues are often fixed with your camera's firmware, software, and drivers. To optimize your digital photography experience, periodically check this section to your Macintosh (click the help button on the camera packaging. Once installation is the letter of firmware. Insert the HP Photosmart Software CD into the CD drive and follow the...
... protection software. Known issues are often fixed with your camera's firmware, software, and drivers. To optimize your digital photography experience, periodically check this section to your Macintosh (click the help button on the camera packaging. Once installation is the letter of firmware. Insert the HP Photosmart Software CD into the CD drive and follow the...

User Guide
Page 16
... the Shutter button halfway down , the picture may be blurry. Optical zoom physically adjusts the lens to hold the camera still for the length of the camera are magnified (this is called camera shake). Digital zoom uses no moving lens parts. To reduce potential blur, see Steady Photo under "Using the Picture Capture and... blurry because it is out of your picture appear closer. If appears when you do not have zoomed the lens fully using optical zoom, the camera employs digital zoom. Optical zoom Optical zoom moves the lens between wide angle (1x) and telephoto (3x). If the...
... the Shutter button halfway down , the picture may be blurry. Optical zoom physically adjusts the lens to hold the camera still for the length of the camera are magnified (this is called camera shake). Digital zoom uses no moving lens parts. To reduce potential blur, see Steady Photo under "Using the Picture Capture and... blurry because it is out of your picture appear closer. If appears when you do not have zoomed the lens fully using optical zoom, the camera employs digital zoom. Optical zoom Optical zoom moves the lens between wide angle (1x) and telephoto (3x). If the...

User Guide
Page 17
...zoom 15 When capturing images using digital zoom, make sure that the MP value shown in the Image Display is not available in , the scene enlarges within the yellow frame to indicate the area of the scene the camera will be captured. NOTE: Digital zoom is appropriate for the size ...at which you want to optical zoom, press until digital zooming stops. For MP values and their recommended print sizes, see Image Quality under...
...zoom 15 When capturing images using digital zoom, make sure that the MP value shown in the Image Display is not available in , the scene enlarges within the yellow frame to indicate the area of the scene the camera will be captured. NOTE: Digital zoom is appropriate for the size ...at which you want to optical zoom, press until digital zooming stops. For MP values and their recommended print sizes, see Image Quality under...

User Guide
Page 44
...even when you turn off if you do not press a button. Digital Zoom-Enables or disables digital zoom. USB Configuration-Specifies how a computer recognizes the camera. Touch or to set preferences for camera sounds (such as a disk drive using MSDC (Mass Storage Device ... of Image Display brightness based on page 6. 42 Using the Camera Setup Menu Off, Low (Default), High. On (Default), Off. See "Setting Remembered Settings" on page 35. • Digital Camera (Default)--Recognizes the camera as a digital camera using PTP (Picture Transfer Protocol). • Disk Drive-Recognizes...
...even when you turn off if you do not press a button. Digital Zoom-Enables or disables digital zoom. USB Configuration-Specifies how a computer recognizes the camera. Touch or to set preferences for camera sounds (such as a disk drive using MSDC (Mass Storage Device ... of Image Display brightness based on page 6. 42 Using the Camera Setup Menu Off, Low (Default), High. On (Default), Off. See "Setting Remembered Settings" on page 35. • Digital Camera (Default)--Recognizes the camera as a digital camera using PTP (Picture Transfer Protocol). • Disk Drive-Recognizes...
User Guide
Page 54
.../ support. 4. support information Windows Vista support www.hp.com Under Learn about:, click Digital Photography www.hp.com/hpinfo/community/accessibility (English only) www.hp.com/support www.hp.com/go/windowsvista (English only) Getting assistance To get the best from your digital camera, including links to the camera's Help screens. 2. Support options and fees vary by phone...
.../ support. 4. support information Windows Vista support www.hp.com Under Learn about:, click Digital Photography www.hp.com/hpinfo/community/accessibility (English only) www.hp.com/support www.hp.com/go/windowsvista (English only) Getting assistance To get the best from your digital camera, including links to the camera's Help screens. 2. Support options and fees vary by phone...
User Guide
Page 64
... (European Economic Area) According to ISO/IEC 17050-1 and EN 17050-1 Supplier's name: Hewlett-Packard Company Digital Photography and Entertainment Division declares that the product: Product name: Product number(s): Regulatory model: Power adapter: HP Photosmart R930 series Digital Camera (may cause harmful interference to radio communications. However, there is connected. • Consult the dealer or...
... (European Economic Area) According to ISO/IEC 17050-1 and EN 17050-1 Supplier's name: Hewlett-Packard Company Digital Photography and Entertainment Division declares that the product: Product name: Product number(s): Regulatory model: Power adapter: HP Photosmart R930 series Digital Camera (may cause harmful interference to radio communications. However, there is connected. • Consult the dealer or...
Quick Start Guide
Page 4
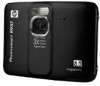
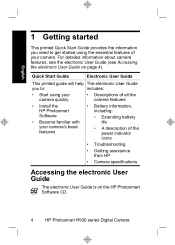
... your camera quickly • Descriptions of the power indicator icons • Troubleshooting • Getting assistance from HP • Camera specifications ...camera's basic features • Battery information, including: • Extending battery life • A description of all the camera features • Install the HP Photosmart Software • Become familiar with your camera. For detailed information about camera features, see the electronic User Guide (see Accessing the electronic User Guide on the HP Photosmart Software CD. 4 HP Photosmart R930 series Digital Camera...
... your camera quickly • Descriptions of the power indicator icons • Troubleshooting • Getting assistance from HP • Camera specifications ...camera's basic features • Battery information, including: • Extending battery life • A description of all the camera features • Install the HP Photosmart Software • Become familiar with your camera. For detailed information about camera features, see the electronic User Guide (see Accessing the electronic User Guide on the HP Photosmart Software CD. 4 HP Photosmart R930 series Digital Camera...
Quick Start Guide
Page 6
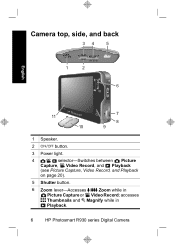
accesses Thumbnails and Magnify while in Picture Capture or Video Record; Camera top, side, and back 34 5 1 2 6 English 11 7 8 10 9 1 Speaker. 2 button. 3 Power light. 4 selector-Switches between Picture Capture, Video Record, and Playback (see Picture Capture, Video Record, and Playback on page 20). 5 Shutter button. 6 Zoom lever-Accesses / Zoom while in Playback. 6 HP Photosmart R930 series Digital Camera
accesses Thumbnails and Magnify while in Picture Capture or Video Record; Camera top, side, and back 34 5 1 2 6 English 11 7 8 10 9 1 Speaker. 2 button. 3 Power light. 4 selector-Switches between Picture Capture, Video Record, and Playback (see Picture Capture, Video Record, and Playback on page 20). 5 Shutter button. 6 Zoom lever-Accesses / Zoom while in Playback. 6 HP Photosmart R930 series Digital Camera
Quick Start Guide
Page 10
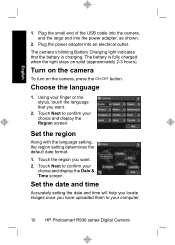
...2. Plug the power adapter into the power adapter, as shown. 2. The camera's blinking Battery Charging light indicates that you have uploaded them to confirm your computer, 10 HP Photosmart R930 series Digital Camera Touch Next to your choice and display the Date & Time screen. English ...1. Turn on the camera To turn on solid (approximately 2-3 hours). Touch Next to confirm...
...2. Plug the power adapter into the power adapter, as shown. 2. The camera's blinking Battery Charging light indicates that you have uploaded them to confirm your computer, 10 HP Photosmart R930 series Digital Camera Touch Next to your choice and display the Date & Time screen. English ...1. Turn on the camera To turn on solid (approximately 2-3 hours). Touch Next to confirm...
Quick Start Guide
Page 12
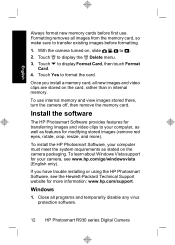
... Support website for transferring images and video clips to display the Delete menu. 3. Formatting removes all programs and temporarily disable any virus protection software. 12 HP Photosmart R930 series Digital Camera With the camera turned on the camera packaging. Once you have trouble installing or using the HP Photosmart Software, see www.hp.com/go/windowsvista (English only).
... Support website for transferring images and video clips to display the Delete menu. 3. Formatting removes all programs and temporarily disable any virus protection software. 12 HP Photosmart R930 series Digital Camera With the camera turned on the camera packaging. Once you have trouble installing or using the HP Photosmart Software, see www.hp.com/go/windowsvista (English only).
Quick Start Guide
Page 14
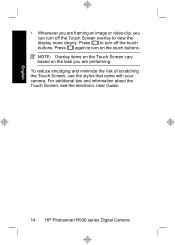
For additional tips and information about the Touch Screen, see the electronic User Guide. 14 HP Photosmart R930 series Digital Camera English • Whenever you can turn off the touch buttons. NOTE: Overlay items on the Touch Screen vary based on the touch buttons. Press again to turn on the task you are framing an image or video clip, you are performing. To reduce smudging and minimize the risk of scratching the Touch Screen, use the stylus that came with your camera. Press to turn off the Touch Screen overlay to view the display more clearly.
For additional tips and information about the Touch Screen, see the electronic User Guide. 14 HP Photosmart R930 series Digital Camera English • Whenever you can turn off the touch buttons. NOTE: Overlay items on the Touch Screen vary based on the touch buttons. Press again to turn on the task you are framing an image or video clip, you are performing. To reduce smudging and minimize the risk of scratching the Touch Screen, use the stylus that came with your camera. Press to turn off the Touch Screen overlay to view the display more clearly.
Quick Start Guide
Page 16
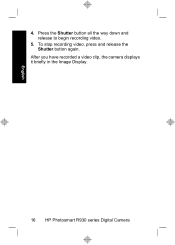
English 4. Press the Shutter button all the way down and release to begin recording video. 5. After you have recorded a video clip, the camera displays it briefly in the Image Display. 16 HP Photosmart R930 series Digital Camera To stop recording video, press and release the Shutter button again.
English 4. Press the Shutter button all the way down and release to begin recording video. 5. After you have recorded a video clip, the camera displays it briefly in the Image Display. 16 HP Photosmart R930 series Digital Camera To stop recording video, press and release the Shutter button again.
Quick Start Guide
Page 18
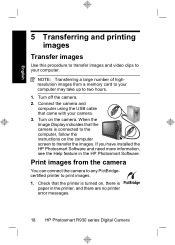
... connected to the computer, follow the instructions on the camera. Check that came with your computer. If you have installed the HP Photosmart Software and need more information, see the Help feature in the printer, and there are no printer error messages. 18 HP Photosmart R930 series Digital Camera English 5 Transferring and printing images Transfer images Use...
... connected to the computer, follow the instructions on the camera. Check that came with your computer. If you have installed the HP Photosmart Software and need more information, see the Help feature in the printer, and there are no printer error messages. 18 HP Photosmart R930 series Digital Camera English 5 Transferring and printing images Transfer images Use...
Quick Start Guide
Page 20
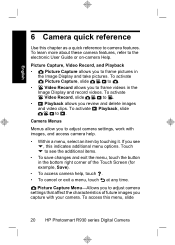
... in the bottom right corner of future images you to the electronic User Guide or on-camera Help. If you to see , this menu, slide 20 HP Photosmart R930 series Digital Camera Touch to frame videos in the Image Display and take pictures. To learn more about these... camera features, refer to adjust camera settings that affect the characteristics of the Touch Screen (for example, Save). • To access camera help . • Within ...
... in the bottom right corner of future images you to the electronic User Guide or on-camera Help. If you to see , this menu, slide 20 HP Photosmart R930 series Digital Camera Touch to frame videos in the Image Display and take pictures. To learn more about these... camera features, refer to adjust camera settings that affect the characteristics of the Touch Screen (for example, Save). • To access camera help . • Within ...
Quick Start Guide
Page 22
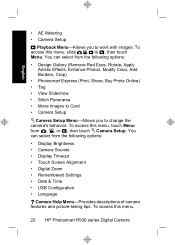
..., Buy Prints Online) • Tag • View Slideshow • Stitch Panorama • Move Images to Card • Camera Setup Camera Setup Menu-Allows you to , then touch Menu. To access this menu, 22 HP Photosmart R930 series Digital Camera To access this menu, slide to work with images. You can select from the following options: •...
..., Buy Prints Online) • Tag • View Slideshow • Stitch Panorama • Move Images to Card • Camera Setup Camera Setup Menu-Allows you to , then touch Menu. To access this menu, 22 HP Photosmart R930 series Digital Camera To access this menu, slide to work with images. You can select from the following options: •...


