
User Guide
Page 7
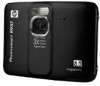
... bottom 5 Before taking pictures Complete the following procedures before taking pictures or recording video clips. Open the Battery/Memory Card door by sliding the door latch as indicated on page 21. 3 Microphone. 4 Battery/Memory Card door. 5 Tripod mount. Camera front and bottom 1 23 5 4 1 Flash. 2 Self-Timer/Focus Assist light-See "Using the Self-Timer settings" on...
... bottom 5 Before taking pictures Complete the following procedures before taking pictures or recording video clips. Open the Battery/Memory Card door by sliding the door latch as indicated on page 21. 3 Microphone. 4 Battery/Memory Card door. 5 Tripod mount. Camera front and bottom 1 23 5 4 1 Flash. 2 Self-Timer/Focus Assist light-See "Using the Self-Timer settings" on...

User Guide
Page 9
Touch or to display Format Card, then touch Format Card. 4. Close the Battery/Memory Card door and turn on your camera with a memory card installed, the camera indicates the number of 1999 images on a memory card. See Date & Time Imprint under "Using the Playback Menu" on... touch Done. Install and format an optional memory card This camera supports standard, high speed, and high capacity Secure Digital (SD and SDHC) memory cards, 32MB to format the card. Turn off the camera and open the Battery/Memory Card door. 2. Touch . 3. Touch or to confirm your computer,...
Touch or to display Format Card, then touch Format Card. 4. Close the Battery/Memory Card door and turn on your camera with a memory card installed, the camera indicates the number of 1999 images on a memory card. See Date & Time Imprint under "Using the Playback Menu" on... touch Done. Install and format an optional memory card This camera supports standard, high speed, and high capacity Secure Digital (SD and SDHC) memory cards, 32MB to format the card. Turn off the camera and open the Battery/Memory Card door. 2. Touch . 3. Touch or to confirm your computer,...
User Guide
Page 56
... that the camera is always ready for use. • A rechargeable Lithium Ion battery can be left in the camera or optional quick recharger for using it again. If battery life is inserted improperly, the compartment door may close but the camera will decrease ... battery. • Do not allow the battery to Auto Flash (see "Install the battery" on the camera to ensure that came with any button wakes up the camera. A Managing batteries Your camera uses a rechargeable HP Photosmart R07 Lithium Ion battery (L1812A/L1812B). If the battery is unacceptably short, replace the battery...
... that the camera is always ready for use. • A rechargeable Lithium Ion battery can be left in the camera or optional quick recharger for using it again. If battery life is inserted improperly, the compartment door may close but the camera will decrease ... battery. • Do not allow the battery to Auto Flash (see "Install the battery" on the camera to ensure that came with any button wakes up the camera. A Managing batteries Your camera uses a rechargeable HP Photosmart R07 Lithium Ion battery (L1812A/L1812B). If the battery is unacceptably short, replace the battery...
User Guide
Page 62
... Design Gallery 30 digital zoom 15, 42 dimensions 58 direct print 36 Display Brightness 42 Display Timeout 42 E e-mail images 40 enhancing photos 31 exposure 14 Exposure Bracketing 20 Exposure Compensation 20, 22 Panorama mode 17 per battery 55 sending 41 ...HP Photosmart Software 8 I Image Display 4 Image Quality 19, 58 images correcting 31 Date & Time Imprint 19 deleting 25 Image Quality 19, 58 magnifying 26 number remaining 11 L Landscape mode 17 Language 6, 42 LEDs 4 lights on camera 4 Lithium Ion battery 54, 56 M Magnify control 4 magnifying images 26 memory capacity 58 card 11 card door...
... Design Gallery 30 digital zoom 15, 42 dimensions 58 direct print 36 Display Brightness 42 Display Timeout 42 E e-mail images 40 enhancing photos 31 exposure 14 Exposure Bracketing 20 Exposure Compensation 20, 22 Panorama mode 17 per battery 55 sending 41 ...HP Photosmart Software 8 I Image Display 4 Image Quality 19, 58 images correcting 31 Date & Time Imprint 19 deleting 25 Image Quality 19, 58 magnifying 26 number remaining 11 L Landscape mode 17 Language 6, 42 LEDs 4 lights on camera 4 Lithium Ion battery 54, 56 M Magnify control 4 magnifying images 26 memory capacity 58 card 11 card door...

Quick Start Guide
Page 7
English 7 USB connector. 8 Battery Charging light. 9 Overlay button-Turns Touch Screen Image Display overlays on and off (see Using the Touch Screen interface on page 13). 10 Stylus (see ...). 11 Touch Screen Image Display-Frames images when in Picture Capture or Video Record, reviews images when in Playback, and provides a Touch Screen interface for camera operations (see Using the Touch Screen interface on page 13). Camera front and bottom 1 23 5 4 1 Flash. 2 Self-Timer/Focus Assist light. 3 Microphone. 4 Battery/Memory Card door. Getting started 7
English 7 USB connector. 8 Battery Charging light. 9 Overlay button-Turns Touch Screen Image Display overlays on and off (see Using the Touch Screen interface on page 13). 10 Stylus (see ...). 11 Touch Screen Image Display-Frames images when in Picture Capture or Video Record, reviews images when in Playback, and provides a Touch Screen interface for camera operations (see Using the Touch Screen interface on page 13). Camera front and bottom 1 23 5 4 1 Flash. 2 Self-Timer/Focus Assist light. 3 Microphone. 4 Battery/Memory Card door. Getting started 7

Quick Start Guide
Page 9
... first time. Do not charge any other battery in until the battery springs free. Setting up your camera 9 To remove the battery, move the battery latch as indicated on the Battery/Memory Card door. 2. NOTE: Your camera uses a rechargeable HP Photosmart R07 Lithium Ion battery (L1812A/ L1812B). Open the Battery/Memory Card door by sliding the door latch as shown until the latch catches...
... first time. Do not charge any other battery in until the battery springs free. Setting up your camera 9 To remove the battery, move the battery latch as indicated on the Battery/Memory Card door. 2. NOTE: Your camera uses a rechargeable HP Photosmart R07 Lithium Ion battery (L1812A/ L1812B). Open the Battery/Memory Card door by sliding the door latch as shown until the latch catches...

Quick Start Guide
Page 11
Install and format an optional memory card This camera supports standard, high speed, and high capacity Secure Digital (SD and SDHC) memory cards, 32MB to adjust the month, date, and year. 2. Turn off the camera and open the Battery/Memory Card door. 2. Insert the optional memory card in the smaller slot as shown. NOTE: When you...
Install and format an optional memory card This camera supports standard, high speed, and high capacity Secure Digital (SD and SDHC) memory cards, 32MB to adjust the month, date, and year. 2. Turn off the camera and open the Battery/Memory Card door. 2. Insert the optional memory card in the smaller slot as shown. NOTE: When you...


