
HP Limited Warranty Statement
Page 5
..., you have different options depending on the duration of mind through extended service coverage. Disallow limitations on the region where you with the marketing name (HP Photosmart R725/R727 Digital Cameras) or product numbers (L2062A, L2063A, L2064A, L2065A, L2066A, L2069A, L2070A, L2071A, L2072A, L2073A). For consumer transactions in the United States, any way affected by law...
..., you have different options depending on the duration of mind through extended service coverage. Disallow limitations on the region where you with the marketing name (HP Photosmart R725/R727 Digital Cameras) or product numbers (L2062A, L2063A, L2064A, L2065A, L2066A, L2069A, L2070A, L2071A, L2072A, L2073A). For consumer transactions in the United States, any way affected by law...

Quick Start Guide
Page 4
... help The electronic User Guide you to: includes: ● Start using the essential features of the power indicator icons ● Troubleshooting ● Getting assistance from HP ● Camera specifications Accessing the electronic User Guide The electronic User Guide is on the HP Photosmart Software CD. 4 HP Photosmart R725/R727 Digital Camera
... help The electronic User Guide you to: includes: ● Start using the essential features of the power indicator icons ● Troubleshooting ● Getting assistance from HP ● Camera specifications Accessing the electronic User Guide The electronic User Guide is on the HP Photosmart Software CD. 4 HP Photosmart R725/R727 Digital Camera

Quick Start Guide
Page 6
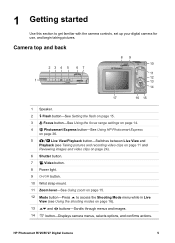
English Camera top and back 234 5 6 7 1 89 10 11 12 13 14 17 16 15 1 Speaker. 2 Flash button-Settings are Auto, Flash On, Flash Off. 3 Focus button-Settings are Normal, Macro, Auto Macro, Infinity. 4 Photosmart Express button-Options are Print, Buy Prints Online, Share Setup. 5 Live View/Playback button-Switches between Live View and Playback (see Live View and Playback on page 18). 6 Shutter button. 7 Video button. 8 Power light. 9 button. 6 HP Photosmart R725/R727 Digital Camera
English Camera top and back 234 5 6 7 1 89 10 11 12 13 14 17 16 15 1 Speaker. 2 Flash button-Settings are Auto, Flash On, Flash Off. 3 Focus button-Settings are Normal, Macro, Auto Macro, Infinity. 4 Photosmart Express button-Options are Print, Buy Prints Online, Share Setup. 5 Live View/Playback button-Switches between Live View and Playback (see Live View and Playback on page 18). 6 Shutter button. 7 Video button. 8 Power light. 9 button. 6 HP Photosmart R725/R727 Digital Camera
Quick Start Guide
Page 8
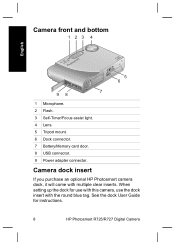
Camera dock insert If you purchase an optional HP Photosmart camera dock, it will come with the round blue tag. See the dock User Guide for use with this camera, use the dock insert with multiple clear inserts. Camera front and bottom 123 4 English 5 6 98 7 1 Microphone. 2 Flash. 3 Self-Timer/Focus assist light. 4 Lens. 5 Tripod mount. 6 Dock connector. 7 Battery/Memory card door. 8 USB connector. 9 Power adapter connector. When setting up the dock for instructions. 8 HP Photosmart R725/R727 Digital Camera
Camera dock insert If you purchase an optional HP Photosmart camera dock, it will come with the round blue tag. See the dock User Guide for use with this camera, use the dock insert with multiple clear inserts. Camera front and bottom 123 4 English 5 6 98 7 1 Microphone. 2 Flash. 3 Self-Timer/Focus assist light. 4 Lens. 5 Tripod mount. 6 Dock connector. 7 Battery/Memory card door. 8 USB connector. 9 Power adapter connector. When setting up the dock for instructions. 8 HP Photosmart R725/R727 Digital Camera
Quick Start Guide
Page 10
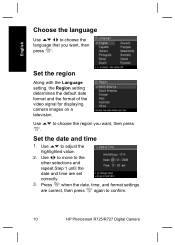
...to move to the other selections and repeat Step 1 until the date and time are correct, then press again to confirm. 10 HP Photosmart R725/R727 Digital Camera Use to choose the region you want , then press . Set the region Along with the Language setting, the Region setting determines ...the default date format and the format of the video signal for displaying camera images on a television. Set the date and time 1. Press when the date, time, and format settings are set correctly. 3. English Choose...
...to move to the other selections and repeat Step 1 until the date and time are correct, then press again to confirm. 10 HP Photosmart R725/R727 Digital Camera Use to choose the region you want , then press . Set the region Along with the Language setting, the Region setting determines ...the default date format and the format of the video signal for displaying camera images on a television. Set the date and time 1. Press when the date, time, and format settings are set correctly. 3. English Choose...

Quick Start Guide
Page 12
... virus protection software. Insert the HP Photosmart Software CD into the CD drive. 2. If you have trouble installing or using the HP Photosmart Software, see the HP Customer Care website for more ). Insert the HP Photosmart Software CD into the CD drive and follow the on the computer desktop. 3. screen instructions. 12 HP Photosmart R725/R727 Digital Camera Double-click the CD icon...
... virus protection software. Insert the HP Photosmart Software CD into the CD drive. 2. If you have trouble installing or using the HP Photosmart Software, see the HP Customer Care website for more ). Insert the HP Photosmart Software CD into the CD drive and follow the on the computer desktop. 3. screen instructions. 12 HP Photosmart R725/R727 Digital Camera Double-click the CD icon...
Quick Start Guide
Page 14
English 14 HP Photosmart R725/R727 Digital Camera To stop recording video, press and release the Video button again. 4.
English 14 HP Photosmart R725/R727 Digital Camera To stop recording video, press and release the Video button again. 4.

Quick Start Guide
Page 16
... using an optional HP Photosmart camera dock (see the dock User Guide). 1. If you have not installed the HP Photosmart Software, see the Help feature in the printer, and there are no printer error messages. 16 HP Photosmart R725/R727 Digital Camera Tip You can connect the camera to any PictBridge-...certified printer to print still images and frames saved from the camera You can also perform this method to transfer images and video ...
... using an optional HP Photosmart camera dock (see the dock User Guide). 1. If you have not installed the HP Photosmart Software, see the Help feature in the printer, and there are no printer error messages. 16 HP Photosmart R725/R727 Digital Camera Tip You can connect the camera to any PictBridge-...certified printer to print still images and frames saved from the camera You can also perform this method to transfer images and video ...
Quick Start Guide
Page 18
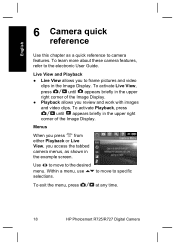
...either Playback or Live View, you to specific selections. Within a menu, use to move to camera features. To exit the menu, press at any time. 18 HP Photosmart R725/R727 Digital Camera To activate Playback, press until appears briefly in the upper right corner of the Image Display.... Live View and Playback ● Live View allows you access the tabbed camera menus, as a quick reference to the...
...either Playback or Live View, you to specific selections. Within a menu, use to move to camera features. To exit the menu, press at any time. 18 HP Photosmart R725/R727 Digital Camera To activate Playback, press until appears briefly in the upper right corner of the Image Display.... Live View and Playback ● Live View allows you access the tabbed camera menus, as a quick reference to the...

Quick Start Guide
Page 20
...Red Eyes Rotate Crop Setup allows you to change the camera's behavior. ● Display Brightness ● Sounds Volume ● Focus Assist Light ● Display Timeout ● Instant Review ● Digital Zoom ● Date & Time ● USB ... ● ● ● ● ● Top Ten Tips Camera Accessories Camera Buttons Using Shooting Modes Using Design Gallery Sharing Images Printing Images Recording Audio Clips Recording Video Clips Reviewing Images and Videos Extracting Prints from Video Deleting Images Transferring Images 20 HP Photosmart R725/R727 Digital Camera
...Red Eyes Rotate Crop Setup allows you to change the camera's behavior. ● Display Brightness ● Sounds Volume ● Focus Assist Light ● Display Timeout ● Instant Review ● Digital Zoom ● Date & Time ● USB ... ● ● ● ● ● Top Ten Tips Camera Accessories Camera Buttons Using Shooting Modes Using Design Gallery Sharing Images Printing Images Recording Audio Clips Recording Video Clips Reviewing Images and Videos Extracting Prints from Video Deleting Images Transferring Images 20 HP Photosmart R725/R727 Digital Camera
User Guide
Page 3
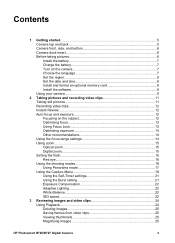
...8 Set the date and time 8 Install and format an optional memory card 8 Install the software 8 Using your camera 9 2 Taking pictures and recording video clips 11 Taking still pictures 11 Recording video clips 12 Instant Review...12 Auto...13 Optimizing exposure 14 Other recommendations 14 Using the focus range settings 14 Using zoom...15 Optical zoom 15 Digital zoom...15 Setting the flash...15 Red eye...16 Using the shooting modes 16 Using Panorama mode 17 ... 25 Saving frames from video clips 25 Viewing thumbnails 25 Magnifying images 25 HP Photosmart R725/R727 Digital Camera 3
...8 Set the date and time 8 Install and format an optional memory card 8 Install the software 8 Using your camera 9 2 Taking pictures and recording video clips 11 Taking still pictures 11 Recording video clips 12 Instant Review...12 Auto...13 Optimizing exposure 14 Other recommendations 14 Using the focus range settings 14 Using zoom...15 Optical zoom 15 Digital zoom...15 Setting the flash...15 Red eye...16 Using the shooting modes 16 Using Panorama mode 17 ... 25 Saving frames from video clips 25 Viewing thumbnails 25 Magnifying images 25 HP Photosmart R725/R727 Digital Camera 3
User Guide
Page 5
HP Photosmart R725/R727 Digital Camera 5 Camera top and back 234 5 6 7 1 89 10 11 12 13 14 17 16 15 1 Speaker. 2 Flash button-See Setting the flash on page 15. 3 Focus button-See Using the focus range settings on page 14. 4 Photosmart Express button-See Using HP Photosmart Express on page 36. 5 Live View/Playback button-Switches between Live View and...
HP Photosmart R725/R727 Digital Camera 5 Camera top and back 234 5 6 7 1 89 10 11 12 13 14 17 16 15 1 Speaker. 2 Flash button-See Setting the flash on page 15. 3 Focus button-See Using the focus range settings on page 14. 4 Photosmart Express button-See Using HP Photosmart Express on page 36. 5 Live View/Playback button-Switches between Live View and...
User Guide
Page 7
... 2-3 hours). Note You can charge the battery in the camera using an optional camera dock, plug in the dock, then dock the camera. 2. The battery is charging (if you are charging in to an electrical outlet. HP Photosmart R725/R727 Digital Camera 7 Note Turn the camera off before using an optional HP Photosmart quick recharger. Connect the AC power adapter to choose...
... 2-3 hours). Note You can charge the battery in the camera using an optional camera dock, plug in the dock, then dock the camera. 2. The battery is charging (if you are charging in to an electrical outlet. HP Photosmart R725/R727 Digital Camera 7 Note Turn the camera off before using an optional HP Photosmart quick recharger. Connect the AC power adapter to choose...
User Guide
Page 9
... than 128 MB of RAM). When the software has finished installing, re-enable virus protection software. Macintosh 1. Double-click the CD icon on page 29 HP Photosmart R725/R727 Digital Camera 9 Use the Share feature to e-mail images to use them to your computer. To learn more about the software features and how to addresses you...
... than 128 MB of RAM). When the software has finished installing, re-enable virus protection software. Macintosh 1. Double-click the CD icon on page 29 HP Photosmart R725/R727 Digital Camera 9 Use the Share feature to e-mail images to use them to your computer. To learn more about the software features and how to addresses you...
User Guide
Page 11
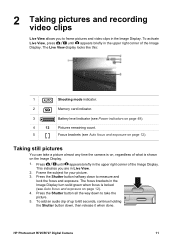
... you to 60 seconds, continue holding the Shutter button down to take a picture almost any time the camera is on, regardless of what is locked (see Auto focus and exposure on the Image Display. 1. HP Photosmart R725/R727 Digital Camera 11 The focus brackets in the Image Display. Frame the subject for your picture. 3. Press the Shutter...
... you to 60 seconds, continue holding the Shutter button down to take a picture almost any time the camera is on, regardless of what is locked (see Auto focus and exposure on the Image Display. 1. HP Photosmart R725/R727 Digital Camera 11 The focus brackets in the Image Display. Frame the subject for your picture. 3. Press the Shutter...
User Guide
Page 13
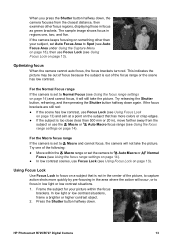
... page 13). Try releasing the Shutter button, reframing, and then pressing the Shutter button halfway down . For the Normal Focus range If the camera is set the camera to Normal Focus (see Using the focus range settings on page 14). If the focus brackets are still red: ● If the scene... focus range or the scene has low contrast. Press the Shutter button halfway down again. When you press the Shutter button halfway down, the camera focuses from the closest distance, then examines other than 500 mm or 20 in focus as green brackets. HP Photosmart R725/R727 Digital Camera 13
... page 13). Try releasing the Shutter button, reframing, and then pressing the Shutter button halfway down . For the Normal Focus range If the camera is set the camera to Normal Focus (see Using the focus range settings on page 14). If the focus brackets are still red: ● If the scene... focus range or the scene has low contrast. Press the Shutter button halfway down again. When you press the Shutter button halfway down, the camera focuses from the closest distance, then examines other than 500 mm or 20 in focus as green brackets. HP Photosmart R725/R727 Digital Camera 13
User Guide
Page 15
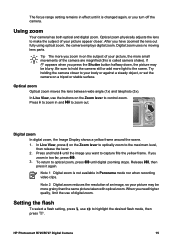
... capture fills the yellow frame. To return to highlight the desired flash mode, then HP Photosmart R725/R727 Digital Camera 15 When you want to hold until the image you need higher quality, limit the use of digital zoom. to optical zoom, press until it again. Press to zoom out. If .... The focus range setting remains in on the subject of your picture, the more small movements of the camera are magnified (this is called camera shake). Note 2 Digital zoom reduces the resolution of your picture may be more light to control zoom. Optical zoom physically adjusts the...
... capture fills the yellow frame. To return to highlight the desired flash mode, then HP Photosmart R725/R727 Digital Camera 15 When you want to hold until the image you need higher quality, limit the use of digital zoom. to optical zoom, press until it again. Press to zoom out. If .... The focus range setting remains in on the subject of your picture, the more small movements of the camera are magnified (this is called camera shake). Note 2 Digital zoom reduces the resolution of your picture may be more light to control zoom. Optical zoom physically adjusts the...
User Guide
Page 17
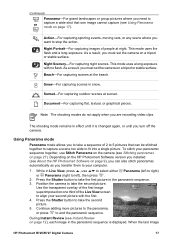
... 2 to 5 pictures that one third of the first image superimposed on one image cannot capture (see About the HP Photosmart Software on a tripod or stable surface. When the last image HP Photosmart R725/R727 Digital Camera 17 Depending on the HP Photosmart Software version you installed (see Using Panorama mode on a tripod or stable surface. Action-For capturing sporting events...
... 2 to 5 pictures that one third of the first image superimposed on one image cannot capture (see About the HP Photosmart Software on a tripod or stable surface. When the last image HP Photosmart R725/R727 Digital Camera 17 Depending on the HP Photosmart Software version you installed (see Using Panorama mode on a tripod or stable surface. Action-For capturing sporting events...
User Guide
Page 19
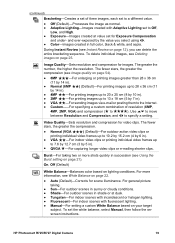
...)-For outdoor action video clips or printing individual video frames up to 7.6 by 12.7 cm (3 by the value you can delete the entire bracketing sequence. HP Photosmart R725/R727 Digital Camera 19 and over-exposed by 5 in shade or at value set the white balance, select Manual, then follow the onscreen instructions. Video Quality-Sets resolution...
...)-For outdoor action video clips or printing individual video frames up to 7.6 by 12.7 cm (3 by the value you can delete the entire bracketing sequence. HP Photosmart R725/R727 Digital Camera 19 and over-exposed by 5 in shade or at value set the white balance, select Manual, then follow the onscreen instructions. Video Quality-Sets resolution...
User Guide
Page 21
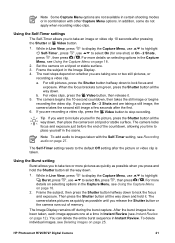
.... In addition, some do not apply when recording video clips. For more details on selecting options in the scene. Set the camera on a tripod or stable surface. Frame the subject in combination with the Self-Timer setting, see Recording audio on page 27.... the Shutter button halfway down , then place the camera on a tripod or stable surface. 3. The camera takes pictures as quickly as possible when you are not available in certain shooting modes or in the Image Display. 4. The Image Display remains off during the burst capture. HP Photosmart R725/R727 Digital Camera 21
.... In addition, some do not apply when recording video clips. For more details on selecting options in the scene. Set the camera on a tripod or stable surface. Frame the subject in combination with the Self-Timer setting, see Recording audio on page 27.... the Shutter button halfway down , then place the camera on a tripod or stable surface. 3. The camera takes pictures as quickly as possible when you are not available in certain shooting modes or in the Image Display. 4. The Image Display remains off during the burst capture. HP Photosmart R725/R727 Digital Camera 21


