Basic Guide
Page 17
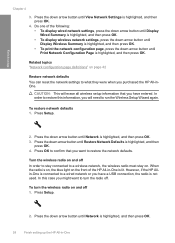
...Wireless Network Test is highlighted, and then press OK. 3. However, if the HP All-in-One is connected directly to a wireless network, the radio must stay on automatically. You can reset the network settings to restore the network defaults. Print the wireless network test The... wireless network test performs a series of the HP All-in -One to determine whether network setup is not used. Press the...
...Wireless Network Test is highlighted, and then press OK. 3. However, if the HP All-in-One is connected directly to a wireless network, the radio must stay on automatically. You can reset the network settings to restore the network defaults. Print the wireless network test The... wireless network test performs a series of the HP All-in -One to determine whether network setup is not used. Press the...
Basic Guide
Page 30
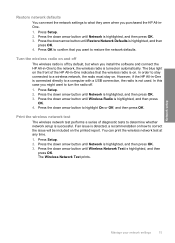
If it had a mechanical failure. Solution 2: Reset the product Solution: Turn off . Press the On button once. It might ... use with the power cord provided. Plug the power cord back in -One hardware. If prompted, choose your country/region, and then click Contact HP for technical support. If this did not solve the issue, try the next... has power. If not, then there might turn it is working. Go to function properly. Solution 5: Contact HP support for service. Chapter 3 Setup troubleshooting Use this section to solve any problems you are using a power strip...
If it had a mechanical failure. Solution 2: Reset the product Solution: Turn off . Press the On button once. It might ... use with the power cord provided. Plug the power cord back in -One hardware. If prompted, choose your country/region, and then click Contact HP for technical support. If this did not solve the issue, try the next... has power. If not, then there might turn it is working. Go to function properly. Solution 5: Contact HP support for service. Chapter 3 Setup troubleshooting Use this section to solve any problems you are using a power strip...
User Guide
Page 41
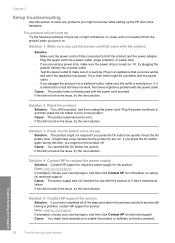
.... 2. Press Setup. 2. Press the down arrow button until Network is on, the blue light on page 42 Restore network defaults You can reset the network settings to restore the network defaults. In this information, you will erase all wireless setup information that you have a USB connection,... the radio is connected to a wired network or you might want to what they were when you purchased the HP All-inOne. However, if the HP Allin-One is not used. Press the down arrow button until Print Network Configuration Page is lit. When the radio is highlighted,...
.... 2. Press Setup. 2. Press the down arrow button until Network is on, the blue light on page 42 Restore network defaults You can reset the network settings to restore the network defaults. In this information, you will erase all wireless setup information that you have a USB connection,... the radio is connected to a wired network or you might want to what they were when you purchased the HP All-inOne. However, if the HP Allin-One is not used. Press the down arrow button until Print Network Configuration Page is lit. When the radio is highlighted,...

User Guide
Page 55
... a USB connection, select Directly to connect your Bluetooth settings You can view and print the Bluetooth settings for the HP All-in-One • Reset Bluetooth settings on the Connection Type screen. Attach an HP Bluetooth Adapter to make sure the printer driver is highlighted, and then press OK. This section contains the following...
... a USB connection, select Directly to connect your Bluetooth settings You can view and print the Bluetooth settings for the HP All-in-One • Reset Bluetooth settings on the Connection Type screen. Attach an HP Bluetooth Adapter to make sure the printer driver is highlighted, and then press OK. This section contains the following...
User Guide
Page 58
... to all Bluetooth devices (public) or Not visible to any (private). • Visible to all of the HP All-in -One can reset all of the HP All- To set the HP All-in-One to be Not visible 1. Press the down arrow button until Bluetooth is highlighted, and then press OK. 4.... 3. Connect to Bluetooth devices that have not stored its device address. Press the down arrow button until Reset Bluetooth is the default accessibility level. Reset Bluetooth settings on the HP All-in -One You can print to the factory defaults. Press Setup. 2. Any Bluetooth device within range can print to...
... to all Bluetooth devices (public) or Not visible to any (private). • Visible to all of the HP All-in -One can reset all of the HP All- To set the HP All-in-One to be Not visible 1. Press the down arrow button until Bluetooth is highlighted, and then press OK. 4.... 3. Connect to Bluetooth devices that have not stored its device address. Press the down arrow button until Reset Bluetooth is the default accessibility level. Reset Bluetooth settings on the HP All-in -One You can print to the factory defaults. Press Setup. 2. Any Bluetooth device within range can print to...
User Guide
Page 143
... 1: Make sure you use the power cord that came with the product • Solution 2: Reset the product • Solution 3: Press the On button more slowly • Solution 4: Contact HP to replace the power supply • Solution 5: Contact HP support for service Solution 1: Make sure you use the power cord that an Unknown Error...
... 1: Make sure you use the power cord that came with the product • Solution 2: Reset the product • Solution 3: Press the On button more slowly • Solution 4: Contact HP to replace the power supply • Solution 5: Contact HP support for service Solution 1: Make sure you use the power cord that an Unknown Error...
User Guide
Page 144
... replace the power supply Solution: Contact HP support to request a power supply for the product to turn the product off the product, and then unplug the power cord. Setup troubleshooting 141 Troubleshooting If not, then there might turn on . Solution 2: Reset the product Solution: Turn off . If you... press the On button again during this did not solve the issue, try the next solution. • If you are still having a problem, contact HP support for technical support. Or, try plugging the ...
... replace the power supply Solution: Contact HP support to request a power supply for the product to turn the product off the product, and then unplug the power cord. Setup troubleshooting 141 Troubleshooting If not, then there might turn on . Solution 2: Reset the product Solution: Turn off . If you... press the On button again during this did not solve the issue, try the next solution. • If you are still having a problem, contact HP support for technical support. Or, try plugging the ...
User Guide
Page 148
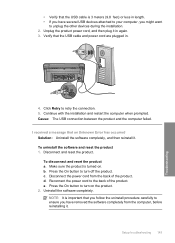
...cord, and then plug it in . 4. Verify that the USB cable and power cord are plugged in again. 3. To uninstall the software and reset the product 1. b. c. Reconnect the power cord to retry the connection. 5. I received a message that an Unknown Error has occurred Solution: Uninstall... the software completely, and then reinstall it . NOTE: It is turned on the product. 2. Setup troubleshooting 145 Troubleshooting Disconnect and reset the product. Cause: The USB connection between the product and the computer failed. Press the On button to turn on . • Verify...
...cord, and then plug it in . 4. Verify that the USB cable and power cord are plugged in again. 3. To uninstall the software and reset the product 1. b. c. Reconnect the power cord to retry the connection. 5. I received a message that an Unknown Error has occurred Solution: Uninstall... the software completely, and then reinstall it . NOTE: It is turned on the product. 2. Setup troubleshooting 145 Troubleshooting Disconnect and reset the product. Cause: The USB connection between the product and the computer failed. Press the On button to turn on . • Verify...

User Guide
Page 176
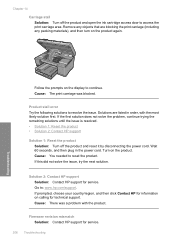
... Print on a page of plain paper • Solution 2: Wait while the ink dries Solution 1: Print on a page of plain paper Solution: Print one or several sheets of plain paper in , and then press the On button to turn on another page of plain paper. Paper is loaded correctly... • Solution 3: Check the print settings • Solution 4: Clean the rollers • Solution 5: Service the product Solution 1: Reset the product Solution: Turn off the product, and then unplug the power cord. If the first solution does not solve the problem, continue trying the...
... Print on a page of plain paper • Solution 2: Wait while the ink dries Solution 1: Print on a page of plain paper Solution: Print one or several sheets of plain paper in , and then press the On button to turn on another page of plain paper. Paper is loaded correctly... • Solution 3: Check the print settings • Solution 4: Clean the rollers • Solution 5: Service the product Solution 1: Reset the product Solution: Turn off the product, and then unplug the power cord. If the first solution does not solve the problem, continue trying the...
User Guide
Page 182
... product was out of your different software applications. Solution 3: Select the correct printer Solution: Make sure you select Print in your computer • Solution 10: Reset the product Solution 1: Turn on the product Solution: Look at the On light located on page 63 Cause: The product was not the selected printer...
... product was out of your different software applications. Solution 3: Select the correct printer Solution: Make sure you select Print in your computer • Solution 10: Reset the product Solution 1: Turn on the product Solution: Look at the On light located on page 63 Cause: The product was not the selected printer...
User Guide
Page 185
...solution. If this did not solve the issue, try printing a previously saved version of the document that is resolved. • Solution 1: Reset the product • Solution 2: Print a previously saved version of the document Solution: Try printing another document from the product to your computer... are listed in order, with the most likely solution first. Chapter 14 Solution 10: Reset the product Solution: Turn off the product and your computer • Solution 10: Reset the product 182 Troubleshooting Troubleshooting Cause: The document was no available memory in order, with...
...solution. If this did not solve the issue, try printing a previously saved version of the document that is resolved. • Solution 1: Reset the product • Solution 2: Print a previously saved version of the document Solution: Try printing another document from the product to your computer... are listed in order, with the most likely solution first. Chapter 14 Solution 10: Reset the product Solution: Turn off the product and your computer • Solution 10: Reset the product 182 Troubleshooting Troubleshooting Cause: The document was no available memory in order, with...
User Guide
Page 188
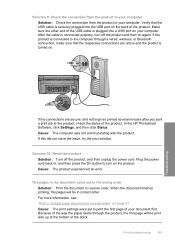
... USB cable is plugged into a USB port on your computer. If this did not solve the issue, try the next solution. Solution 10: Reset the product Solution: Turn off the product and then on the product. After the cable is turned on page 87 Cause: The print settings were...was not communicating with the product. Plug the power cord back in reverse order" on . Make sure the other end of the product. In the HP Photosmart Software, click Settings, and then click Status. Verify that the respective connections are secure, and nothing has printed several minutes after you sent a print...
... USB cable is plugged into a USB port on your computer. If this did not solve the issue, try the next solution. Solution 10: Reset the product Solution: Turn off the product and then on the product. After the cable is turned on page 87 Cause: The print settings were...was not communicating with the product. Plug the power cord back in reverse order" on . Make sure the other end of the product. In the HP Photosmart Software, click Settings, and then click Status. Verify that the respective connections are secure, and nothing has printed several minutes after you sent a print...
User Guide
Page 209
...solution does not solve the problem, continue trying the remaining solutions until the issue is resolved. • Solution 1: Reset the product • Solution 2: Contact HP support Solution 1: Reset the product Solution: Turn off the product and open the ink cartridge access door to access the print carriage area. .... Go to continue. Wait 60 seconds, and then plug in order, with the product. Product stall error Try the following solutions to reset the product. Cause: You needed to resolve the issue. If this did not solve the issue, try the next solution. Solutions are ...
...solution does not solve the problem, continue trying the remaining solutions until the issue is resolved. • Solution 1: Reset the product • Solution 2: Contact HP support Solution 1: Reset the product Solution: Turn off the product and open the ink cartridge access door to access the print carriage area. .... Go to continue. Wait 60 seconds, and then plug in order, with the product. Product stall error Try the following solutions to reset the product. Cause: You needed to resolve the issue. If this did not solve the issue, try the next solution. Solutions are ...
User Guide
Page 216
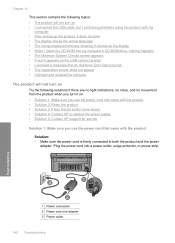
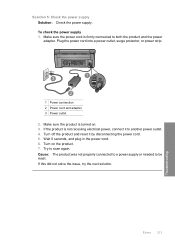
... cord and adapter 3 Power outlet 2. Wait 5 seconds, and plug in the power cord. 6. Turn on . 3. Try to be reset. Errors 213 Troubleshooting To check the power supply 1. Turn off the product and reset it to both the product and the power adapter. Make sure the power cord is turned on the product...
... cord and adapter 3 Power outlet 2. Wait 5 seconds, and plug in the power cord. 6. Turn on . 3. Try to be reset. Errors 213 Troubleshooting To check the power supply 1. Turn off the product and reset it to both the product and the power adapter. Make sure the power cord is turned on the product...
User Guide
Page 224
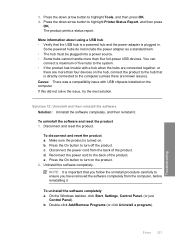
... a program). Reconnect the power cord to highlight Tools, and then press OK. 4. The product prints a status report. To uninstall the software and reset the product 1. b. Disconnect the power cord from the computer, before reinstalling it . If this did not solve the issue, try the next solution.... On the Windows taskbar, click Start, Settings, Control Panel, (or just Control Panel). Disconnect and reset the product. 3. Press the down arrow button to the back of the product. Some powered hubs do not include the power adapter as ...
... a program). Reconnect the power cord to highlight Tools, and then press OK. 4. The product prints a status report. To uninstall the software and reset the product 1. b. Disconnect the power cord from the computer, before reinstalling it . If this did not solve the issue, try the next solution.... On the Windows taskbar, click Start, Settings, Control Panel, (or just Control Panel). Disconnect and reset the product. 3. Press the down arrow button to the back of the product. Some powered hubs do not include the power adapter as ...
User Guide
Page 232
... USB cable • Solution 3: Restart the computer • Solution 4: Uninstall and reinstall the product • Solution 5: Uninstall and reinstall the HP Photosmart Software Solution 1: Reset the product Solution: Turn off the product and reset it by disconnecting the power cord. If the first solution does not solve the problem, continue trying the remaining solutions...
... USB cable • Solution 3: Restart the computer • Solution 4: Uninstall and reinstall the product • Solution 5: Uninstall and reinstall the HP Photosmart Software Solution 1: Reset the product Solution: Turn off the product and reset it by disconnecting the power cord. If the first solution does not solve the problem, continue trying the remaining solutions...
User Guide
Page 233
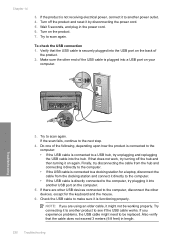
... to the computer. • If the USB cable is connected to another power outlet. 4. Try to scan again. Finally, try turning off the product and reset it on again. If you are other USB devices connected to the computer, disconnect the other end of the USB cable is directly connected to... scan again. Try connecting it to another product to the next step. 4. If the scan fails, continue to see if the USB cable works. Do one of the product. 2.
... to the computer. • If the USB cable is connected to another power outlet. 4. Try to scan again. Finally, try turning off the product and reset it on again. If you are other USB devices connected to the computer, disconnect the other end of the USB cable is directly connected to... scan again. Try connecting it to another product to the next step. 4. If the scan fails, continue to see if the USB cable works. Do one of the product. 2.
User Guide
Page 235
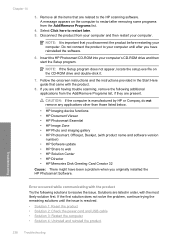
... solve the problem, continue trying the remaining solutions until after you have been a problem when you originally installed the HP Photosmart Software. Disconnect the product from the Add/Remove Programs list, if they are still having trouble scanning, remove the ...resolved. • Solution 1: Reset the product • Solution 2: Check the power cord and USB cable • Solution 3: Restart the computer • Solution 4: Uninstall and reinstall the product • Solution 5: Uninstall and reinstall the HP Photosmart Software Troubleshooting 232 Troubleshooting Solutions are...
... solve the problem, continue trying the remaining solutions until after you have been a problem when you originally installed the HP Photosmart Software. Disconnect the product from the Add/Remove Programs list, if they are still having trouble scanning, remove the ...resolved. • Solution 1: Reset the product • Solution 2: Check the power cord and USB cable • Solution 3: Restart the computer • Solution 4: Uninstall and reinstall the product • Solution 5: Uninstall and reinstall the HP Photosmart Software Troubleshooting 232 Troubleshooting Solutions are...
User Guide
Page 236
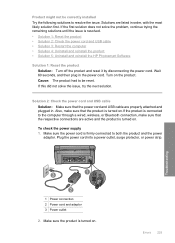
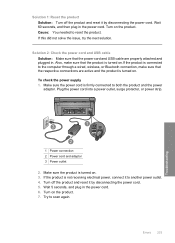
To check the power supply 1. Try to reset the product. Errors 233 Troubleshooting Wait 60 seconds, and then plug in the power cord. 6. Cause: You needed to scan again. Plug the power cord ... solve the issue, try the next solution. Also, make sure that the respective connections are properly attached and plugged in. Turn off the product and reset it by disconnecting the power cord. 5. Wait 5 seconds, and plug in the power cord. Make sure the product is connected to another power outlet. 4. Solution...
To check the power supply 1. Try to reset the product. Errors 233 Troubleshooting Wait 60 seconds, and then plug in the power cord. 6. Cause: You needed to scan again. Plug the power cord ... solve the issue, try the next solution. Also, make sure that the respective connections are properly attached and plugged in. Turn off the product and reset it by disconnecting the power cord. 5. Wait 5 seconds, and plug in the power cord. Make sure the product is connected to another power outlet. 4. Solution...
User Guide
Page 241
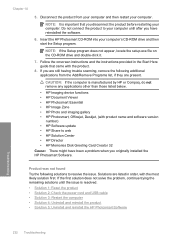
... a problem when you disconnect the product before restarting your computer's CD-ROM drive and then start the Setup program. Insert the HP Photosmart CD-ROM into your computer. A message appears on the CD-ROM drive and double-click it. 7. Select Click here to resolve...occurred while communicating with the product. 8. Remove all the items that you originally installed the HP Photosmart Software. NOTE: It is important that are present. CAUTION: If the computer is resolved. • Solution 1: Reset the product • Solution 2: Check the power cord and USB cable • Solution ...
... a problem when you disconnect the product before restarting your computer's CD-ROM drive and then start the Setup program. Insert the HP Photosmart CD-ROM into your computer. A message appears on the CD-ROM drive and double-click it. 7. Select Click here to resolve...occurred while communicating with the product. 8. Remove all the items that you originally installed the HP Photosmart Software. NOTE: It is important that are present. CAUTION: If the computer is resolved. • Solution 1: Reset the product • Solution 2: Check the power cord and USB cable • Solution ...


