Setup Guide
Page 1
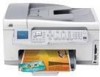
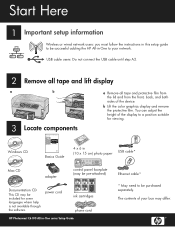
Windows CD Basics Guide 4 x 6 in -One to your box may be included for viewing. power cord ink cartridges phone cord HP Photosmart C6100 All-in -One series Basics Guide a Remove all tape and lift display a b 3 Locate components HP Photosmart C6100 All-in -One series Setup Guide Ethernet cable* * May need to be purchased separately. b Lift the color...setup information Wireless or wired network users: you must follow the instructions in this setup guide to be successful adding the HP All-in (10 x 15 cm) photo paper USB cable* Mac CD adapter control panel faceplate (may be pre-...
Windows CD Basics Guide 4 x 6 in -One to your box may be included for viewing. power cord ink cartridges phone cord HP Photosmart C6100 All-in -One series Basics Guide a Remove all tape and lift display a b 3 Locate components HP Photosmart C6100 All-in -One series Setup Guide Ethernet cable* * May need to be purchased separately. b Lift the color...setup information Wireless or wired network users: you must follow the instructions in this setup guide to be successful adding the HP All-in (10 x 15 cm) photo paper USB cable* Mac CD adapter control panel faceplate (may be pre-...
Setup Guide
Page 7
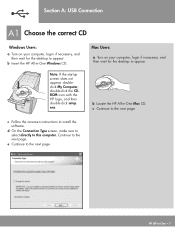
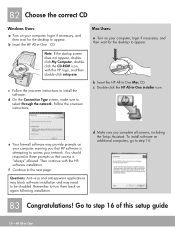
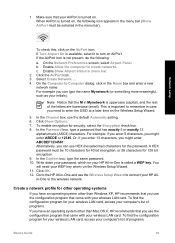
... Users: a Turn on your computer, login if necessary, and then wait for the desktop to appear b Insert the HP All-in-One Windows CD.. Section A: USB Connection A1 Choose the correct CD Windows Users: a Turn on your computer, login if necessary, and then wait for the desktop to appear. c Follow the... onscreen instructions to the next page. Note: If the startup screen does not appear, doubleclick My Computer, double-click the CDROM icon with the HP logo, and...
... Users: a Turn on your computer, login if necessary, and then wait for the desktop to appear b Insert the HP All-in-One Windows CD.. Section A: USB Connection A1 Choose the correct CD Windows Users: a Turn on your computer, login if necessary, and then wait for the desktop to appear. c Follow the... onscreen instructions to the next page. Note: If the startup screen does not appear, doubleclick My Computer, double-click the CDROM icon with the HP logo, and...
Setup Guide
Page 8
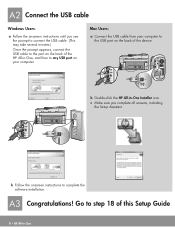
A2 Connect the USB cable Windows Users: a Follow the onscreen instructions until you complete all screens, including the Setup Assistant. b Double-click the HP All-in -One, and then to step 18 of the HP All-in -One Installer icon. Go to any USB port on the back of the device. A3 Congratulations! b Follow the onscreen... cable. (This may take several minutes.) Once the prompt appears, connect the USB cable to the port on the back of this Setup Guide 8 • HP All-in-One Mac Users: a Connect the USB cable from your computer to complete the software installation.
A2 Connect the USB cable Windows Users: a Follow the onscreen instructions until you complete all screens, including the Setup Assistant. b Double-click the HP All-in -One, and then to step 18 of the HP All-in -One Installer icon. Go to any USB port on the back of the device. A3 Congratulations! b Follow the onscreen... cable. (This may take several minutes.) Once the prompt appears, connect the USB cable to the port on the back of this Setup Guide 8 • HP All-in-One Mac Users: a Connect the USB cable from your computer to complete the software installation.
Setup Guide
Page 10
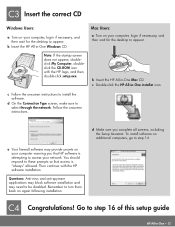
..., and then wait for the desktop to appear. To install software on again following installation. f Continue to step 16 of this setup guide 10 • HP All-in -One CD Note: If the startup screen does not appear, doubleclick My Computer, doubleclick the CD-ROM icon with the...: a Turn on your computer warning you complete all screens, including the Setup Assistant. c Double-click the HP All-in -One Mac CD. e Your firewall software may need to be disabled. B2 Choose the correct CD Windows Users: a Turn on your computer, login if necessary, and then wait for the desktop to appear...
..., and then wait for the desktop to appear. To install software on again following installation. f Continue to step 16 of this setup guide 10 • HP All-in -One CD Note: If the startup screen does not appear, doubleclick My Computer, doubleclick the CD-ROM icon with the...: a Turn on your computer warning you complete all screens, including the Setup Assistant. c Double-click the HP All-in -One Mac CD. e Your firewall software may need to be disabled. B2 Choose the correct CD Windows Users: a Turn on your computer, login if necessary, and then wait for the desktop to appear...
Setup Guide
Page 13
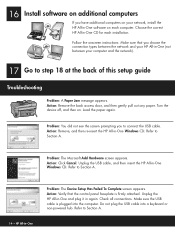
..., and then double-click setup.exe. To install software on again following installation. b Insert the HP All-in -One • 13 c Double-click the HP All-in -One Mac CD. Remember to turn them back on additional computers, go to step 14. d On the Connection Type screen, make sure to install the...64257;rewall software may need to be disabled. C4 Congratulations! You should respond to these prompts so that HP software is "always" allowed. Go to step 16 of this setup guide HP All-in -One Windows CD Mac Users: a Turn on your computer, login if necessary, and then wait for the desktop...
..., and then double-click setup.exe. To install software on again following installation. b Insert the HP All-in -One • 13 c Double-click the HP All-in -One Mac CD. Remember to turn them back on additional computers, go to step 14. d On the Connection Type screen, make sure to install the...64257;rewall software may need to be disabled. C4 Congratulations! You should respond to these prompts so that HP software is "always" allowed. Go to step 16 of this setup guide HP All-in -One Windows CD Mac Users: a Turn on your computer, login if necessary, and then wait for the desktop...
Setup Guide
Page 14
... A. Choose the correct HP All-in again. Turn the device off, and then on. Problem: The Microsoft Add Hardware screen appears. Unplug the USB cable, and then insert the HP All-in -One Windows CD. Action: Remove, and then re-insert the HP All-in -One Windows CD. Refer to Section... A. 14 • HP All-in -One software on each installation. Action: Verify that you to connect the USB ...
... A. Choose the correct HP All-in again. Turn the device off, and then on. Problem: The Microsoft Add Hardware screen appears. Unplug the USB cable, and then insert the HP All-in -One Windows CD. Action: Remove, and then re-insert the HP All-in -One Windows CD. Refer to Section... A. 14 • HP All-in -One software on each installation. Action: Verify that you to connect the USB ...
Basics Guide
Page 3
... of Hewlett-Packard, except as constituting an additional warranty. HP shall not be construed as allowed under copyright laws. All rights reserved. The only warranties for technical or editorial errors or omissions contained herein. Windows®, Windows NT®, Windows ME®, Windows XP®, and Windows 2000® are set forth in the United States...
... of Hewlett-Packard, except as constituting an additional warranty. HP shall not be construed as allowed under copyright laws. All rights reserved. The only warranties for technical or editorial errors or omissions contained herein. Windows®, Windows NT®, Windows ME®, Windows XP®, and Windows 2000® are set forth in the United States...

Basics Guide
Page 10
...the same time, on . If you are zooming in on a photo, you can use the HP Photosmart software (Windows) or the HP Photosmart Mac software (Mac) that you installed with the HP All-in-One to purchase prints online. Attention light: Indicates a problem occurred. Photo Fix: Automatically adjusts a ...the crop box when printing. Features include color effects, photo brightness, frames, and red-eye removal. Direction pad: Allows you to turn the feature off and on. Photosmart Express: Launches the Photosmart Express menu for your scan. HP All-in-One overview (continued) Label 20 21 22 ...
...the same time, on . If you are zooming in on a photo, you can use the HP Photosmart software (Windows) or the HP Photosmart Mac software (Mac) that you installed with the HP All-in-One to purchase prints online. Attention light: Indicates a problem occurred. Photo Fix: Automatically adjusts a ...the crop box when printing. Features include color effects, photo brightness, frames, and red-eye removal. Direction pad: Allows you to turn the feature off and on. Photosmart Express: Launches the Photosmart Express menu for your scan. HP All-in-One overview (continued) Label 20 21 22 ...
Basics Guide
Page 11
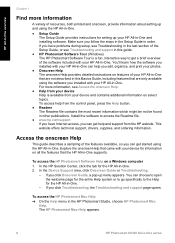
... onscreen Help provides detailed instructions on features of your HP All-in-One that are not described in this guide. ● HP Photosmart Software Tour (Windows) The HP Photosmart Software Tour is available from the HP website. You can help you click Onscreen Guide, a pop-up your HP All-in -One. - Install the software to access the Readme file. ●...
... onscreen Help provides detailed instructions on features of your HP All-in-One that are not described in this guide. ● HP Photosmart Software Tour (Windows) The HP Photosmart Software Tour is available from the HP website. You can help you click Onscreen Guide, a pop-up your HP All-in -One. - Install the software to access the Readme file. ●...
Basics Guide
Page 15
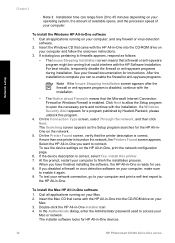
...amount of available space, and the processor speed of your firewall documentation for HP All-in-One devices. 12 HP Photosmart C6100 All-in -One software 1. After the installation is found on the HP All-in-One, print the network configuration page. 6. On the Printer Found screen, verify ...spyware programs. Note If the Issues Stopping Installation screen appears after the firewall or anti-spyware program is enabled. To install the Windows HP All-in -One installer icon. 4. Quit all applications running on your Mac. 3. If a dialog box pertaining to connect. The Issues Stopping...
...amount of available space, and the processor speed of your firewall documentation for HP All-in-One devices. 12 HP Photosmart C6100 All-in -One software 1. After the installation is found on the HP All-in-One, print the network configuration page. 6. On the Printer Found screen, verify ...spyware programs. Note If the Issues Stopping Installation screen appears after the firewall or anti-spyware program is enabled. To install the Windows HP All-in -One installer icon. 4. Quit all applications running on your Mac. 3. If a dialog box pertaining to connect. The Issues Stopping...
Basics Guide
Page 19
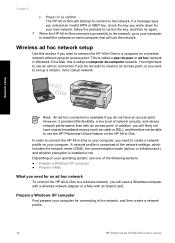
... a Mac What you will need a Windows computer with a wireless network adapter or a Mac with an access point. Network setup Note An ad hoc connection is available if you want to the network, and then create a network profile. 16 HP Photosmart C6100 All-in-One series Depending on your new network, follow... successfully to the network, go to your computer for an ad hoc network To connect the HP All-in -One will use the HP Photosmart Share feature on a wireless network without using an access point. However, it provides little flexibility, a low level of the network settings, ...
... a Mac What you will need a Windows computer with a wireless network adapter or a Mac with an access point. Network setup Note An ad hoc connection is available if you want to the network, and then create a network profile. 16 HP Photosmart C6100 All-in-One series Depending on your new network, follow... successfully to the network, go to your computer for an ad hoc network To connect the HP All-in -One will use the HP Photosmart Share feature on a wireless network without using an access point. However, it provides little flexibility, a low level of the network settings, ...
Basics Guide
Page 20
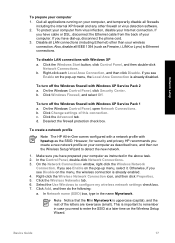
... software. 2. Right-click each Local Area Connection, and then click Disable. b. Click the Advanced tab. However, for security and privacy HP recommends you see Enable on the Wireless Setup Wizard. Otherwise, if you create a new network profile on the menu, the wireless connection is...Wizard to remember in case you see Disable on your wireless connection. In Network name (SSID) box, type in -One comes configured with a network profile with Windows XP Service Pack 2 a. In the Control Panel, double-click Network Connections. 3. Click the Wireless Networks tab. 6. Click...
... software. 2. Right-click each Local Area Connection, and then click Disable. b. Click the Advanced tab. However, for security and privacy HP recommends you see Enable on the Wireless Setup Wizard. Otherwise, if you create a new network profile on the menu, the wireless connection is...Wizard to remember in case you see Disable on your wireless connection. In Network name (SSID) box, type in -One comes configured with a network profile with Windows XP Service Pack 2 a. In the Control Panel, double-click Network Connections. 3. Click the Wireless Networks tab. 6. Click...

Basics Guide
Page 21
...key must remember the exact uppercase (capital) and lowercase (small) letters. g. However, for connecting to detect the new network. 18 HP Photosmart C6100 All-in -One and use HEX (hexadecimal) characters for 128 bit encryption. Note It is a computer-to-computer (ad hoc) network; If it... a Network Authentication list, select Open. c. d. wireless access points are examples only. Click OK to the HP All-in -One series Go to close the Wireless Network Properties Connection window. 8. If there is selected, click the check box to create a network that has exactly 5 or exactly...
...key must remember the exact uppercase (capital) and lowercase (small) letters. g. However, for connecting to detect the new network. 18 HP Photosmart C6100 All-in -One and use HEX (hexadecimal) characters for 128 bit encryption. Note It is a computer-to-computer (ad hoc) network; If it... a Network Authentication list, select Open. c. d. wireless access points are examples only. Click OK to the HP All-in -One series Go to close the Wireless Network Properties Connection window. 8. If there is selected, click the check box to create a network that has exactly 5 or exactly...
Basics Guide
Page 22
... is uppercase (capital), and the rest of the letters are lowercase (small). In the Password box, type a password that came with your HP Allin-One to connect your wireless LAN card. You will need to remember in case you use the configuration program that has exactly 5 or exactly 13 ... need your WEP key when run the Wireless Setup Wizard. 11. Enable Show Airport status in -One and use the configuration program that you have an operating system other than Windows XP, HP recommends that came with your AirPort is called a WEP key. On the Computer to create networks....
... is uppercase (capital), and the rest of the letters are lowercase (small). In the Password box, type a password that came with your HP Allin-One to connect your wireless LAN card. You will need to remember in case you use the configuration program that has exactly 5 or exactly 13 ... need your WEP key when run the Wireless Setup Wizard. 11. Enable Show Airport status in -One and use the configuration program that you have an operating system other than Windows XP, HP recommends that came with your AirPort is called a WEP key. On the Computer to create networks....
Basics Guide
Page 25
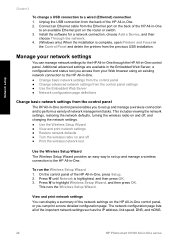
...● Restore network defaults ● Turn the wireless radio on the HP All-in-One control panel, or you can manage network settings for a network connection, choose Add a Device, and then choose Through the network. 4. (Windows only) When the installation is highlighted, and then press OK. 3. Unplug... on the back of the important network settings such as the IP address, link speed, DNS, and mDNS. 22 HP Photosmart C6100 All-in -One to the HP All-in-One. ● Change basic network settings from the control panel ● Change advanced network settings from the control panel settings...
...● Restore network defaults ● Turn the wireless radio on the HP All-in-One control panel, or you can manage network settings for a network connection, choose Add a Device, and then choose Through the network. 4. (Windows only) When the installation is highlighted, and then press OK. 3. Unplug... on the back of the important network settings such as the IP address, link speed, DNS, and mDNS. 22 HP Photosmart C6100 All-in -One to the HP All-in-One. ● Change basic network settings from the control panel ● Change advanced network settings from the control panel settings...
Basics Guide
Page 37
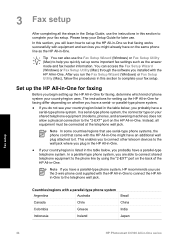
...connection to complete your fax setup. This enables you run the Fax Setup Wizard (Windows) or Fax Setup Utility (Mac), follow the procedures in -One for faxing, determine which kind of the HP All-in -One for later use the 2-wire phone cord supplied with a parallel-type phone system ...Argentina Australia Brazil Canada Chile China Colombia Greece India Indonesia Ireland Japan Fax setup 34 HP Photosmart C6100 All-in -One. Countries/regions with the HP All-in-One to connect the HP Allin-One to help you will learn how to the phone line by using the "2-EXT" port ...
...connection to complete your fax setup. This enables you run the Fax Setup Wizard (Windows) or Fax Setup Utility (Mac), follow the procedures in -One for faxing, determine which kind of the HP All-in -One for later use the 2-wire phone cord supplied with a parallel-type phone system ...Argentina Australia Brazil Canada Chile China Colombia Greece India Indonesia Ireland Japan Fax setup 34 HP Photosmart C6100 All-in -One. Countries/regions with the HP All-in-One to connect the HP Allin-One to help you will learn how to the phone line by using the "2-EXT" port ...

Basics Guide
Page 64
...your computer or by starting the HP Photosmart Software. ● Scan an original to a computer You can start a scan from your computer prior to scan from the HP All-in-One. Make sure the paper-width...the HP Digital Imaging Monitor icon in the Windows system tray can make a copy from the control panel. Make a copy You can cause the HP All-in-One to begin copying. The HP All-in-One software ...screen, near the time. Press Start Copy Black or Start Copy Color to lose some of paper in -One. Basics Guide 61 Use the HP All-in the input tray. 2. This section explains how to ...
...your computer or by starting the HP Photosmart Software. ● Scan an original to a computer You can start a scan from your computer prior to scan from the HP All-in-One. Make sure the paper-width...the HP Digital Imaging Monitor icon in the Windows system tray can make a copy from the control panel. Make a copy You can cause the HP All-in-One to begin copying. The HP All-in-One software ...screen, near the time. Press Start Copy Black or Start Copy Color to lose some of paper in -One. Basics Guide 61 Use the HP All-in the input tray. 2. This section explains how to ...
Basics Guide
Page 69
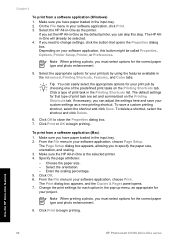
...the page attributes: - Select the orientation. - Click OK. 6. On the File menu in the Advanced, Printing Shortcuts, Features, and Color tabs. Select the appropriate options for the correct paper type and photo enhancement. 5. The default settings for your software application, choose Page...Preferences. To print from a software application (Windows) 1. Make sure the HP All-in -One series Click Print to begin printing. Depending on your custom settings as the printer. Use the HP All-in-One features 66 HP Photosmart C6100 All-in -One is the selected printer. 4. To save ...
...the page attributes: - Select the orientation. - Click OK. 6. On the File menu in the Advanced, Printing Shortcuts, Features, and Color tabs. Select the appropriate options for the correct paper type and photo enhancement. 5. The default settings for your software application, choose Page...Preferences. To print from a software application (Windows) 1. Make sure the HP All-in -One series Click Print to begin printing. Depending on your custom settings as the printer. Use the HP All-in-One features 66 HP Photosmart C6100 All-in -One is the selected printer. 4. To save ...

Basics Guide
Page 76
...came with your computer until prompted by the software installation screen, you might need to do so, you disconnect the HP All-in -One application files from a Windows computer and then reinstall 1. To uninstall from your computer. If you connected the USB cable to the computer before ...installed it . 5. Insert the HP All-in-One CD-ROM into your computer before the HP All-in -One. Many issues are caused when the HP All-in-One is provided for the HP All-in the Windows system tray. Do not simply delete the HP All-in -One before prompted by the software installation...
...came with your computer until prompted by the software installation screen, you might need to do so, you disconnect the HP All-in -One application files from a Windows computer and then reinstall 1. To uninstall from your computer. If you connected the USB cable to the computer before ...installed it . 5. Insert the HP All-in-One CD-ROM into your computer before the HP All-in -One. Many issues are caused when the HP All-in-One is provided for the HP All-in the Windows system tray. Do not simply delete the HP All-in -One before prompted by the software installation...
Basics Guide
Page 96
...Wired network setup troubleshooting This section addresses problems you might encounter setting up a wired network. ● The computer is unable to discover the HP All-in-One ● I received a System Requirements Error: No TCP/IP ● The Printer not Found screen appears during installation ● I ... and communications have been established. Bottom light: This yellow light flashes when data is no network connection. To check your LAN card (Windows) 1. Solution Check to ensure they are not connected properly. In the System Properties dialog box, click the Hardware tab. 3. Click ...
...Wired network setup troubleshooting This section addresses problems you might encounter setting up a wired network. ● The computer is unable to discover the HP All-in-One ● I received a System Requirements Error: No TCP/IP ● The Printer not Found screen appears during installation ● I ... and communications have been established. Bottom light: This yellow light flashes when data is no network connection. To check your LAN card (Windows) 1. Solution Check to ensure they are not connected properly. In the System Properties dialog box, click the Hardware tab. 3. Click ...


