
Limited Warranty and Support Guide
Page 14
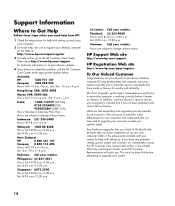
... has not been tampered with setting up. Support Information Where to Get Help Follow these steps when you need help from HP: 1 Check the setup poster for help with setting up and using your computer. 2 For faster help, be sure to register your desktop computer on , immediately contact the HP Customer Care Center listed earlier in this a key differentiator for all customers...
... has not been tampered with setting up. Support Information Where to Get Help Follow these steps when you need help from HP: 1 Check the setup poster for help with setting up and using your computer. 2 For faster help, be sure to register your desktop computer on , immediately contact the HP Customer Care Center listed earlier in this a key differentiator for all customers...
Getting Started
Page 58
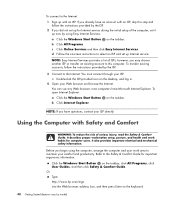
... the Windows Start Button on the desktop, and log in. 4 Open your comfort and productivity. It describes proper workstation setup, posture, and health and work area to maintain your Web browser and browse the Internet. Refer to the Safety & Comfort Guide for Internet service during the initial setup of the computer, set up Internet service. a Click the Windows Start Button on the taskbar, click All Programs, click User Guides, and...
... the Windows Start Button on the desktop, and log in. 4 Open your comfort and productivity. It describes proper workstation setup, posture, and health and work area to maintain your Web browser and browse the Internet. Refer to the Safety & Comfort Guide for Internet service during the initial setup of the computer, set up Internet service. a Click the Windows Start Button on the taskbar, click All Programs, click User Guides, and...

Getting Started
Page 95
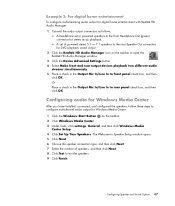
... the speaker connection type, and then click Next. 7 Select the number of powered stereo 5.1 or 7.1 speakers to the rear Speaker Out connectors for Windows Media Center: 1 Click the Windows Start Button on the taskbar to open the Realtek HD Audio Manager window. 3 Click the Device Advanced Settings button. 4 Select Make front and rear output devices playback two different audio streams simultaneously. 5 Place a check in the Output Mic In/Line In to test the speakers. 9 Click Finish. Configuring Speaker and Sound Options 85...
... the speaker connection type, and then click Next. 7 Select the number of powered stereo 5.1 or 7.1 speakers to the rear Speaker Out connectors for Windows Media Center: 1 Click the Windows Start Button on the taskbar to open the Realtek HD Audio Manager window. 3 Click the Device Advanced Settings button. 4 Select Make front and rear output devices playback two different audio streams simultaneously. 5 Place a check in the Output Mic In/Line In to test the speakers. 9 Click Finish. Configuring Speaker and Sound Options 85...
Getting Started
Page 23
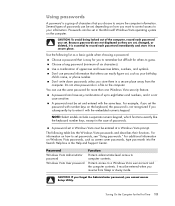
... to enter it is not case sensitive. Use a combination of passwords can use personal information that you cannot access Setup Utility. It must be set . Turning On the Computer for more than one Windows Vista security feature. Several types of uppercase and lowercase letters, numbers, and symbols. Because passwords are not displayed as screen saver passwords, type passwords into the Search Help box in Windows Vista must be entered when you set and entered with...
... to enter it is not case sensitive. Use a combination of passwords can use personal information that you cannot access Setup Utility. It must be set . Turning On the Computer for more than one Windows Vista security feature. Several types of uppercase and lowercase letters, numbers, and symbols. Because passwords are not displayed as screen saver passwords, type passwords into the Search Help box in Windows Vista must be entered when you set and entered with...
Getting Started
Page 57
... 7.1 speakers to the rear Speaker Out connectors for Windows Media Center: 1 Click the Windows Start Button on the taskbar to open the Realtek HD Audio Manager window. 3 Click the Device Advanced Settings button. 4 Select Make front and rear output devices playback two different audio streams simultaneously. 5 Place a check in the Output Mic In/Line In to front panel check box, and then click OK. Configuring Speaker and Sound Options 47 Configuring audio for Windows Media Center After you have installed, connected, and configured the speakers...
... 7.1 speakers to the rear Speaker Out connectors for Windows Media Center: 1 Click the Windows Start Button on the taskbar to open the Realtek HD Audio Manager window. 3 Click the Device Advanced Settings button. 4 Select Make front and rear output devices playback two different audio streams simultaneously. 5 Place a check in the Output Mic In/Line In to front panel check box, and then click OK. Configuring Speaker and Sound Options 47 Configuring audio for Windows Media Center After you have installed, connected, and configured the speakers...

Getting Started Guide
Page 58
... open Internet Explorer: a Click the Windows Start Button on the keyboard. 48 Getting Started (features vary by the ISP. 2 If you begin using Easy Internet Services. Or Type http://www.hp.com/ergo into the Web browser address box, and then press Enter on the taskbar. b Click All Programs. c Click Online Services and then click Easy Internet Services. To transfer existing accounts, follow the instructions provided by model...
... open Internet Explorer: a Click the Windows Start Button on the keyboard. 48 Getting Started (features vary by the ISP. 2 If you begin using Easy Internet Services. Or Type http://www.hp.com/ergo into the Web browser address box, and then press Enter on the taskbar. b Click All Programs. c Click Online Services and then click Easy Internet Services. To transfer existing accounts, follow the instructions provided by model...
Upgrading and Servicing Guide
Page 12
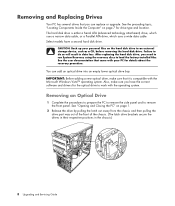
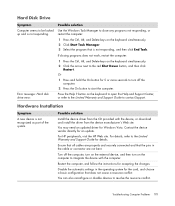
... positions in data loss. CAUTION: Back up your PC for drive type and location. After replacing the hard disk drive, you need to run System Recovery using the recovery discs to load the factory-installed files. Select models have the correct software and drivers for the optical drive to an external storage device, such as a CD, before removing the hard disk drive. Removing and Replacing Drives Your PC has several drives that you can add an optical drive into an empty lower optical drive bay.
... positions in data loss. CAUTION: Back up your PC for drive type and location. After replacing the hard disk drive, you need to run System Recovery using the recovery discs to load the factory-installed files. Select models have the correct software and drivers for the optical drive to an external storage device, such as a CD, before removing the hard disk drive. Removing and Replacing Drives Your PC has several drives that you can add an optical drive into an empty lower optical drive bay.
Upgrading and Servicing Guide
Page 28
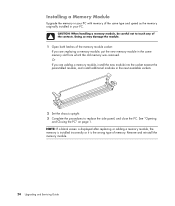
.... 1 Open both latches of the contacts. NOTE: If a blank screen is displayed after replacing or adding a memory module, the memory is installed incorrectly or it is the wrong type of the same type and speed as the memory originally installed in your PC. Installing a Memory Module Upgrade the memory in your PC with memory of memory. Remove and reinstall the memory module. 24 Upgrading and Servicing Guide Or If you are adding a memory module, install the new module...
.... 1 Open both latches of the contacts. NOTE: If a blank screen is displayed after replacing or adding a memory module, the memory is installed incorrectly or it is the wrong type of the same type and speed as the memory originally installed in your PC. Installing a Memory Module Upgrade the memory in your PC with memory of memory. Remove and reinstall the memory module. 24 Upgrading and Servicing Guide Or If you are adding a memory module, install the new module...
Upgrading and Servicing Guide
Page 31
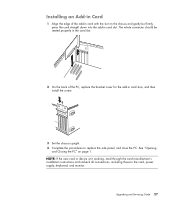
... new card or device isn't working, read through the card manufacturer's installation instructions and recheck all connections, including those to replace the side panel, and close the PC. See "Opening and Closing the PC" on the chassis and gently but firmly press the card straight down into the add-in card slots, and then install the screw. 3 Set the chassis upright. 4 Complete the procedures to the card, power supply, keyboard, and monitor...
... new card or device isn't working, read through the card manufacturer's installation instructions and recheck all connections, including those to replace the side panel, and close the PC. See "Opening and Closing the PC" on the chassis and gently but firmly press the card straight down into the add-in card slots, and then install the screw. 3 Set the chassis upright. 4 Complete the procedures to the card, power supply, keyboard, and monitor...
Upgrading and Servicing Guide
Page 32
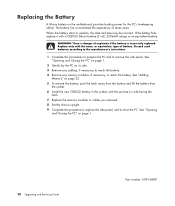
... side panel. See "Adding Memory" on its side. 3 Remove any cabling, if necessary, to reach the battery. 4 Remove any memory modules, if necessary, to close the PC. Replace only with the positive (+) side facing the latch. 7 Replace the memory modules or cables you removed. 8 Set the chassis upright. 9 Complete the procedure to replace the side panel, and to reach the battery. Replacing the Battery A lithium battery on page 1. 28 Upgrading and Servicing Guide Part number...
... side panel. See "Adding Memory" on its side. 3 Remove any cabling, if necessary, to reach the battery. 4 Remove any memory modules, if necessary, to close the PC. Replace only with the positive (+) side facing the latch. 7 Replace the memory modules or cables you removed. 8 Set the chassis upright. 9 Complete the procedure to replace the side panel, and to reach the battery. Replacing the Battery A lithium battery on page 1. 28 Upgrading and Servicing Guide Part number...
PC Troubleshooting
Page 9
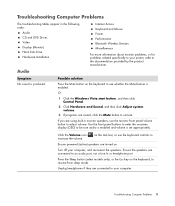
... DVD Drives Video Display (Monitor) Hard Disk Drive Hardware Installation Internet Access Keyboard and Mouse Power Performance Bluetooth Wireless Devices Miscellaneous For more information about monitor problems, or for problems related specifically to your printer, refer to an audio port, not a Line In or headphone port. Press the Sleep button (select models only), or the Esc key on the task bar, or use the monitor front panel volume button to resume from sleep mode. Click the Volume icon ( ) on the keyboard, to adjust volume. Troubleshooting Computer Problems...
... DVD Drives Video Display (Monitor) Hard Disk Drive Hardware Installation Internet Access Keyboard and Mouse Power Performance Bluetooth Wireless Devices Miscellaneous For more information about monitor problems, or for problems related specifically to your printer, refer to an audio port, not a Line In or headphone port. Press the Sleep button (select models only), or the Esc key on the task bar, or use the monitor front panel volume button to resume from sleep mode. Click the Volume icon ( ) on the keyboard, to adjust volume. Troubleshooting Computer Problems...
PC Troubleshooting
Page 15
... part of the system. You can also reconfigure or disable devices to contact Support. Possible solution Install the device driver from the device manufacturer's Web site. Troubleshooting Computer Problems 11 A Hardware Installation Symptom A new device is not responding. Contact the device vendor directly for accepting the changes. Restart the computer, and follow the instructions for an update. Press the Help ? You may need an updated driver for the card, and choose a basic configuration...
... part of the system. You can also reconfigure or disable devices to contact Support. Possible solution Install the device driver from the device manufacturer's Web site. Troubleshooting Computer Problems 11 A Hardware Installation Symptom A new device is not responding. Contact the device vendor directly for accepting the changes. Restart the computer, and follow the instructions for an update. Press the Help ? You may need an updated driver for the card, and choose a basic configuration...
PC Troubleshooting
Page 17
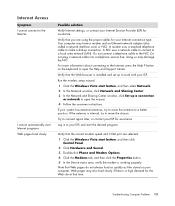
Possible solution Verify Internet settings, or contact your ISP, and start the desired program. Do not plug a network cable into a telephone service line; Run the wireless setup wizard: 1 Click the Windows Vista start button, and then select Network. 2 In the Network window, click Network and Sharing Center. 3 In the Network and Sharing Center window, click Set up a connection or network to your Internet Service Provider (ISP) for assistance. Log in to open the Help and Support Center. Internet Access Symptom I cannot automatically start Internet programs...
Possible solution Verify Internet settings, or contact your ISP, and start the desired program. Do not plug a network cable into a telephone service line; Run the wireless setup wizard: 1 Click the Windows Vista start button, and then select Network. 2 In the Network window, click Network and Sharing Center. 3 In the Network and Sharing Center window, click Set up a connection or network to your Internet Service Provider (ISP) for assistance. Log in to open the Help and Support Center. Internet Access Symptom I cannot automatically start Internet programs...
PC Troubleshooting
Page 31
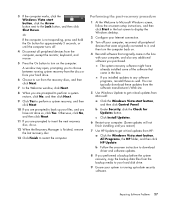
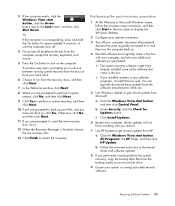
... When the Recovery Manager is finished, remove the last recovery disc. 13 Click Finish to it, and then turn on . 4 Reinstall software that came in the box. Performing the post-recovery procedure 1 At the Welcome to Microsoft Windows screen, follow the onscreen setup instructions, and then click Start in the last screen to display the Windows desktop. 2 Configure your Internet connection. 3 Turn off your computer. (Some updates will not finish installing until the...
... When the Recovery Manager is finished, remove the last recovery disc. 13 Click Finish to it, and then turn on . 4 Reinstall software that came in the box. Performing the post-recovery procedure 1 At the Welcome to Microsoft Windows screen, follow the onscreen setup instructions, and then click Start in the last screen to display the Windows desktop. 2 Configure your Internet connection. 3 Turn off your computer. (Some updates will not finish installing until the...
Getting Started Guide
Page 50
... instructions to the Internet that you may choose another ISP or transfer an existing account to the Internet, you did not set up modem, a cable modem, or a DSL modem for any Web browser; b Click All Programs. c Click Online Services and then click Easy Internet Services. To connect to make the hardware connections: for a modem, see "Setting Up a Local Area Network." To open Internet Explorer: a Click the Windows Start Button...
... instructions to the Internet that you may choose another ISP or transfer an existing account to the Internet, you did not set up modem, a cable modem, or a DSL modem for any Web browser; b Click All Programs. c Click Online Services and then click Easy Internet Services. To connect to make the hardware connections: for a modem, see "Setting Up a Local Area Network." To open Internet Explorer: a Click the Windows Start Button...
Getting Started Guide
Page 54
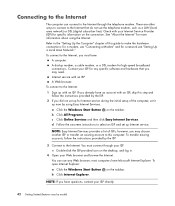
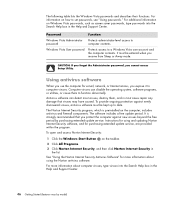
... and Support Center. Windows Vista User password Protects access to set passwords, see "Using passwords." Computer viruses can detect most viruses, destroy them to computer contents. See "Using the Norton Internet Security Antivirus Software" for more information about using and updating Norton Internet Security software, and for e-mail, network, or Internet access, you resume from Sleep or Away mode. It must be entered when you expose it to date. The software includes a free update period. Password Function Windows Vista Administrator password...
... and Support Center. Windows Vista User password Protects access to set passwords, see "Using passwords." Computer viruses can detect most viruses, destroy them to computer contents. See "Using the Norton Internet Security Antivirus Software" for more information about using and updating Norton Internet Security software, and for e-mail, network, or Internet access, you resume from Sleep or Away mode. It must be entered when you expose it to date. The software includes a free update period. Password Function Windows Vista Administrator password...
Getting Started Guide
Page 56
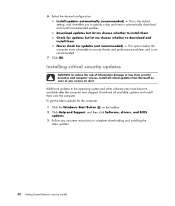
.... 6 Select the desired configuration: Install updates automatically (recommended) - Additional updates to complete downloading and installing the latest updates. 48 Getting Started (features vary by model) Download updates but let me choose whether to install them Check for the computer: 1 Click the Windows Start Button on the taskbar. 2 Click Help and Support, and then click Software, drivers, and BIOS updates. 3 Follow any onscreen instructions to the operating system and other software may have become...
.... 6 Select the desired configuration: Install updates automatically (recommended) - Additional updates to complete downloading and installing the latest updates. 48 Getting Started (features vary by model) Download updates but let me choose whether to install them Check for the computer: 1 Click the Windows Start Button on the taskbar. 2 Click Help and Support, and then click Software, drivers, and BIOS updates. 3 Follow any onscreen instructions to the operating system and other software may have become...
Troubleshooting and Maintenance Guide
Page 9
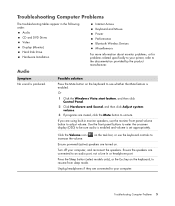
...: Audio CD and DVD Drives Video Display (Monitor) Hard Disk Drive Hardware Installation Internet Access Keyboard and Mouse Power Performance Bluetooth Wireless Devices Miscellaneous For more information about monitor problems, or for problems related specifically to your printer, refer to the documentation provided by the product manufacturer. Click the Volume icon ( ) on the keyboard, to resume from sleep mode. Press the Sleep button (select models only), or the Esc key on the task bar, or use the monitor front panel volume button to...
...: Audio CD and DVD Drives Video Display (Monitor) Hard Disk Drive Hardware Installation Internet Access Keyboard and Mouse Power Performance Bluetooth Wireless Devices Miscellaneous For more information about monitor problems, or for problems related specifically to your printer, refer to the documentation provided by the product manufacturer. Click the Volume icon ( ) on the keyboard, to resume from sleep mode. Press the Sleep button (select models only), or the Esc key on the task bar, or use the monitor front panel volume button to...

Troubleshooting and Maintenance Guide
Page 17
... plug a network cable into a telephone service line; button on your ISP. If your ISP, and start the desired program. I cannot connect to a better position. Troubleshooting Computer Problems 13 Log in to your system has external antennas, try to move the antenna to the Internet. Web pages may also load slowly if there is installed and set up to open the wizard. 4 Follow the onscreen instructions. Internet Access...
... plug a network cable into a telephone service line; button on your ISP. If your ISP, and start the desired program. I cannot connect to a better position. Troubleshooting Computer Problems 13 Log in to your system has external antennas, try to move the antenna to the Internet. Web pages may also load slowly if there is installed and set up to open the wizard. 4 Follow the onscreen instructions. Internet Access...
Troubleshooting and Maintenance Guide
Page 31
... Windows Vista start button, click the Arrow button next to turn the computer back on the computer. If you installed updates to it, and then turn on . 4 Reinstall software that came in the box. Repairing Software Problems 27 Performing the post-recovery procedure 1 At the Welcome to Microsoft Windows screen, follow the onscreen setup instructions, and then click Start in the last screen to display the Windows desktop. 2 Configure your Internet connection. 3 Turn off . 4 Disconnect all peripheral devices...
... Windows Vista start button, click the Arrow button next to turn the computer back on the computer. If you installed updates to it, and then turn on . 4 Reinstall software that came in the box. Repairing Software Problems 27 Performing the post-recovery procedure 1 At the Welcome to Microsoft Windows screen, follow the onscreen setup instructions, and then click Start in the last screen to display the Windows desktop. 2 Configure your Internet connection. 3 Turn off . 4 Disconnect all peripheral devices...


