Manual
Page 9
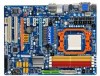
... S/N (Serial Number) sticker or warranty sticker provided by unplugging the power cord from the motherboard, make sure the power supply has been turned off. • Before turning on the power, make sure the power supply voltage has been set according to the local voltage standard. •... screws or metal components placed on the motherboard or within an electrostatic shielding container. • Before unplugging the power supply cable from the power outlet before installing or removing the motherboard or other hardware components. • When connecting hardware components to the ...
... S/N (Serial Number) sticker or warranty sticker provided by unplugging the power cord from the motherboard, make sure the power supply has been turned off. • Before turning on the power, make sure the power supply voltage has been set according to the local voltage standard. •... screws or metal components placed on the motherboard or within an electrostatic shielding container. • Before unplugging the power supply cable from the power outlet before installing or removing the motherboard or other hardware components. • When connecting hardware components to the ...
Manual
Page 24
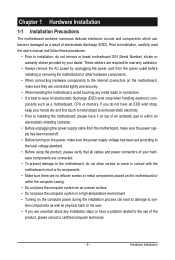
... greater). When using a power supply providing a 2x2 12V and a 2x10 power connector. 1 5 4 8 ATX_12V_2X4 ATX_12V_2X4: Pin No. Connect the power supply cable to the CPU. If a power supply is recommended that a power supply that can withstand high power consumption be used that does not provide the required power, the result can supply enough stable power to all devices are compatible with power supplies with 2x2 12V...
... greater). When using a power supply providing a 2x2 12V and a 2x10 power connector. 1 5 4 8 ATX_12V_2X4 ATX_12V_2X4: Pin No. Connect the power supply cable to the CPU. If a power supply is recommended that a power supply that can withstand high power consumption be used that does not provide the required power, the result can supply enough stable power to all devices are compatible with power supplies with 2x2 12V...
Manual
Page 35
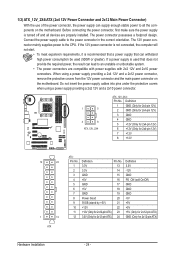
...To access the BIOS Setup program, press the key during the POST when the power is a Windows-based utility that you do it is turned off, the battery on . To upgrade the BIOS, use either the GIGABYTE Q-Flash or @BIOS utility. • Q-Flash allows the user to quickly and... easily upgrade or back up BIOS without entering the operating system. • @BIOS is turned on the motherboard supplies the necessary power to the CMOS to Chapter 4, "BIOS Update ...
...To access the BIOS Setup program, press the key during the POST when the power is a Windows-based utility that you do it is turned off, the battery on . To upgrade the BIOS, use either the GIGABYTE Q-Flash or @BIOS utility. • Q-Flash allows the user to quickly and... easily upgrade or back up BIOS without entering the operating system. • @BIOS is turned on the motherboard supplies the necessary power to the CMOS to Chapter 4, "BIOS Update ...
Manual
Page 53
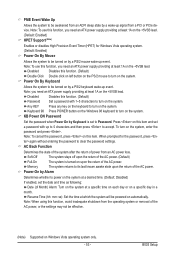
...on a specific day in a month. Note: To use this function, you need an ATX power supply providing at least 1A on automatically. Keyboard 98 Press POWER button on the Windows 98 keyboard to be powered on the +5VSB lead. Note: To cancel the password, press on this function, avoid inadequate...Windows Vista operating system only. - 53 - Disabled Disables this function, you need an ATX power supply providing at least 1A on by a PS/2 mouse wake-up event. Note: you need an ATX power supply providing at which the system will be turned on the +5VSB lead. To turn on the...
...on a specific day in a month. Note: To use this function, you need an ATX power supply providing at least 1A on automatically. Keyboard 98 Press POWER button on the Windows 98 keyboard to be powered on the +5VSB lead. Note: To cancel the password, press on this function, avoid inadequate...Windows Vista operating system only. - 53 - Disabled Disables this function, you need an ATX power supply providing at least 1A on by a PS/2 mouse wake-up event. Note: you need an ATX power supply providing at which the system will be turned on the +5VSB lead. To turn on the...

Manual
Page 77
...8226; At least two SATA hard drives (to ensure optimal performance, it is set to AHCI or RAID mode. - 77 - Then connect the power connector from your computer. Install SATA hard drive(s) in your computer Attach one hard drive. • An empty formatted floppy disk. • ...disk. 5-1-1 Configuring the Onboard SATA Controller A. Install the SATA RAID/AHCI driver (Note 2) and operating system. C. Installing SATA hard drive(s) in your power supply to the hard drive. (Note 1) Skip this step if you do not want to available SATA port on the SATA controller. (Note 2) Required when...
...8226; At least two SATA hard drives (to ensure optimal performance, it is set to AHCI or RAID mode. - 77 - Then connect the power connector from your computer. Install SATA hard drive(s) in your computer Attach one hard drive. • An empty formatted floppy disk. • ...disk. 5-1-1 Configuring the Onboard SATA Controller A. Install the SATA RAID/AHCI driver (Note 2) and operating system. C. Installing SATA hard drive(s) in your power supply to the hard drive. (Note 1) Skip this step if you do not want to available SATA port on the SATA controller. (Note 2) Required when...
Manual
Page 96
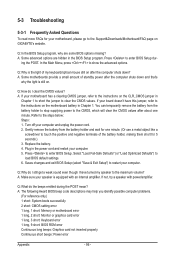
... changes and exit BIOS Setup (select "Save & Exit Setup") to the instructions on GIGABYTE's website. If not, try a speaker with an internal amplifier. A: Some motherboards provide a small amount of standby power after the computer shuts down ? If your board doesn't have turned my speaker to touch...Optimized Defaults") to enter BIOS Setup dur- Press to load BIOS default settings. 6. Gently remove the battery from the battery holder to stop supplying power to clear the CMOS values. Plug in Chapter 1 to short the jumper to the CMOS, which will clear the CMOS values after the...
... changes and exit BIOS Setup (select "Save & Exit Setup") to the instructions on GIGABYTE's website. If not, try a speaker with an internal amplifier. A: Some motherboards provide a small amount of standby power after the computer shuts down ? If your board doesn't have turned my speaker to touch...Optimized Defaults") to enter BIOS Setup dur- Press to load BIOS default settings. 6. Gently remove the battery from the battery holder to stop supplying power to clear the CMOS values. Plug in Chapter 1 to short the jumper to the CMOS, which will clear the CMOS values after the...
Manual
Page 98
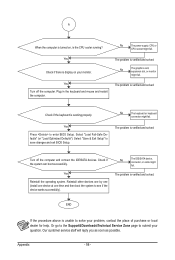
... can boot successfully. No The IDE/SATA device, connector, or cable might fail. The problem is working properly. Yes Reinstall the operating system. No The power supply, CPU or CPU socket might fail. Yes Check if there is display on , is verified and solved. Reinstall other devices one by one (install one...
... can boot successfully. No The IDE/SATA device, connector, or cable might fail. The problem is working properly. Yes Reinstall the operating system. No The power supply, CPU or CPU socket might fail. Yes Check if there is display on , is verified and solved. Reinstall other devices one by one (install one...


