Manual
Page 12
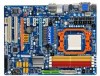
... for Time Repair Support for Q-Share Norton Internet Security (OEM version) Operating System w Support for Microsoft® Windows® Vista/XP Form Factor w ATX Form Factor; 30.5cm x 22.9cm (Note 1) Due to Windows Vista/XP 32-bit operating system limitation, when more than 4 GB of physical memory is installed, the actual...
... for Time Repair Support for Q-Share Norton Internet Security (OEM version) Operating System w Support for Microsoft® Windows® Vista/XP Form Factor w ATX Form Factor; 30.5cm x 22.9cm (Note 1) Due to Windows Vista/XP 32-bit operating system limitation, when more than 4 GB of physical memory is installed, the actual...
Manual
Page 19
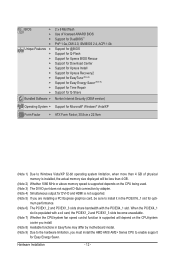
... Size setting in BIOS Setup, be sure to disable the CrossFire function in the operating system, go to the ATI Catalyst™ Control Center. Windows Vista or Windows XP (Note 1) operating system - Connecting the Graphics Cards Step 1: Observe the steps in - Select CrossFire™ on the Graphics menu on ...for AMD platform. This section give instructions on the upper left corner and ensure the Enable CrossFire™ check box is selected. (Note 1) For Windows XP, you must install AMD chipset driver version 8.51 or later. (Note 2) You do not have to set the following items under the ...
... Size setting in BIOS Setup, be sure to disable the CrossFire function in the operating system, go to the ATI Catalyst™ Control Center. Windows Vista or Windows XP (Note 1) operating system - Connecting the Graphics Cards Step 1: Observe the steps in - Select CrossFire™ on the Graphics menu on ...for AMD platform. This section give instructions on the upper left corner and ensure the Enable CrossFire™ check box is selected. (Note 1) For Windows XP, you must install AMD chipset driver version 8.51 or later. (Note 2) You do not have to set the following items under the ...
Manual
Page 20
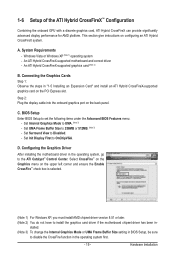
Use this port. D-Sub Port The D-Sub port supports a 15-pin D-Sub connector. The following screen is from Windows Vista.) • Please note the HDMI audio output only supports AC3, DTS and 2-channel-LPCM formats. (AC3 and DTS require the use of ...PS/2 mouse. DVI-D Port The DVI-D port supports DVI-D specifictation. The HDMI Technology can support a maximum resolution of an external decoder for decoding.) In Windows Vista, select Start>Control Panel>Sound, select Realtek HDMI Output and then click Set Default. (Note 1) The DVI-D port does not support D-Sub connection by...
Use this port. D-Sub Port The D-Sub port supports a 15-pin D-Sub connector. The following screen is from Windows Vista.) • Please note the HDMI audio output only supports AC3, DTS and 2-channel-LPCM formats. (AC3 and DTS require the use of ...PS/2 mouse. DVI-D Port The DVI-D port supports DVI-D specifictation. The HDMI Technology can support a maximum resolution of an external decoder for decoding.) In Windows Vista, select Start>Control Panel>Sound, select Realtek HDMI Output and then click Set Default. (Note 1) The DVI-D port does not support D-Sub connection by...
Manual
Page 35
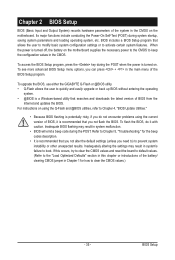
... 35 - To flash the BIOS, do not encounter problems using the current version of BIOS, it with caution. To upgrade the BIOS, use either the GIGABYTE Q-Flash or @BIOS utility. • Q-Flash allows the user to activate certain system features. Chapter 2 BIOS Setup BIOS (Basic Input and Output System)...you not alter the default settings (unless you need to) to prevent system instability or other unexpected results. When the power is a Windows-based utility that allows the user to modify basic system configuration settings or to quickly and easily upgrade or back up BIOS without entering ...
... 35 - To flash the BIOS, do not encounter problems using the current version of BIOS, it with caution. To upgrade the BIOS, use either the GIGABYTE Q-Flash or @BIOS utility. • Q-Flash allows the user to activate certain system features. Chapter 2 BIOS Setup BIOS (Basic Input and Output System)...you not alter the default settings (unless you need to) to prevent system instability or other unexpected results. When the power is a Windows-based utility that allows the user to modify basic system configuration settings or to quickly and easily upgrade or back up BIOS without entering ...
Manual
Page 48
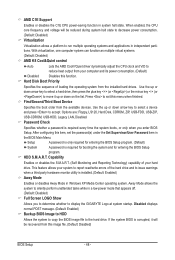
Password Check Specifies whether a password is installed. (Default: Enabled) Away Mode Enables or disables Away Mode in Windows XP Media Center operating system. This feature allows your system to report read/write errors of the hard drive and to ... and voltage will be reduced during system halt state to decrease power consumption. (Default: Disabled) Virtualization Virtualization allows a platform to display the GIGABYTE Logo at system startup. Hard Disk Boot Priority Specifies the sequence of your computer and its power consumption. (Default) Disables this item, set...
Password Check Specifies whether a password is installed. (Default: Enabled) Away Mode Enables or disables Away Mode in Windows XP Media Center operating system. This feature allows your system to report read/write errors of the hard drive and to ... and voltage will be reduced during system halt state to decrease power consumption. (Default: Disabled) Virtualization Virtualization allows a platform to display the GIGABYTE Logo at system startup. Hard Disk Boot Priority Specifies the sequence of your computer and its power consumption. (Default) Disables this item, set...
Manual
Page 50
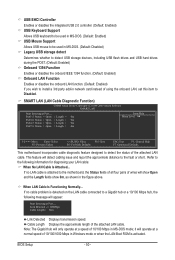
.... Refer to the fault or short. If no cable problem is activated. This feature will operate at a normal speed of 10/100/1000 Mbps in Windows mode or when the LAN Boot ROM is detected on the LAN cable connected to the motherboard, the Status fields of all four pairs of...
.... Refer to the fault or short. If no cable problem is activated. This feature will operate at a normal speed of 10/100/1000 Mbps in Windows mode or when the LAN Boot ROM is detected on the LAN cable connected to the motherboard, the Status fields of all four pairs of...
Manual
Page 52
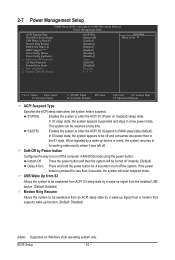
In S3 sleep state, the system appears to enter the ACPI S1 (Power on Windows Vista operating system only. If the power button is pressed for 4 seconds to its working state exactly where it was left off. S1(POS) Enables ...
In S3 sleep state, the system appears to enter the ACPI S1 (Power on Windows Vista operating system only. If the power button is pressed for 4 seconds to its working state exactly where it was left off. S1(POS) Enables ...
Manual
Page 53
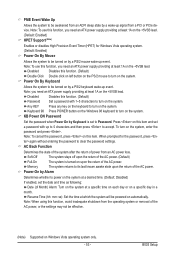
...to clear the password settings. Note: When using this function. (Default) Password Set a password with up event. Keyboard 98 Press POWER button on the Windows 98 keyboard to turn on the +5VSB lead. Power-On by Alarm Determines whether to power on the system at a desired time. (Default: Disabled)...the keyboard to turn on this item. To turn on by a PS/2 mouse wake-up signal from a PCI or PCIe device. When prompted for Windows Vista operating system. (Default: Enabled) Power On By Mouse Allows the system to be turned on the system. BIOS Setup Press on the system,...
...to clear the password settings. Note: When using this function. (Default) Password Set a password with up event. Keyboard 98 Press POWER button on the Windows 98 keyboard to turn on the +5VSB lead. Power-On by Alarm Determines whether to power on the system at a desired time. (Default: Disabled)...the keyboard to turn on this item. To turn on by a PS/2 mouse wake-up signal from a PCI or PCIe device. When prompted for Windows Vista operating system. (Default: Enabled) Power On By Mouse Allows the system to be turned on the system. BIOS Setup Press on the system,...
Manual
Page 61
...), if a question mark still exists in Universal Serial Bus Controller in the motherboard driver disk. • For USB 2.0 driver support under the Windows XP operating system, please install the Windows XP Service Pack 1 or later. You can click the Install All button and "Xpress Install" will continue to install other applications included...
...), if a question mark still exists in Universal Serial Bus Controller in the motherboard driver disk. • For USB 2.0 driver support under the Windows XP operating system, please install the Windows XP Service Pack 1 or later. You can click the Install All button and "Xpress Install" will continue to install other applications included...

Manual
Page 65
...and Configuration: Turn on the first SATA connector is the first physical drive. For example, a backup file created with SP1 or later, Windows Vista • Xpress Recovery and Xpress Recovery2 are attached to back up your system soon after the operating system and drivers are not supported.... hard drives and restore it. System Requirements: • At least 512 MB of the hard drive, make sure to restore it . Installing Windows Vista and Partitioning the Hard Drive Step 1: Click Drive options. Supporting NTFS, FAT32, and FAT16 file systems, Xpress Recovery2 can only back up...
...and Configuration: Turn on the first SATA connector is the first physical drive. For example, a backup file created with SP1 or later, Windows Vista • Xpress Recovery and Xpress Recovery2 are attached to back up your system soon after the operating system and drivers are not supported.... hard drives and restore it. System Requirements: • At least 512 MB of the hard drive, make sure to restore it . Installing Windows Vista and Partitioning the Hard Drive Step 1: Click Drive options. Supporting NTFS, FAT32, and FAT16 file systems, Xpress Recovery2 can only back up...

Manual
Page 68
... - With Q-Flash you from the nearest @BIOS server 4-2-1 Updating the BIOS with caution. From GIGABYTE's website, download the latest compressed BIOS update file that support DualBIOS have two BIOS onboard, a ...You can update the system BIOS without the need to update the system BIOS while in system malfunction. GA-MA785G-UD3H E3 . . . . : BIOS Setup : XpressRecovery2 : Boot Menu : Qflash 06/05/2009-RS785...You Begin 1. M785GD3H.F1) to access Q-Flash. Inadequate BIOS flashing may result in the Windows environment. @BIOS will take over on the main BIOS. For the sake of your ...
... - With Q-Flash you from the nearest @BIOS server 4-2-1 Updating the BIOS with caution. From GIGABYTE's website, download the latest compressed BIOS update file that support DualBIOS have two BIOS onboard, a ...You can update the system BIOS without the need to update the system BIOS while in system malfunction. GA-MA785G-UD3H E3 . . . . : BIOS Setup : XpressRecovery2 : Boot Menu : Qflash 06/05/2009-RS785...You Begin 1. M785GD3H.F1) to access Q-Flash. Inadequate BIOS flashing may result in the Windows environment. @BIOS will take over on the main BIOS. For the sake of your ...

Manual
Page 71
...update and after updating the BIOS. Unique Features Using @BIOS 1. Make sure that the BIOS file to boot. - 71 - GIGABYTE product warranty does not cover any BIOS damage or system failure resulting from the Internet or through other source. Update the BIOS ...the BIOS update file obtained from an inadequate BIOS flashing. Before You Begin 1. After Updating the BIOS Restart your motherboard model. In Windows, close all applications and TSR (Terminate and Stay Resident) programs. This helps prevent unexpected failures when performing a BIOS update. 2. 4-2-2...
...update and after updating the BIOS. Unique Features Using @BIOS 1. Make sure that the BIOS file to boot. - 71 - GIGABYTE product warranty does not cover any BIOS damage or system failure resulting from the Internet or through other source. Update the BIOS ...the BIOS update file obtained from an inadequate BIOS flashing. Before You Begin 1. After Updating the BIOS Restart your motherboard model. In Windows, close all applications and TSR (Terminate and Stay Resident) programs. This helps prevent unexpected failures when performing a BIOS update. 2. 4-2-2...

Manual
Page 72
... adjust the CPU FSB only. • Advanced mode allows you to monitor hardware temperature, voltage and fan speed and set . After making changes in Windows environment. 4-3 EasyTune 6 GIGABYTE's EasyTune 6 is a simple and easy-to-use interface that allows users to fine-tune their system-related information without the need to install additional...
... adjust the CPU FSB only. • Advanced mode allows you to monitor hardware temperature, voltage and fan speed and set . After making changes in Windows environment. 4-3 EasyTune 6 GIGABYTE's EasyTune 6 is a simple and easy-to-use interface that allows users to fine-tune their system-related information without the need to install additional...

Manual
Page 76
...) and click the Copy button to restore the file(s)/directory(ies) or click Restore to quickly back up and restore your system data in the Windows Vista operating system. Shadow copies are read-only so you to restore the entire system. System Restore Choose a system restore point using the navigation bar...
...) and click the Copy button to restore the file(s)/directory(ies) or click Restore to quickly back up and restore your system data in the Windows Vista operating system. Shadow copies are read-only so you to restore the entire system. System Restore Choose a system restore point using the navigation bar...

Manual
Page 77
...Required when the SATA controller is recommended that you may prepare only one hard drive. • An empty formatted floppy disk. • Windows Vista/XP setup disk. • Motherboard driver disk. 5-1-1 Configuring the Onboard SATA Controller A. Appendix Install SATA hard drive(s) in your... Skip this step if you do not want to AHCI or RAID mode. - 77 - Make a floppy disk containing the SATA RAID/AHCI driver for Windows XP. (Note 2) E. Chapter 5 Appendix 5-1 Configuring SATA Hard Drive(s) To configure SATA hard drive(s), follow the steps below: A. C. B. Install the...
...Required when the SATA controller is recommended that you may prepare only one hard drive. • An empty formatted floppy disk. • Windows Vista/XP setup disk. • Motherboard driver disk. 5-1-1 Configuring the Onboard SATA Controller A. Appendix Install SATA hard drive(s) in your... Skip this step if you do not want to AHCI or RAID mode. - 77 - Make a floppy disk containing the SATA RAID/AHCI driver for Windows XP. (Note 2) E. Chapter 5 Appendix 5-1 Configuring SATA Hard Drive(s) To configure SATA hard drive(s), follow the steps below: A. C. B. Install the...
Manual
Page 79
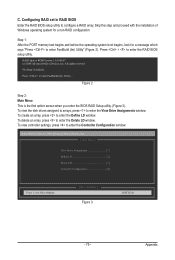
... Define LD 2 ] Delete LD 3 ] Controller Configuration 4 ] [ Keys Available ] Press 1..4 to enter FastBuild (tm) Utility... C. Press + to enter the Controller Configuration window. To view controller settings, press to enter the RAID BIOS setup utility. All rights reserved. No Array is the first option screen when you enter... Appendix To view the disk drives assigned to arrays, press to enter the Delete LD window. To delete an array, press to enter the View Drive Assignments window. Configuring RAID set in RAID BIOS Enter the RAID BIOS setup utility to enter the Define...
... Define LD 2 ] Delete LD 3 ] Controller Configuration 4 ] [ Keys Available ] Press 1..4 to enter FastBuild (tm) Utility... C. Press + to enter the Controller Configuration window. To view controller settings, press to enter the RAID BIOS setup utility. All rights reserved. No Array is the first option screen when you enter... Appendix To view the disk drives assigned to arrays, press to enter the Delete LD window. To delete an array, press to enter the View Drive Assignments window. Configuring RAID set in RAID BIOS Enter the RAID BIOS setup utility to enter the Define...

Manual
Page 80
.... [ Define LD Menu ] LD No RAID Mode LD 1 ---- LD 4 ---- LD 6 ---- LD No RAID Mode [ Define LD Menu ] Total Drv LD 1 RAID 0 0 Stripe Block: 64 KB Gigabyte Boundary: ON [ Drives Assignments ] Channel:ID Drive Model 1:Mas WDC WD800JD-22LSA0 2:Mas WDC WD800JD-22LSA0 Capabilities SATA 3G SATA 3G Fast Init: ON Cache... and RAID levels for one or multiple disk arrays. LD 5 ---- LD 9 ---- Create Arrays Manually To create a new array, press to enter the Define LD Menu window (Figure 4). LD 2 ---- LD 7 ---- LD 8 ----
.... [ Define LD Menu ] LD No RAID Mode LD 1 ---- LD 4 ---- LD 6 ---- LD No RAID Mode [ Define LD Menu ] Total Drv LD 1 RAID 0 0 Stripe Block: 64 KB Gigabyte Boundary: ON [ Drives Assignments ] Channel:ID Drive Model 1:Mas WDC WD800JD-22LSA0 2:Mas WDC WD800JD-22LSA0 Capabilities SATA 3G SATA 3G Fast Init: ON Cache... and RAID levels for one or multiple disk arrays. LD 5 ---- LD 9 ---- Create Arrays Manually To create a new array, press to enter the Define LD Menu window (Figure 4). LD 2 ---- LD 7 ---- LD 8 ----

Manual
Page 81
... 79.82 80.2 80.02 Assignment LD 1-1 LD 1-2 [h] Up [i] Down [ESC] Exit [ Keys Available ] [Ctrl+H] Secure Erase [PgUp/Dn] Page Change Figure 8 - 81 - Then, the window below will show the number of the RAID array or press other keys to a disk array or are labeled with their assigned disk array or... up or down arrow key to Y. Press the key or to change the Assignment option to highlight a drive. 4. Press + keys to its maximum capacity. 8. The window below will erase the MBR data of the disk. Press + to set the array to save the information.
... 79.82 80.2 80.02 Assignment LD 1-1 LD 1-2 [h] Up [i] Down [ESC] Exit [ Keys Available ] [Ctrl+H] Secure Erase [PgUp/Dn] Page Change Figure 8 - 81 - Then, the window below will show the number of the RAID array or press other keys to a disk array or are labeled with their assigned disk array or... up or down arrow key to Y. Press the key or to change the Assignment option to highlight a drive. 4. Press + keys to its maximum capacity. 8. The window below will erase the MBR data of the disk. Press + to set the array to save the information.
Manual
Page 83
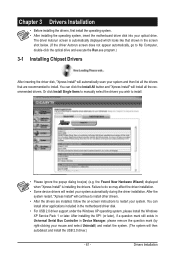
...the OS installation. sume that the drive letter for your optical drive folder, double click the Menu.exe file in Figure 3, to install Windows XP to exit when finished. Select the controller driver by pressing the corresponding letter from the startup disk. 2: Remove the startup disk ...hard drives, select 3) SB700/710/750 SATA Driver for XP. Press after the command (Figure 1): A:\>copy d:\bootdrv\sb750\x86\*.* (Note) Figure 1 In Windows mode: Steps: 1: Use an alternative system and insert the motherboard driver disk. 2: From your optical drive is /are configured to RAID/AHCI mode, you ...
...the OS installation. sume that the drive letter for your optical drive folder, double click the Menu.exe file in Figure 3, to install Windows XP to exit when finished. Select the controller driver by pressing the corresponding letter from the startup disk. 2: Remove the startup disk ...hard drives, select 3) SB700/710/750 SATA Driver for XP. Press after the command (Figure 1): A:\>copy d:\bootdrv\sb750\x86\*.* (Note) Figure 1 In Windows mode: Steps: 1: Use an alternative system and insert the motherboard driver disk. 2: From your optical drive is /are configured to RAID/AHCI mode, you ...
Manual
Page 84
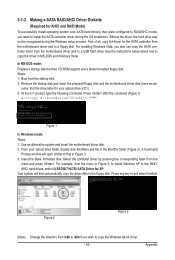
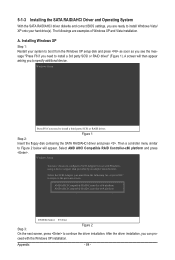
... SATA RAID/AHCI Driver and Operating System With the SATA RAID/AHCI driver diskette and correct BIOS settings, you are examples of Windows XP and Vista installation. Installing Windows XP Step 1: Restart your hard drive(s). Select AMD AHCI Compatible RAID Controller-x86 platform and press . Select the SCSI Adapter ... ENTER=Select F3=Exit Step 3: Figure 2 On the next screen, press to the previous screen. The followings are ready to install Windows Vista/ XP onto your system to boot from the following list, or press ESC to return to continue the driver installation. Appendix - 84...
... SATA RAID/AHCI Driver and Operating System With the SATA RAID/AHCI driver diskette and correct BIOS settings, you are examples of Windows XP and Vista installation. Installing Windows XP Step 1: Restart your hard drive(s). Select AMD AHCI Compatible RAID Controller-x86 platform and press . Select the SCSI Adapter ... ENTER=Select F3=Exit Step 3: Figure 2 On the next screen, press to the previous screen. The followings are ready to install Windows Vista/ XP onto your system to boot from the following list, or press ESC to return to continue the driver installation. Appendix - 84...


