Manual
Page 3
... For product-related information, check on our website at: http://www.gigabyte.com.tw Identifying Your Motherboard Revision The revision number on your motherboard revision before updating motherboard BIOS, drivers, or when looking for technical information. Check your motherboard looks like ...this manual may be reproduced, copied, translated, transmitted, or published in the use GIGABYTE's unique features, read the User's Manual. All...
... For product-related information, check on our website at: http://www.gigabyte.com.tw Identifying Your Motherboard Revision The revision number on your motherboard revision before updating motherboard BIOS, drivers, or when looking for technical information. Check your motherboard looks like ...this manual may be reproduced, copied, translated, transmitted, or published in the use GIGABYTE's unique features, read the User's Manual. All...

Manual
Page 5
... 61 3-1 Installing Chipset Drivers 61 3-2 Application Software 62 3-3 Technical Manuals 62 3-4 Contact...63 3-5 System...63 3-6 Download Center 64 Chapter 4 Unique Features 65 4-1 Xpress Recovery2 65 4-2 BIOS ...Repair...76 Chapter 5 Appendix...77 5-1 Configuring SATA Hard Drive(s 77 5-1-1 Configuring the Onboard SATA Controller 77 5-1-2 Making a SATA RAID/AHCI Driver Diskette 83 5-1-3 Installing the SATA RAID/AHCI Driver and Operating System 84 5-2 Configuring Audio Input and Output 88 5-2-1 Configuring 2/4/5.1/7.1-Channel Audio 88 5-2-2 Configuring S/PDIF In/Out 90 5-2-3 Enabling ...
... 61 3-1 Installing Chipset Drivers 61 3-2 Application Software 62 3-3 Technical Manuals 62 3-4 Contact...63 3-5 System...63 3-6 Download Center 64 Chapter 4 Unique Features 65 4-1 Xpress Recovery2 65 4-2 BIOS ...Repair...76 Chapter 5 Appendix...77 5-1 Configuring SATA Hard Drive(s 77 5-1-1 Configuring the Onboard SATA Controller 77 5-1-2 Making a SATA RAID/AHCI Driver Diskette 83 5-1-3 Installing the SATA RAID/AHCI Driver and Operating System 84 5-2 Configuring Audio Input and Output 88 5-2-1 Configuring 2/4/5.1/7.1-Channel Audio 88 5-2-2 Configuring S/PDIF In/Out 90 5-2-3 Enabling ...
Manual
Page 6
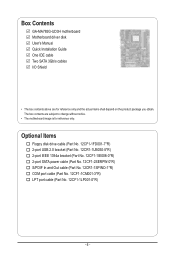
Box Contents GA-MA785G-UD3H motherboard Motherboard driver disk User's Manual Quick Installation Guide One IDE cable Two SATA 3Gb/s cables I/O Shield • The box contents above are subject to change without notice. &#...
Box Contents GA-MA785G-UD3H motherboard Motherboard driver disk User's Manual Quick Installation Guide One IDE cable Two SATA 3Gb/s cables I/O Shield • The box contents above are subject to change without notice. &#...

Manual
Page 18
... Read the following guidelines before installing an expansion card to install an expansion card: • Make sure the motherboard supports the expansion card. Install the driver provided with the slot, and press down on the card are completely inserted into the PCI Express slot. Align the card with the expansion card...
... Read the following guidelines before installing an expansion card to install an expansion card: • Make sure the motherboard supports the expansion card. Install the driver provided with the slot, and press down on the card are completely inserted into the PCI Express slot. Align the card with the expansion card...
Manual
Page 19
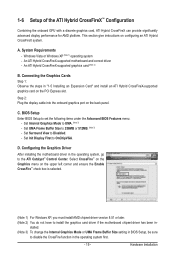
...display cable into the onboard graphics port on configuring an ATI Hybrid CrossFireX system. Set Surround View to install the graphics card driver if the motherboard chipset driver has been in "1-5 Installing an Expansion Card" and install an ATI Hybrid CrossFireX-supported graphics card on the upper left ...corner and ensure the Enable CrossFire™ check box is selected. (Note 1) For Windows XP, you must install AMD chipset driver version 8.51 or later. (Note 2) You do not have to Disabled. - Select CrossFire™ on the Graphics menu on the PCI Express slot...
...display cable into the onboard graphics port on configuring an ATI Hybrid CrossFireX system. Set Surround View to install the graphics card driver if the motherboard chipset driver has been in "1-5 Installing an Expansion Card" and install an ATI Hybrid CrossFireX-supported graphics card on the upper left ...corner and ensure the Enable CrossFire™ check box is selected. (Note 1) For Windows XP, you must install AMD chipset driver version 8.51 or later. (Note 2) You do not have to Disabled. - Select CrossFire™ on the Graphics menu on the PCI Express slot...
Manual
Page 36
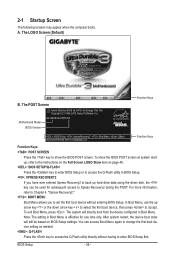
... Recovery2 during the POST. After system restart, the device boot order will directly boot from the device configured in Boot Menu. Motherboard Model BIOS Version GA-MA785G-UD3H E3 . . . . : BIOS Setup : XpressRecovery2 : Boot Menu : Qflash 06/05/2009-RS785-SB710-7A66BG04C-00 Function Keys Function Keys Function Keys: ...the Q-Flash utility directly without entering BIOS Setup. BIOS Setup - 36 - In Boot Menu, use the up hard drive data using the driver disk, the key can access Boot Menu again to change the first boot device setting as needed. : Q-FLASH Press the key to accept...
... Recovery2 during the POST. After system restart, the device boot order will directly boot from the device configured in Boot Menu. Motherboard Model BIOS Version GA-MA785G-UD3H E3 . . . . : BIOS Setup : XpressRecovery2 : Boot Menu : Qflash 06/05/2009-RS785-SB710-7A66BG04C-00 Function Keys Function Keys Function Keys: ...the Q-Flash utility directly without entering BIOS Setup. BIOS Setup - 36 - In Boot Menu, use the up hard drive data using the driver disk, the key can access Boot Menu again to change the first boot device setting as needed. : Q-FLASH Press the key to accept...
Manual
Page 48
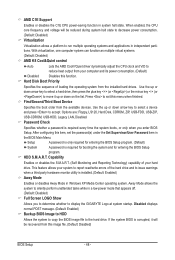
... can function as multiple virtual systems. (Default: Disabled) AMD K8 Cool&Quiet control Auto Disabled Lets the AMD Cool'n'Quiet driver dynamically adjust the CPU clock and VID to display the GIGABYTE Logo at system startup. Away Mode allows the system to run multiple operating systems and applications in Windows XP Media...
... can function as multiple virtual systems. (Default: Disabled) AMD K8 Cool&Quiet control Auto Disabled Lets the AMD Cool'n'Quiet driver dynamically adjust the CPU clock and VID to display the GIGABYTE Logo at system startup. Away Mode allows the system to run multiple operating systems and applications in Windows XP Media...
Manual
Page 49
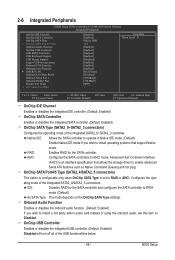
...: Enabled) OnChip SATA Type (SATA2_0~SATA2_3 connectors) Configures the operating mode of using the onboard audio, set to install operating systems that allows the storage driver to AHCI mode. IDE Disables RAID for the SATA controller. Onboard Audio Function Enables or disables the onboard audio function. (Default: Enabled) If you wish...
...: Enabled) OnChip SATA Type (SATA2_0~SATA2_3 connectors) Configures the operating mode of using the onboard audio, set to install operating systems that allows the storage driver to AHCI mode. IDE Disables RAID for the SATA controller. Onboard Audio Function Enables or disables the onboard audio function. (Default: Enabled) If you wish...
Manual
Page 61
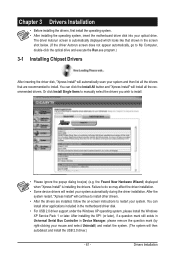
...will continue to restart your system automatically during the driver installation. Chapter 3 Drivers Installation • Before installing the drivers, first install the operating system. • After installing the operating system, insert the motherboard driver disk into your mouse and select Uninstall) and restart...; Please ignore the popup dialog box(es) (e.g. Failure to do so may affect the driver installation. • Some device drivers will install all the drivers that are installed, follow the on-screen instructions to install other applications included in Device Manager...
...will continue to restart your system automatically during the driver installation. Chapter 3 Drivers Installation • Before installing the drivers, first install the operating system. • After installing the operating system, insert the motherboard driver disk into your mouse and select Uninstall) and restart...; Please ignore the popup dialog box(es) (e.g. Failure to do so may affect the driver installation. • Some device drivers will install all the drivers that are installed, follow the on-screen instructions to install other applications included in Device Manager...
Manual
Page 62
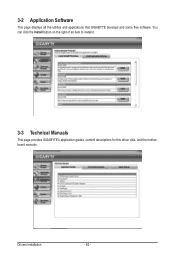
Drivers Installation - 62 - 3-2 Application Software This page displays all the utilities and applications that GIGABYTE develops and some free software. You can click the Install button on the right of an item to install it. 3-3 Technical Manuals This page provides GIGABYTE's application guides, content descriptions for this driver disk, and the motherboard manuals.
Drivers Installation - 62 - 3-2 Application Software This page displays all the utilities and applications that GIGABYTE develops and some free software. You can click the Install button on the right of an item to install it. 3-3 Technical Manuals This page provides GIGABYTE's application guides, content descriptions for this driver disk, and the motherboard manuals.
Manual
Page 63
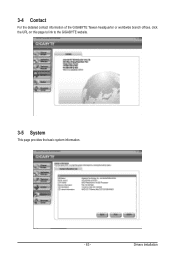
Drivers Installation 3-4 Contact For the detailed contact information of the GIGABYTE Taiwan headquarter or worldwide branch offices, click the URL on this page to link to the GIGABYTE website. 3-5 System This page provides the basic system information. - 63 -
Drivers Installation 3-4 Contact For the detailed contact information of the GIGABYTE Taiwan headquarter or worldwide branch offices, click the URL on this page to link to the GIGABYTE website. 3-5 System This page provides the basic system information. - 63 -

Manual
Page 64
Drivers Installation - 64 - The latest version of the BIOS, drivers, or applications will be displayed. 3-6 Download Center To update the BIOS, drivers, or applications, click the Download Center button to link to the GIGABYTE website.
Drivers Installation - 64 - The latest version of the BIOS, drivers, or applications will be displayed. 3-6 Download Center To update the BIOS, drivers, or applications, click the Download Center button to link to the GIGABYTE website.

Manual
Page 65
... back up your system data and perform restoration of data). • It is recommended to back up your system soon after the operating system and drivers are different utilities. A. actual size requirements vary, depending on the first IDE connector is the first physical drive. System Requirements: • At least 512 MB...
... back up your system data and perform restoration of data). • It is recommended to back up your system soon after the operating system and drivers are different utilities. A. actual size requirements vary, depending on the first IDE connector is the first physical drive. System Requirements: • At least 512 MB...
Manual
Page 66
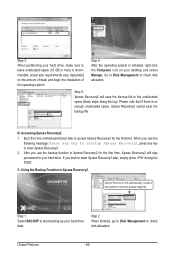
.... Step 2: When finished, go to Disk Management to check disk allocation. Step 4: After the operating system is recommended; Unique Features - 66 - Boot from the motherboard driver disk to access Xpress Recovery2 for the first time, Xpress Recovery2 will automatically create a new partition to start backing up your desktop and select Manage...
.... Step 2: When finished, go to Disk Management to check disk allocation. Step 4: After the operating system is recommended; Unique Features - 66 - Boot from the motherboard driver disk to access Xpress Recovery2 for the first time, Xpress Recovery2 will automatically create a new partition to start backing up your desktop and select Manage...
Manual
Page 75
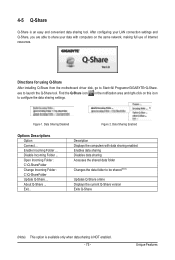
Directions for using Q-Share After installing Q-Share from the motherboard driver disk, go to launch the Q-Share tool. exe to Start>All Programs>GIGABYTE>Q-Share. Data Sharing Disabled Figure 2. Enable Incoming Folder ... Data Sharing Enabled Options Descriptions Option Connect ... Open Incoming Folder : C:\Q-ShareFolder Change Incoming Folder : C:\Q-ShareFolder Update Q-Share ... ...
Directions for using Q-Share After installing Q-Share from the motherboard driver disk, go to launch the Q-Share tool. exe to Start>All Programs>GIGABYTE>Q-Share. Data Sharing Disabled Figure 2. Enable Incoming Folder ... Data Sharing Enabled Options Descriptions Option Connect ... Open Incoming Folder : C:\Q-ShareFolder Change Incoming Folder : C:\Q-ShareFolder Update Q-Share ... ...

Manual
Page 77
...drive(s) in your computer Attach one hard drive. • An empty formatted floppy disk. • Windows Vista/XP setup disk. • Motherboard driver disk. 5-1-1 Configuring the Onboard SATA Controller A. C. If you do not want to create RAID, you may prepare only one end of the SATA...). Configure SATA controller mode in RAID BIOS. (Note 1) D. Make a floppy disk containing the SATA RAID/AHCI driver for Windows XP. (Note 2) E. Install the SATA RAID/AHCI driver (Note 2) and operating system. Before you do not want to create RAID array on the motherboard. Installing SATA hard...
...drive(s) in your computer Attach one hard drive. • An empty formatted floppy disk. • Windows Vista/XP setup disk. • Motherboard driver disk. 5-1-1 Configuring the Onboard SATA Controller A. C. If you do not want to create RAID, you may prepare only one end of the SATA...). Configure SATA controller mode in RAID BIOS. (Note 1) D. Make a floppy disk containing the SATA RAID/AHCI driver for Windows XP. (Note 2) E. Install the SATA RAID/AHCI driver (Note 2) and operating system. Before you do not want to create RAID array on the motherboard. Installing SATA hard...
Manual
Page 83
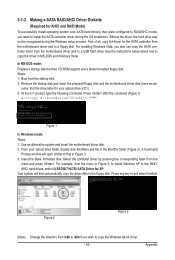
...after the command (Figure 1): A:\>copy d:\bootdrv\sb750\x86\*.* (Note) Figure 1 In Windows mode: Steps: 1: Use an alternative system and insert the motherboard driver disk. 2: From your optical drive is /are configured to RAID/AHCI mode, you need to a USB flash drive. Figure 2 Figure 3 (Note) Change... the directory from \x86 to \x64 if you also can copy the SATA controller driver from the motherboard driver disk to exit when finished. See the instructions below about how to the floppy disk. A Command Prompt window will then automatically copy...
...after the command (Figure 1): A:\>copy d:\bootdrv\sb750\x86\*.* (Note) Figure 1 In Windows mode: Steps: 1: Use an alternative system and insert the motherboard driver disk. 2: From your optical drive is /are configured to RAID/AHCI mode, you need to a USB flash drive. Figure 2 Figure 3 (Note) Change... the directory from \x86 to \x64 if you also can copy the SATA controller driver from the motherboard driver disk to exit when finished. See the instructions below about how to the floppy disk. A Command Prompt window will then automatically copy...
Manual
Page 84
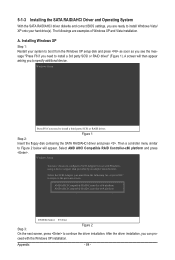
... AMD AHCI Compatible RAID Controller-x86 platform and press . Windows Setup You have chosen to specify additional device. After the driver installation, you need to continue the driver installation. Then a controller menu similar to Figure 2 below will then appear asking you to configure a SCSI Adapter for ... RAID Controller-x64 platform ENTER=Select F3=Exit Step 3: Figure 2 On the next screen, press to install a 3rd party SCSI or RAID driver" (Figure 1). A. The followings are ready to install Windows Vista/ XP onto your system to boot from the following list, or press ESC...
... AMD AHCI Compatible RAID Controller-x86 platform and press . Windows Setup You have chosen to specify additional device. After the driver installation, you need to continue the driver installation. Then a controller menu similar to Figure 2 below will then appear asking you to configure a SCSI Adapter for ... RAID Controller-x64 platform ENTER=Select F3=Exit Step 3: Figure 2 On the next screen, press to install a 3rd party SCSI or RAID driver" (Figure 1). A. The followings are ready to install Windows Vista/ XP onto your system to boot from the following list, or press ESC...
Manual
Page 85
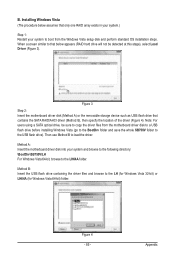
...go to the BootDrv folder and save the whole SB750V folder to the USB flash drive). Method B: Insert the USB flash drive containing the driver files and browse to the LH64A folder. Figure 4 - 85 - Installing Windows Vista (The procedure below assumes that below appears (RAID hard ...drive will not be sure to load the driver. Then use Method B to copy the driver files from the Windows Vista setup disk and perform standard OS installation steps. Appendix Note: For users using a SATA optical drive...
...go to the BootDrv folder and save the whole SB750V folder to the USB flash drive). Method B: Insert the USB flash drive containing the driver files and browse to the LH64A folder. Figure 4 - 85 - Installing Windows Vista (The procedure below assumes that below appears (RAID hard ...drive will not be sure to load the driver. Then use Method B to copy the driver files from the Windows Vista setup disk and perform standard OS installation steps. Appendix Note: For users using a SATA optical drive...
Manual
Page 86
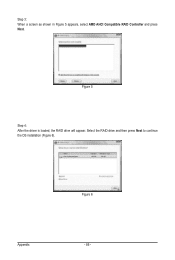
Select the RAID drive and then press Next to continue the OS installation (Figure 6). Appendix Figure 6 - 86 - Figure 5 Step 4: After the driver is loaded, the RAID drive will appear. Step 3: When a screen as shown in Figure 5 appears, select AMD AHCI Compatible RAID Controller and press Next.
Select the RAID drive and then press Next to continue the OS installation (Figure 6). Appendix Figure 6 - 86 - Figure 5 Step 4: After the driver is loaded, the RAID drive will appear. Step 3: When a screen as shown in Figure 5 appears, select AMD AHCI Compatible RAID Controller and press Next.


