Manual
Page 3
... website. Check your motherboard looks like this manual is protected by GIGABYTE without GIGABYTE's prior written permission. Disclaimer Information in this : "REV: X.X." For product-related information, check... on our website at: http://www.gigabyte.com Identifying Your Motherboard Revision The revision number on how to the specifications and...be reproduced, copied, translated, transmitted, or published in this product, GIGABYTE provides the following types of GIGABYTE. For example, "REV: 1.0" means the revision of this manual are legally registered to ...
... website. Check your motherboard looks like this manual is protected by GIGABYTE without GIGABYTE's prior written permission. Disclaimer Information in this : "REV: X.X." For product-related information, check... on our website at: http://www.gigabyte.com Identifying Your Motherboard Revision The revision number on how to the specifications and...be reproduced, copied, translated, transmitted, or published in this product, GIGABYTE provides the following types of GIGABYTE. For example, "REV: 1.0" means the revision of this manual are legally registered to ...
Manual
Page 4
...GA-G41M-Combo Motherboard Layout 5 Chapter 1 Hardware Installation 6 1-1 Installation Precautions 6 1-2 Product Specifications 7 1-3 Installing the CPU and CPU Cooler 9 1-3-1 Installing the CPU...9 1-4 Installing the Memory 10 1-4-1 Dual Channel Memory Configuration 10 1-5 Installing an Expansion Card 10 1-6 Back Panel Connectors 11 1-7 Internal Connectors 12 Chapter 2 BIOS... Setup 21 2-1 Startup Screen 21 2-2 The Main Menu 21 2-3 MB Intelligent Tweaker(M.I.T 22 2-4 Standard CMOS Features 28 2-5 Advanced BIOS Features 29 2-6 Advanced Chipset...
...GA-G41M-Combo Motherboard Layout 5 Chapter 1 Hardware Installation 6 1-1 Installation Precautions 6 1-2 Product Specifications 7 1-3 Installing the CPU and CPU Cooler 9 1-3-1 Installing the CPU...9 1-4 Installing the Memory 10 1-4-1 Dual Channel Memory Configuration 10 1-5 Installing an Expansion Card 10 1-6 Back Panel Connectors 11 1-7 Internal Connectors 12 Chapter 2 BIOS... Setup 21 2-1 Startup Screen 21 2-2 The Main Menu 21 2-3 MB Intelligent Tweaker(M.I.T 22 2-4 Standard CMOS Features 28 2-5 Advanced BIOS Features 29 2-6 Advanced Chipset...
Manual
Page 8
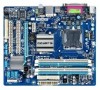
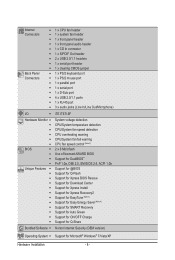
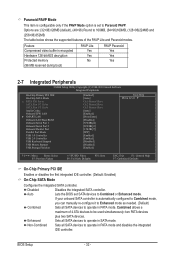
... w 1 x PS/2 mouse port w 1 x parallel port w 1 x serial port w 1 x D-Sub port w 4 x USB 2.0/1.1 ports w 1 x RJ-45 port w 3 x audio jacks (Line In/Line Out/Microphone) I/O w iTE IT8718F Hardware Monitor w w w w w w BIOS w w w w Unique Features w w w w w w w w w w w w System voltage detection CPU/System temperature detection CPU/System fan speed detection CPU overheating warning CPU/System fan fail warning CPU fan speed...
... w 1 x PS/2 mouse port w 1 x parallel port w 1 x serial port w 1 x D-Sub port w 4 x USB 2.0/1.1 ports w 1 x RJ-45 port w 3 x audio jacks (Line In/Line Out/Microphone) I/O w iTE IT8718F Hardware Monitor w w w w w w BIOS w w w w Unique Features w w w w w w w w w w w w System voltage detection CPU/System temperature detection CPU/System fan speed detection CPU overheating warning CPU/System fan fail warning CPU fan speed...
Manual
Page 16
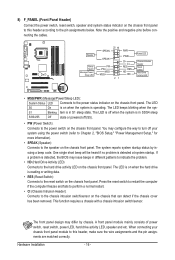
... LED Connects to the hard drive activity LED on the chassis front panel. The LED S0 On is on when the system is detected, the BIOS may issue beeps in S1 sleep state. If a problem is operating. Press the reset switch to restart the computer if the computer freezes and fails.../sensor. The front panel design may configure the way to the pin assignments below. When connecting your system using the power switch (refer to Chapter 2, "BIOS Setup," "Power Management Setup," for more information). • SPEAK (Speaker): Connects to the power switch on the chassis front panel.
... LED Connects to the hard drive activity LED on the chassis front panel. The LED S0 On is on when the system is detected, the BIOS may issue beeps in S1 sleep state. If a problem is operating. Press the reset switch to restart the computer if the computer freezes and fails.../sensor. The front panel design may configure the way to the pin assignments below. When connecting your system using the power switch (refer to Chapter 2, "BIOS Setup," "Power Management Setup," for more information). • SPEAK (Speaker): Connects to the power switch on the chassis front panel.
Manual
Page 19
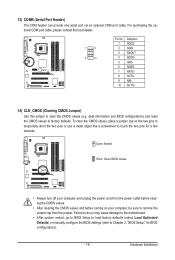
... Failure to do so may cause damage to the motherboard. • After system restart, go to BIOS Setup to load factory defaults (select Load Optimized Defaults) or manually configure the BIOS settings (refer to factory defaults. Open: Normal Short: Clear CMOS Values • Always turn off your... and before turning on the two pins to temporarily short the two pins or use a metal object like a screwdriver to touch the two pins for BIOS configurations). - 19 - For purchasing the optional COM port cable, please contact the local dealer. 1 2 9 10 Pin No. 1 2 3 4 5 6 7 8 9 10 Definition ...
... Failure to do so may cause damage to the motherboard. • After system restart, go to BIOS Setup to load factory defaults (select Load Optimized Defaults) or manually configure the BIOS settings (refer to factory defaults. Open: Normal Short: Clear CMOS Values • Always turn off your... and before turning on the two pins to temporarily short the two pins or use a metal object like a screwdriver to touch the two pins for BIOS configurations). - 19 - For purchasing the optional COM port cable, please contact the local dealer. 1 2 9 10 Pin No. 1 2 3 4 5 6 7 8 9 10 Definition ...
Manual
Page 20
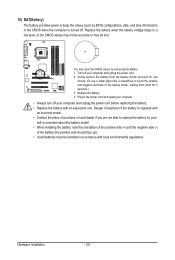
... - Plug in accordance with local environmental regulations. Turn off . Replace the battery. 4. 15) BAT(Battery) The battery provides power to keep the values (such as BIOS configurations, date, and time information) in the CMOS when the computer is replaced with an incorrect model. • Contact the place of purchase or local...
... - Plug in accordance with local environmental regulations. Turn off . Replace the battery. 4. 15) BAT(Battery) The battery provides power to keep the values (such as BIOS configurations, date, and time information) in the CMOS when the computer is replaced with an incorrect model. • Contact the place of purchase or local...
Manual
Page 21
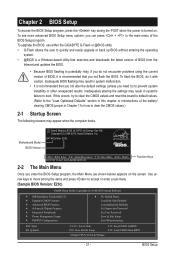
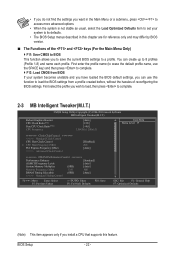
G41M-Combo E20c . . . . : BIOS Setup : XpressRecovery2 : Boot Menu : Qflash 05/07/2010-G41-ICH7-6A79PG0FC-00 Function Keys 2-2 The Main Menu Once you enter the BIOS Setup program, the Main Menu (as shown below) appears on . Chapter 2 BIOS Setup To access the BIOS Setup program, press the key ...based utility that searches and downloads the latest version of BIOS, it is potentially risky, if you not flash the BIOS. Inadequate BIOS flashing may appear when the computer boots. To upgrade the BIOS, use either the GIGABYTE Q-Flash or @BIOS utility. • Q-Flash allows the user to ...
G41M-Combo E20c . . . . : BIOS Setup : XpressRecovery2 : Boot Menu : Qflash 05/07/2010-G41-ICH7-6A79PG0FC-00 Function Keys 2-2 The Main Menu Once you enter the BIOS Setup program, the Main Menu (as shown below) appears on . Chapter 2 BIOS Setup To access the BIOS Setup program, press the key ...based utility that searches and downloads the latest version of BIOS, it is potentially risky, if you not flash the BIOS. Inadequate BIOS flashing may appear when the computer boots. To upgrade the BIOS, use either the GIGABYTE Q-Flash or @BIOS utility. • Q-Flash allows the user to ...
Manual
Page 22
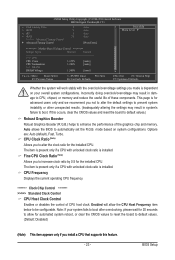
First enter the profile name (to erase the default profile name, use this function to load the BIOS settings from BIOS If your system to its defaults. • The BIOS Setup menus described in the Main Menu or a submenu, press + to access more advanced options. • When the system is... profile created before, without the hassles of the and keys (For the Main Menu Only) F11: Save CMOS to BIOS This function allows you to save the current BIOS settings to a profile. First select the profile you wish to load, then press to complete. 2-3 MB Intelligent Tweaker(M.I.T.) CMOS...
First enter the profile name (to erase the default profile name, use this function to load the BIOS settings from BIOS If your system to its defaults. • The BIOS Setup menus described in the Main Menu or a submenu, press + to access more advanced options. • When the system is... profile created before, without the hassles of the and keys (For the Main Menu Only) F11: Save CMOS to BIOS This function allows you to save the current BIOS settings to a profile. First select the profile you wish to load, then press to complete. 2-3 MB Intelligent Tweaker(M.I.T.) CMOS...
Manual
Page 23
... results. (Inadequately altering the settings may result in system's failure to CPU, chipset, or memory and reduce the useful life of CPU host clock. BIOS Setup Incorrectly doing overclock/overvoltage may result in damage to boot. Note: If your overall system configurations. CMOS Setup Utility-Copyright (C) 1984-2010 Award Software... if a CPU with unlocked clock ratio is for the installed CPU. Enabled will work stably with unlocked clock ratio is installed. Auto allows the BIOS to enhance the performance of the graphics chip and memory. If this feature. - 23 -
... results. (Inadequately altering the settings may result in system's failure to CPU, chipset, or memory and reduce the useful life of CPU host clock. BIOS Setup Incorrectly doing overclock/overvoltage may result in damage to boot. Note: If your overall system configurations. CMOS Setup Utility-Copyright (C) 1984-2010 Award Software... if a CPU with unlocked clock ratio is for the installed CPU. Enabled will work stably with unlocked clock ratio is installed. Auto allows the BIOS to enhance the performance of the graphics chip and memory. If this feature. - 23 -
Manual
Page 24
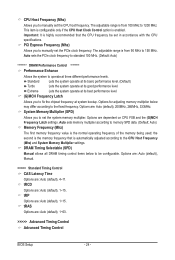
... : Auto (default), 4~11. Options are: Auto (default), Manual. >>>>> Standard Timing Control CAS Latency Time Options are : Auto (default), 1~63. >>>>> Advanced Timing Control Advanced Timing Control BIOS Setup - 24 - Important: It is highly recommended that is the memory frequency that the CPU frequency be configurable. Options for adjusting memory multiplier below to...
... : Auto (default), 4~11. Options are: Auto (default), Manual. >>>>> Standard Timing Control CAS Latency Time Options are : Auto (default), 1~63. >>>>> Advanced Timing Control Advanced Timing Control BIOS Setup - 24 - Important: It is highly recommended that is the memory frequency that the CPU frequency be configurable. Options for adjusting memory multiplier below to...

Manual
Page 25
... Rate(CMD) Options are : Auto (default), 1~31. tRTP Options are : Auto (default), 1~31. tWTR Options are : Auto (default), 1~15. tRFC Options are : Auto (default), 1~15. BIOS Setup CMOS Setup Utility-Copyright (C) 1984-2010 Award Software Advanced Timing Control x tRRD x tWTR x tWR x tRFC x tRTP x Command Rate (CMD) Auto Auto Auto Auto Auto...
... Rate(CMD) Options are : Auto (default), 1~31. tRTP Options are : Auto (default), 1~31. tWTR Options are : Auto (default), 1~15. tRFC Options are : Auto (default), 1~15. BIOS Setup CMOS Setup Utility-Copyright (C) 1984-2010 Award Software Advanced Timing Control x tRRD x tWTR x tWR x tRFC x tRTP x Command Rate (CMD) Auto Auto Auto Auto Auto...
Manual
Page 26
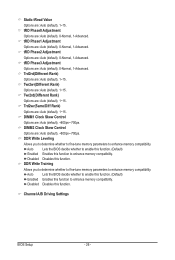
...default), 0-Normal, 1-Advanced. tRD Phase3 Adjustment Options are : Auto (default), 0-Normal, 1-Advanced. Auto Lets the BIOS decide whether to enhance memory compatibility. Disabled Disables this function to enable this function. (Default) Enabled Enables this function...enable this function. (Default) Enabled Enables this function. tRD Phase2 Adjustment Options are : Auto (default), +800ps~-700ps. Auto Lets the BIOS decide whether to enhance memory compatibility. DIMM1 Clock Skew Control Options are : Auto (default), 0-Normal, 1-Advanced. Trd2rd(Different Rank) Options...
...default), 0-Normal, 1-Advanced. tRD Phase3 Adjustment Options are : Auto (default), 0-Normal, 1-Advanced. Auto Lets the BIOS decide whether to enhance memory compatibility. Disabled Disables this function to enable this function. (Default) Enabled Enables this function...enable this function. (Default) Enabled Enables this function. tRD Phase2 Adjustment Options are : Auto (default), +800ps~-700ps. Auto Lets the BIOS decide whether to enhance memory compatibility. DIMM1 Clock Skew Control Options are : Auto (default), 0-Normal, 1-Advanced. Trd2rd(Different Rank) Options...
Manual
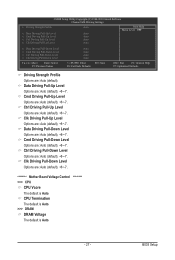
Page 27
... are : Auto (default), +8~-7. CPU Termination The default is Auto. >>> DRAM DRAM Voltage The default is Auto. Ctrl Driving Pull-Up Level Options are : Auto (default). BIOS Setup Data Driving Pull-Up Level Options are : Auto (default), +8~-7. Ctrl Driving Pull-Down Level Options are : Auto (default), +8~-7.
... are : Auto (default), +8~-7. CPU Termination The default is Auto. >>> DRAM DRAM Voltage The default is Auto. Ctrl Driving Pull-Up Level Options are : Auto (default). BIOS Setup Data Driving Pull-Up Level Options are : Auto (default), +8~-7. Ctrl Driving Pull-Down Level Options are : Auto (default), +8~-7.
Manual
Page 28
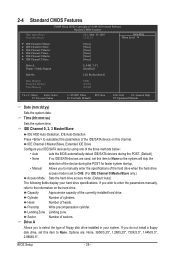
... the hard drive when the hard drive access mode is set to manually enter the specifications of the three methods below: • Auto Lets the BIOS automatically detect IDE/SATA devices during the POST for faster system startup. • Manual Allows you wish to enter the parameters manually, refer to the... skip the detection of floppy disk drive installed in your hard drive specifications. Time (hh:mm:ss) Sets the system time. Precomp Write precompensation cylinder. BIOS Setup - 28 -
... the hard drive when the hard drive access mode is set to manually enter the specifications of the three methods below: • Auto Lets the BIOS automatically detect IDE/SATA devices during the POST for faster system startup. • Manual Allows you wish to enter the parameters manually, refer to the... skip the detection of floppy disk drive installed in your hard drive specifications. Time (hh:mm:ss) Sets the system time. Precomp Write precompensation cylinder. BIOS Setup - 28 -
Manual
Page 29
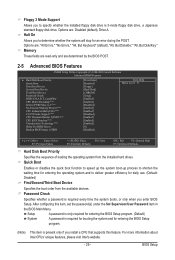
... Support (Note) CPU Thermal Monitor 2(TM2) (Note) CPU EIST Function (Note) Virtualization Technology (Note) Delay For HDD (Secs) Backup BIOS Image to deliver greater efficiency for daily use. (Default: Disabled) First/Second/Third Boot Device Specifies the boot order from the installed hard ...drives. After configuring this feature. BIOS Setup Options are : "All Errors," "No Errors," "All, But Keyboard" (default), "All, But Diskette," "All, But Disk/Key."...
... Support (Note) CPU Thermal Monitor 2(TM2) (Note) CPU EIST Function (Note) Virtualization Technology (Note) Delay For HDD (Secs) Backup BIOS Image to deliver greater efficiency for daily use. (Default: Disabled) First/Second/Third Boot Device Specifies the boot order from the installed hard ...drives. After configuring this feature. BIOS Setup Options are : "All Errors," "No Errors," "All, But Keyboard" (default), "All, But Diskette," "All, But Disk/Key."...
Manual
Page 30
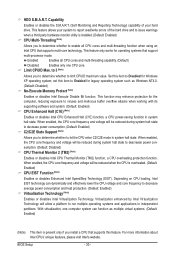
... CPU loading, Intel EIST technology can function as Windows NT4.0. (Default: Disabled) No-Execute Memory Protect (Note) Enables or disables Intel Execute Disable Bit function. BIOS Setup - 30 - HDD S.M.A.R.T. to 3 (Note) Allows you to determine whether to let the CPU enter C2/C2E mode in independent partitions. When enabled, the CPU...
... CPU loading, Intel EIST technology can function as Windows NT4.0. (Default: Disabled) No-Execute Memory Protect (Note) Enables or disables Intel Execute Disable Bit function. BIOS Setup - 30 - HDD S.M.A.R.T. to 3 (Note) Allows you to determine whether to let the CPU enter C2/C2E mode in independent partitions. When enabled, the CPU...
Manual
Page 31
...memory is from 0 to 15 seconds. (Default: 0) Backup BIOS Image to HDD Allows the system to copy the BIOS image file to the hard drive. BIOS Setup Enable If No Ext PEG Activates the onboard graphics only...-ray disc). PAVP Lite Mode Specifies the buffer memory size for the BIOS to initialize the hard drive as the system boots up a dual view configuration, set to Always Enable.... If the system BIOS is installed. PAVP mode can support increased content protection and robustness requirements for premium content playback (e.g....
...memory is from 0 to 15 seconds. (Default: 0) Backup BIOS Image to HDD Allows the system to copy the BIOS image file to the hard drive. BIOS Setup Enable If No Ext PEG Activates the onboard graphics only...-ray disc). PAVP Lite Mode Specifies the buffer memory size for the BIOS to initialize the hard drive as the system boots up a dual view configuration, set to Always Enable.... If the system BIOS is installed. PAVP mode can support increased content protection and robustness requirements for premium content playback (e.g....
Manual
Page 32
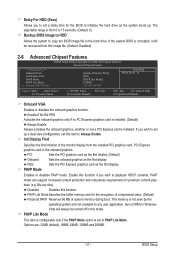
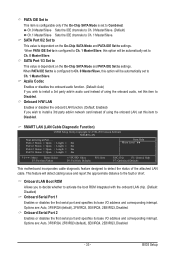
... Lite and Paranoid modes. The table below shows the supported features of 4 ATA devices to operate in PATA mode. Auto Lets the BIOS set to 160MB, (64+96)160MB, (128+96)224MB and (256+96)352MB. Enhanced Sets all SATA devices to Azalia Codec ... the integrated SATA controller. Non-Combined Sets all SATA devices to Combined or Enhanced mode. Disabled Disables the integrated SATA controller. BIOS Setup - 32 - Feature PAVP Lite Compressed video buffer is encrypted Yes Hardware 128-bit AES decryption Yes Protected memory No (...
... Lite and Paranoid modes. The table below shows the supported features of 4 ATA devices to operate in PATA mode. Auto Lets the BIOS set to 160MB, (64+96)160MB, (128+96)224MB and (256+96)352MB. Enhanced Sets all SATA devices to Azalia Codec ... the integrated SATA controller. Non-Combined Sets all SATA devices to Combined or Enhanced mode. Disabled Disables the integrated SATA controller. BIOS Setup - 32 - Feature PAVP Lite Compressed video buffer is encrypted Yes Hardware 128-bit AES decryption Yes Protected memory No (...
Manual
Page 33
.../Slave. Ch.0 Master/Slave Sets the IDE channels to Ch. 0 Master/Slave. (Default) Ch.1 Master/Slave Sets the IDE channels to the fault or short. BIOS Setup When PATA IDE Set to is dependent on the On-Chip SATA Mode and PATA IDE Set to settings. Azalia Codec Enables or disables...
.../Slave. Ch.0 Master/Slave Sets the IDE channels to Ch. 0 Master/Slave. (Default) Ch.1 Master/Slave Sets the IDE channels to the fault or short. BIOS Setup When PATA IDE Set to is dependent on the On-Chip SATA Mode and PATA IDE Set to settings. Azalia Codec Enables or disables...

Manual
Page 34
...) USB Mouse Function Allows USB mouse to be used in MS-DOS. (Default: Disabled) USB Storage Function Determines whether to be resumed at any time. BIOS Setup - 34 - In S3 sleep state, the system appears to detect USB storage devices, including USB flash drives and USB hard drives during the POST...
...) USB Mouse Function Allows USB mouse to be used in MS-DOS. (Default: Disabled) USB Storage Function Determines whether to be resumed at any time. BIOS Setup - 34 - In S3 sleep state, the system appears to detect USB storage devices, including USB flash drives and USB hard drives during the POST...


