
Gateway Notebook User's Guide - Canada/French
Page 105
www.gateway.com files 7 files across network 56 folders 9 programs 7 P parental controls 82 activity ...38 recovering files and folders 11 Recycle Bin 6 deleting files and folders 11 emptying 12 recovering files and folders 11 removing files and folders 6, 11, 12, 19, 90 renaming files and folders 19 restoring files and folders 11 router configuring...printer 56 shortcuts adding to desktop 8 closing programs 19 closing windows 19 copying 19 deleting files and folders 19 keyboard 19 pasting 19 renaming files and folders 19 selecting adjacent items in list 19 selecting items in list 19 switching...
www.gateway.com files 7 files across network 56 folders 9 programs 7 P parental controls 82 activity ...38 recovering files and folders 11 Recycle Bin 6 deleting files and folders 11 emptying 12 recovering files and folders 11 removing files and folders 6, 11, 12, 19, 90 renaming files and folders 19 restoring files and folders 11 router configuring...printer 56 shortcuts adding to desktop 8 closing programs 19 closing windows 19 copying 19 deleting files and folders 19 keyboard 19 pasting 19 renaming files and folders 19 selecting adjacent items in list 19 selecting items in list 19 switching...
Gateway Notebook User's Guide - English
Page 105
www.gateway.com files 7 files across network 56 folders 9 programs 7 P parental controls 82 activity ...38 recovering files and folders 11 Recycle Bin 6 deleting files and folders 11 emptying 12 recovering files and folders 11 removing files and folders 6, 11, 12, 19, 90 renaming files and folders 19 restoring files and folders 11 router configuring...printer 56 shortcuts adding to desktop 8 closing programs 19 closing windows 19 copying 19 deleting files and folders 19 keyboard 19 pasting 19 renaming files and folders 19 selecting adjacent items in list 19 selecting items in list 19 switching...
www.gateway.com files 7 files across network 56 folders 9 programs 7 P parental controls 82 activity ...38 recovering files and folders 11 Recycle Bin 6 deleting files and folders 11 emptying 12 recovering files and folders 11 removing files and folders 6, 11, 12, 19, 90 renaming files and folders 19 restoring files and folders 11 router configuring...printer 56 shortcuts adding to desktop 8 closing programs 19 closing windows 19 copying 19 deleting files and folders 19 keyboard 19 pasting 19 renaming files and folders 19 selecting adjacent items in list 19 selecting items in list 19 switching...
Gateway Quick Start Guide for Windows 7
Page 11
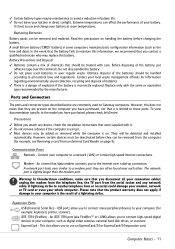
...Gateway computers. Battery Precautions and Disposal ✓ Batteries contain a mix of the batteries should be treated with the same or equivalent type recommended by the manufacturer. Ultimate disposal of chemicals that it is on page 9). To view documentation specific to the model you have purchased, nor that should be added or removed... small lithium battery ('CMOS' battery) in direct sunlight. Contact your local waste management officials for example: keyboard, printer, scanner). Warning: In thunderstorm conditions, make sure that the product warranty does not apply if ...
...Gateway computers. Battery Precautions and Disposal ✓ Batteries contain a mix of the batteries should be treated with the same or equivalent type recommended by the manufacturer. Ultimate disposal of chemicals that it is on page 9). To view documentation specific to the model you have purchased, nor that should be added or removed... small lithium battery ('CMOS' battery) in direct sunlight. Contact your local waste management officials for example: keyboard, printer, scanner). Warning: In thunderstorm conditions, make sure that the product warranty does not apply if ...

Gateway Quick Start Guide for Windows 7
Page 36
... some details. Select Exit in Safe Mode to use basic files and drivers. 1. Switch your keyboard to access the advanced startup options. 3. This option will automatically restart. When the Gateway logo appears, press F8 on your computer on . 2. Caution: You should only enter the ...computer will restore the system settings that you have entered the last time you used it. 1. Please read Removing additional external devices, Removing the battery and Removing additional internal hardware on all system requirements. Check InfoCentre to learn more about your computer to lose data that...
... some details. Select Exit in Safe Mode to use basic files and drivers. 1. Switch your keyboard to access the advanced startup options. 3. This option will automatically restart. When the Gateway logo appears, press F8 on your computer on . 2. Caution: You should only enter the ...computer will restore the system settings that you have entered the last time you used it. 1. Please read Removing additional external devices, Removing the battery and Removing additional internal hardware on all system requirements. Check InfoCentre to learn more about your computer to lose data that...
Gateway Quick Start Guide for Windows 7
Page 53
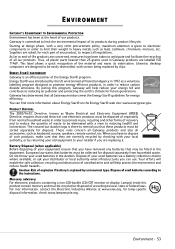
... replaced by the US environmental Protection Agency in 1992 as keyboard, mouse, speakers, remote control, etc. For mor information, contact the Electronic Industries Alliance at the heart of all our products. Gateway has determined that they are designed to promote energy-efficient ...products, in heavy metals such as end-of your used batteries via a battery collection scheme where available, or ask your distributor or local authority what infrastructures you have removed any ...
... replaced by the US environmental Protection Agency in 1992 as keyboard, mouse, speakers, remote control, etc. For mor information, contact the Electronic Industries Alliance at the heart of all our products. Gateway has determined that they are designed to promote energy-efficient ...products, in heavy metals such as end-of your used batteries via a battery collection scheme where available, or ask your distributor or local authority what infrastructures you have removed any ...
Gateway Quick Start Guide for Windows 7
Page 56
... Power supply 10 PowerDVD 19 Printer 42 R Recovery System Restore 27 Regulatory Information 48, 53 Remote control 8 Receiver 12 Removable media devices 9 Removing hardware 9 Removing software 26 Restore points 28 S Safe Computing 25 Safe mode 36 Safety precautions 4 Screen saver 35 Security Antivirus 29 Updates...Disk Defragmenter 25 Error checking 25 Windows System Restore 27 T Task Manager 38 Touchpad 6, 38, 39 Troubleshooting Display 39 Internet 40 Keyboard 38 Printer 42 Sound 39 Top cases 34 Touchpad 38 TV tuner 12, 18 TV-Out 12 U Uninstalling hardware 9 Update ...
... Power supply 10 PowerDVD 19 Printer 42 R Recovery System Restore 27 Regulatory Information 48, 53 Remote control 8 Receiver 12 Removable media devices 9 Removing hardware 9 Removing software 26 Restore points 28 S Safe Computing 25 Safe mode 36 Safety precautions 4 Screen saver 35 Security Antivirus 29 Updates...Disk Defragmenter 25 Error checking 25 Windows System Restore 27 T Task Manager 38 Touchpad 6, 38, 39 Troubleshooting Display 39 Internet 40 Keyboard 38 Printer 42 Sound 39 Top cases 34 Touchpad 38 TV tuner 12, 18 TV-Out 12 U Uninstalling hardware 9 Update ...
Service Guide
Page 4
...components 43 Preventing static electricity discharge 44 Tape 44 Preparing the work space 45 Required tools 46 Preparing the notebook 47 Removing the battery 48 Removing the bay cover 49 Adding or replacing memory modules 50 Replacing the wireless card 52 Replacing the hard drive 54 Replacing... the optical drive 56 Replacing the keyboard cover 58 Replacing the multimedia board 60 Replacing the keyboard 62 Replacing the LCD panel ...
...components 43 Preventing static electricity discharge 44 Tape 44 Preparing the work space 45 Required tools 46 Preparing the notebook 47 Removing the battery 48 Removing the bay cover 49 Adding or replacing memory modules 50 Replacing the wireless card 52 Replacing the hard drive 54 Replacing... the optical drive 56 Replacing the keyboard cover 58 Replacing the multimedia board 60 Replacing the keyboard 62 Replacing the LCD panel ...
Service Guide
Page 64
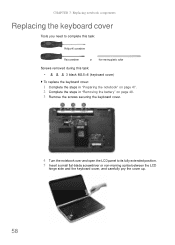
...: 1 Complete the steps in "Preparing the notebook" on page 47. 2 Complete the steps in "Removing the battery" on page 48. 3 Remove the screws securing the keyboard cover. 4 Turn the notebook over and open the LCD panel to its fully extended position. 5 Insert a small flat-blade screwdriver or non-marring scribe between ...
...: 1 Complete the steps in "Preparing the notebook" on page 47. 2 Complete the steps in "Removing the battery" on page 48. 3 Remove the screws securing the keyboard cover. 4 Turn the notebook over and open the LCD panel to its fully extended position. 5 Insert a small flat-blade screwdriver or non-marring scribe between ...

Service Guide
Page 65
... the notebook through the multimedia board cable. The keyboard cover is facing up. 13 Secure the keyboard cover with the connector facing up, on the new keyboard cover. 9 Insert the multimedia cable to its underside (a). www.gateway.com Caution The keyboard cover is not correctly installed, your notebook could ... Reinstall the battery. 59 Disconnect this cable first before pulling the cover away from the palm rest assembly. 6 Detach the keyboard cover from the old keyboard cover, remove it by performing steps 3 and 4 of the cover and find no gaps. 12 Close the LCD panel and turn it...
... the notebook through the multimedia board cable. The keyboard cover is facing up. 13 Secure the keyboard cover with the connector facing up, on the new keyboard cover. 9 Insert the multimedia cable to its underside (a). www.gateway.com Caution The keyboard cover is not correctly installed, your notebook could ... Reinstall the battery. 59 Disconnect this cable first before pulling the cover away from the palm rest assembly. 6 Detach the keyboard cover from the old keyboard cover, remove it by performing steps 3 and 4 of the cover and find no gaps. 12 Close the LCD panel and turn it...
Service Guide
Page 66
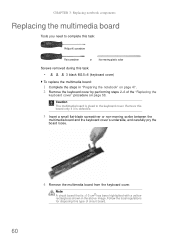
... Insert a small flat-blade screwdriver or non-marring scribe between the multimedia board and the keyboard cover's underside, and carefully pry the board loose. 4 Remove the multimedia board from the keyboard cover. Caution The multimedia board is >10 cm2 has been highlighted with a yellow rectangle... 2-6 of circuit board. 60 CHAPTER 3: Replacing notebook components Replacing the multimedia board Tools you need to the keyboard cover. Remove this type of the "Replacing the keyboard cover" procedure on page 58. Note A circuit board that is glued to complete this task: Phillips #0 ...
... Insert a small flat-blade screwdriver or non-marring scribe between the multimedia board and the keyboard cover's underside, and carefully pry the board loose. 4 Remove the multimedia board from the keyboard cover. Caution The multimedia board is >10 cm2 has been highlighted with a yellow rectangle... 2-6 of circuit board. 60 CHAPTER 3: Replacing notebook components Replacing the multimedia board Tools you need to the keyboard cover. Remove this type of the "Replacing the keyboard cover" procedure on page 58. Note A circuit board that is glued to complete this task: Phillips #0 ...

Service Guide
Page 67
.... 6 Insert the multimedia cable to lock the cable in place. www.gateway.com 5 Secure the new multimedia board, with the connector facing up . 10 Secure the keyboard cover with the screws removed in step 3 of the "Replacing the keyboard cover" procedure on the cover until it clicks in place. 7 Insert the ...tabs on the front side of the keyboard cover into the slots located on the top corners of...
.... 6 Insert the multimedia cable to lock the cable in place. www.gateway.com 5 Secure the new multimedia board, with the connector facing up . 10 Secure the keyboard cover with the screws removed in step 3 of the "Replacing the keyboard cover" procedure on the cover until it clicks in place. 7 Insert the ...tabs on the front side of the keyboard cover into the slots located on the top corners of...
Service Guide
Page 68
... the notebook" on page 47. 2 Remove the keyboard cover by performing steps 2-6 of the keyboard slightly, then carefully slide it toward the LCD panel to release the keyboard retaining tabs from the palm rest. 4 Flip the keyboard over onto the touchpad area to access to the keyboard cable (a). Caution The keyboard is connected to the notebook through...
... the notebook" on page 47. 2 Remove the keyboard cover by performing steps 2-6 of the keyboard slightly, then carefully slide it toward the LCD panel to release the keyboard retaining tabs from the palm rest. 4 Flip the keyboard over onto the touchpad area to access to the keyboard cable (a). Caution The keyboard is connected to the notebook through...
Service Guide
Page 70
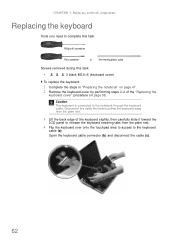
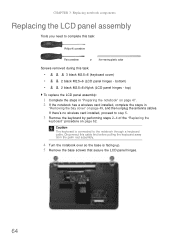
...there's no wireless card installed, proceed to the notebook through a keyboard cable. Disconnect this task: • 3 black M2.5×6 (keyboard cover) • 2 black M2.5×6 (LCD panel hinges - Caution The keyboard is facing up. 5 Remove the base screws that secure the LCD panel hinges. 64 CHAPTER 3:...Tools you need to complete this task: Phillips #0 screwdriver Flat screwdriver or Non-marring plastic scribe Screws removed during this cable first before pulling the keyboard away from the palm rest assembly. 4 Turn the notebook over so the base is connected to step...
...there's no wireless card installed, proceed to the notebook through a keyboard cable. Disconnect this task: • 3 black M2.5×6 (keyboard cover) • 2 black M2.5×6 (LCD panel hinges - Caution The keyboard is facing up. 5 Remove the base screws that secure the LCD panel hinges. 64 CHAPTER 3:...Tools you need to complete this task: Phillips #0 screwdriver Flat screwdriver or Non-marring plastic scribe Screws removed during this cable first before pulling the keyboard away from the palm rest assembly. 4 Turn the notebook over so the base is connected to step...

Service Guide
Page 73
www.gateway.com 15 Lift the LCD panel assembly up . 25 Reinstall the keyboard and the keyboard cover by performing steps 5-8 of the "Replacing the keyboard" procedure on the notebook, and then secure it with the hinge screws removed in step 14. 17 If the notebook has a wireless card installed, proceed to step 18 to .... 22 If the notebook has a wireless card installed, reconnect the antenna cables and then reinstall the bay cover. 23 Return the base hinge screws removed in step 5. 24 Turn the notebook over so the palm rest is facing up and away from the notebook. 16 Position the new LCD panel...
www.gateway.com 15 Lift the LCD panel assembly up . 25 Reinstall the keyboard and the keyboard cover by performing steps 5-8 of the "Replacing the keyboard" procedure on the notebook, and then secure it with the hinge screws removed in step 14. 17 If the notebook has a wireless card installed, proceed to step 18 to .... 22 If the notebook has a wireless card installed, reconnect the antenna cables and then reinstall the bay cover. 23 Return the base hinge screws removed in step 5. 24 Turn the notebook over so the palm rest is facing up and away from the notebook. 16 Position the new LCD panel...
Service Guide
Page 74
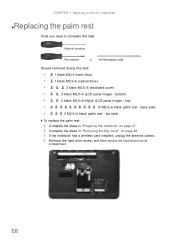
... this task: Phillips #0 screwdriver Flat screwdriver or Non-marring plastic scribe Screws removed during this task: • 1 black M2×5 (hard drive) • 1 black M2.5×6 (optical drive) • 3 black M2.5×6 (keyboard cover) • 2 black M2.5×6 (LCD panel hinges - top ...side) To replace the palm rest: 1 Complete the steps in "Preparing the notebook" on page 47. 2 Complete the steps in "Removing the bay cover" on page 49. 3 If the notebook...
... this task: Phillips #0 screwdriver Flat screwdriver or Non-marring plastic scribe Screws removed during this task: • 1 black M2×5 (hard drive) • 1 black M2.5×6 (optical drive) • 3 black M2.5×6 (keyboard cover) • 2 black M2.5×6 (LCD panel hinges - top ...side) To replace the palm rest: 1 Complete the steps in "Preparing the notebook" on page 47. 2 Complete the steps in "Removing the bay cover" on page 49. 3 If the notebook...
Service Guide
Page 75
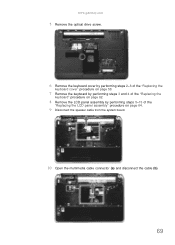
www.gateway.com 5 Remove the optical drive screw. 6 Remove the keyboard cover by performing steps 2-6 of the "Replacing the keyboard cover" procedure on page 58. 7 Remove the keyboard by performing steps 3 and 4 of the "Replacing the keyboard" procedure on page 62. 8 Remove the LCD panel assembly by performing steps 5-15 of the "Replacing the LCD panel assembly" procedure on page 64. 9 Disconnect the speaker cable from the system board. 10 Open the multimedia cable connector (a) and disconnect the cable (b). 69
www.gateway.com 5 Remove the optical drive screw. 6 Remove the keyboard cover by performing steps 2-6 of the "Replacing the keyboard cover" procedure on page 58. 7 Remove the keyboard by performing steps 3 and 4 of the "Replacing the keyboard" procedure on page 62. 8 Remove the LCD panel assembly by performing steps 5-15 of the "Replacing the LCD panel assembly" procedure on page 64. 9 Disconnect the speaker cable from the system board. 10 Open the multimedia cable connector (a) and disconnect the cable (b). 69

Service Guide
Page 77
www.gateway.com 16 Locate the small gaps on the top side of the palm rest and insert a ...the speaker, multimedia, and touchpad cables to their respective system board connectors. 21 Secure the palm rest assembly with the screws removed in steps 13 and 15. 22 Reinstall the LCD panel assembly by performing steps 16-23 of the "Replacing the LCD ...panel assembly" procedure on page 64. 23 Reinstall the keyboard and the keyboard cover by performing steps 5-8 of the "Replacing the keyboard" procedure on page 62. 24 Return the optical screw drive in its place. 25 Reinstall ...
www.gateway.com 16 Locate the small gaps on the top side of the palm rest and insert a ...the speaker, multimedia, and touchpad cables to their respective system board connectors. 21 Secure the palm rest assembly with the screws removed in steps 13 and 15. 22 Reinstall the LCD panel assembly by performing steps 16-23 of the "Replacing the LCD ...panel assembly" procedure on page 64. 23 Reinstall the keyboard and the keyboard cover by performing steps 5-8 of the "Replacing the keyboard" procedure on page 62. 24 Return the optical screw drive in its place. 25 Reinstall ...
Service Guide
Page 78
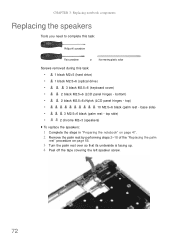
...; 2 chrome M2×3 (speakers) To replace the speakers: 1 Complete the steps in "Preparing the notebook" on page 47. 2 Remove the palm rest by performing steps 2-18 of the "Replacing the palm rest" procedure on page 68. 3 Turn the palm rest over so...you need to complete this task: Phillips #0 screwdriver Flat screwdriver or Non-marring plastic scribe Screws removed during this task: • 1 black M2×5 (hard drive) • 1 black M2.5×6 (optical drive) • 3 black M2.5×6 (keyboard cover) • 2 black M2.5×6 (LCD panel hinges - base side) • ...
...; 2 chrome M2×3 (speakers) To replace the speakers: 1 Complete the steps in "Preparing the notebook" on page 47. 2 Remove the palm rest by performing steps 2-18 of the "Replacing the palm rest" procedure on page 68. 3 Turn the palm rest over so...you need to complete this task: Phillips #0 screwdriver Flat screwdriver or Non-marring plastic scribe Screws removed during this task: • 1 black M2×5 (hard drive) • 1 black M2.5×6 (optical drive) • 3 black M2.5×6 (keyboard cover) • 2 black M2.5×6 (LCD panel hinges - base side) • ...
Service Guide
Page 79
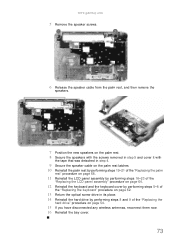
www.gateway.com 5 Remove the speaker screws. 6 Release the speaker cable from the palm rest, and then remove the speakers. 7 Position the new speakers on the palm rest. 8 Secure the speakers with the screws removed in step 5 and cover it with the tape that was detached in step 4. 9 Secure the speaker cable...by performing steps 16-23 of the "Replacing the LCD panel assembly" procedure on page 64. 12 Reinstall the keyboard and the keyboard cover by performing steps 5-8 of the "Replacing the keyboard" procedure on page 62. 13 Return the optical screw drive in its place. 14 Reinstall the hard drive ...
www.gateway.com 5 Remove the speaker screws. 6 Release the speaker cable from the palm rest, and then remove the speakers. 7 Position the new speakers on the palm rest. 8 Secure the speakers with the screws removed in step 5 and cover it with the tape that was detached in step 4. 9 Secure the speaker cable...by performing steps 16-23 of the "Replacing the LCD panel assembly" procedure on page 64. 12 Reinstall the keyboard and the keyboard cover by performing steps 5-8 of the "Replacing the keyboard" procedure on page 62. 13 Return the optical screw drive in its place. 14 Reinstall the hard drive ...
Service Guide
Page 80
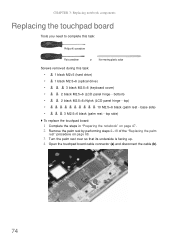
...10 M2.5×6 black (palm rest - top side) To replace the touchpad board: 1 Complete the steps in "Preparing the notebook" on page 47. 2 Remove the palm rest by performing steps 2-18 of the "Replacing the palm rest" procedure on page 68. 3 Turn the palm rest over so that its ... notebook components Replacing the touchpad board Tools you need to complete this task: Phillips #0 screwdriver Flat screwdriver or Non-marring plastic scribe Screws removed during this task: • 1 black M2×5 (hard drive) • 1 black M2.5×6 (optical drive) • 3 black M2.5×...
...10 M2.5×6 black (palm rest - top side) To replace the touchpad board: 1 Complete the steps in "Preparing the notebook" on page 47. 2 Remove the palm rest by performing steps 2-18 of the "Replacing the palm rest" procedure on page 68. 3 Turn the palm rest over so that its ... notebook components Replacing the touchpad board Tools you need to complete this task: Phillips #0 screwdriver Flat screwdriver or Non-marring plastic scribe Screws removed during this task: • 1 black M2×5 (hard drive) • 1 black M2.5×6 (optical drive) • 3 black M2.5×...


