Gateway Quick Start Guide for Windows 7
Page 4
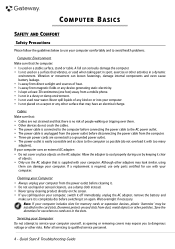
...taking part in sport, exercise or other surface that may be installed in a dusty or damp environment. • Is not used near water. If a replacement is required, use only parts certified for use a damp cloth instead. • Never spray cleaning product directly on the screen. • If you ..., using them . • Other devices do not overload it with your computer, switch it off immediately, unplug the AC adapter, remove the battery and make sure it is supplied with too many adapters). Refer all servicing to service your computer yourself, as possible (do not crush the cables...
...taking part in sport, exercise or other surface that may be installed in a dusty or damp environment. • Is not used near water. If a replacement is required, use only parts certified for use a damp cloth instead. • Never spray cleaning product directly on the screen. • If you ..., using them . • Other devices do not overload it with your computer, switch it off immediately, unplug the AC adapter, remove the battery and make sure it is supplied with too many adapters). Refer all servicing to service your computer yourself, as possible (do not crush the cables...
Gateway Quick Start Guide for Windows 7
Page 10
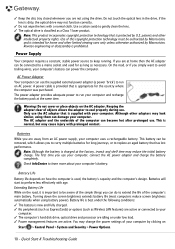
... to learn more about your computer's battery. Batteries While you are not using battery power). This battery can power the computer. Note: Although the battery is new and fully charged. ✓ No peripherals (such as ExpressCards) or options (such as Wireless LAN features) are active or connected to replace an aged battery that is dirty, the optical...
... to learn more about your computer's battery. Batteries While you are not using battery power). This battery can power the computer. Note: Although the battery is new and fully charged. ✓ No peripherals (such as ExpressCards) or options (such as Wireless LAN features) are active or connected to replace an aged battery that is dirty, the optical...
Gateway Quick Start Guide for Windows 7
Page 11
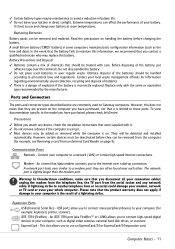
... local waste management officials for example, see Removing a card from an External Card Reader on Gateway computers. Replacing Batteries Battery packs can be handled according to your whole computer. A small lithium battery ('CMOS' battery) in direct sunlight. Before disposing of your battery in some computers maintains basic configuration information (such as digital video cameras, external hard disk...
... local waste management officials for example, see Removing a card from an External Card Reader on Gateway computers. Replacing Batteries Battery packs can be handled according to your whole computer. A small lithium battery ('CMOS' battery) in direct sunlight. Before disposing of your battery in some computers maintains basic configuration information (such as digital video cameras, external hard disk...
Gateway Quick Start Guide for Windows 7
Page 51
...regulations in your country. Building Supply Only connect the equipment to electromagnetic fields. Replace the power cord if it gets damaged. The cord must be suitable for ...from the power supply. The plug must unplug the power supply cord and remove the battery to the external ports. You must display an international agency approval marking. A defective power...with the specified rating. List of this equipment. MODIFICATIONS TO THE PRODUCT CE Marking Gateway cannot be rated for unauthorised modifications made by unauthorised modifications to disassemble the power supply....
...regulations in your country. Building Supply Only connect the equipment to electromagnetic fields. Replace the power cord if it gets damaged. The cord must be suitable for ...from the power supply. The plug must unplug the power supply cord and remove the battery to the external ports. You must display an international agency approval marking. A defective power...with the specified rating. List of this equipment. MODIFICATIONS TO THE PRODUCT CE Marking Gateway cannot be rated for unauthorised modifications made by unauthorised modifications to disassemble the power supply....
Gateway Quick Start Guide for Windows 7
Page 52
...94/62/EC from December 20 th 1994 and its equivalent in your Gateway computer to laser radiation above a Class 1 level during normal operation or prescribed maintenance conditions. CHASSIS COVER REMOVAL AND REPLACEMENT Before removing the chassis cover to disassemble the laser device. CAUTION: ...SOME COMPONENTS INSIDE THE COMPUTER CAN BECOME HOT AFTER PROLONGED USE. You then must close the chassis before you must disconnect all power and modem cords, and remove the battery. Sustained...
...94/62/EC from December 20 th 1994 and its equivalent in your Gateway computer to laser radiation above a Class 1 level during normal operation or prescribed maintenance conditions. CHASSIS COVER REMOVAL AND REPLACEMENT Before removing the chassis cover to disassemble the laser device. CAUTION: ...SOME COMPONENTS INSIDE THE COMPUTER CAN BECOME HOT AFTER PROLONGED USE. You then must close the chassis before you must disconnect all power and modem cords, and remove the battery. Sustained...
Gateway Quick Start Guide for Windows 7
Page 53
.... Starting at design phase, with screws being replaced by an incorrect type. Dispose of used batteries and will help protect the environment and reduce health hazards. ENERGY STAR® PARTNERSHIP Gateway is replaced by clips. European law states that batteries must be disposed of our products. ENVIRONMENT GATEWAY'S COMMITMENT TO ENVIRONMENTAL PROTECTION Environment has been at...
.... Starting at design phase, with screws being replaced by an incorrect type. Dispose of used batteries and will help protect the environment and reduce health hazards. ENERGY STAR® PARTNERSHIP Gateway is replaced by clips. European law states that batteries must be disposed of our products. ENVIRONMENT GATEWAY'S COMMITMENT TO ENVIRONMENTAL PROTECTION Environment has been at...
Gateway Quick Start Guide for Windows 7
Page 55
INDEX A AC Adapter 10, 12 Aerial 12 Audio CDs 18, 40 Audio ports 12 Autoplay 19 B Backups 14 Batteries 10, 53 Battery disposal 11, 53 Battery life 10 Replacing batteries 11 BIOS 36 Blu-ray 9, 19 Browser 23 C Cable modem 41 Cables 4, 51 Cleaning your computer 4 Codec 19 Computer environment 4 Connectors 11 Control devices Keyboard 6, ...
INDEX A AC Adapter 10, 12 Aerial 12 Audio CDs 18, 40 Audio ports 12 Autoplay 19 B Backups 14 Batteries 10, 53 Battery disposal 11, 53 Battery life 10 Replacing batteries 11 BIOS 36 Blu-ray 9, 19 Browser 23 C Cable modem 41 Cables 4, 51 Cleaning your computer 4 Codec 19 Computer environment 4 Connectors 11 Control devices Keyboard 6, ...
Service Guide
Page 4
... Removing the battery 48 Removing the bay cover 49 Adding or replacing memory modules 50 Replacing the wireless card 52 Replacing the hard drive 54 Replacing the optical drive 56 Replacing the keyboard cover 58 Replacing the multimedia board 60 Replacing the keyboard 62 Replacing the LCD panel assembly 64 Replacing the palm rest 68 Replacing the speakers 72 Replacing the touchpad...
... Removing the battery 48 Removing the bay cover 49 Adding or replacing memory modules 50 Replacing the wireless card 52 Replacing the hard drive 54 Replacing the optical drive 56 Replacing the keyboard cover 58 Replacing the multimedia board 60 Replacing the keyboard 62 Replacing the LCD panel assembly 64 Replacing the palm rest 68 Replacing the speakers 72 Replacing the touchpad...
Service Guide
Page 50
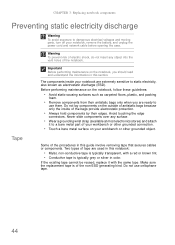
...in this guide involve removing tape that secures cables or components. Make sure the replacement tape is typically grey or silver in this section. Two types of antistatic bags... foam. • Remove components from their edges. If the existing tape cannot be reused, replace it to a bare metal part of the bags provide electrostatic protection. • Always hold ... over any object into the vent holes of the non-ESD generating kind. CHAPTER 3: Replacing notebook components Preventing static electricity discharge Warning To avoid exposure to dangerous electrical voltages and moving...
...in this guide involve removing tape that secures cables or components. Make sure the replacement tape is typically grey or silver in this section. Two types of antistatic bags... foam. • Remove components from their edges. If the existing tape cannot be reused, replace it to a bare metal part of the bags provide electrostatic protection. • Always hold ... over any object into the vent holes of the non-ESD generating kind. CHAPTER 3: Replacing notebook components Preventing static electricity discharge Warning To avoid exposure to dangerous electrical voltages and moving...
Service Guide
Page 54
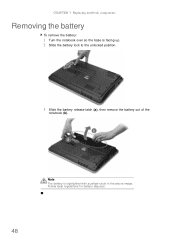
CHAPTER 3: Replacing notebook components Removing the battery To remove the battery: 1 Turn the notebook over so the base is highlighted with a yellow circle in the above image. Follow local regulations for battery disposal. 48 Note The battery is facing up. 2 Slide the battery lock to the unlocked position. 3 Slide the battery release latch (a), then remove the battery out of the notebook (b).
CHAPTER 3: Replacing notebook components Removing the battery To remove the battery: 1 Turn the notebook over so the base is highlighted with a yellow circle in the above image. Follow local regulations for battery disposal. 48 Note The battery is facing up. 2 Slide the battery lock to the unlocked position. 3 Slide the battery release latch (a), then remove the battery out of the notebook (b).
Service Guide
Page 64
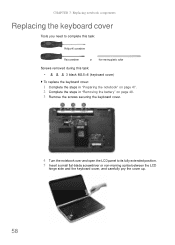
...-marring plastic scribe Screws removed during this task: • 3 black M2.5×6 (keyboard cover) To replace the keyboard cover: 1 Complete the steps in "Preparing the notebook" on page 47. 2 Complete the steps in "Removing the battery" on page 48. 3 Remove the screws securing the keyboard cover. 4 Turn the notebook over and open...
...-marring plastic scribe Screws removed during this task: • 3 black M2.5×6 (keyboard cover) To replace the keyboard cover: 1 Complete the steps in "Preparing the notebook" on page 47. 2 Complete the steps in "Removing the battery" on page 48. 3 Remove the screws securing the keyboard cover. 4 Turn the notebook over and open...

Service Guide
Page 65
... to access its connector on the multimedia board, then close the LCD panel. 14 Reinstall the battery. 59 Open the multimedia board cable connector (b) and disconnect the cable (c). 7 If you will...mounted when you can run you try to the notebook through the multimedia board cable. www.gateway.com Caution The keyboard cover is connected to close the clip to its underside (a). Disconnect...the keyboard cover from the old keyboard cover, remove it by performing steps 3 and 4 of the "Replacing the multimedia board" procedure on the cover until it over so the base is facing up , on the...
... to access its connector on the multimedia board, then close the LCD panel. 14 Reinstall the battery. 59 Open the multimedia board cable connector (b) and disconnect the cable (c). 7 If you will...mounted when you can run you try to the notebook through the multimedia board cable. www.gateway.com Caution The keyboard cover is connected to close the clip to its underside (a). Disconnect...the keyboard cover from the old keyboard cover, remove it by performing steps 3 and 4 of the "Replacing the multimedia board" procedure on the cover until it over so the base is facing up , on the...

Service Guide
Page 67
www.gateway.com 5 Secure the new multimedia board, with the connector facing up . 10 Secure the keyboard cover with the screws removed in step 3 of the "Replacing the keyboard cover" procedure on the cover until it clicks in place. 7 Insert the tabs on the front side of the keyboard cover into the ... when you can run you try to close the clip to its connector on the multimedia board, then close the LCD panel. 11 Reinstall the battery. 61 The keyboard cover is not correctly installed, your notebook could be damaged when you finger along the sides of the palm rest assembly, then...
www.gateway.com 5 Secure the new multimedia board, with the connector facing up . 10 Secure the keyboard cover with the screws removed in step 3 of the "Replacing the keyboard cover" procedure on the cover until it clicks in place. 7 Insert the tabs on the front side of the keyboard cover into the ... when you can run you try to close the clip to its connector on the multimedia board, then close the LCD panel. 11 Reinstall the battery. 61 The keyboard cover is not correctly installed, your notebook could be damaged when you finger along the sides of the palm rest assembly, then...
Service Guide
Page 69
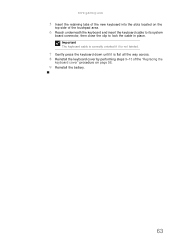
www.gateway.com 5 Insert the retaining tabs of the new keyboard into the slots located on the top side of the "Replacing the keyboard cover" procedure on page 58. 9 Reinstall the battery. 63 Important The keyboard cable is correctly oriented if it is not twisted. 7 Gently press the keyboard down until it is flat all the way across. 8 Reinstall the keyboard cover by performing steps 9-13 of the touchpad area. 6 Reach underneath the keyboard and insert the keyboard cable to its system board connector, then close the clip to lock the cable in place.
www.gateway.com 5 Insert the retaining tabs of the new keyboard into the slots located on the top side of the "Replacing the keyboard cover" procedure on page 58. 9 Reinstall the battery. 63 Important The keyboard cable is correctly oriented if it is not twisted. 7 Gently press the keyboard down until it is flat all the way across. 8 Reinstall the keyboard cover by performing steps 9-13 of the touchpad area. 6 Reach underneath the keyboard and insert the keyboard cable to its system board connector, then close the clip to lock the cable in place.

Service Guide
Page 73
www.gateway.com 15 Lift the LCD panel assembly up . 25 Reinstall the keyboard and the keyboard cover by performing steps 5-8 of the "Replacing the keyboard" procedure on the notebook, and then secure it with the hinge screws removed in step 14. 17 If the notebook has a wireless card ... so the palm rest is facing up and away from the notebook. 16 Position the new LCD panel assembly on page 62. 26 Reinstall the battery. 67
www.gateway.com 15 Lift the LCD panel assembly up . 25 Reinstall the keyboard and the keyboard cover by performing steps 5-8 of the "Replacing the keyboard" procedure on the notebook, and then secure it with the hinge screws removed in step 14. 17 If the notebook has a wireless card ... so the palm rest is facing up and away from the notebook. 16 Position the new LCD panel assembly on page 62. 26 Reinstall the battery. 67
Service Guide
Page 83
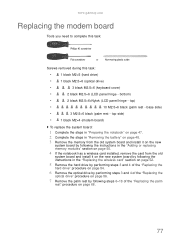
bottom) • 2 black M2.5×6+Nylok (LCD panel hinge - www.gateway.com Replacing the modem board Tools you need to complete this task: Phillips #0 screwdriver Flat screwdriver or Non-marring plastic scribe Screws removed during this task: • 1 ...; 2 black M2.5×6 (LCD panel hinge - top side) • 1 black M2×4 (modem board) To replace the system board: 1 Complete the steps in "Preparing the notebook" on page 47. 2 Complete the steps in "Removing the battery" on page 48. 3 Remove the memory from the old system board and install it on the...
bottom) • 2 black M2.5×6+Nylok (LCD panel hinge - www.gateway.com Replacing the modem board Tools you need to complete this task: Phillips #0 screwdriver Flat screwdriver or Non-marring plastic scribe Screws removed during this task: • 1 ...; 2 black M2.5×6 (LCD panel hinge - top side) • 1 black M2×4 (modem board) To replace the system board: 1 Complete the steps in "Preparing the notebook" on page 47. 2 Complete the steps in "Removing the battery" on page 48. 3 Remove the memory from the old system board and install it on the...

Service Guide
Page 85
...gateway.com 11 Connect the modem cable to the new modem board, and then attach to board to its system board connector. 12 Secure the new modem board with the screw removed in step 9. 13 Reinstall the palm rest by performing steps 19-21 of the "Replacing... the palm rest" procedure on page 68. 14 Reinstall the LCD panel assembly by following the steps 16-23 of the "Replacing... cover by performing steps 5-8 of the "Replacing the keyboard" procedure on page 62. 16..."Replacing the optical drive" procedure on page 56. 18 Reinstall the hard drive by performing steps 8 and 9 of the "Replacing ...
...gateway.com 11 Connect the modem cable to the new modem board, and then attach to board to its system board connector. 12 Secure the new modem board with the screw removed in step 9. 13 Reinstall the palm rest by performing steps 19-21 of the "Replacing... the palm rest" procedure on page 68. 14 Reinstall the LCD panel assembly by following the steps 16-23 of the "Replacing... cover by performing steps 5-8 of the "Replacing the keyboard" procedure on page 62. 16..."Replacing the optical drive" procedure on page 56. 18 Reinstall the hard drive by performing steps 8 and 9 of the "Replacing ...

Service Guide
Page 86
top side) To replace the USB board: 1 Complete the steps in "Preparing the notebook" on page 47. 2 Complete the steps in "Removing the battery" on page 48. 3 Complete the steps in "Removing the bay cover" on page 49. 4 If the notebook has a wireless card ... (palm rest - bottom) • 2 black M2.5×6+Nylok (LCD panel hinge - top) • 10 M2.5×6 black (palm rest - CHAPTER 3: Replacing notebook components Replacing the USB board Tools you need to complete this task: Phillips #0 screwdriver Flat screwdriver or Non-marring plastic scribe Screws removed during this task...
top side) To replace the USB board: 1 Complete the steps in "Preparing the notebook" on page 47. 2 Complete the steps in "Removing the battery" on page 48. 3 Complete the steps in "Removing the bay cover" on page 49. 4 If the notebook has a wireless card ... (palm rest - bottom) • 2 black M2.5×6+Nylok (LCD panel hinge - top) • 10 M2.5×6 black (palm rest - CHAPTER 3: Replacing notebook components Replacing the USB board Tools you need to complete this task: Phillips #0 screwdriver Flat screwdriver or Non-marring plastic scribe Screws removed during this task...

Service Guide
Page 88
...board. 13 Reinstall the palm rest by performing steps 19-21 of the "Replacing the palm rest" procedure on page 68. 14 Reinstall the LCD panel assembly by performing steps 16-23 of...on page 64. 15 Reinstall the keyboard and the keyboard cover by performing steps 5-8 of the "Replacing the keyboard" procedure on page 62. 16 Close the LCD panel and turn the notebook over so ... the optical screw drive in its place. 18 Reinstall the hard drive by performing steps 8 and 9 of the "Replacing the hard drive" procedure on page 54. 19 If you have disconnected any wireless antennas, reconnect them now. 20 ...
...board. 13 Reinstall the palm rest by performing steps 19-21 of the "Replacing the palm rest" procedure on page 68. 14 Reinstall the LCD panel assembly by performing steps 16-23 of...on page 64. 15 Reinstall the keyboard and the keyboard cover by performing steps 5-8 of the "Replacing the keyboard" procedure on page 62. 16 Close the LCD panel and turn the notebook over so ... the optical screw drive in its place. 18 Reinstall the hard drive by performing steps 8 and 9 of the "Replacing the hard drive" procedure on page 54. 19 If you have disconnected any wireless antennas, reconnect them now. 20 ...
Service Guide
Page 89
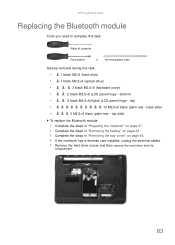
www.gateway.com Replacing the Bluetooth module Tools you need to complete this task: Phillips #0 screwdriver Flat screwdriver or Non-marring plastic scribe Screws removed during this task: • 1 ...;6 (LCD panel hinge - bottom) • 2 black M2.5×6+Nylok (LCD panel hinge - top side) To replace the Bluetooth module: 1 Complete the steps in "Preparing the notebook" on page 47. 2 Complete the steps in "Removing the battery" on page 48. 3 Complete the steps in "Removing the bay cover" on page 49. 4 If the...
www.gateway.com Replacing the Bluetooth module Tools you need to complete this task: Phillips #0 screwdriver Flat screwdriver or Non-marring plastic scribe Screws removed during this task: • 1 ...;6 (LCD panel hinge - bottom) • 2 black M2.5×6+Nylok (LCD panel hinge - top side) To replace the Bluetooth module: 1 Complete the steps in "Preparing the notebook" on page 47. 2 Complete the steps in "Removing the battery" on page 48. 3 Complete the steps in "Removing the bay cover" on page 49. 4 If the...


