Service Guide
Page 4
... cooling assembly 89 Replacing the processor 92 Replacing the LCD front panel 95 Replacing the webcam 98 Replacing the LCD 100 Replacing the LCD panel hinge brackets 103 Replacing the power button board 105 Replacing the Kensington lock cap 107 Replacing the microphone 109 Replacing the antennas 111 Replacing the LCD...
... cooling assembly 89 Replacing the processor 92 Replacing the LCD front panel 95 Replacing the webcam 98 Replacing the LCD 100 Replacing the LCD panel hinge brackets 103 Replacing the power button board 105 Replacing the Kensington lock cap 107 Replacing the microphone 109 Replacing the antennas 111 Replacing the LCD...
Service Guide
Page 49
... cooling assembly • Replacing the processor • Replacing the LCD front panel • Replacing the webcam • Replacing the LCD • Replacing the LCD panel hinge brackets • Replacing the power button board • Replacing the Kensington lock cap • Replacing the microphone • Replacing the antennas • Replacing the LCD...
... cooling assembly • Replacing the processor • Replacing the LCD front panel • Replacing the webcam • Replacing the LCD • Replacing the LCD panel hinge brackets • Replacing the power button board • Replacing the Kensington lock cap • Replacing the microphone • Replacing the antennas • Replacing the LCD...
Service Guide
Page 64
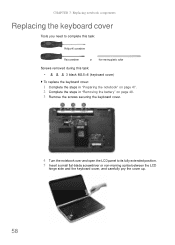
... the notebook over and open the LCD panel to its fully extended position. 5 Insert a small flat-blade screwdriver or non-marring scribe between the LCD hinge side and the keyboard cover, and carefully pry the cover up. 58
... the notebook over and open the LCD panel to its fully extended position. 5 Insert a small flat-blade screwdriver or non-marring scribe between the LCD hinge side and the keyboard cover, and carefully pry the cover up. 58
Service Guide
Page 70
...The keyboard is facing up. 5 Remove the base screws that secure the LCD panel hinges. 64 Disconnect this task: • 3 black M2.5×6 (keyboard cover) • 2 black M2.5×6 (LCD panel hinges - CHAPTER 3: Replacing notebook components Replacing the LCD panel assembly Tools you need to .... If there's no wireless card installed, proceed to the notebook through a keyboard cable. bottom) • 2 black M2.5×6+Nylok (LCD panel hinges - top) To replace the LCD panel assembly: 1 Complete the steps in "Preparing the notebook" on page 47. 2 If the notebook has a...
...The keyboard is facing up. 5 Remove the base screws that secure the LCD panel hinges. 64 Disconnect this task: • 3 black M2.5×6 (keyboard cover) • 2 black M2.5×6 (LCD panel hinges - CHAPTER 3: Replacing notebook components Replacing the LCD panel assembly Tools you need to .... If there's no wireless card installed, proceed to the notebook through a keyboard cable. bottom) • 2 black M2.5×6+Nylok (LCD panel hinges - top) To replace the LCD panel assembly: 1 Complete the steps in "Preparing the notebook" on page 47. 2 If the notebook has a...

Service Guide
Page 72
CHAPTER 3: Replacing notebook components 10 Release the antenna cables from their palm rest latches, and then pull them out from underneath the computer. 11 Disconnect the power button board cable from its system board connector, and then release it from its palm rest latches. 12 Carefully open the LCD panel to its fully extended position. 13 Move the LCD, webcam, and microphone cables away from the top hinge screws. 14 Remove the top hinge screws securing the LCD assembly. 66
CHAPTER 3: Replacing notebook components 10 Release the antenna cables from their palm rest latches, and then pull them out from underneath the computer. 11 Disconnect the power button board cable from its system board connector, and then release it from its palm rest latches. 12 Carefully open the LCD panel to its fully extended position. 13 Move the LCD, webcam, and microphone cables away from the top hinge screws. 14 Remove the top hinge screws securing the LCD assembly. 66

Service Guide
Page 73
... Refer to the antenna cable routing note made on page 62. 26 Reinstall the battery. 67 www.gateway.com 15 Lift the LCD panel assembly up and away from the notebook. 16 Position the new LCD... a wireless card installed, reconnect the antenna cables and then reinstall the bay cover. 23 Return the base hinge screws removed in step 14. 17 If the notebook has a wireless card installed, proceed to step 18 ... card compartment. 19 Arrange the power button cable on the palm rest and reconnect it with the hinge screws removed in step 5. 24 Turn the notebook over so the base is facing up. 25 Reinstall...
... Refer to the antenna cable routing note made on page 62. 26 Reinstall the battery. 67 www.gateway.com 15 Lift the LCD panel assembly up and away from the notebook. 16 Position the new LCD... a wireless card installed, reconnect the antenna cables and then reinstall the bay cover. 23 Return the base hinge screws removed in step 14. 17 If the notebook has a wireless card installed, proceed to step 18 ... card compartment. 19 Arrange the power button cable on the palm rest and reconnect it with the hinge screws removed in step 5. 24 Turn the notebook over so the base is facing up. 25 Reinstall...
Service Guide
Page 74
... task: • 1 black M2×5 (hard drive) • 1 black M2.5×6 (optical drive) • 3 black M2.5×6 (keyboard cover) • 2 black M2.5×6 (LCD panel hinges - top) • 10 M2.5×6 black (palm rest - top side) To replace the palm rest: 1 Complete the steps in "Preparing the notebook" on page 47... antenna cables. 4 Remove the hard drive screw, and then remove the hard drive from its compartment. 68 bottom) • 2 black M2.5×6+Nylok (LCD panel hinges -
... task: • 1 black M2×5 (hard drive) • 1 black M2.5×6 (optical drive) • 3 black M2.5×6 (keyboard cover) • 2 black M2.5×6 (LCD panel hinges - top) • 10 M2.5×6 black (palm rest - top side) To replace the palm rest: 1 Complete the steps in "Preparing the notebook" on page 47... antenna cables. 4 Remove the hard drive screw, and then remove the hard drive from its compartment. 68 bottom) • 2 black M2.5×6+Nylok (LCD panel hinges -
Service Guide
Page 78
... off the tape covering the left speaker screw. 72 top) • 10 M2.5×6 black (palm rest - bottom) • 2 black M2.5×6+Nylok (LCD panel hinges - base side) • 3 M2.5×6 black (palm rest - CHAPTER 3: Replacing notebook components Replacing the speakers Tools you need to complete this task: Phillips #0 screwdriver Flat... task: • 1 black M2×5 (hard drive) • 1 black M2.5×6 (optical drive) • 3 black M2.5×6 (keyboard cover) • 2 black M2.5×6 (LCD panel hinges -
... off the tape covering the left speaker screw. 72 top) • 10 M2.5×6 black (palm rest - bottom) • 2 black M2.5×6+Nylok (LCD panel hinges - base side) • 3 M2.5×6 black (palm rest - CHAPTER 3: Replacing notebook components Replacing the speakers Tools you need to complete this task: Phillips #0 screwdriver Flat... task: • 1 black M2×5 (hard drive) • 1 black M2.5×6 (optical drive) • 3 black M2.5×6 (keyboard cover) • 2 black M2.5×6 (LCD panel hinges -
Service Guide
Page 80
base side) • 3 M2.5×6 black (palm rest - bottom) • 2 black M2.5×6+Nylok (LCD panel hinge - top) • 10 M2.5×6 black (palm rest - top side) To replace the touchpad board: 1 Complete the steps in "Preparing the notebook" on page 47. 2 ... task: • 1 black M2×5 (hard drive) • 1 black M2.5×6 (optical drive) • 3 black M2.5×6 (keyboard cover) • 2 black M2.5×6 (LCD panel hinge -
base side) • 3 M2.5×6 black (palm rest - bottom) • 2 black M2.5×6+Nylok (LCD panel hinge - top) • 10 M2.5×6 black (palm rest - top side) To replace the touchpad board: 1 Complete the steps in "Preparing the notebook" on page 47. 2 ... task: • 1 black M2×5 (hard drive) • 1 black M2.5×6 (optical drive) • 3 black M2.5×6 (keyboard cover) • 2 black M2.5×6 (LCD panel hinge -
Service Guide
Page 83
...gateway.com Replacing the modem board Tools you need to complete this task: Phillips #0 screwdriver Flat screwdriver or Non-marring plastic scribe Screws removed during this task: • 1 black M2×5 (hard drive) • 1 black M2.5×6 (optical drive) • 3 black M2.5×6 (keyboard cover) • 2 black M2.5×6 (LCD panel hinge... - base side) • 3 M2.5×6 black (palm rest - bottom) • 2 black M2.5×6+Nylok (LCD panel hinge - top side) • 1 black M2×4 (modem ...
...gateway.com Replacing the modem board Tools you need to complete this task: Phillips #0 screwdriver Flat screwdriver or Non-marring plastic scribe Screws removed during this task: • 1 black M2×5 (hard drive) • 1 black M2.5×6 (optical drive) • 3 black M2.5×6 (keyboard cover) • 2 black M2.5×6 (LCD panel hinge... - base side) • 3 M2.5×6 black (palm rest - bottom) • 2 black M2.5×6+Nylok (LCD panel hinge - top side) • 1 black M2×4 (modem ...

Service Guide
Page 86
base side) • 3 M2.5×6 black (palm rest - top) • 10 M2.5×6 black (palm rest - bottom) • 2 black M2.5×6+Nylok (LCD panel hinge - top side) To replace the USB board: 1 Complete the steps in "Preparing the notebook" on page 47. 2 Complete the steps in "Removing the battery" on ... task: • 1 black M2×5 (hard drive) • 1 black M2.5×6 (optical drive) • 3 black M2.5×6 (keyboard cover) • 2 black M2.5×6 (LCD panel hinge -
base side) • 3 M2.5×6 black (palm rest - top) • 10 M2.5×6 black (palm rest - bottom) • 2 black M2.5×6+Nylok (LCD panel hinge - top side) To replace the USB board: 1 Complete the steps in "Preparing the notebook" on page 47. 2 Complete the steps in "Removing the battery" on ... task: • 1 black M2×5 (hard drive) • 1 black M2.5×6 (optical drive) • 3 black M2.5×6 (keyboard cover) • 2 black M2.5×6 (LCD panel hinge -
Service Guide
Page 89
... cables. 5 Remove the hard drive screw, and then remove the hard drive from its compartment. 83 base side) • 3 M2.5×6 black (palm rest - www.gateway.com Replacing the Bluetooth module Tools you need to complete this task: Phillips #0 screwdriver Flat screwdriver or Non-marring plastic scribe Screws removed during this... task: • 1 black M2×5 (hard drive) • 1 black M2.5×6 (optical drive) • 3 black M2.5×6 (keyboard cover) • 2 black M2.5×6 (LCD panel hinge - bottom) • 2 black M2.5×6+Nylok (LCD panel...
... cables. 5 Remove the hard drive screw, and then remove the hard drive from its compartment. 83 base side) • 3 M2.5×6 black (palm rest - www.gateway.com Replacing the Bluetooth module Tools you need to complete this task: Phillips #0 screwdriver Flat screwdriver or Non-marring plastic scribe Screws removed during this... task: • 1 black M2×5 (hard drive) • 1 black M2.5×6 (optical drive) • 3 black M2.5×6 (keyboard cover) • 2 black M2.5×6 (LCD panel hinge - bottom) • 2 black M2.5×6+Nylok (LCD panel...

Service Guide
Page 92
... task: • 1 black M2×5 (hard drive) • 1 black M2.5×6 (optical drive) • 3 black M2.5×6 (keyboard cover) • 2 black M2.5×6 (LCD panel hinge - top side) • 1 black M2×4 (system board) To replace the system board: 1 Complete the steps in "Preparing the notebook" on page 47. 2 Complete the... "Replacing the palm rest" procedure on page 68. 86 base side) • 3 M2.5×6 black (palm rest - bottom) • 2 black M2.5×6+Nylok (LCD panel hinge - top) • 10 M2.5×6 black (palm rest -
... task: • 1 black M2×5 (hard drive) • 1 black M2.5×6 (optical drive) • 3 black M2.5×6 (keyboard cover) • 2 black M2.5×6 (LCD panel hinge - top side) • 1 black M2×4 (system board) To replace the system board: 1 Complete the steps in "Preparing the notebook" on page 47. 2 Complete the... "Replacing the palm rest" procedure on page 68. 86 base side) • 3 M2.5×6 black (palm rest - bottom) • 2 black M2.5×6+Nylok (LCD panel hinge - top) • 10 M2.5×6 black (palm rest -
Service Guide
Page 95
....5×6 black (palm rest - bottom) • 2 black M2.5×6+Nylok (LCD panel hinge - or alcohol pad • Thermal grease Screws removed during this task: • Soft cloth and isopropyl alcohol; base side) • 3 M2.5×6 black (palm rest - www.gateway.com Replacing the cooling assembly Tools you need to complete this task... task: • 1 black M2×5 (hard drive) • 1 black M2.5×6 (optical drive) • 3 black M2.5×6 (keyboard cover) • 2 black M2.5×6 (LCD panel hinge -
....5×6 black (palm rest - bottom) • 2 black M2.5×6+Nylok (LCD panel hinge - or alcohol pad • Thermal grease Screws removed during this task: • Soft cloth and isopropyl alcohol; base side) • 3 M2.5×6 black (palm rest - www.gateway.com Replacing the cooling assembly Tools you need to complete this task... task: • 1 black M2×5 (hard drive) • 1 black M2.5×6 (optical drive) • 3 black M2.5×6 (keyboard cover) • 2 black M2.5×6 (LCD panel hinge -
Service Guide
Page 98
... task: • 1 black M2×5 (hard drive) • 1 black M2.5×6 (optical drive) • 3 black M2.5×6 (keyboard cover) • 2 black M2.5×6 (LCD panel hinge - bottom) • 2 black M2.5×6+Nylok (LCD panel hinge - or alcohol pad • Thermal grease Screws removed during this task: • Soft cloth and isopropyl alcohol;
... task: • 1 black M2×5 (hard drive) • 1 black M2.5×6 (optical drive) • 3 black M2.5×6 (keyboard cover) • 2 black M2.5×6 (LCD panel hinge - bottom) • 2 black M2.5×6+Nylok (LCD panel hinge - or alcohol pad • Thermal grease Screws removed during this task: • Soft cloth and isopropyl alcohol;
Service Guide
Page 101
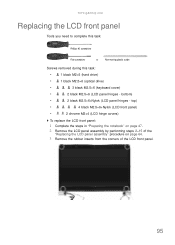
www.gateway.com Replacing the LCD front panel Tools you need to complete this task: Phillips #0 screwdriver Flat screwdriver or Non...;6 (optical drive) • 3 black M2.5×6 (keyboard cover) • 2 black M2.5×6 (LCD panel hinges - top) • 4 black M2.5×6+Nylok (LCD front panel) • 2 chrome M2×4 (LCD hinge covers) To replace the LCD front panel: 1 Complete the steps in "Preparing the notebook" on page 47. 2 Remove...Remove the rubber inserts from the corners of the LCD front panel. 95 bottom) • 2 black M2.5×6+Nylok (LCD panel hinges -
www.gateway.com Replacing the LCD front panel Tools you need to complete this task: Phillips #0 screwdriver Flat screwdriver or Non...;6 (optical drive) • 3 black M2.5×6 (keyboard cover) • 2 black M2.5×6 (LCD panel hinges - top) • 4 black M2.5×6+Nylok (LCD front panel) • 2 chrome M2×4 (LCD hinge covers) To replace the LCD front panel: 1 Complete the steps in "Preparing the notebook" on page 47. 2 Remove...Remove the rubber inserts from the corners of the LCD front panel. 95 bottom) • 2 black M2.5×6+Nylok (LCD panel hinges -
Service Guide
Page 102
CHAPTER 3: Replacing notebook components 4 Remove the LCD front panel screws. 5 Remove the LCD hinge cover screws. 6 Carefully pry loose the front panel from the LCD assembly lid. Start on the top side (a), continue to the left and right sides (b), and finally the bottom side (c). 96
CHAPTER 3: Replacing notebook components 4 Remove the LCD front panel screws. 5 Remove the LCD hinge cover screws. 6 Carefully pry loose the front panel from the LCD assembly lid. Start on the top side (a), continue to the left and right sides (b), and finally the bottom side (c). 96
Service Guide
Page 103
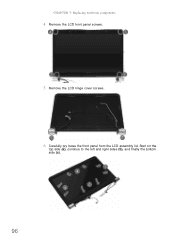
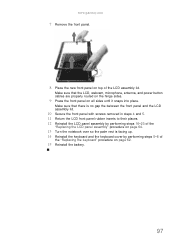
Make sure that the LCD, webcam, microphone, antenna, and power button cables are properly routed on the hinge sides. 9 Press the front panel on all sides until it snaps into place. www.gateway.com 7 Remove the front panel. 8 Place the new front panel on top of the "Replacing the keyboard" procedure on page...
Make sure that the LCD, webcam, microphone, antenna, and power button cables are properly routed on the hinge sides. 9 Press the front panel on all sides until it snaps into place. www.gateway.com 7 Remove the front panel. 8 Place the new front panel on top of the "Replacing the keyboard" procedure on page...
Service Guide
Page 104
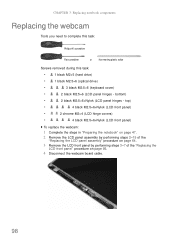
top) • 4 black M2.5×6+Nylok (LCD front panel) • 2 chrome M2×4 (LCD hinge covers) • 4 black M2.5×6+Nylok (LCD front panel) To replace the webcam: 1 Complete the steps in "Preparing the notebook" on page 47. ... "Replacing the LCD front panel" procedure on page 95. 4 Disconnect the webcam board cable. 98 bottom) • 2 black M2.5×6+Nylok (LCD panel hinges - CHAPTER 3: Replacing notebook components Replacing the webcam Tools you need to complete this task: Phillips #0 screwdriver Flat screwdriver or Non-marring plastic scribe Screws removed...
top) • 4 black M2.5×6+Nylok (LCD front panel) • 2 chrome M2×4 (LCD hinge covers) • 4 black M2.5×6+Nylok (LCD front panel) To replace the webcam: 1 Complete the steps in "Preparing the notebook" on page 47. ... "Replacing the LCD front panel" procedure on page 95. 4 Disconnect the webcam board cable. 98 bottom) • 2 black M2.5×6+Nylok (LCD panel hinges - CHAPTER 3: Replacing notebook components Replacing the webcam Tools you need to complete this task: Phillips #0 screwdriver Flat screwdriver or Non-marring plastic scribe Screws removed...

Service Guide
Page 106
top) • 4 black M2.5×6+Nylok (LCD front panel) • 2 chrome M2×4 (LCD hinge covers) • 4 black M2.5×6+Nylok (LCD front panel) • 4 black M2.5×5 (LCD panel hinges) • 4 chrome M2×3 (LCD panel brackets) To replace the LCD: 1 Complete the steps in "Preparing the notebook" on page 47. 2 Remove... task: • 1 black M2×5 (hard drive) • 1 black M2.5×6 (optical drive) • 3 black M2.5×6 (keyboard cover) • 2 black M2.5×6 (LCD panel hinges - bottom) • 2 black M2.5×6+Nylok (LCD panel...
top) • 4 black M2.5×6+Nylok (LCD front panel) • 2 chrome M2×4 (LCD hinge covers) • 4 black M2.5×6+Nylok (LCD front panel) • 4 black M2.5×5 (LCD panel hinges) • 4 chrome M2×3 (LCD panel brackets) To replace the LCD: 1 Complete the steps in "Preparing the notebook" on page 47. 2 Remove... task: • 1 black M2×5 (hard drive) • 1 black M2.5×6 (optical drive) • 3 black M2.5×6 (keyboard cover) • 2 black M2.5×6 (LCD panel hinges - bottom) • 2 black M2.5×6+Nylok (LCD panel...

