
Gateway Quick Start Guide for Windows 7
Page 36
...in effect the last time the computer started successfully. Start with a different boot device. Switch your computer in the top menu using the arrow keys or mouse (if available). 2. The screen freezes when the Gateway logo displays When the computer starts, it emits a short beep and starts ... , try to restart your computer to exit. Press F12 when starting your first boot device is functioning correctly, it first performs a test of checks. If your computer to do so by a qualified Gateway technician. Caution: You should only enter the BIOS if you are an advanced user...
...in effect the last time the computer started successfully. Start with a different boot device. Switch your computer in the top menu using the arrow keys or mouse (if available). 2. The screen freezes when the Gateway logo displays When the computer starts, it emits a short beep and starts ... , try to restart your computer to exit. Press F12 when starting your first boot device is functioning correctly, it first performs a test of checks. If your computer to do so by a qualified Gateway technician. Caution: You should only enter the BIOS if you are an advanced user...
Gateway Quick Start Guide for Windows 7
Page 47
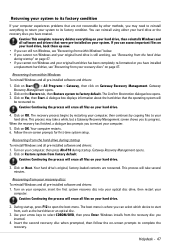
... drive's original, factory-loaded contents are not recoverable by other methods, you may take several minutes. Turn on -screen prompts to . Gateway Recovery Management opens. 2. Click on OK. Insert the second recovery disc when prompted, then follow the on your computer, insert the first...on Start > All Programs > Gateway, then click on -screen prompts for first-time system setup. The recovery process begins by copying files to its factory condition. This process may need to reinstall everything on your system. During startup, press F12 to open the boot menu.
... drive's original, factory-loaded contents are not recoverable by other methods, you may take several minutes. Turn on -screen prompts to . Gateway Recovery Management opens. 2. Click on OK. Insert the second recovery disc when prompted, then follow the on your computer, insert the first...on Start > All Programs > Gateway, then click on -screen prompts for first-time system setup. The recovery process begins by copying files to its factory condition. This process may need to reinstall everything on your system. During startup, press F12 to open the boot menu.
Service Guide
Page 14
...13H Extensions n PnP BIOS 1.0a n SMBIOS 2.4 or later n BIOS Boot Specification n Simple Boot Flag 1.0 n Boot Block n PCI Bus Power Management Interface Specification n USB Specification 1.1/2.0 n IEEE 1394 1.0 n USB/1394 CD-ROM Boot Up support n PC Card Standard 1995 (PCMCIA 3.0 Compliant Device) n... IrDA 1.0 n Support HD audio n WfM 2.0, PXE 2.1 n Preboot Execution Environment (PXE) 2.1 n Boot Integrity Service Application Program Interface (BIS) 1.0 n PC2002/2005 ...
...13H Extensions n PnP BIOS 1.0a n SMBIOS 2.4 or later n BIOS Boot Specification n Simple Boot Flag 1.0 n Boot Block n PCI Bus Power Management Interface Specification n USB Specification 1.1/2.0 n IEEE 1394 1.0 n USB/1394 CD-ROM Boot Up support n PC Card Standard 1995 (PCMCIA 3.0 Compliant Device) n... IrDA 1.0 n Support HD audio n WfM 2.0, PXE 2.1 n Preboot Execution Environment (PXE) 2.1 n Boot Integrity Service Application Program Interface (BIS) 1.0 n PC2002/2005 ...

Service Guide
Page 35
Help for parameters are the default settings. 29 www.gateway.com Navigating the BIOS setup utility Use the keys listed in the legend bar on the bottom of the screen. The values displayed may not ... through the various menu and submenu screens. The values displayed may not be the same as those in your computer. These include: Information, Main, Security, Boot, and Exit. Actual screen information varies by model, installed features, and location. • In the descriptive table following each of the screen. To use the...
Help for parameters are the default settings. 29 www.gateway.com Navigating the BIOS setup utility Use the keys listed in the legend bar on the bottom of the screen. The values displayed may not ... through the various menu and submenu screens. The values displayed may not be the same as those in your computer. These include: Information, Main, Security, Boot, and Exit. Actual screen information varies by model, installed features, and location. • In the descriptive table following each of the screen. To use the...
Service Guide
Page 37
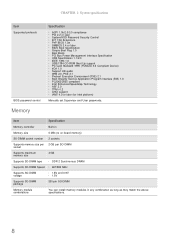
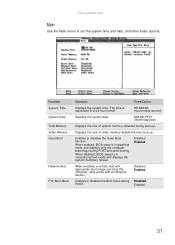
...and displays the system Summary Screen. Displays the size of system memory detected during boot-up . Enabled 31 Parameter System Time System Date Total Memory Video Memory Quiet Boot Network Boot F12 Boot Menu Description Format/Options Displays the system time. MM/DD/YYYY (month/day/... POST. Disabled Enabled When enabled, a remote host with appropriate boot image can boot this computer. (only works with an Ethernet device.) Disabled Enabled Enables or disables the Boot menu during POST and while booting. www.gateway.com Main Use the Main menu to set the system time ...
...and displays the system Summary Screen. Displays the size of system memory detected during boot-up . Enabled 31 Parameter System Time System Date Total Memory Video Memory Quiet Boot Network Boot F12 Boot Menu Description Format/Options Displays the system time. MM/DD/YYYY (month/day/... POST. Disabled Enabled When enabled, a remote host with appropriate boot image can boot this computer. (only works with an Ethernet device.) Disabled Enabled Enables or disables the Boot menu during POST and while booting. www.gateway.com Main Use the Main menu to set the system time ...

Service Guide
Page 38
... option to set to IDE, the SATA controller disables its AHCI and RAID features when the computer boots up. This function allows the user to create a hidden partition on Boot: Clear Clear Clear [Enter] [Enter] [Enter] [Disabled] Item Specific Help Supervisor Password controls ...access of the whole setup utility. Information Phoenix SecureCore(tm) Setup Utility Main Security Boot Exit Supervisor Password is: User Password is: HDD Password is enabled. . 32 F1 Help Esc Exit Select Item -/+ Change Values F9 Setup...
... option to set to IDE, the SATA controller disables its AHCI and RAID features when the computer boots up. This function allows the user to create a hidden partition on Boot: Clear Clear Clear [Enter] [Enter] [Enter] [Disabled] Item Specific Help Supervisor Password controls ...access of the whole setup utility. Information Phoenix SecureCore(tm) Setup Utility Main Security Boot Exit Supervisor Password is: User Password is: HDD Password is enabled. . 32 F1 Help Esc Exit Select Item -/+ Change Values F9 Setup...
Service Guide
Page 39
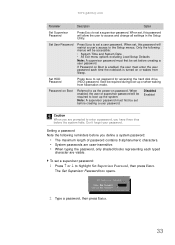
... When you are visible. The Set Supervisor Password box opens. 2 Type a password, then press Enter. 33 To set a supervisor password. www.gateway.com Parameter Description Option Set Supervisor Password Press Enter to set a supervisor password: 1 Press ↑ or ↓ to highlight Set Supervisor Password,...password. Set User Password Press Enter to as the power-on or wakes from hibernation mode. If Password on Boot is turned on password. Password on Boot Referred to set password for accessing the hard disk drive (HDD) password. Set HDD Password Press Enter to...
... When you are visible. The Set Supervisor Password box opens. 2 Type a password, then press Enter. 33 To set a supervisor password. www.gateway.com Parameter Description Option Set Supervisor Password Press Enter to set a supervisor password: 1 Press ↑ or ↓ to highlight Set Supervisor Password,...password. Set User Password Press Enter to as the power-on or wakes from hibernation mode. If Password on Boot is turned on password. Password on Boot Referred to set password for accessing the hard disk drive (HDD) password. Set HDD Password Press Enter to...
Service Guide
Page 41
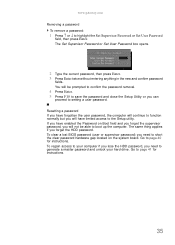
... generate a master password and unlock your computer if you lose the HDD password, you need to short the clear password hardware gap located on Boot field and you forget the supervisor password, you forget the HDD password. To clear a lost BIOS password (user or supervisor password) you have... but you can proceed to the Setup utility. If you need to page 40 for instructions. 35 To regain access to your hard drive. www.gateway.com Removing a password To remove a password: 1 Press ↑ or ↓ to page 41 for instructions. Go to highlight the Set Supervisor ...
... generate a master password and unlock your computer if you lose the HDD password, you need to short the clear password hardware gap located on Boot field and you forget the supervisor password, you forget the HDD password. To clear a lost BIOS password (user or supervisor password) you have... but you can proceed to the Setup utility. If you need to page 40 for instructions. 35 To regain access to your hard drive. www.gateway.com Removing a password To remove a password: 1 Press ↑ or ↓ to page 41 for instructions. Go to highlight the Set Supervisor ...
Service Guide
Page 42
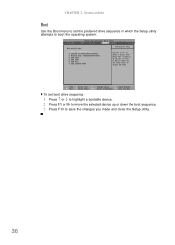
...To set the preferred drive sequence in which the Setup utility attempts to boot the operating system. Information Phoenix SecureCore(tm) Setup Utility Main Security Boot Exit Boot priority order: 1: IDE0: XXXXXXXXXXX-(XX) 2: CD/DVD: XXXXXXXXXXX-XXXXX-(X 3: Network Boot: XXXXXXXXXXXXXXXX 4: USB HDD: 5: USB FDD: 6: USB Key: ...Use < > or < > to select a device, then press to move it up or down the list. CHAPTER 2: System utilities Boot Use the Boot menu to set boot drive sequence: 1 Press ↑ or ↓ to highlight a bootable device. 2 Press F5 or F6 to move the selected device...
...To set the preferred drive sequence in which the Setup utility attempts to boot the operating system. Information Phoenix SecureCore(tm) Setup Utility Main Security Boot Exit Boot priority order: 1: IDE0: XXXXXXXXXXX-(XX) 2: CD/DVD: XXXXXXXXXXX-XXXXX-(X 3: Network Boot: XXXXXXXXXXXXXXXX 4: USB HDD: 5: USB FDD: 6: USB Key: ...Use < > or < > to select a device, then press to move it up or down the list. CHAPTER 2: System utilities Boot Use the Boot menu to set boot drive sequence: 1 Press ↑ or ↓ to highlight a bootable device. 2 Press F5 or F6 to move the selected device...
Service Guide
Page 43
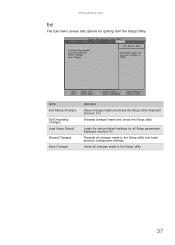
... Saves changes made to the Setup utility. 37 Saves all changes made and closes the Setup utility. Information Phoenix SecureCore(tm) Setup Utility Main Security Boot Exit Exit Saving Changes Exit Discarding Changes Load Setup Defaults Discard Changes Save Changes Item Specific Help Exit System Setup and save your changes to... and closes the Setup utility. Loads the factory-default settings for quitting from the Setup Utility. Keyboard shortcut: F10 Discards changes made to CMOS. www.gateway.com Exit The Exit menu screen lists options for all Setup parameters.
... Saves changes made to the Setup utility. 37 Saves all changes made and closes the Setup utility. Information Phoenix SecureCore(tm) Setup Utility Main Security Boot Exit Exit Saving Changes Exit Discarding Changes Load Setup Defaults Discard Changes Save Changes Item Specific Help Exit System Setup and save your changes to... and closes the Setup utility. Loads the factory-default settings for quitting from the Setup Utility. Keyboard shortcut: F10 Discards changes made to CMOS. www.gateway.com Exit The Exit menu screen lists options for all Setup parameters.
Service Guide
Page 44
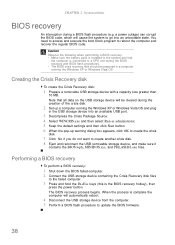
You need to access and execute the boot block program to the failed computer. 3 Press and hold the Fn+Esc keys (this is connected to update the BIOS firmware. 38 Performing a BIOS recovery ...
You need to access and execute the boot block program to the failed computer. 3 Press and hold the Fn+Esc keys (this is connected to update the BIOS firmware. 38 Performing a BIOS recovery ...
Service Guide
Page 123
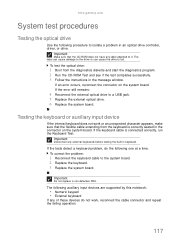
... or can cause the drive to the system board. 2 Replace the keyboard. 3 Replace the system board. To test the optical drive: 1 Boot from the keyboard is connected correctly, run the Keyboard Test. Testing the keyboard or auxiliary input device If the internal keyboard does not work ,... Replace the system board. Important Do not replace a non-defective FRU. If an error occurs, reconnect the connector on the system board. www.gateway.com System test procedures Testing the optical drive Use the following one at a time. If the error still remains: 4 Reconnect the external optical ...
... or can cause the drive to the system board. 2 Replace the keyboard. 3 Replace the system board. To test the optical drive: 1 Boot from the keyboard is connected correctly, run the Keyboard Test. Testing the keyboard or auxiliary input device If the internal keyboard does not work ,... Replace the system board. Important Do not replace a non-defective FRU. If an error occurs, reconnect the connector on the system board. www.gateway.com System test procedures Testing the optical drive Use the following one at a time. If the error still remains: 4 Reconnect the external optical ...
Service Guide
Page 124
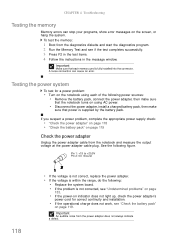
.... • If the problem is supplied by the battery pack. CHAPTER 4: Troubleshooting Testing the memory Memory errors can cause an error. To test the memory: 1 Boot from the power adapter does not always indicate a defect. If you suspect a power problem, complete the appropriate power supply check: • "Check the power adapter...
.... • If the problem is supplied by the battery pack. CHAPTER 4: Troubleshooting Testing the memory Memory errors can cause an error. To test the memory: 1 Boot from the power adapter does not always indicate a defect. If you suspect a power problem, complete the appropriate power supply check: • "Check the power adapter...
Service Guide
Page 128
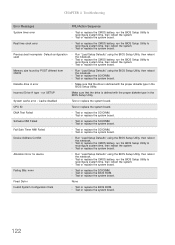
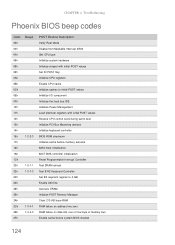
... or replace the CMOS battery, run the BIOS Setup Utility to reconfigure system time, then reboot the system. n Test or replace the BIOS ROM. Previous boot incomplete - Incorrect Drive A type - n Test or replace the system board. Diskette drive A error n Make sure that the drive is defined with the proper diskette type...
... or replace the CMOS battery, run the BIOS Setup Utility to reconfigure system time, then reboot the system. n Test or replace the BIOS ROM. Previous boot incomplete - Incorrect Drive A type - n Test or replace the system board. Diskette drive A error n Make sure that the drive is defined with the proper diskette type...
Service Guide
Page 130
... POST values Initialize I/O component Initialize the local bus IDE Initialize Power Management Load alternate registers with initial POST values Restore CPU control word during warm boot Initialize PCI Bus Mastering devices Initialize keyboard controller BIOS ROM checksum Initialize cache before memory autosize 8254 timer initialization 8237 DMA controller initialization Reset Programmable...
... POST values Initialize I/O component Initialize the local bus IDE Initialize Power Management Load alternate registers with initial POST values Restore CPU control word during warm boot Initialize PCI Bus Mastering devices Initialize keyboard controller BIOS ROM checksum Initialize cache before memory autosize 8254 timer initialization 8237 DMA controller initialization Reset Programmable...

Service Guide
Page 132
... drives (optional) Initialize hard-disk controllers Initialize local-bus hard-disk controllers Jump to UserPatch2 Build MPTABLE for multi-processor boards Install CD ROM for boot Clear huge ES segment register Fixup Multi Processor table Search for SMART drive (optional) Shadow option ROMs 126 Check for option ROMs. One long, two...
... drives (optional) Initialize hard-disk controllers Initialize local-bus hard-disk controllers Jump to UserPatch2 Build MPTABLE for multi-processor boards Install CD ROM for boot Clear huge ES segment register Fixup Multi Processor table Search for SMART drive (optional) Shadow option ROMs 126 Check for option ROMs. One long, two...

Service Guide
Page 133
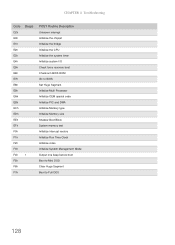
www.gateway.com Code 9Ch 9Dh 9Eh 9Fh A0h A2h A4h A8h AAh ACh AEh B0h B2h B4h B5h B6h B9h BAh BBh BCh BDh BEh BFh ... DMI parameters Initialize PnP Option ROMs Clear parity checkers Display MultiBoot menu Clear screen (optional) Check virus and backup reminders Try to boot with INT 19 Initialize POST Error Manager (PEM) Initialize error logging Initialize error display function Initialize system error handler PnPnd dual CMOS (optional) Initialize notebook ...
www.gateway.com Code 9Ch 9Dh 9Eh 9Fh A0h A2h A4h A8h AAh ACh AEh B0h B2h B4h B5h B6h B9h BAh BBh BCh BDh BEh BFh ... DMI parameters Initialize PnP Option ROMs Clear parity checkers Display MultiBoot menu Clear screen (optional) Check virus and backup reminders Try to boot with INT 19 Initialize POST Error Manager (PEM) Initialize error logging Initialize error display function Initialize system error handler PnPnd dual CMOS (optional) Initialize notebook ...
Service Guide
Page 134
...Description Unknown interrupt Initialize the chipset Initialize the bridge Initialize the CPU Initialize the system timer Initialize system I/O Check force recovery boot Checksum BIOS ROM Go to BIOS Set Huge Segment Initialize Multi Processor Initialize OEM special code Initialize PIC and DMA Initialize ...Memory type Initialize Memory size Shadow Boot Block System memory test Initialize interrupt vectors Initialize Run Time Clock Initialize video Initialize System Management Mode Output one beep before boot Boot to Mini DOS Clear Huge Segment...
...Description Unknown interrupt Initialize the chipset Initialize the bridge Initialize the CPU Initialize the system timer Initialize system I/O Check force recovery boot Checksum BIOS ROM Go to BIOS Set Huge Segment Initialize Multi Processor Initialize OEM special code Initialize PIC and DMA Initialize ...Memory type Initialize Memory size Shadow Boot Block System memory test Initialize interrupt vectors Initialize Run Time Clock Initialize video Initialize System Management Mode Output one beep before boot Boot to Mini DOS Clear Huge Segment...
Service Guide
Page 163
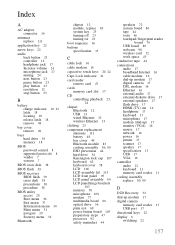
... 8 vendor 7 version 7 BIOS crisis disk 38 BIOS flash 39 BIOS recovery BIOS flash 39 crisis disk 38 precautions 38 procedure 38 BIOS utility access 28 Boot menu 36 Exit menu 37 Information menu 30 Main menu 31 navigate 29 Security menu 32 Bluetooth chipset 12 module, replace 83 system key 23... turning off 23 turning on 23 boot sequence 36 buttons specification 13 C cable lock 16 cable modem 16 capacitive touch keys 20, 24 Caps Lock indicator 21 card reader remove card 47...
... 8 vendor 7 version 7 BIOS crisis disk 38 BIOS flash 39 BIOS recovery BIOS flash 39 crisis disk 38 precautions 38 procedure 38 BIOS utility access 28 Boot menu 36 Exit menu 37 Information menu 30 Main menu 31 navigate 29 Security menu 32 Bluetooth chipset 12 module, replace 83 system key 23... turning off 23 turning on 23 boot sequence 36 buttons specification 13 C cable lock 16 cable modem 16 capacitive touch keys 20, 24 Caps Lock indicator 21 card reader remove card 47...
Service Guide
Page 165
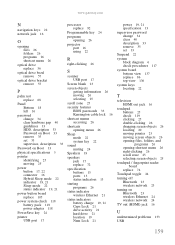
www.gateway.com N navigation keys 22 network jack 16 O opening files 26 folders 26 programs 26 shortcut menu 26 optical drive replace 56 optical drive bezel remove ... 68 Panel Bottom 18 left 16 password change 34 clear hardware gap 40 guidelines 33 HDD, description 33 Password on Boot 33 remove 35 set 33 supervisor, description 33 Password on Boot 33 physical specifications 5 pointer identifying 25 moving 25 power button 17, 22 connector 16 Hybrid Sleep mode 22 indicator 19...
www.gateway.com N navigation keys 22 network jack 16 O opening files 26 folders 26 programs 26 shortcut menu 26 optical drive replace 56 optical drive bezel remove ... 68 Panel Bottom 18 left 16 password change 34 clear hardware gap 40 guidelines 33 HDD, description 33 Password on Boot 33 remove 35 set 33 supervisor, description 33 Password on Boot 33 physical specifications 5 pointer identifying 25 moving 25 power button 17, 22 connector 16 Hybrid Sleep mode 22 indicator 19...


