Gateway Notebook User's Guide - Canada/French
Page 66
... remember but you cannot replace the information stored on your notebook. If you forget your password, you will have to enter your password when you turn on your notebook or access your files. Startup and hard drive password Use a startup and hard drive password to keep other ...people from being stolen. When you set up a Documents folder for someone else to guess. But these features also make it easy for each account. You can buy a cable lock at most electronics stores and many department stores. You have to return your notebook to Gateway...
... remember but you cannot replace the information stored on your notebook. If you forget your password, you will have to enter your password when you turn on your notebook or access your files. Startup and hard drive password Use a startup and hard drive password to keep other ...people from being stolen. When you set up a Documents folder for someone else to guess. But these features also make it easy for each account. You can buy a cable lock at most electronics stores and many department stores. You have to return your notebook to Gateway...

Gateway Notebook User's Guide - English
Page 66
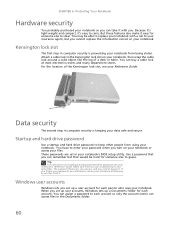
... Startup and hard drive password Use a startup and hard drive password to keep other people from using your notebook from being stolen. You have to return your notebook to Gateway so we can reset it easy for each account so only the account owner can remember but you cannot replace the information ...stored on creating a startup and hard drive password, see your data safe and secure. If you forget...
... Startup and hard drive password Use a startup and hard drive password to keep other people from using your notebook from being stolen. You have to return your notebook to Gateway so we can reset it easy for each account so only the account owner can remember but you cannot replace the information ...stored on creating a startup and hard drive password, see your data safe and secure. If you forget...
Gateway Quick Start Guide for Windows 7
Page 47
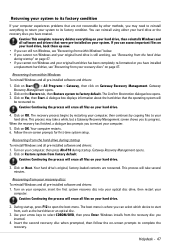
... tab, then Restore system to select CDROM/DVD, then press Enter. Caution: Continuing the process will take a while, but a Gateway Recovery Management screen shows you have installed a replacement hard drive, see "Recovering from the hard drive during startup. During startup, press F12 to your recovery discs To reinstall Windows and all files on page 47. Caution...
... tab, then Restore system to select CDROM/DVD, then press Enter. Caution: Continuing the process will take a while, but a Gateway Recovery Management screen shows you have installed a replacement hard drive, see "Recovering from the hard drive during startup. During startup, press F12 to your recovery discs To reinstall Windows and all files on page 47. Caution...
Service Guide
Page 4
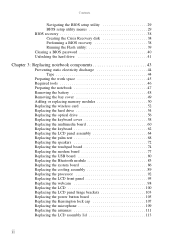
... 50 Replacing the wireless card 52 Replacing the hard drive 54 Replacing the optical drive 56 Replacing the keyboard cover 58 Replacing the multimedia board 60 Replacing the keyboard 62 Replacing the LCD panel assembly 64 Replacing the palm rest 68 Replacing the speakers 72 Replacing the touchpad board 74 Replacing the modem board 77 Replacing the USB board 80 Replacing the Bluetooth module 83 Replacing the...
... 50 Replacing the wireless card 52 Replacing the hard drive 54 Replacing the optical drive 56 Replacing the keyboard cover 58 Replacing the multimedia board 60 Replacing the keyboard 62 Replacing the LCD panel assembly 64 Replacing the palm rest 68 Replacing the speakers 72 Replacing the touchpad board 74 Replacing the modem board 77 Replacing the USB board 80 Replacing the Bluetooth module 83 Replacing the...
Service Guide
Page 49
... wireless card • Replacing the hard drive • Replacing the optical drive • Replacing the keyboard cover • Replacing the multimedia board • Replacing the keyboard • Replacing the LCD panel assembly • Replacing the palm rest • Replacing the speakers • Replacing the touchpad board • Replacing the modem board • Replacing the USB board • Replacing the Bluetooth module • Replacing the system board...
... wireless card • Replacing the hard drive • Replacing the optical drive • Replacing the keyboard cover • Replacing the multimedia board • Replacing the keyboard • Replacing the LCD panel assembly • Replacing the palm rest • Replacing the speakers • Replacing the touchpad board • Replacing the modem board • Replacing the USB board • Replacing the Bluetooth module • Replacing the system board...

Service Guide
Page 60
... you need to complete this task: Phillips #0 screwdriver Non-marring plastic scribe Screws removed during this task: • 1 black M2×5 (hard drive) • 2 chrome M3×3 (hard drive bracket) To replace the hard drive: 1 Complete the steps in "Preparing the notebook" on page 47. 2 Complete the steps in "Removing the bay cover" on page 49. 3 Remove...
... you need to complete this task: Phillips #0 screwdriver Non-marring plastic scribe Screws removed during this task: • 1 black M2×5 (hard drive) • 2 chrome M3×3 (hard drive bracket) To replace the hard drive: 1 Complete the steps in "Preparing the notebook" on page 47. 2 Complete the steps in "Removing the bay cover" on page 49. 3 Remove...
Service Guide
Page 74
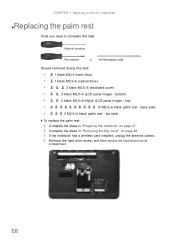
..., unplug the antenna cables. 4 Remove the hard drive screw, and then remove the hard drive from its compartment. 68 top) • 10 M2.5×6 black (palm rest - base side) • 3 M2.5×6 black (palm rest - bottom) • 2 black M2.5×6+Nylok (LCD panel hinges - CHAPTER 3: Replacing notebook components Replacing the palm rest Tools you need to...
..., unplug the antenna cables. 4 Remove the hard drive screw, and then remove the hard drive from its compartment. 68 top) • 10 M2.5×6 black (palm rest - base side) • 3 M2.5×6 black (palm rest - bottom) • 2 black M2.5×6+Nylok (LCD panel hinges - CHAPTER 3: Replacing notebook components Replacing the palm rest Tools you need to...

Service Guide
Page 77
www.gateway.com 16 Locate the small gaps on the top side of the palm rest and insert a small flat-blade screwdriver or non-marring scribe into .... 23 Reinstall the keyboard and the keyboard cover by performing steps 5-8 of the "Replacing the keyboard" procedure on page 62. 24 Return the optical screw drive in its place. 25 Reinstall the hard drive by performing steps 8 and 9 of the "Replacing the hard drive" procedure on page 54. 26 If you have disconnected any wireless antennas, reconnect...
www.gateway.com 16 Locate the small gaps on the top side of the palm rest and insert a small flat-blade screwdriver or non-marring scribe into .... 23 Reinstall the keyboard and the keyboard cover by performing steps 5-8 of the "Replacing the keyboard" procedure on page 62. 24 Return the optical screw drive in its place. 25 Reinstall the hard drive by performing steps 8 and 9 of the "Replacing the hard drive" procedure on page 54. 26 If you have disconnected any wireless antennas, reconnect...
Service Guide
Page 78
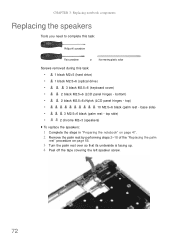
...Complete the steps in "Preparing the notebook" on page 47. 2 Remove the palm rest by performing steps 2-18 of the "Replacing the palm rest" procedure on page 68. 3 Turn the palm rest over so that its underside is facing up. 4 ...M2.5×6 black (palm rest - CHAPTER 3: Replacing notebook components Replacing the speakers Tools you need to complete this task: Phillips #0 screwdriver Flat screwdriver or Non-marring plastic scribe Screws removed during this task: • 1 black M2×5 (hard drive) • 1 black M2.5×6 (optical drive) • 3 black M2.5×6 (keyboard ...
...Complete the steps in "Preparing the notebook" on page 47. 2 Remove the palm rest by performing steps 2-18 of the "Replacing the palm rest" procedure on page 68. 3 Turn the palm rest over so that its underside is facing up. 4 ...M2.5×6 black (palm rest - CHAPTER 3: Replacing notebook components Replacing the speakers Tools you need to complete this task: Phillips #0 screwdriver Flat screwdriver or Non-marring plastic scribe Screws removed during this task: • 1 black M2×5 (hard drive) • 1 black M2.5×6 (optical drive) • 3 black M2.5×6 (keyboard ...
Service Guide
Page 79
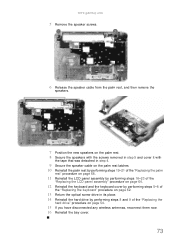
www.gateway.com 5 Remove the speaker screws. 6 Release the speaker cable from the palm rest, and then remove the... on the palm rest latches 10 Reinstall the palm rest by performing steps 19-21 of the "Replacing the palm rest" procedure on page 68. 11 Reinstall the LCD panel assembly by performing steps 16-23 of the... the keyboard cover by performing steps 5-8 of the "Replacing the keyboard" procedure on page 62. 13 Return the optical screw drive in its place. 14 Reinstall the hard drive by performing steps 8 and 9 of the "Replacing the hard drive" procedure on page 54. 15 If you have disconnected...
www.gateway.com 5 Remove the speaker screws. 6 Release the speaker cable from the palm rest, and then remove the... on the palm rest latches 10 Reinstall the palm rest by performing steps 19-21 of the "Replacing the palm rest" procedure on page 68. 11 Reinstall the LCD panel assembly by performing steps 16-23 of the... the keyboard cover by performing steps 5-8 of the "Replacing the keyboard" procedure on page 62. 13 Return the optical screw drive in its place. 14 Reinstall the hard drive by performing steps 8 and 9 of the "Replacing the hard drive" procedure on page 54. 15 If you have disconnected...
Service Guide
Page 80
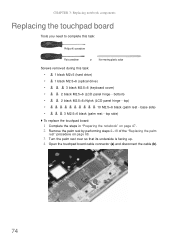
CHAPTER 3: Replacing notebook components Replacing the touchpad board Tools you need to complete this task: Phillips #0 screwdriver Flat screwdriver or Non-marring plastic scribe Screws removed during this task: • 1 black M2×5 (hard drive) • 1 black M2.5×6 (optical drive) • 3 black M2.5×6 (keyboard cover) • 2 black M2.5×6 (LCD panel hinge - base side...
CHAPTER 3: Replacing notebook components Replacing the touchpad board Tools you need to complete this task: Phillips #0 screwdriver Flat screwdriver or Non-marring plastic scribe Screws removed during this task: • 1 black M2×5 (hard drive) • 1 black M2.5×6 (optical drive) • 3 black M2.5×6 (keyboard cover) • 2 black M2.5×6 (LCD panel hinge - base side...

Service Guide
Page 82
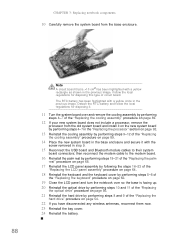
...touchpad board from the palm rest. Follow the local regulations for disposing this type of the "Replacing the hard drive" procedure on page 62. 16 Return the optical screw drive in its place. 17 Reinstall the hard drive by performing steps 8 and 9 of circuit board. 10 Observing the same orientation as shown ...in place. 13 Reinstall the palm rest by performing steps 19-21 of the "Replacing the palm rest" procedure on page...
...touchpad board from the palm rest. Follow the local regulations for disposing this type of the "Replacing the hard drive" procedure on page 62. 16 Return the optical screw drive in its place. 17 Reinstall the hard drive by performing steps 8 and 9 of circuit board. 10 Observing the same orientation as shown ...in place. 13 Reinstall the palm rest by performing steps 19-21 of the "Replacing the palm rest" procedure on page...
Service Guide
Page 83
... the "Replacing the hard drive" procedure on page 54. 6 Remove the optical drive by performing steps 3 and 4 of the "Replacing the optical drive" procedure on page 56. 7 Remove the palm rest by following steps 6-18 of the "Replacing the palm rest" procedure on page 68. 77 base side) • 3 M2.5×6 black (palm rest - www.gateway.com Replacing the...
... the "Replacing the hard drive" procedure on page 54. 6 Remove the optical drive by performing steps 3 and 4 of the "Replacing the optical drive" procedure on page 56. 7 Remove the palm rest by following steps 6-18 of the "Replacing the palm rest" procedure on page 68. 77 base side) • 3 M2.5×6 black (palm rest - www.gateway.com Replacing the...

Service Guide
Page 85
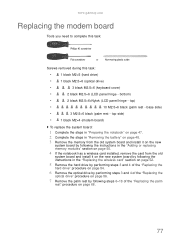
www.gateway.com 11 Connect the modem cable to the new modem board, and then attach to board to its system board connector. 12 Secure the new modem board with the screw removed in step 9. 13 Reinstall the palm rest by performing steps 19-21 of the "Replacing the palm rest" ... the notebook over so the base is facing up. 17 Reinstall the optical drive by performing steps 10 and 11 of the "Replacing the optical drive" procedure on page 56. 18 Reinstall the hard drive by performing steps 8 and 9 of the "Replacing the hard drive" procedure on page 54. 19 If you have disconnected any wireless antennas,...
www.gateway.com 11 Connect the modem cable to the new modem board, and then attach to board to its system board connector. 12 Secure the new modem board with the screw removed in step 9. 13 Reinstall the palm rest by performing steps 19-21 of the "Replacing the palm rest" ... the notebook over so the base is facing up. 17 Reinstall the optical drive by performing steps 10 and 11 of the "Replacing the optical drive" procedure on page 56. 18 Reinstall the hard drive by performing steps 8 and 9 of the "Replacing the hard drive" procedure on page 54. 19 If you have disconnected any wireless antennas,...

Service Guide
Page 86
..., unplug the antenna cables. 5 Remove the hard drive screw, and then remove the hard drive from its compartment. 80 top) • 10 M2.5×6 black (palm rest - base side) • 3 M2.5×6 black (palm rest - bottom) • 2 black M2.5×6+Nylok (LCD panel hinge - CHAPTER 3: Replacing notebook components Replacing the USB board Tools you need to...
..., unplug the antenna cables. 5 Remove the hard drive screw, and then remove the hard drive from its compartment. 80 top) • 10 M2.5×6 black (palm rest - base side) • 3 M2.5×6 black (palm rest - bottom) • 2 black M2.5×6+Nylok (LCD panel hinge - CHAPTER 3: Replacing notebook components Replacing the USB board Tools you need to...

Service Guide
Page 88
... Connect the USB board and modem board cables to the new USB board. 13 Reinstall the palm rest by performing steps 19-21 of the "Replacing the palm rest" procedure on page 68. 14 Reinstall the LCD panel assembly by performing steps 16-23 of the... the LCD panel and turn the notebook over so the base is facing up. 17 Return the optical screw drive in its place. 18 Reinstall the hard drive by performing steps 8 and 9 of the "Replacing the hard drive" procedure on page 54. 19 If you have disconnected any wireless antennas, reconnect them now. 20 Reinstall the...
... Connect the USB board and modem board cables to the new USB board. 13 Reinstall the palm rest by performing steps 19-21 of the "Replacing the palm rest" procedure on page 68. 14 Reinstall the LCD panel assembly by performing steps 16-23 of the... the LCD panel and turn the notebook over so the base is facing up. 17 Return the optical screw drive in its place. 18 Reinstall the hard drive by performing steps 8 and 9 of the "Replacing the hard drive" procedure on page 54. 19 If you have disconnected any wireless antennas, reconnect them now. 20 Reinstall the...
Service Guide
Page 89
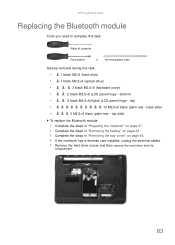
... page 49. 4 If the notebook has a wireless card installed, unplug the antenna cables. 5 Remove the hard drive screw, and then remove the hard drive from its compartment. 83 base side) • 3 M2.5×6 black (palm rest - www.gateway.com Replacing the Bluetooth module Tools you need to complete this task: Phillips #0 screwdriver Flat screwdriver or Non...
... page 49. 4 If the notebook has a wireless card installed, unplug the antenna cables. 5 Remove the hard drive screw, and then remove the hard drive from its compartment. 83 base side) • 3 M2.5×6 black (palm rest - www.gateway.com Replacing the Bluetooth module Tools you need to complete this task: Phillips #0 screwdriver Flat screwdriver or Non...

Service Guide
Page 91
...gateway.com 10 Secure the new Bluetooth module on the base enclosure and connect the Bluetooth cable to it. 11 Reinstall the palm rest by performing steps 19-21 of the "Replacing the palm rest" procedure on page 68. 12 Reinstall the LCD panel assembly by performing steps 16-23 of the "Replacing...LCD panel and turn the notebook over so the base is facing up. 15 Return the optical screw drive in its place. 16 Reinstall the hard drive by performing steps 8 and 9 of the "Replacing the hard drive" procedure on page 54. 17 If you have disconnected any wireless antennas, reconnect them now. 18 ...
...gateway.com 10 Secure the new Bluetooth module on the base enclosure and connect the Bluetooth cable to it. 11 Reinstall the palm rest by performing steps 19-21 of the "Replacing the palm rest" procedure on page 68. 12 Reinstall the LCD panel assembly by performing steps 16-23 of the "Replacing...LCD panel and turn the notebook over so the base is facing up. 15 Return the optical screw drive in its place. 16 Reinstall the hard drive by performing steps 8 and 9 of the "Replacing the hard drive" procedure on page 54. 17 If you have disconnected any wireless antennas, reconnect them now. 18 ...

Service Guide
Page 92
... the new system board by following the instructions in the "Replacing the wireless card" section on page 52. 5 Remove the hard drive by performing steps 3 and 4 of the "Replacing the hard drive" procedure on page 54. 6 Remove the optical drive by performing steps 3 and 4 of the "Replacing the optical drive" procedure on page 56. 7 Remove the palm rest by...
... the new system board by following the instructions in the "Replacing the wireless card" section on page 52. 5 Remove the hard drive by performing steps 3 and 4 of the "Replacing the hard drive" procedure on page 54. 6 Remove the optical drive by performing steps 3 and 4 of the "Replacing the optical drive" procedure on page 56. 7 Remove the palm rest by...
Service Guide
Page 94
...Reinstall the LCD panel assembly by following the steps 16-23 of the "Replacing the LCD panel assembly" procedure on page 64. 18 Reinstall the keyboard and the keyboard cover by performing steps 8 and 9 of the "Replacing the hard drive" procedure on page 62. 19 Close the LCD panel and turn the ...notebook over and remove the cooling assembly by performing steps 4-7 of the "Replacing the cooling assembly" procedure on page 89. 12 If your new system...
...Reinstall the LCD panel assembly by following the steps 16-23 of the "Replacing the LCD panel assembly" procedure on page 64. 18 Reinstall the keyboard and the keyboard cover by performing steps 8 and 9 of the "Replacing the hard drive" procedure on page 62. 19 Close the LCD panel and turn the ...notebook over and remove the cooling assembly by performing steps 4-7 of the "Replacing the cooling assembly" procedure on page 89. 12 If your new system...


