Service Guide
Page 95
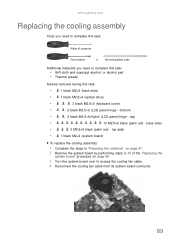
... black (palm rest - bottom) • 2 black M2.5×6+Nylok (LCD panel hinge - top side) • 1 black M2×4 (system board) To replace the cooling assembly: 1 Complete the steps in "Preparing the notebook" on page 47. 2 Remove the system board by performing steps 2-10 of the... procedure on page 86. 3 Turn the system board over to complete this task: • Soft cloth and isopropyl alcohol; www.gateway.com Replacing the cooling assembly Tools you need to complete this task: Phillips #0 screwdriver Flat screwdriver or Non-marring plastic scribe Additional materials you ...
... black (palm rest - bottom) • 2 black M2.5×6+Nylok (LCD panel hinge - top side) • 1 black M2×4 (system board) To replace the cooling assembly: 1 Complete the steps in "Preparing the notebook" on page 47. 2 Remove the system board by performing steps 2-10 of the... procedure on page 86. 3 Turn the system board over to complete this task: • Soft cloth and isopropyl alcohol; www.gateway.com Replacing the cooling assembly Tools you need to complete this task: Phillips #0 screwdriver Flat screwdriver or Non-marring plastic scribe Additional materials you ...

Service Guide
Page 97
... Follow the sequence of the number beside each screw when securing the cooling assembly. 12 Reconnect the cooling fan cable to evaporate before continuing. Wipe the die surface several times to secure it in poor thermal grease ... page 64. 16 Reinstall the keyboard and the keyboard cover by performing steps 5-8 of the "Replacing the keyboard" procedure on page 62. 17 Close the LCD panel and turn the notebook over so...your finger that no particles or dust contaminants are evident. www.gateway.com 8 Remove the barcode sticker on page 54. 20 If you have disconnected any thermal grease residue....
... Follow the sequence of the number beside each screw when securing the cooling assembly. 12 Reconnect the cooling fan cable to evaporate before continuing. Wipe the die surface several times to secure it in poor thermal grease ... page 64. 16 Reinstall the keyboard and the keyboard cover by performing steps 5-8 of the "Replacing the keyboard" procedure on page 62. 17 Close the LCD panel and turn the notebook over so...your finger that no particles or dust contaminants are evident. www.gateway.com 8 Remove the barcode sticker on page 54. 20 If you have disconnected any thermal grease residue....
Service Guide
Page 164
... drive check 117 external monitor 16, 22 EZ Pad touchpad See touchpad F fan 16, 18 features 3 files opening 26 Fn key 22 folders opening 26 function keys 22 H hard drive bay 19 HDD password 33 indicator 21 replace 54 hard drive bracket remove 55 HDD password description 33 HDMI (TV) out... 22 toggle display 22 Windows 22 wireless Ethernet 24 L latch battery 18 LCD replace 100 LCD assembly lid replace 113 LCD front panel replace 95 LCD panel switching display 22 LCD panel assembly replace 64 LCD panel hinge brackets replace 103 LCD/CRT system key 22 lock Kensington cable 16 M media reader See ...
... drive check 117 external monitor 16, 22 EZ Pad touchpad See touchpad F fan 16, 18 features 3 files opening 26 Fn key 22 folders opening 26 function keys 22 H hard drive bay 19 HDD password 33 indicator 21 replace 54 hard drive bracket remove 55 HDD password description 33 HDMI (TV) out... 22 toggle display 22 Windows 22 wireless Ethernet 24 L latch battery 18 LCD replace 100 LCD assembly lid replace 113 LCD front panel replace 95 LCD panel switching display 22 LCD panel assembly replace 64 LCD panel hinge brackets replace 103 LCD/CRT system key 22 lock Kensington cable 16 M media reader See ...


